Using the Node Value Editor
Version 25.3.9469
Version 25.3.9469
Using the Node Value Editor
The Node Value Editor supports modifying values as they are mapped from the source to the destination. This editor uses the ArcScript language to format and dynamically generate content. To open the editor, hover over a node in the destination document and click the tablet and pencil ![]() icon.
icon.
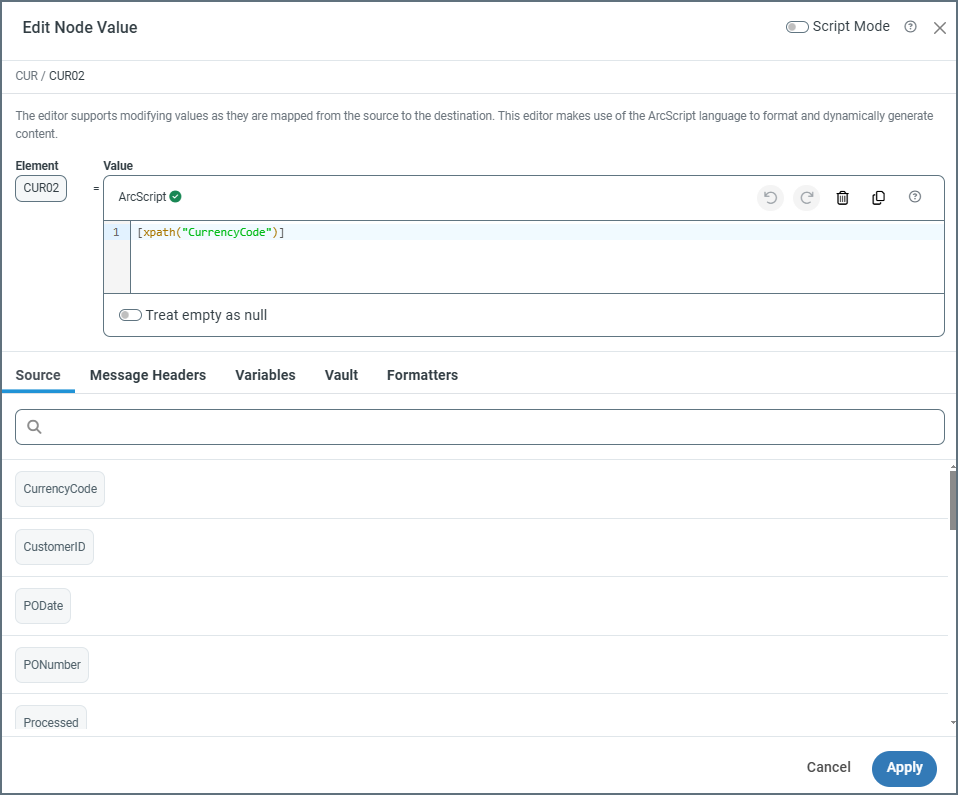
The editor contains a panel with the ArcScript expression used to render the result. When you edit a node that has already been mapped to an element from the source XML, the expression displays the xpath representing this mapping. From here, edit the expression to manipulate the value, or include references to additional nodes in the source XML.
Note: The editor validates your expression as you type. If you see an Invalid Expression message, you have some sort of syntax issue. This is typically caused by not escaping reserved characters such as square brackets, parentheses, or slashes.
Treat Empty As Null
Check Treat empty as null to treat empty input values (such as a string with a length of 0) as NULL output values. This is unchecked by default, so empty input values are treated as an empty string: “”
Leaving this setting unchecked can be useful in situations where mappings might interface with a database table that includes columns that do not accept NULL values. In this case, empty string values can prevent errors while inserting to the database, or empty string values pulled from the database might need to be converted to NULL to better reflect the dataset.
Source
The Source tab contains a dynamically-generated list of XML elements from the source which you scroll through to select the one you need. It then applies the correct xpath in ArcScript in the editor, where you can make additional changes.
Any expression in square brackets is evaluated as a variable in ArcScript. In most situations, variable expressions include an xpath() evaluation of an element in the source document. You can use multiple bracketed expressions to express multiple variables, either back-to-back or interspersed with literal characters (outside of square brackets).
For example, to combine the values at two different paths:
<Customer>
<First>Bruce</First>
<Last>Wayne</Last>
</Customer>
A single expression can join the two values:
[xpath('Customer/First')] [xpath('Customer/Last')]
Message Headers
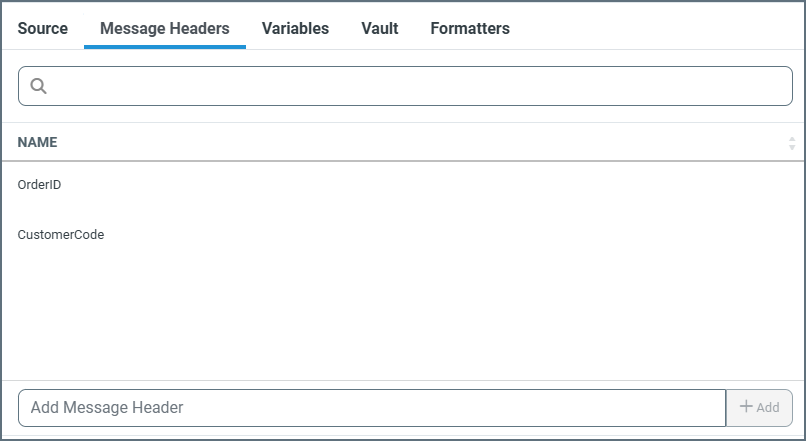
Message headers help Arc track the progress of data through flows. All Tracked Headers appear on the Message Header tab in the mapping editor, and you can reference them in your expression. To add nodes as tracked headers, right-click or click the ellipses on a node in the mapping and choose Add Tracking.
You can also include other message headers in your expression by using the Add Message Header field in the mapping editor and providing the name of an existing header. These do not have to be tracked headers.
Header nodes enable you to map values as headers on the output message of the mapping. These header nodes are not included in the output XML, but are added as metadata message headers on the output message. These headers stay with the message throughout the entire flow and their values can be referenced by any downstream connector as needed, which makes it easy to track the progress of data through the application. Header nodes are automatically added to the Message Headers tab in the node value editor. To add a header node, right-click or click the ellipses on an existing node and choose Add > Add Header.
Header nodes are not added to Tracked Headers. You can add non-header destination nodes to the tracked headers by clicking the ellipses on a node and choosing Add Tracking. See Message Headers for more information.
Variables
It can be useful to set variables at one point in the mapping and reference those variables again later in the mapping. The scope of a variable encompasses an entire document processed by the mapping. In other words, any attributes of the variable persist throughout the mapping and are only cleared when Arc finishes processing a file.
For example, a mapping might require tallying up the total cost of multiple line items in a purchase order (perhaps the mapping includes some number of LineItemCost elements and also a TotalCost element). You could add a variable to LineItemCost to sum the values of each LineItemCost element. If you include this variable in an element in the Foreach loop that loops over all of the line items, the sum would be the TotalCost when the Foreach loop exits.
To add a variable, click the ellipses on a node in the mapping editor and choose Add Node > Add Variable. Once you have done that, the variable appears on the Variables tab and you can reference it in your expression.
Vault
Use the Vault tab to add items from your Global Settings Vault to an expression. This is useful if you have values that you reuse in different places throughout a flow. You can define those values in the vault, then reference them at the beginning of the expression. Keep in mind that if you want the mapping to use the value of the item in the vault, you need to reference it inside square brackets; otherwise the editor interprets the item name as a literal.
Formatters
Formatters support manipulating the values returned at different xpaths. Formatters are separated by a pipe character (|) in the expression, and evaluated from left to right. For example:
[xpath('City') | toupper | substring(0,3)]
In this example, before the value of the City xpath is returned, all string characters are converted to upper case characters, and a substring of the first three characters is returned in the result. For example, if the source document had a value of:
<City>Durham</City>
The resulting expression returns the following:
DUR
The formatters are listed on the Formatters tab. Add a formatter to the expression by clicking it in the list.
String Manipulation
String manipulation is a common use case for the editor. Common string formatters include:
For example, you might want to split a CustomerName value from the input XML into two separate fields in the output XML. Use the split formatter to accomplish this. The parameters for split are the character around which to split the string and the index of the resulting array that should be returned (indexes begin at 1):
[xpath(CustomerName) | split(' ', 1)]
Find the full list of string formatters here.
Date Manipulation
Another common use case involves reformatting dates from the source document to the destination. This is supported by the todate formatter, which allows three arguments:
- output date format (mandatory)
- input date format (optional): Use this if the formatter cannot auto-detect the input datetime format.
- strict input format (optional): Use this to check whether the incoming date value matches the input format. If it does not, the task throws an error instead of converting the date to a standard date format. The default is not to check. To force the check, add
trueto the formatter.
The following example converts a date in the form of 12/21/22 to a date in the form of Friday, 21 December, 2022, and checks that the date value matches the input format:
[xpath(PurchaseDate) | todate(D, "mm/dd/yy", true)]
Additional functions that are useful for date calculation are dateadd and compare, which you can use to add or subtract fixed periods of time to a date, and to perform date comparisons.
Find the full list of date formatters here.
Number Operations
Number operations are useful for performing calculations on numerical values from the source XML. The following example converts cents to dollars, and ensures that the resulting value is a decimal value with two positions:
[xpath(ItemCost) | divide(100) | decimal(2)]
You can use number formatters to calculate tax and add the tax value to a total. The following example includes a nested set of number formatter expressions: each expression is evaluated from left to right, and a nested expression is evaluated in its entirety before returning to the outer expression:
[xpath(Subtotal) | divide(100) | multiply([xpath(TaxPercent) | divide(100) | add(1)]) | decimal(2)]
Find the full list of number formatters here.
Lookahead
The xpath() formatter supports lookahead syntax to further specify which values from the source document should be mapped to the destination. Lookaheads can help target a specific value in the midst of repeated XML element structures.
For example, your input XML might have multiple line items, only one of which contains the desired value. Each line item has the same xpath, so lookahead syntax is required to retrieve the desired value from the values at the same xpath.
The following XML demonstrates this situation. Notice that the LineItem elements have a matching XML structure:
<LineItem>
  <ItemType>Goods</ItemType>
  <ItemName>Widgets</ItemName>
  <ItemAmount>20.00</ItemAmount>
</LineItem>
<LineItem>
  <ItemType>Tax</ItemType>
  <ItemName>Sales Tax</ItemName>
  <ItemAmount>1.38</ItemAmount>
</LineItem>
Imagine that the amount for the Tax line item (1.38) needs to be mapped to the destination document, but not the amount for the Goods item (20.00). Since both line items have the same XML structure, an xpath alone is not enough to specify the Sales Tax line item amount. As an illustration, the following expression uses the correct xpath but retrieves the Goods item amount instead of the Tax item amount (because the Goods item amount is the first value that satisfies the xpath):
[xpath(LineItem/ItemAmount)]
In order to specify the Tax line item, the expression needs to look into the LineItem element for the ItemType element, which identifies the line item as a Tax item. The LineItem element is the lookahead ‘parent’, and the ItemType element is the lookahead ‘target’.
Lookahead syntax is as follows: inside the xpath expression, add square brackets directly after the parent element of the lookahead. Inside the square brackets, provide the xpath to the target element of the lookahead and use an equals expression to check the target value (notice that the square brackets must be escaped with backslashes):
[xpath(LineItem\[ItemType='Tax'\]/ItemAmount)]
This translates to “find the value from LineItem/ItemAmount for the LineItem element where LineItem/ItemType is Tax. The expression would return the value 1.38.
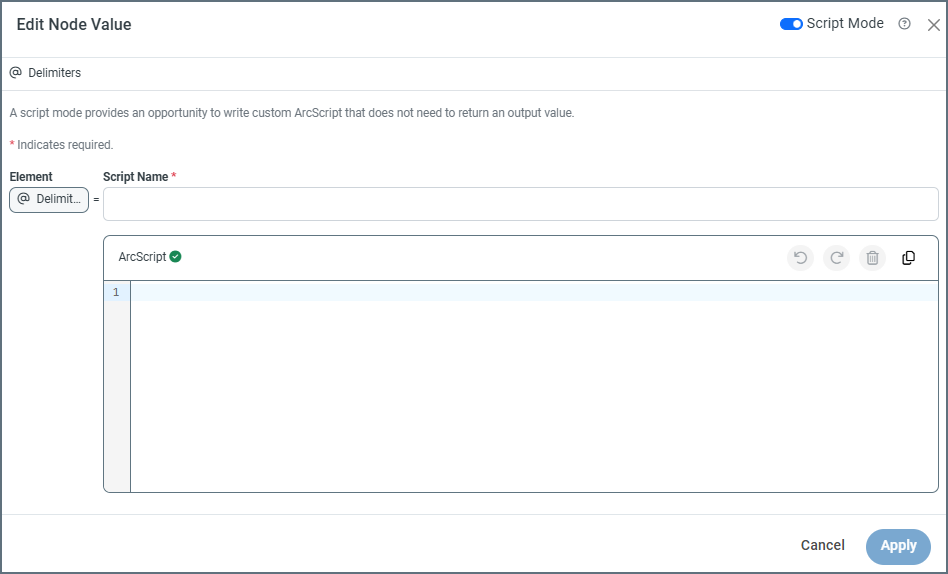
Script Mode
Use the Script Mode toggle at the top of the editor to switch the condition editor from designer mode to script mode. This means that conditions must be written in ArcScript, instead of using the standard designer mode. Script mode allows you to write custom ArcScript that does not need to return an output value. When script mode is enabled on a node, that node’s value displays as the name of the script. It is denoted by this icon: ![]() .
.