Label Connector
Version 25.3.9469
Version 25.3.9469
Label Connector
The Label connector generates Zebra Programming Language (ZPL) labels based on a template, which is filled in at runtime using XML as input.
Key Capabilities
- ZPL label generation from XML input with template-based customization
- Compatible with XML Map connector for automated label creation workflows
- Dynamic field substitution using ${…} syntax for thermal printer output
Overview
The Label connector converts input XML into ZPL files based on a predefined XML template, which enables automated and consistent label creation for printing on Zebra thermal printers. It is compatible with the XML Map connector as well as raw XML input. However, the primary use case is for XML to be mapped to the ZPL structure represented in XML using a flow that goes from an XML Map to a Label connector.
Connector Configuration
This section contains all of the configurable connector properties.
Settings Tab
Configuration
Settings related to establishing the connection.
- Connector Id The static, unique identifier for the connector.
- Connector Type Displays the connector name and a description of what it does.
- Connector Description An optional field to provide a free-form description of the connector and its role in the flow.
Template
- ZPL Template The ZPL file to use as a template. When you create a Label connector, Arc pre-fills this field with a ZPL template to use as a starting point. See Generating a ZPL Document for details.
Automation Tab
Automation Settings
Settings related to the automatic processing of files by the connector.
- Send Check this to have the connector automatically send files when they are ready.
Performance
Settings related to the allocation of resources to the connector.
- Max Workers The maximum number of worker threads consumed from the threadpool to process files on this connector. If set, this overrides the default setting on the Performance Settings portion of the Advanced Settings page.
- Max Files The maximum number of files sent by each thread assigned to the connector. If set, this overrides the default setting on the Performance Settings portion of the Advanced Settings page.
Alerts Tab
Settings related to configuring alerts and Service Level Agreements (SLAs).
Connector Email Settings
Before you can execute SLAs, you need to set up email alerts for notifications. Clicking Configure Alerts opens a new browser window to the Settings page where you can set up system-wide alerts. See Alerts for more information.
Service Level Agreement (SLA) Settings
SLAs enable you to configure the volume you expect connectors in your flow to send or receive, and to set the time frame in which you expect that volume to be met. CData Arc sends emails to warn the user when an SLA is not met, and marks the SLA as At Risk, which means that if the SLA is not met soon, it will be marked as Violated. This gives the user an opportunity to step in and determine the reasons the SLA is not being met, and to take appropriate actions. If the SLA is still not met at the end of the at-risk time period, the SLA is marked as violated, and the user is notified again.
To define an SLA, click Add Expected Volume Criteria.
- If your connector has separate send and receive actions, use the radio buttons to specify which direction the SLA pertains to.
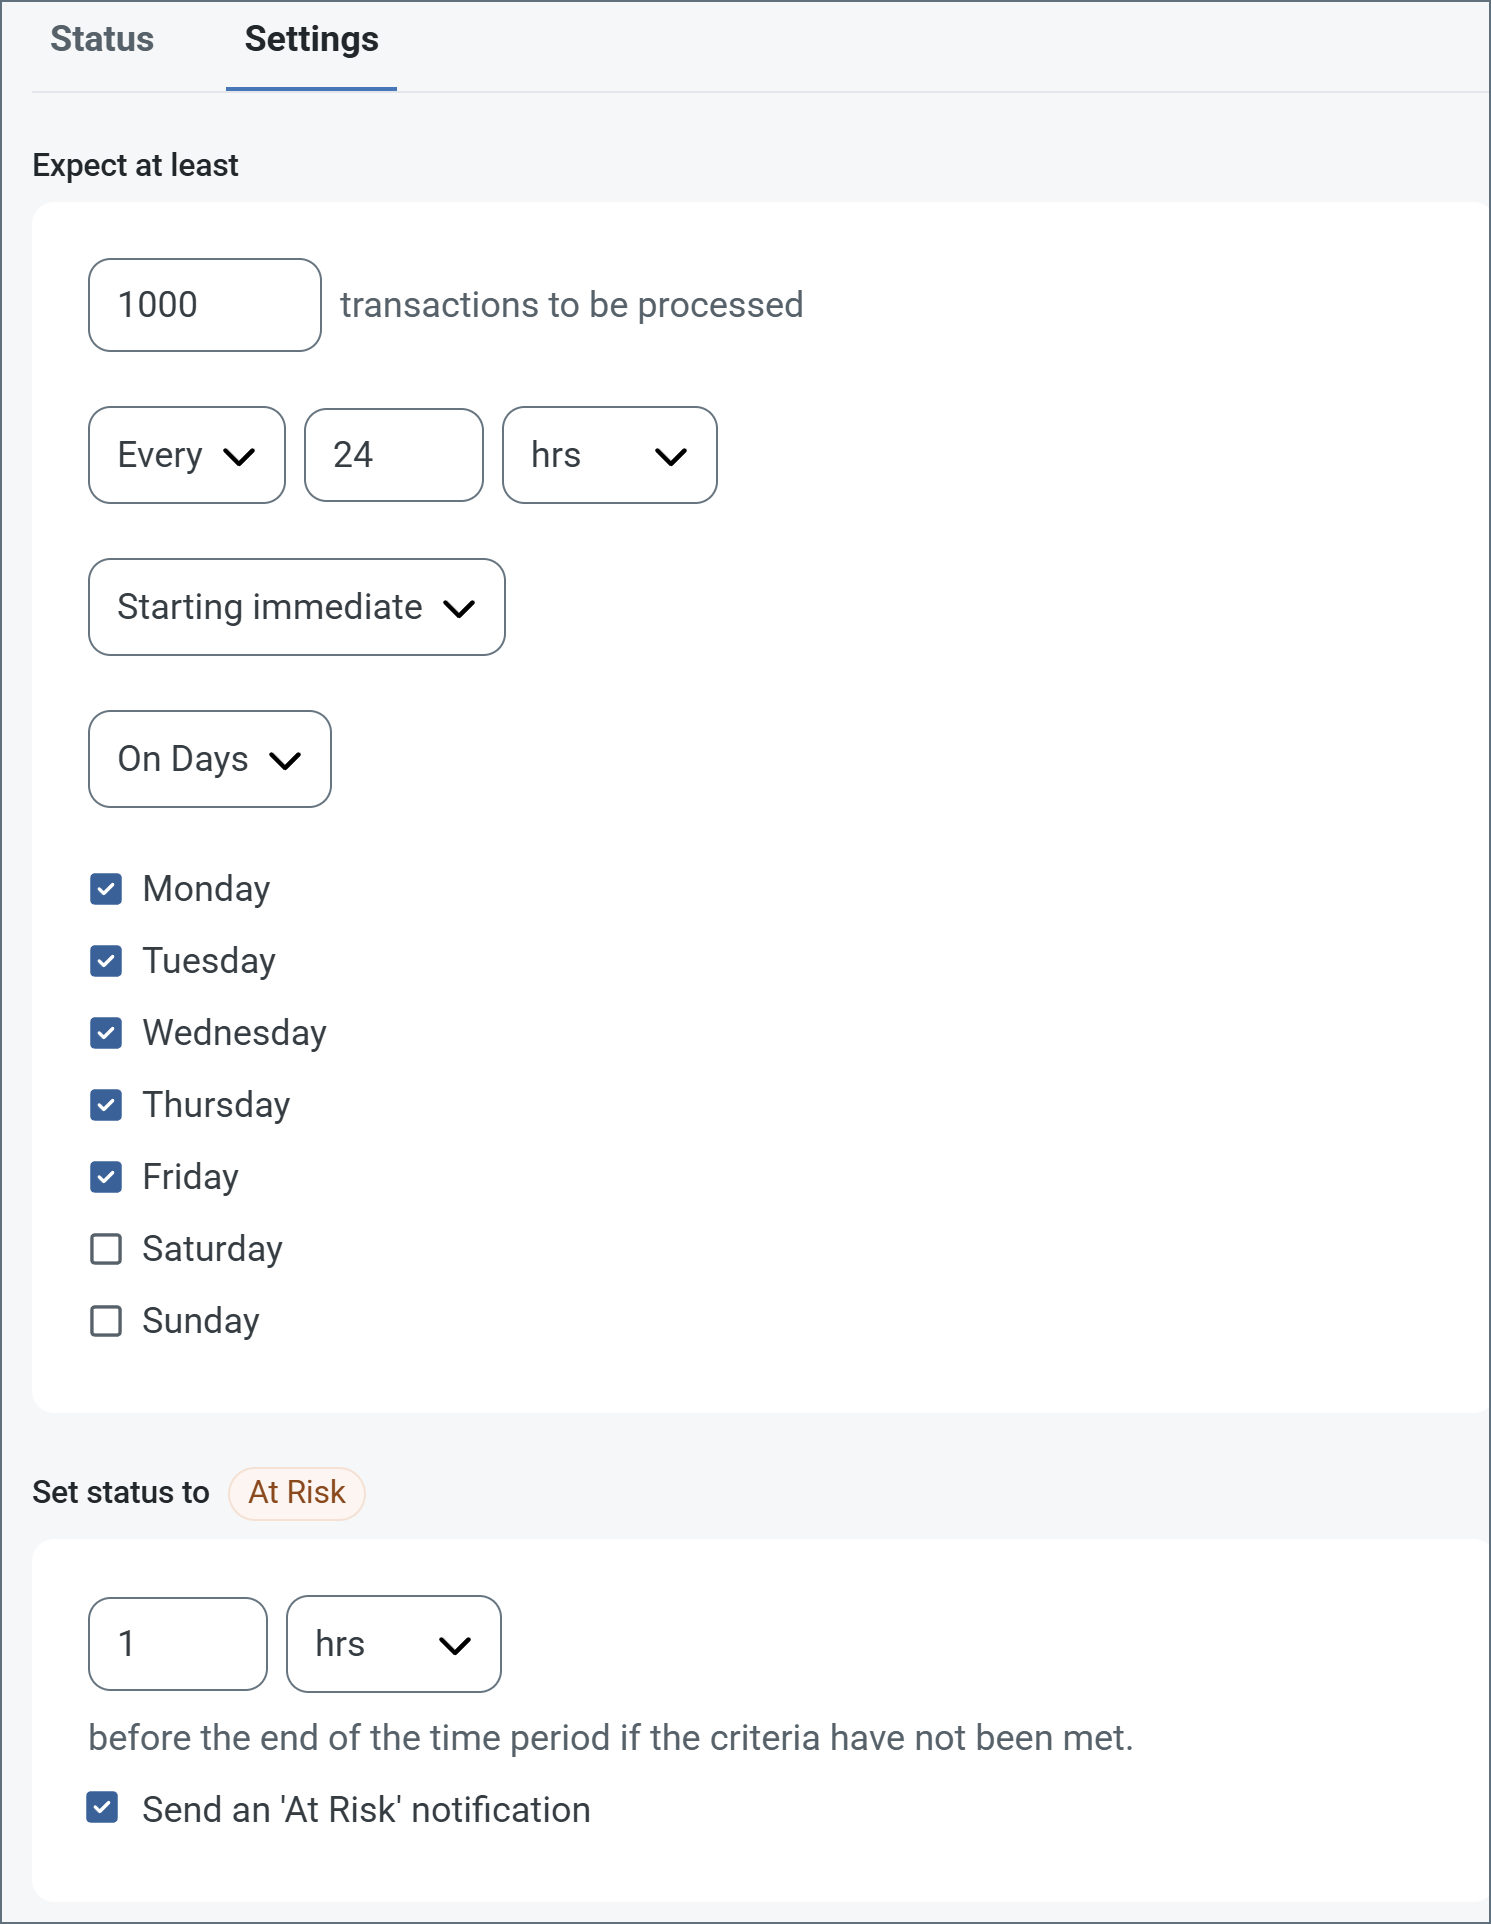
- Set Expect at least to the minimum number of transactions (the volume) you expect to be processed, then use the Every fields to specify the time frame.
- By default, the SLA is in effect every day. To change that, uncheck Everyday then check the boxes for the days of the week you want.
- Use And set status to ‘At Risk’ to indicate when the SLA should be marked as at risk.
- By default, notifications are not sent until an SLA is in violation. To change that, check Send an ‘At Risk’ notification.
The following example shows an SLA configured for a connector that expects to receive 1000 files every day Monday-Friday. An at-risk notification is sent 1 hour before the end of the time period if the 1000 files have not been received.
Advanced Tab
Advanced Settings
Settings not included in the previous categories.
- Local File Scheme A scheme for assigning filenames to messages that are output by the connector. You can use macros in your filenames dynamically to include information such as identifiers and timestamps. For more information, see Macros.
Message
Message settings determine how the connector searches for messages and manages them after processing. You can save messages to your Sent folder or you can group them based on a Sent folder scheme, as described below.
- Save to Sent Folder Check this to copy files processed by the connector to the Sent folder for the connector.
- Sent Folder Scheme Instructs the connector to group files in the Sent folder according to the selected interval. For example, the Weekly option instructs the connector to create a new subfolder each week and store all sent files for the week in that folder. The blank setting instructs the connector to save all files directly in the Sent folder. For connectors that process many transactions, using subfolders can help keep files organized and improve performance.
Logging
- Log Level The verbosity of logs generated by the connector. When you request support, set this to Debug.
- Log Subfolder Scheme Instructs the connector to group files in the Logs folder according to the selected interval. The Weekly option (which is the default) instructs the connector to create a new subfolder each week and store all logs for the week in that folder. Leaving this setting blank tells the connector to save all logs directly in the Logs folder. For connectors that process many transactions, using subfolders helps keep logs organized and improves performance.
- Log Messages Check this to have the log entry for a processed file include a copy of the file itself. If you disable this, you might not be able to download a copy of the file from the Input or Output tabs.
Miscellaneous
Miscellaneous settings are for specific use cases.
- Other Settings Enables you to configure hidden connector settings in a semicolon-separated list (for example,
setting1=value1;setting2=value2). Normal connector use cases and functionality should not require the use of these settings.
Generating a ZPL Document
The Label connector reads an XML input file into the ZPL template specified in the Template field, and uses the data from the template to generate ZPL labels.
Default ZPL Template
Arc pre-fills the Template field with a ZPL template to use as a starting point. This documentation does not go into detail on how to use the ZPL language: you need to learn that outside of Arc. You can modify other aspects and dynamic fields of the ZPL template as necessary, but here is the default content:
^XA
^FX Top section with logo, name and address.
^CF0,60
^FO50,50^GB100,100,100^FS
^FO75,75^FR^GB100,100,100^FS
^FO93,93^GB40,40,40^FS
^FO220,50^FDIntershipping, Inc.^FS
^CF0,30
^FO220,115^FD1000 Shipping Lane^FS
^FO220,155^FDShelbyville TN 38102^FS
^FO220,195^FDUnited States (USA)^FS
^FO50,250^GB700,3,3^FS
^FX Second section with recipient address and permit information.
^CFA,30
^FO50,280^FD${name}^FS
^FO50,320^FD${address}^FS
^FO50,360^FD${address2}^FS
^FO50,400^FD${city}^FS
^FO175,400^FD${state}^FS
^FO225,400^FD${zip}^FS
^FO50,440^FD${country}^FS
^CFA,15
^FO600,300^GB150,150,3^FS
^FO638,340^FDPermit^FS
^FO638,390^FD123456^FS
^FO50,500^GB700,3,3^FS
^FX Third section with barcode.
^BY5,2,270
^FO100,550^BC^FD${barcode}^FS
^FX Fourth section (the two boxes on the bottom).
^FO50,900^GB700,250,3^FS
^FO400,900^GB3,250,3^FS
^CF0,40
^FO100,960^FDCtr. X34B-1^FS
^FO100,1010^FDREF1 F00B47^FS
^FO100,1060^FDREF2 BL4H8^FS
^CF0,190
^FO470,955^FDCA^FS
^XZ
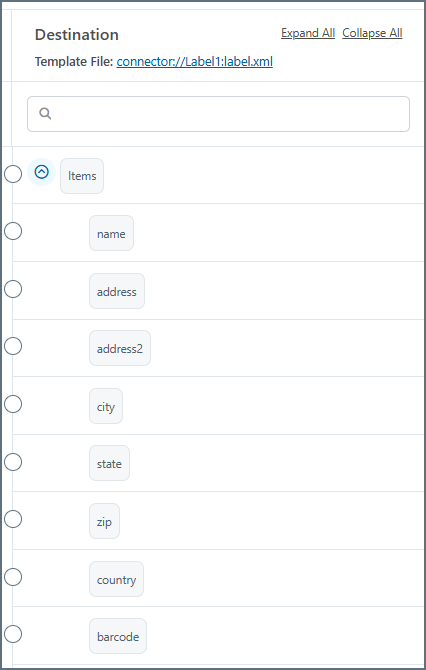
The elements using the ${...} syntax (such as ${name} in the content above) are what Arc pulls from the input XML passed into the connector. When you put an XML Map connector in front of a Label connector in a flow, the destination side of the mapping shows these fields, as shown in the following image.
If you map XML to these elements and feed it through the flow, the Label connector output (when viewed with a tool that reads .zpl files) contains the same ZPL data with the values filled in:
^FO50,280^FDCharlie^FS
^FO50,320^FD123 Address Street^FS
^FO50,360^FDUnit 2^FS
^FO50,400^FDGotham^FS
^FO175,400^FDNY^FS
^FO225,400^FD12345^FS
^FO50,440^FDUnited States^FS
...
^FO100,550^BC^FD02271994^FS
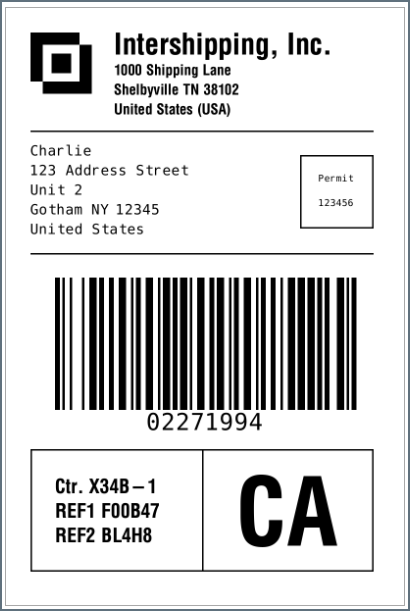
Finally, when you run the ZPL through a reader to make the label, it looks like this:
Macros
Using macros in file naming strategies can enhance organizational efficiency and contextual understanding of data. By incorporating macros into filenames, you can dynamically include relevant information such as identifiers, timestamps, and header information, providing valuable context to each file. This helps ensure that filenames reflect details important to your organization.
CData Arc supports these macros, which all use the following syntax: %Macro%.
| Macro | Description |
|---|---|
| ConnectorID | Evaluates to the ConnectorID of the connector. |
| Ext | Evaluates to the file extension of the file currently being processed by the connector. |
| Filename | Evaluates to the filename (extension included) of the file currently being processed by the connector. |
| FilenameNoExt | Evaluates to the filename (without the extension) of the file currently being processed by the connector. |
| MessageId | Evaluates to the MessageId of the message being output by the connector. |
| RegexFilename:pattern | Applies a RegEx pattern to the filename of the file currently being processed by the connector. |
| Header:headername | Evaluates to the value of a targeted header (headername) on the current message being processed by the connector. |
| LongDate | Evaluates to the current datetime of the system in long-handed format (for example, Wednesday, January 24, 2024). |
| ShortDate | Evaluates to the current datetime of the system in a yyyy-MM-dd format (for example, 2024-01-24). |
| DateFormat:format | Evaluates to the current datetime of the system in the specified format (format). See Sample Date Formats for the available datetime formats |
| Vault:vaultitem | Evaluates to the value of the specified vault item. |
Examples
Some macros, such as %Ext% and %ShortDate%, do not require an argument, but others do. All macros that take an argument use the following syntax: %Macro:argument%
Here are some examples of the macros that take an argument:
- %Header:headername%: Where
headernameis the name of a header on a message. - %Header:mycustomheader% resolves to the value of the
mycustomheaderheader set on the input message. - %Header:ponum% resolves to the value of the
ponumheader set on the input message. - %RegexFilename:pattern%: Where
patternis a regex pattern. For example,%RegexFilename:^([\w][A-Za-z]+)%matches and resolves to the first word in the filename and is case insensitive (test_file.xmlresolves totest). - %Vault:vaultitem%: Where
vaultitemis the name of an item in the vault. For example,%Vault:companyname%resolves to the value of thecompanynameitem stored in the vault. - %DateFormat:format%: Where
formatis an accepted date format (see Sample Date Formats for details). For example,%DateFormat:yyyy-MM-dd-HH-mm-ss-fff%resolves to the date and timestamp on the file.
You can also create more sophisticated macros, as shown in the following examples:
- Combining multiple macros in one filename:
%DateFormat:yyyy-MM-dd-HH-mm-ss-fff%%EXT% - Including text outside of the macro:
MyFile_%DateFormat:yyyy-MM-dd-HH-mm-ss-fff% - Including text within the macro:
%DateFormat:'DateProcessed-'yyyy-MM-dd_'TimeProcessed-'HH-mm-ss%