Peppol Connector
Version 25.3.9469
Version 25.3.9469
Peppol Connector
The Peppol connector for CData Arc enables secure, automated exchange of e-invoices and other business documents over the Peppol (Pan-European Public Procurement Online) network. This connector allows organizations to integrate their systems with the Peppol eDelivery infrastructure directly from within Arc, streamlining compliance with electronic procurement and invoicing mandates across Europe and beyond. The network facilitates the transmission of critical business documents through standardized Universal Business Language (UBL) formats and secure AS4 protocol messaging.
The Peppol network operates on a four-corner model architecture consisting of the sender, the sender’s Access Point (AP), the receiver’s AP, and the final receiver. This distributed infrastructure ensures reliable and standardized communication pathways for electronic procurement processes across international boundaries, with Access Points serving as certified gateways that handle the secure transmission of documents between participants on the network.
Key Capabilities
- Pan-European e-invoicing and e-procurement network integration using AS4-based four-corner model architecture
- Universal Business Language (UBL) format support with automatic message routing based on party identifiers
- SMP integration for dynamic endpoint discovery with certificate-based encryption and digital signatures
Overview
A Peppol connection is configured in two places. Configure the Peppol Profiles page with a local party identifier and a private certificate. Then configure individual Peppol connectors with connection settings specific to a single trading partner. When an input file is processed by a Peppol connector, it is packaged and sent to the specified trading partner.
When CData Arc receives a file over Peppol, it attempts to route the file to a specific Peppol connector. The application uses the Peppol party identifiers in the Peppol message to determine which Peppol connector should receive the file. When a file is routed to a Peppol connector, that file is placed in the connector’s Transactions tab, and is passed along to the next connected connector in the flow (when there is one).
Prerequisites
Before you can configure and use the Peppol connector, you must complete the following:
-
Go to https://Peppol.org/ to register and complete the certification to become a Peppol access point.
-
Register with an external SMP (Service Metadata Publisher). You must either register with an existing SMP or host your own.
Profile Configuration
The Peppol Profile must be configured before connections can be established with individual Peppol connectors. Click Profiles on the navbar, then click the Peppol tab.
Peppol Profile Tab
Personal Id
Settings for identifying the local profile.
- Party Identifier The Party Id used by Arc in AS4 Peppol exchanges. Identifiers are case-sensitive.
Personal Certificate
Settings related to the private decryption and signature certificate.
- Private Certificate The certificate used to decrypt incoming messages and sign outgoing messages. Never share this certificate with external parties. Click the Create Certificate button to generate a self-signed certificate that is ready to use in a Peppol transaction: a corresponding public key is also generated with the same filename and a
.cerextension. - Private Certificate Password The password required to access the Private Certificate.
Application URLs
Settings and displayed values related to accessing Arc from the public web.
- Receiving URL The URL at which Arc listens for incoming Peppol messages. Share this URL with all your trading partners. It is in this format:
<application_base_URL>/pub/Peppol.rsb.
Connector Configuration
Once you configure the global Peppol profile settings, create and configure individual Peppol connectors for each trading partner on the Flows page.
Settings Tab
Configuration
- コネクタId コネクタの静的な一意の識別子。
- コネクタの種類 コネクタ名とその機能の説明が表示されます。
- コネクタの説明 コネクタとフローにおけるロールについて自由形式の説明を記載するオプションのフィールド。
- Peppol ID The unique identifier of the trading partner you are exchanging documents with. This is how you connect to the Peppol network, which enables secure and targeted message exchange.
Advanced Settings
- ローカルファイルスキーム コネクタがアウトプットするメッセージにファイル名を割り当てるスキーム。ファイル名にマクロを動的に使用して、識別子やタイムスタンプなどの情報を含めることができます。詳しくは、マクロ を参照してください。
Advanced Tab
Other Settings
Settings not included in the previous categories.
- Duplicate Message Action How the connector should behave when it receives a Peppol message with a Message Id that the connector has seen before. The connector detects duplicate messages by remembering Message Ids that have been received within the number of minutes specified in * * Duplicate Interval The number of minutes that a message with the same Message Id is considered a duplicate. If you set this to 0, the Message Ids are stored until the server is restarted.
Proxy Settings
These are a collection of settings that identify and authenticate to the proxy through which the Peppol connection should be routed. By default, this section uses the global settings on the Proxy Settings portion of the Security Settings page. Clear the checkbox to supply settings specific to your connector.
- プロキシの種類 プロキシベースのファイアウォールで使用されるプロトコル。
- プロキシホスト プロキシベースのファイアウォールの名前またはIP アドレス。
- プロキシポート プロキシベースのファイアウォールのTCP ポート。
- プロキシユーザー プロキシベースのファイアウォールでの認証に使用するユーザー名。
- プロキシパスワード プロキシベースのファイアウォールに認証するために使われるパスワード。
- 認証スキーム デフォルトのNone のままにするか、以下の認証スキームから1つを選択します:Basic、Digest、Proprietary、NTLM。
Message
Message settings determine how the connector searches for messages and manages them after processing. You can save messages to your Sent folder or you can group them based on a Sent folder scheme, as described below.
- Sent フォルダに保存 チェックすると、コネクタで処理されたファイルをコネクタのSent フォルダにコピーします。
- Sent Folder Scheme Instructs the connector to group files in the Sent folder according to the selected interval. For example, the Weekly option instructs the connector to create a new subfolder each week and store all sent files for the week in that folder. The blank setting instructs the connector to save all files directly in the Sent folder. For connectors that process many transactions, using subfolders can help keep files organized and improve performance.
Logging
Settings that govern the creation and storage of logs.
- Log Level The verbosity of logs generated by the connector. When you request support, set this to Debug.
- Log Subfolder Scheme Instructs the connector to group files in the Logs folder according to the selected interval. The Weekly option (which is the default) instructs the connector to create a new subfolder each week and store all logs for the week in that folder. Leaving this setting blank tells the connector to save all logs directly in the Logs folder. For connectors that process many transactions, using subfolders helps keep logs organized and improves performance.
- Log Messages Check this to have the log entry for a processed file include a copy of the file itself. If you disable this, you might not be able to download a copy of the file from the Input or Output tabs.
Miscellaneous
Miscellaneous settings are for specific use cases.
- Other Settings Enables you to configure hidden connector settings in a semicolon-separated list (for example,
setting1=value1;setting2=value2). Normal connector use cases and functionality should not require the use of these settings.
Automation Tab
Automation Settings
Settings related to the automatic processing of files by the connector.
- Send Whether files arriving at the connector are automatically sent as Peppol messages.
- Retry Interval The number of minutes before a failed send is retried. A retry is triggered when the server does not respond to a send attempt, or responds negatively to communicate that the file was not received.
- Max Attempts The maximum number of times the connector processes the input file. Success is based on a successful server acknowledgement and validation of the receipt (when requested synchronously). If you set this to 0, the connect retries the file indefinitely.
Performance
コネクタへのリソースの割り当てに関する設定。
- 最大ワーカー数 このコネクタでファイルを処理するためにスレッドプールで消費されるワーカースレッドの最大数。設定すると、高度な設定ページのパフォーマンス設定セクションのデフォルト設定がオーバーライドされます。
- 最大ファイル数 コネクタに割り当てられた各スレッドが送信するファイルの最大数。設定すると、高度な設定ページのパフォーマンス設定セクションのデフォルト設定がオーバーライドされます。
アラートタブ
アラートの設定に関連する設定.
サービスレベル(SLA)を実行する前に、通知用のE メールアラートを設定する必要があります。デフォルトでは、Arc はアラートタブのグローバル設定を使用します。このコネクタに他の設定を使用するには、グローバル設定をオーバーライドをON にしてください。
デフォルトでは、エラーアラートが有効になっています。これはエラーが発生するたびにE メールが送信されることを意味します。アラートをオフにするには、有効化チェックボックスのチェックを外します。
件名(必須)を入力し、オプションでE メールの受信者のリストをカンマ区切りで入力します。
SLA タブ
サービスレベル(SLA)の設定に関連する設定.
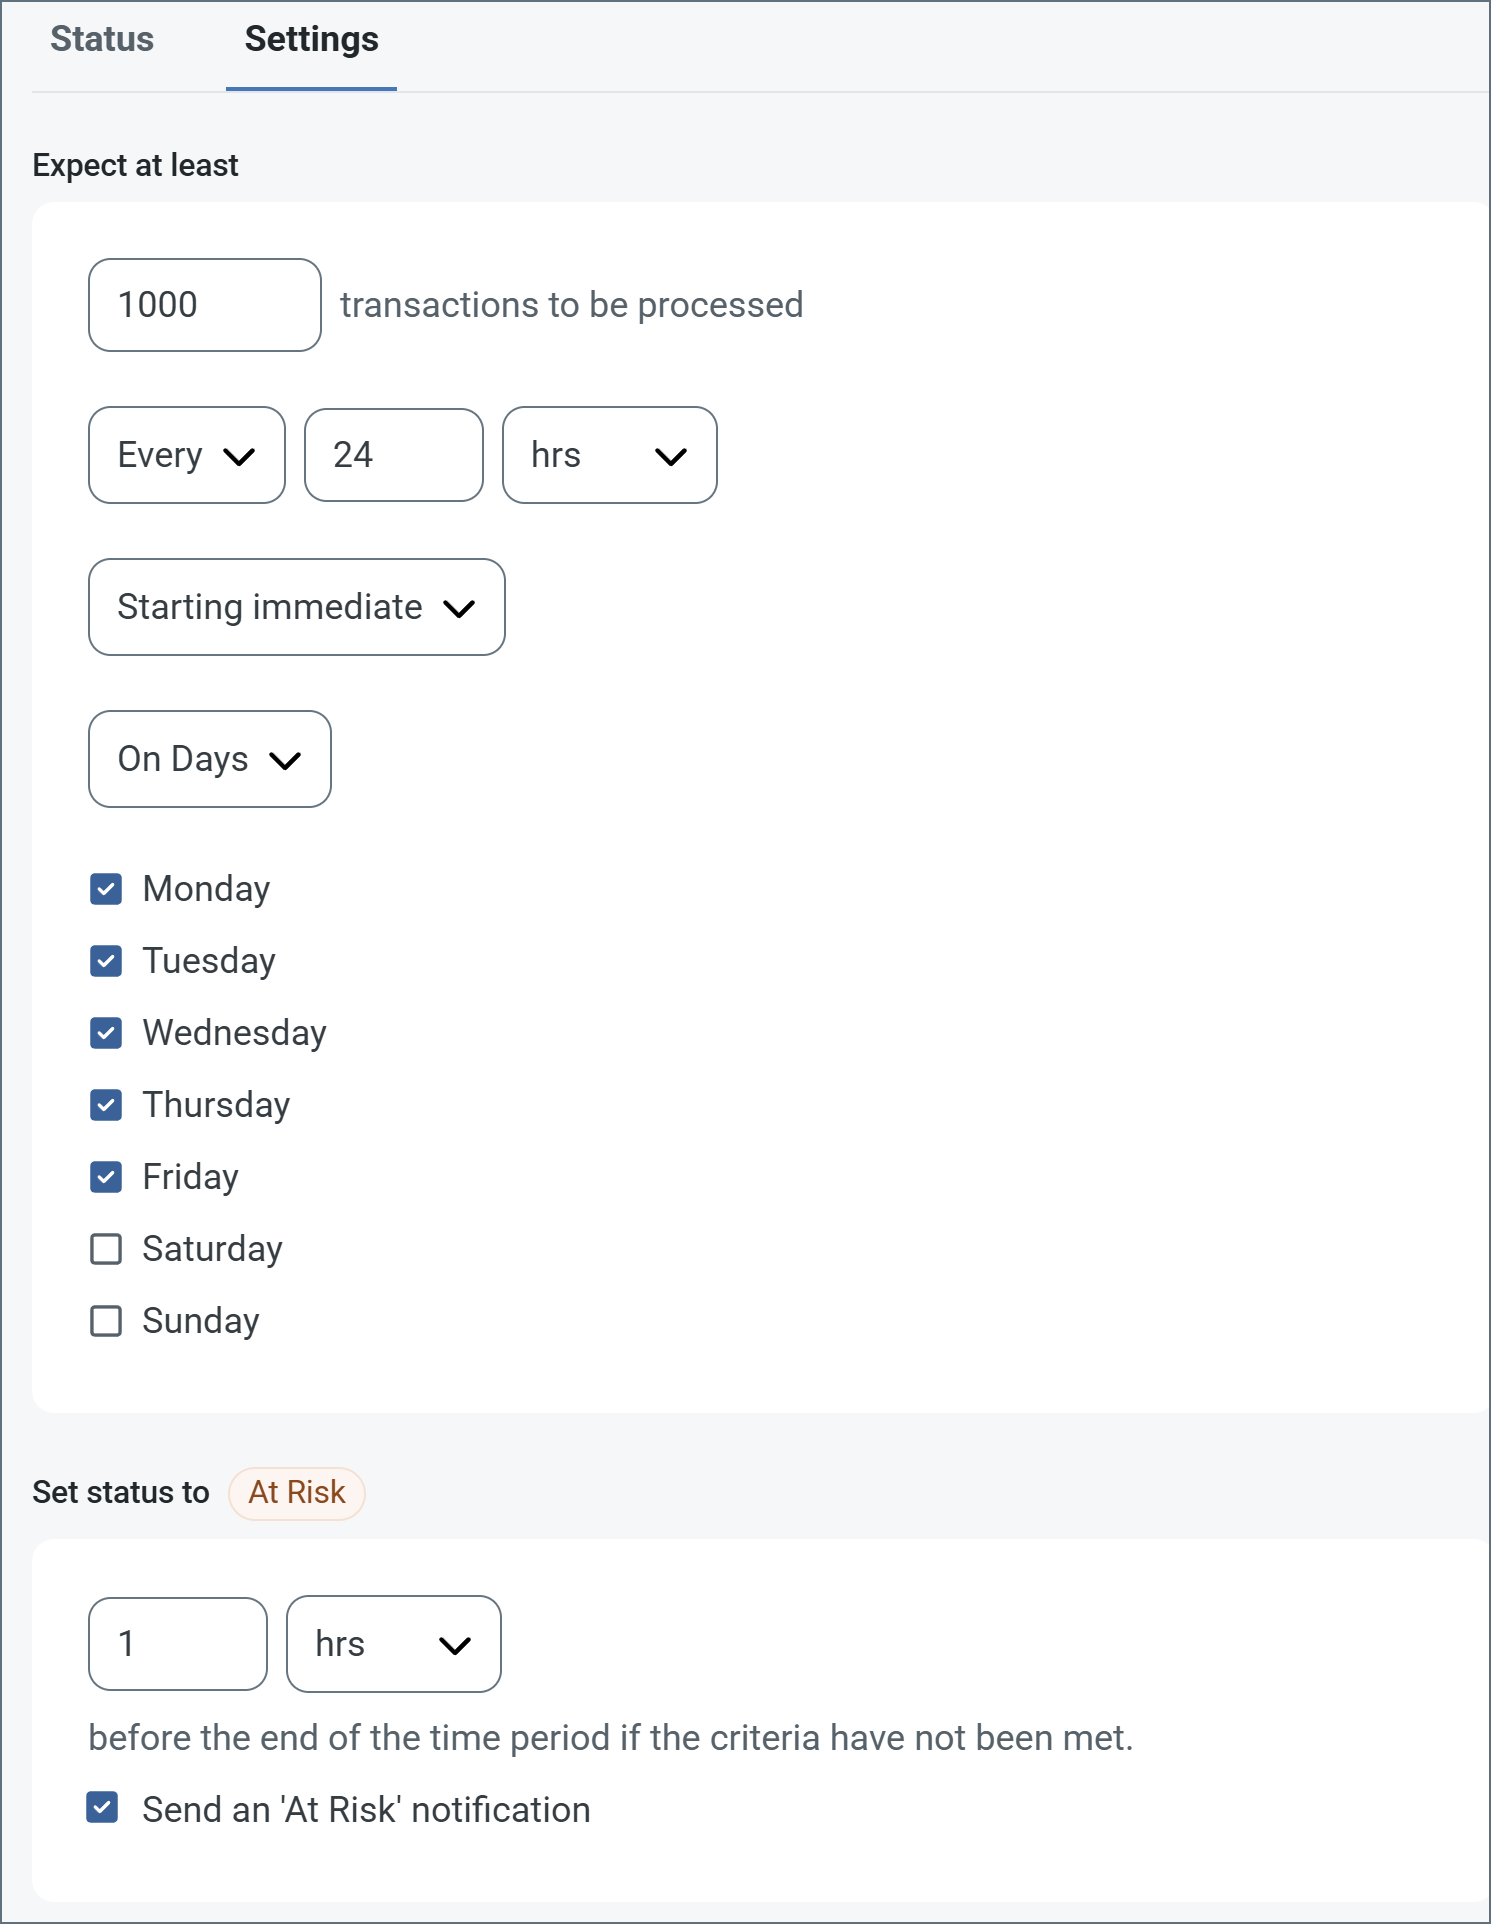
サービスレベルでは、フロー内のコネクタが送受信すると予想される処理量を設定し、その量が満たされると予想される時間枠を設定できます。CData Arc は、サービスレベルが満たされていない場合にユーザーに警告するE メールを送信し、SLA を At Risk(危険) としてマークします。これは、サービスレベルがすぐに満たされない場合に Violated(違反) としてマークされることを意味します。これにより、ユーザーはサービスレベルが満たされていない理由を特定し、適切な措置を講じることができます。At Risk の期間内にサービスレベルが満たされなかった場合、SLA はViolated としてマークされ、ユーザーに再度通知されます。
SLA を定義するには、予想処理量をON にして設定タブをクリックします。
![]()
- コネクタに個別の送信アクションと受信アクションがある場合は、ラジオボタンを使用してSLA に関連する方向を指定します。
- ウィンドウの検知基準(最小)で:
- 処理が予想されるトランザクションの最小値(量)に設定します
- 毎フィールドを使用して期間を指定します
- SLA がいつ有効になるかを示します。開始日 を選択した場合は、日時フィールドを入力してください。
- SLA を有効にする曜日のボックスをON にします。必要に応じて、ドロップダウンから毎日を選択します。
- ウィンドウの期間終了前にステータスを’At Risk’ に設定するタイミングで、SLA がAt Risk としてマークされるタイミングを指定します。
- デフォルトでは、通知はSLA が違反のステータスになるまで送信されません。これを変更するには、‘At Risk’ 通知を送信のチェックをON にします。
次の例は、月曜日から金曜日まで毎日1000ファイルを受信すると予想されるコネクタに対して構成されたSLA を示しています。1000ファイルが受信されていない場合、期間終了の1時間前にAt Risk 通知が送信されます。
Transactions Tab
This tab lists all messages associated with the connector. Use the search bar to find specific messages, or click the funnel icon to apply a filter. You can filter by time, message direction, and/or status.
Sending Documents
When sending documents, the following occurs:
- The connector uses the Peppol Id to look up the metadata (such as the endpoint and certificates) for the partner that has that ID.
- The receiver defined in the Standard Business Document Header (SBDH) of the outbound message must match the Peppol Id of the connector where the message being sent.
- You can configure the SBDH using an XML Map connector when it is connected as the input to a Peppol connector.
- The metadata that is returned from the lookup is used by the connector to send the document to the partner.
Receiving Documents
When receiving documents, the steps described in Sending happen in reverse:
- Your partner’s Peppol AP looks up the metadata details that you provided to the SMP you registered with.
- That metadata is used by your partner’s Peppol AP to send you the message(s). When a message reaches Arc, the engine looks at the sender Peppol Id defined in the message SBDH, then routes the message to the Peppol connector that is configured with that Peppol Id.
Macros
ファイルの命名規則にマクロを使用することで、組織の効率とデータの文脈的理解を高めることができます。マクロをファイル名に組み込むことで、識別子、タイムスタンプ、ヘッダー情報などの関連情報を動的に含めることができ、各ファイルに有益なコンテキストを付与できます。これにより、組織にとって重要な詳細をファイル名に反映させることができます。
CData Arc はこれらのマクロをサポートしており、すべて次の構文を使用します:%Macro%
| Macro | 説明 |
|---|---|
| ConnectorID | コネクタのConnectorID を返します。 |
| Ext | コネクタが処理中のファイルの拡張子を返します。 |
| Filename | コネクタが処理中のファイルのファイル名(拡張子を含む)を返します。 |
| FilenameNoExt | コネクタが処理中のファイルのファイル名(拡張子なし)を返します。 |
| MessageId | コネクタがアウトプットするメッセージのMessageId を返します。 |
| RegexFilename:pattern | コネクタで処理中のファイルのファイル名にRegEx パターンを適用します。 |
| Header:headername | コネクタが処理中のメッセージのヘッダー(headername)の値を返します。 |
| LongDate | システムの現在の日時を長い形式(例:Wednesday, January 24, 2024)で返します。 |
| ShortDate | システムの現在の日時をyyyy-MM-dd 形式(例:2024-01-24)で返します。 |
| DateFormat:format | システムの現在の日時を指定されたフォーマット(format)で返します。使用可能な日付フォーマットについては、サンプル日付フォーマット を参照してください。 |
| Vault:vaultitem | 指定されたvault 項目の値を返します。 |
例
%Ext% や%ShortDate% などの引数を必要としないマクロもありますが、引数を必要とするマクロもあります。引数を渡すマクロはすべて次の構文を用います:%Macro:argument%
以下は、引数を渡すマクロの例です。
- %Header:headername%:
headernameはメッセージのヘッダー名です。 - %Header:mycustomheader% は、インプットメッセージで設定された
mycustomheaderヘッダーの値を返します。 - %Header:ponum% は、インプットメッセージで設定された
ponumヘッダーの値に対応します。 - %RegexFilename:pattern%:
patternは正規表現パターンです。例えば、%RegexFilename:^([\w][A-Za-z]+)%はファイル名の最初の単語と照合し、大文字と小文字を区別せずに結果を返します(test_file.xmlはtestに変換されます)。 - %Vault:vaultitem%:
vaultitemは、vault のアイテム名です。例えば、%Vault:companyname%はVault に保存されているcompanynameアイテムの値を返します。 - %DateFormat:format%:
formatは使用可能な日付フォーマットです(詳細はサンプル日付フォーマット を参照してください)。例えば、%DateFormat:yyyy-MM-dd-HH-mm-ss-fff%はファイルの日付とタイムスタンプを返します。
以下の例に示すように、より詳細なマクロを作成することもできます。
- 複数のマクロを1つのファイル名にまとめる:
%DateFormat:yyyy-MM-dd-HH-mm-ss-fff%%EXT% - マクロの外側にテキストを含める:
MyFile_%DateFormat:yyyy-MM-dd-HH-mm-ss-fff% - マクロ内にテキストを含める:
%DateFormat:'DateProcessed-'yyyy-MM-dd_'TimeProcessed-'HH-mm-ss%