AMQP Connector Setup
Version 25.3.9469
Version 25.3.9469
AMQP Connector Setup
The Advanced Message Queueing Protocol (AMQP) connector allows you to integrate AMQP into your data flow by performing Produce and Consume actions on your data.
Key Capabilities
- Bidirectional message queueing with produce and consume actions
- Support for multiple authentication schemes (None, SASL Anonymous, SASL Plain)
- TLS encryption support for secure connections
- Flexible message value types including JSON composite data support
Follow the steps below to connect CData Arc to AMQP.
Establish a Connection
You must first establish a connection to AMQP through one of these two methods:
- Add a AMQP connector to your flow. Then, in the settings pane, click Create next to the Connection drop-down list.
- Open the CData Arc Settings page, then open the Connections tab. Click Add, select AMQP, and click Next.
Note:
- The login process is only required the first time the connection is created.
- Connections to AMQP can be re-used across multiple AMQP connectors.
After opening the connection dialogue, follow these steps:
-
Enter the connection information:
-
Name — the static name of the connection.
-
Type — this is always set to AMQP.
-
Remote Host — the hostname or IP address of your AMQP remote host.
-
Remote Port — the port for your remote host connection.
-
Use TLS — whether to use TLS to encrypt the connection. Set this according to your AMQP configuration.
-
Container Id — (optional) the ID value for the container in your AMQP connection that you want to access.
-
Auth Scheme — the authentication scheme to use for the connection. Options are None, SASL Anonymous, and SASL Plain.
If you select SASL Anonymous or SASL Plain authentication, enter the following information:
-
User — the username to use when connecting to AMQP.
-
Password — the password for the user.
-
-
Click Test Connection to ensure that Arc can connect to AMQP with the provided information. If an error occurs, check all fields and try again.
-
Click Add Connection to finalize the connection.
Connector Configuration
This section contains all of the configurable connector properties.
Settings Tab
Configuration
- コネクタId コネクタの静的な一意の識別子。
- コネクタの種類 コネクタ名とその機能の説明が表示されます。
- コネクタの説明 コネクタとフローにおけるロールについて自由形式の説明を記載するオプションのフィールド。
- Connection Select the connection you created in the previous steps.
- Target (Optional) For the Produce action, supply the address of the node that should act as the receiver. For the Consume action, supply the address of the node that the connector should receive data from.
- Action The action that the connector should perform. See Select an Action for more information.
AMQP Message
- Value Type The default value type for messages produced by the connector. Including a message header called AMQP-ValueType on input messages overrides this selection.
JSON Composite Data Value Type
One Value Type option is JSON (Composite Data). The composite data JSON schema consists of type-value objects, which hold an AMQP typename and a value. The syntax for a type-value object is:
{
"type": "typename",
"value": value
}
The following table provides a complete list of valid typenames, and describes how the associated values should be represented:
| Typename | Description | Value Format |
|---|---|---|
| null | Null | null |
| boolean | Boolean | true or false |
| ubyte | Unsigned byte | 0 to 255 |
| ushort | Unsigned short | 0 to 65535 |
| uint | Unsigned integer | 0 to 4294967295 |
| ulong | Unsigned long | 0 to 18446744073709551615 |
| byte | Byte | -128 to 127 |
| short | Short | -32768 to 32767 |
| int | Integer | -2147483648 to 2147483647 |
| long | Long | -9223372036854775808 to 9223372036854775807 |
| float | Float | [IEEE 754 32-bit floating point number] |
| double | Double | [IEEE 754 64-bit floating point number] |
| decimal | Decimal | Hex-encoded byte string like “0A1B2C3D” |
| char | Char | “c” |
| timestamp | Timestamp | [Number of milliseconds since the Unix epoch (January 1, 1970 00:00:00 UTC)] |
| uuid | UUID | Hex-encoded UUID string like “XXXXXXXX-XXXX-XXXX-XXXX-XXXXXXXXXXXX” (hyphens optional, case-insensitive) |
| binary | Binary data | Hex-encoded byte string like “0A1B2C3D” |
| string | String | “UTF-8 string (correctly escaped for JSON)” |
| symbol | Symbolic value | “ASCII string” |
| array | AMQP array | JSON array with zero or more type-value objects of the same type |
| list | AMQP list | JSON array with zero or more type-value objects |
| map | AMQP map | JSON array with even number of type-value objects representing keys and values; no duplicate keys allowed |
Note: Typenames must be lowercase in order to be parsed correctly.
Automation Tab
Automation Settings
Settings related to the automatic processing of files by the connector.
- Send A toggle that instructs the connector to automatically send files when they are ready.
- Retry Interval The interval the connector waits before retrying a failed send.
- Max Attempts The number of attempts the connector makes to send the message. Setting this value to 1 instructs the connector to only make the initial send attempt without retrying. The connector waits the duration specified by Retry Interval between each attempt.
Performance
コネクタへのリソースの割り当てに関する設定。
- 最大ワーカー数 このコネクタでファイルを処理するためにスレッドプールで消費されるワーカースレッドの最大数。設定すると、高度な設定ページのパフォーマンス設定セクションのデフォルト設定がオーバーライドされます。
- 最大ファイル数 コネクタに割り当てられた各スレッドが送信するファイルの最大数。設定すると、高度な設定ページのパフォーマンス設定セクションのデフォルト設定がオーバーライドされます。
アラートタブ
アラートとサービスレベル(SLA)の設定に関連する設定。
コネクタのE メール設定
サービスレベル(SLA)を実行する前に、通知用のE メールアラートを設定する必要があります。アラートを設定をクリックすると、新しいブラウザウィンドウで設定ページが開き、システム全体のアラートを設定することができます。詳しくは、アラートを参照してください。
サービスレベル(SLA)の設定
サービスレベルでは、フロー内のコネクタが送受信すると予想される処理量を設定し、その量が満たされると予想される時間枠を設定できます。CData Arc は、サービスレベルが満たされていない場合にユーザーに警告するE メールを送信し、SLA を At Risk(危険) としてマークします。これは、サービスレベルがすぐに満たされない場合に Violated(違反) としてマークされることを意味します。これにより、ユーザーはサービスレベルが満たされていない理由を特定し、適切な措置を講じることができます。At Risk の期間内にサービスレベルが満たされなかった場合、SLA はViolated としてマークされ、ユーザーに再度通知されます。
サービスレベルを定義するには、予想処理量の条件を追加をクリックします。
- コネクタに個別の送信アクションと受信アクションがある場合は、ラジオボタンを使用してSLA に関連する方向を指定します。
- 検知基準(最小)を、処理が予想されるトランザクションの最小値(量)に設定し、毎フィールドを使用して期間を指定します。
- デフォルトでは、SLA は毎日有効です。これを変更するには、毎日のチェックをOFF にし、希望する曜日のチェックをON にします。
- 期間終了前にステータスを’At Risk’ に設定するタイミングを使用して、SLA がAt Risk としてマークされるようにします。
- デフォルトでは、通知はSLA が違反のステータスになるまで送信されません。これを変更するには、‘At Risk’ 通知を送信のチェックをON にします。
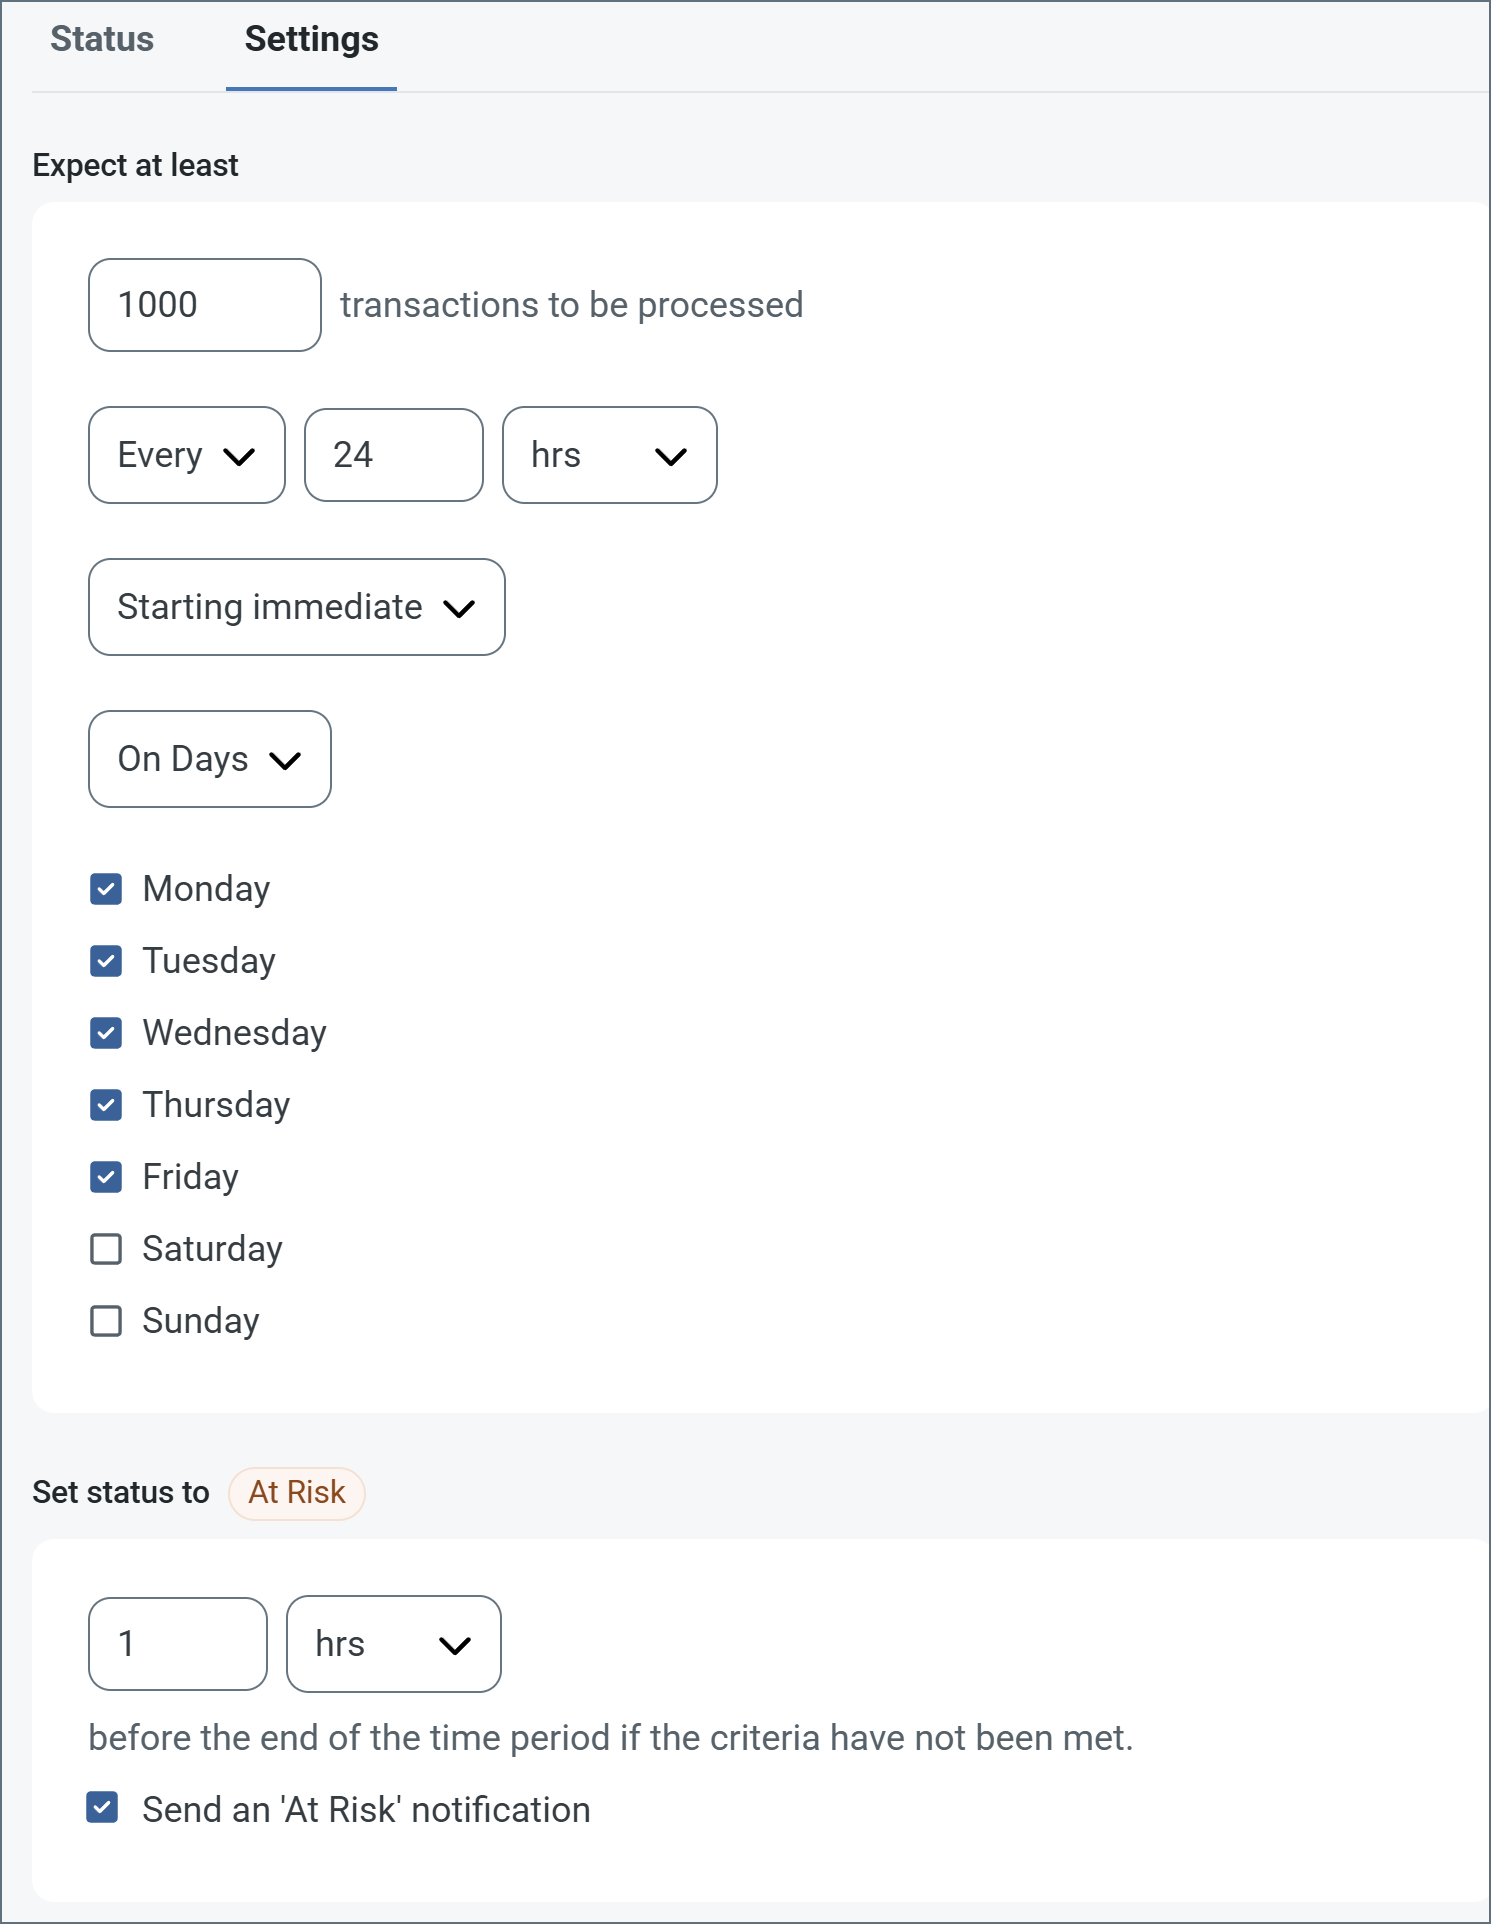
次の例は、月曜日から金曜日まで毎日1000ファイルを受信すると予想されるコネクタに対して構成されたSLA を示しています。1000ファイルが受信されていない場合、期間終了の1時間前にAt Risk 通知が送信されます。
Advanced Tab
Other Settings
- Local File Scheme A scheme for assigning filenames to messages that are output by the connector. You can use macros in your filenames dynamically to include information such as identifiers and timestamps. For more information, see Macros.
Proxy Settings
These are a collection of settings that identify and authenticate to the proxy through which the AMQP connection should be routed. By default, this section uses the global settings on the Proxy Settings portion of the Security Settings page. Clear the checkbox to supply settings specific to your connector.
- プロキシの種類 プロキシベースのファイアウォールで使用されるプロトコル。
- プロキシホスト プロキシベースのファイアウォールの名前またはIP アドレス。
- プロキシポート プロキシベースのファイアウォールのTCP ポート。
- プロキシユーザー プロキシベースのファイアウォールでの認証に使用するユーザー名。
- プロキシパスワード プロキシベースのファイアウォールに認証するために使われるパスワード。
- 認証スキーム デフォルトのNone のままにするか、以下の認証スキームから1つを選択します:Basic、Digest、Proprietary、NTLM。
Message
- Sent フォルダに保存 チェックすると、コネクタで処理されたファイルをコネクタのSent フォルダにコピーします。
- Sent フォルダのスキーム 選択された時間間隔に従ってSent フォルダ内のメッセージをグループ化するようコネクタに指示します。例えば、Weekly オプションを選択すると、コネクタは毎週新しいサブフォルダを作成してその週のすべてのメッセージをそのフォルダに格納します。ブランクに設定すると、コネクタはすべてのメッセージをSent フォルダに直接保存します。多くのメッセージを処理するコネクタの場合、サブフォルダを使用するとメッセージが整理されてパフォーマンスが向上します。
Logging
- Log Level The verbosity of logs generated by the connector. When you request support, set this to Debug.
- Log Subfolder Scheme Instructs the connector to group files in the Logs folder according to the selected interval. The Weekly option (which is the default) instructs the connector to create a new subfolder each week and store all logs for the week in that folder. Leaving this setting blank tells the connector to save all logs directly in the Logs folder. For connectors that process many transactions, using subfolders helps keep logs organized and improves performance.
- Log Messages Check this to have the log entry for a processed file include a copy of the file itself. If you disable this, you might not be able to download a copy of the file from the Input or Output tabs.
Miscellaneous
Miscellaneous settings are for specific use cases.
- Other Settings Enables you to configure hidden connector settings in a semicolon-separated list (for example,
setting1=value1;setting2=value2). Normal connector use cases and functionality should not require the use of these settings.
Select an Action
After establishing a connection to AMQP, you must choose the action that the AMQP connector will perform. The table below outlines each action and where it belongs in an CData Arc flow:
| Action | Description | Position in Flow |
|---|---|---|
| Produce | Accepts input data from a file or another connector and sends it to your AMQP connection. | End |
| Consume | Listens for messages coming into the queue and sends incoming data down the flow through the Output path. | Beginning |
Produce
The Produce action sends input data to your AMQP connection. This data can come from other connectors or from files that you manually upload to the Input tab of the AMQP connector.
In some AMQP configurations, you can set the value of the Target field to the address of the node that should act as the receiver. This might not be necessary in all configurations.
Consume
The Consume action checks for messages in the AMQP queue. Data processed through the Consume connector goes to the Output tab and travels down to the next steps of the Arc flow.
In some AMQP configurations, you can set the value of the Target field to the address of the node that the connector should receive data from. This might not be necessary in all configurations.
Macros
ファイルの命名規則にマクロを使用することで、組織の効率とデータの文脈的理解を高めることができます。マクロをファイル名に組み込むことで、識別子、タイムスタンプ、ヘッダー情報などの関連情報を動的に含めることができ、各ファイルに有益なコンテキストを付与できます。これにより、組織にとって重要な詳細をファイル名に反映させることができます。
CData Arc はこれらのマクロをサポートしており、すべて次の構文を使用します:%Macro%
| Macro | 説明 |
|---|---|
| ConnectorID | コネクタのConnectorID を返します。 |
| Ext | コネクタが処理中のファイルの拡張子を返します。 |
| Filename | コネクタが処理中のファイルのファイル名(拡張子を含む)を返します。 |
| FilenameNoExt | コネクタが処理中のファイルのファイル名(拡張子なし)を返します。 |
| MessageId | コネクタがアウトプットするメッセージのMessageId を返します。 |
| RegexFilename:pattern | コネクタで処理中のファイルのファイル名にRegEx パターンを適用します。 |
| Header:headername | コネクタが処理中のメッセージのヘッダー(headername)の値を返します。 |
| LongDate | システムの現在の日時を長い形式(例:Wednesday, January 24, 2024)で返します。 |
| ShortDate | システムの現在の日時をyyyy-MM-dd 形式(例:2024-01-24)で返します。 |
| DateFormat:format | システムの現在の日時を指定されたフォーマット(format)で返します。使用可能な日付フォーマットについては、サンプル日付フォーマット を参照してください。 |
| Vault:vaultitem | 指定されたvault 項目の値を返します。 |
例
%Ext% や%ShortDate% などの引数を必要としないマクロもありますが、引数を必要とするマクロもあります。引数を渡すマクロはすべて次の構文を用います:%Macro:argument%
以下は、引数を渡すマクロの例です。
- %Header:headername%:
headernameはメッセージのヘッダー名です。 - %Header:mycustomheader% は、インプットメッセージで設定された
mycustomheaderヘッダーの値を返します。 - %Header:ponum% は、インプットメッセージで設定された
ponumヘッダーの値に対応します。 - %RegexFilename:pattern%:
patternは正規表現パターンです。例えば、%RegexFilename:^([\w][A-Za-z]+)%はファイル名の最初の単語と照合し、大文字と小文字を区別せずに結果を返します(test_file.xmlはtestに変換されます)。 - %Vault:vaultitem%:
vaultitemは、vault のアイテム名です。例えば、%Vault:companyname%はVault に保存されているcompanynameアイテムの値を返します。 - %DateFormat:format%:
formatは使用可能な日付フォーマットです(詳細はサンプル日付フォーマット を参照してください)。例えば、%DateFormat:yyyy-MM-dd-HH-mm-ss-fff%はファイルの日付とタイムスタンプを返します。
以下の例に示すように、より詳細なマクロを作成することもできます。
- 複数のマクロを1つのファイル名にまとめる:
%DateFormat:yyyy-MM-dd-HH-mm-ss-fff%%EXT% - マクロの外側にテキストを含める:
MyFile_%DateFormat:yyyy-MM-dd-HH-mm-ss-fff% - マクロ内にテキストを含める:
%DateFormat:'DateProcessed-'yyyy-MM-dd_'TimeProcessed-'HH-mm-ss%