Form Connector
Version 25.3.9469
Version 25.3.9469
Form Connector
Form connectors expose a public web endpoint where clients fill out a form and submit that data into a CData Arc flow.
Key Capabilities
- Web-based form creation with drag-and-drop designer
- Support for sections, detail tables, and multiple field types
- User authentication and access control for form submissions
- Dynamic form generation with customizable branding and success messages
Overview
Forms are created on the connector Form Designer tab. A form is divided into sections and detail tables, each of which can have a variable number of fields. For details, see Creating Forms.
When you use a Form connector to submit new data, you should place the connector at the start of a connected flow. Clients can connect to the web endpoint, view and fill out the form, and submit this data into the configured Arc flow. For more information, see Submitting Form Data.
The following sections explain how to configure the connector, create forms, and submit new form data.
Connector Configuration
This section contains all of the configurable connector properties.
Form Designer Tab
Settings related to building a set of form fields that are organized into sections and detail tables.
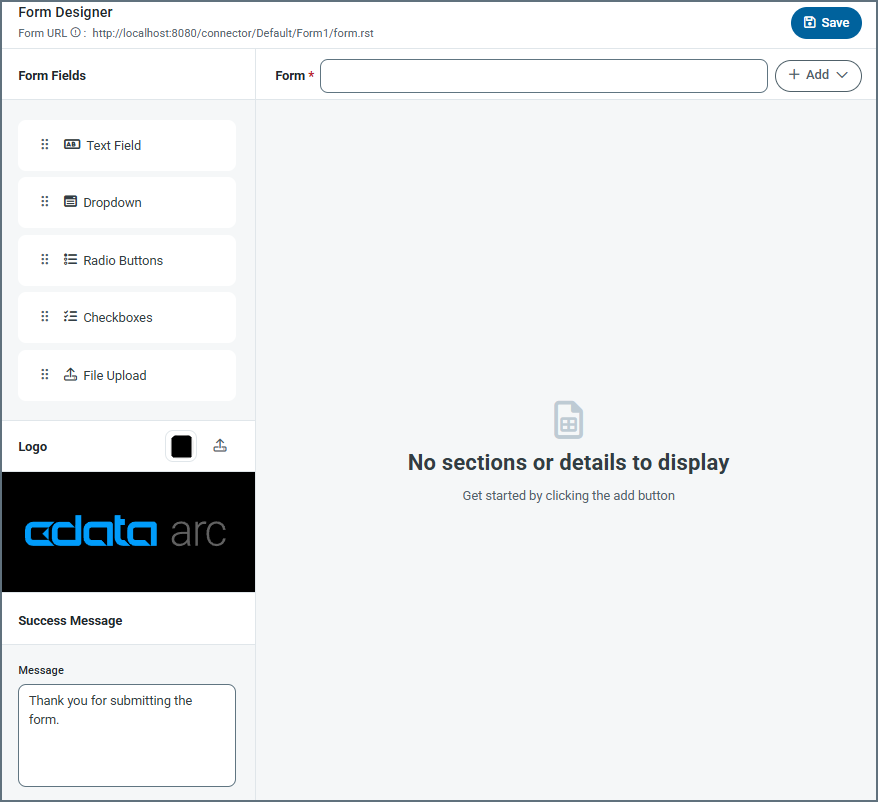
When clients connect to the configured endpoint and submit a form, they see fields that are laid out exactly as they are configured in the panel above.
The designer includes the following settings (see Creating Forms for more details).
- Form URL A link to the published form.
- Form Title of the form (for example, your company name).
- Add Dropdown to add a section or a detail table. Add Section lets you add specific sections to a form, and Add Detail lets you add a detail table to the form. Detail tables act like a pre-configured table where the form user can add as many records as they need for the dataset.
- Form Fields Drag and drop fields into detail table and section areas of the form. Repeat this as many times as necessary. The field types are:
- Text Field An input text box with a name and description.
- Dropdown A dropdown list with name and dropdown options.
- Radio Buttons A set of radio buttons with name and radio button options.
- Checkboxes A set of checkboxes with name and checkbox options.
- File Upload Allows form users to upload specific file types directly to the form.
- Logo Upload your company logo, which appears at the top of the form. By default it uses the CData Arc logo. You can also change the color of the banner.
- Success Message The confirmation message users see after they submit form data successfully. You can change the default message or add additional text.
Settings Tab
Connector Settings
Settings related to the core configuration of the connector.
- コネクタId コネクタの静的な一意の識別子。
- コネクタの種類 コネクタ名とその機能の説明が表示されます。
- コネクタの説明 コネクタとフローにおけるロールについて自由形式の説明を記載するオプションのフィールド。
Advanced Settings
- ローカルファイルスキーム コネクタがアウトプットするメッセージにファイル名を割り当てるスキーム。ファイル名にマクロを動的に使用して、識別子やタイムスタンプなどの情報を含めることができます。詳しくは、マクロ を参照してください。
Logging
- Log Level The verbosity of logs generated by the connector. When you request support, set this to Debug.
- Log Subfolder Scheme Instructs the connector to group files in the Logs folder according to the selected interval. The Weekly option (which is the default) instructs the connector to create a new subfolder each week and store all logs for the week in that folder. Leaving this setting blank tells the connector to save all logs directly in the Logs folder. For connectors that process many transactions, using subfolders helps keep logs organized and improves performance.
- Log Messages Check this to have the log entry for a processed file include a copy of the file itself. If you disable this, you might not be able to download a copy of the file from the Transactions tab.
Miscellaneous
Miscellaneous settings are for specific use cases.
- Other Settings Enables you to configure hidden connector settings in a semicolon-separated list (for example,
setting1=value1;setting2=value2). Normal connector use cases and functionality should not require the use of these settings.
Form Users Tab
The Form Users tab lets you create user credentials for clients so that they can access the public endpoint. If a client is not logged into the application administration console already, that client is prompted to enter the User and Password combination when they browse to the endpoint.
You can add, edit, and delete credentials on this tab.
Adding Users
To add user credentials:
-
Click Add User to open the Add Form User dialog box.
-
Enter a username and password. (Click the eye icon to see the contents of the password field.)
-
Click Save Changes and the new user is added to the list of form users.
Editing Users
To edit users:
-
Click the ellipses next to the user that you want to edit, then click Edit.
-
Edit the credentials and click Save. If you decide not to make changes, click Cancel.
Deleting Individual Users
To delete individual users:
-
Click the ellipses next to the user that you want to edit, then click Remove.
-
Click Remove to delete the user or Cancel to cancel the deletion request.
Deleting Multiple Users
To remove multiple users, select the checkboxes for the users you want to delete, then click Remove. Confirm the deletion, or cancel the request.
Server Tab
Trusted IP Addresses
次の機能は、信頼されたIP アドレスセクションで利用可能です。
- 追加 新しいIP アドレスの範囲を入力します。
- 編集 選択されたIP アドレスの範囲を編集します。
- 削除 選択されたIP アドレスの範囲をリストから削除します。
この機能には次の制約が適用されます。
localhostを編集したり、リストから削除することはできません。- 定義された範囲外のIP アドレスは拒否されます。
- 範囲指定に対応しています。例えば、エントリ
100.10.100.1-15は、100.10.100.1から100.10.100.15までのIP アドレスが許可されることを示します。 - Classless Inter-Domain Routing (CIDR) 表記に対応しています。例えば、エントリ
100.10.100.0/24は、100.10.100.0から100.10.100.255までのIP アドレスが許可されることを示します。 - ワイルドカードのパターンに対応しています。例えば、エントリ
100.10.100.*は、100.10.100で始まるIP アドレスが許可されることを示します。
Note:クライアントがサーバーに到達できるようにするには、明確なネットワークパスが必要です。クラウド環境では、次の3か所で変更を加える必要がある場合があります:
- クラウドコンソールのネットワークルール。
- アプリケーションをホストしているマシンのファイアウォールルール。例えば、Amazon AMI を使用する場合、Uncomplicated Firewall(UFW)を使って目的のポートのトラフィックを許可することができます。Linux 環境での一般的なストラテジーでは、1024 未満のポートから1024 以上の非標準ポートにトラフィックを転送し、非標準ポートを使用するようにアプリケーションを構成します。これにより、1024 未満のポートにバインドする非root ユーザーに関連する権限の問題を回避できます。
- セキュリティタブのネットワークアクセスセクション。
Transactions Tab
This tab lists all messages associated with the connector. Use the search bar to find specific messages, or click the funnel icon to apply a filter. You can filter by time, message direction, and/or status.
Incoming form responses appear on this tab.
Configuring the IIS Server
If your Arc instance is hosted on an IIS server and you use Microsoft Windows authentication to login to the application, you must disable Windows authentication for your users. Otherwise, the Form connector cannot properly authenticate users, and the connector will not work properly.
To disable Windows authentication:
-
In your IIS manager, create a new folder named
connectorin the base application path. -
Select Authentication under IIS (in the right pane) for the
connectorfolder.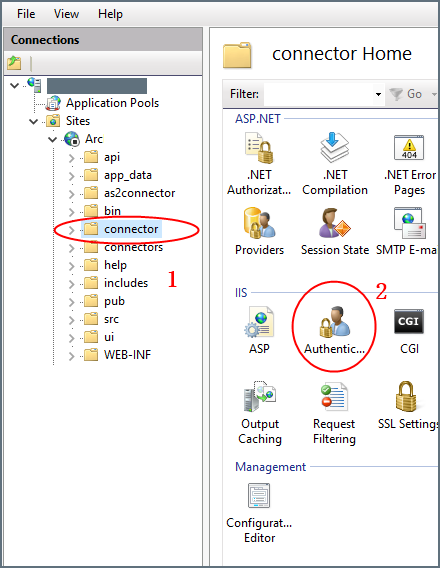
-
Set Windows Authentication to Disabled for this folder.

Creating Forms
Forms have fields, sections, and details:
- Section: A heading that groups fields together
- Detail: An object that acts like a pre-configured table where the form user can add as many records as they need for the dataset
- Field: An input box with a label where users enter form data
To get started, click the Add button next to the form title, and choose whether to Add Section or Add Detail.
Adding Sections
Sections divide fields in the form by categorizing them under a heading. For example, the Ship To section might contain fields like Address, City, and Zip.
Sections are not required in order to add fields to the form. However, sections provide logical groupings of items that help users quickly understand the form.
To add a section:
-
Choose Add Section from the dropdown. Enter a section name.
-
Now you can start Adding Fields to the section.

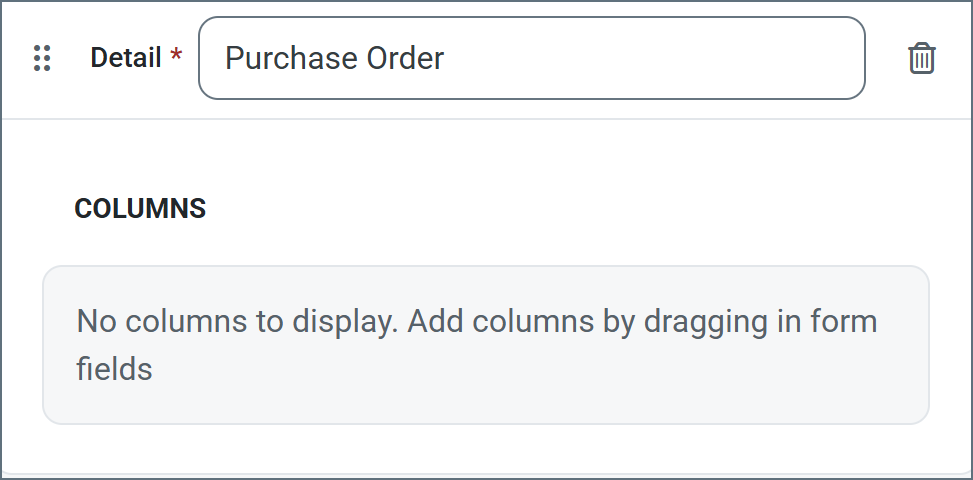
Adding Detail Tables
Detail tables allow form creators to embed a table in the web form to enable structured, row-based data entry. They include a configurable number of columns which you define during the form creation. They are ideal for capturing repeatable datasets in a single form submission. End users can then dynamically add as many rows as needed and enter values for each column in those rows. See Accessing Your Form for an example.
To add a detail table to your form:
-
Click Add Detail from the dropdown. Enter a name.
-
Now you are ready to add columns to the table. Select any of the form field types.
Adding Fields
Fields are the basic unit of input for the form.
To add a field:
-
Drag an object from the Form Fields section into your section or detail table.
-
Enter a Display Name (for example, Line Item Id). By default, XML Name is populated, but you can use the Override checkbox to supply a different name.
-
Use the Is required checkbox to specify whether the field is mandatory.
-
The other options vary based on the form field type. The following example shows a text field being defined. When you are finished defining the field, click Add.

Tips:
- To edit a field, click the link to its name, or the ellipses to the right of the name.
- To remove a field, click the ellipses and choose Remove Instance.
- Drag and drop fields in a section or detail table to reorder their position in the form.
Form Field Types
Text Field Options
- Display Name: Name of the field in the form.
- XML Name: Sanitized version of the Display Name. It must be a valid XML element name.
- Override: Checkbox which allows you to change the default XML Name.
- Is required: Checkbox indicating whether the field is mandatory.
- Default Value: Populates the form with the text supplied here.
- Description: Helper text describing what the field is for.
Dropdown Field Options
- Display Name: Name of the field in the form.
- XML Name: Sanitized version of the Display Name. It must be a valid XML element name.
- Override: Checkbox which allows you to change the default XML Name.
- Dropdown Options: The list of options that appear in the form dropdown field. Click Add Option to add the options you need.
- Is required: Checkbox indicating whether the field is mandatory.
- Default Value: Populates the form with the text supplied here.
- Description: Helper text describing what the field is for.
Radio Button Field Options
- Display Name: Name of the field in the form.
- XML Name: Sanitized version of the Display Name. It must be a valid XML element name.
- Override: Checkbox which allows you to change the default XML Name.
- Radio Button Options: The list of options that appear in the form radio button field. Click Add Option to add the options you need.
- Is required: Checkbox indicating whether the field is mandatory.
- Default Value: Populates the form with the text supplied here.
- Description: Helper text describing what the field is for.
Checkbox Field Options
- Display Name: Name of the field in the form.
- XML Name: Sanitized version of the Display Name. It must be a valid XML element name.
- Override: Checkbox which allows you to change the default XML Name.
- Checkbox Options: The list of options that appear in the form checkbox field. Click Add Option to add the options you need.
- Is required: Checkbox indicating whether the field is mandatory.
- Default Value: Populates the form with the text supplied here.
- Description: Helper text describing what the field is for.
File Upload Field Options
- Display Name: Name of the field in the form.
- XML Name: Sanitized version of the Display Name. It must be a valid XML element name.
- Override: Checkbox which allows you to change the default XML Name.
- Accepted File Type Extensions: The allowed list of upload file types. For example,
.xmlonly accepts XML files. To allow all file types, use*. Click Add Option to add the options you need. - Is required: Checkbox indicating whether the field is mandatory.
- Default Value: Populates the form with the text supplied here.
- Description: Helper text describing what the field is for.
Accessing Your Form
When you finish designing your form, access it by clicking the Form URL link at the top of the designer. The following form is a simple example:

Submitting Form Data
After you create a form, users access the Form connector’s web endpoint and submit data using the form.
For fields in the main form, users simply enter the values that correspond to the labels on the form (which are taken from the name of the fields that you created).
Users can add rows to the detail table by clicking Add Row. Once a user enters all their data, they click Submit to submit their data. If the submission is successful, a message similar to the following appears.

When a user submits a form, the form data is pushed to the Transactions tab. The output is an XML file that contains the following structure:
<Items>
  <FormTitle>
    <FieldA>data</FieldA>
    <FieldB>more data</FieldB>
    <FieldC>even more data</FieldC>
    <DetailTitle>
      <SubFieldA>123</SubFieldA>
      <SubFieldB>456</SubFieldB>
    </DetailTitle>
    <DetailTitle>
      <SubFieldA>135</SubFieldA>
      <SubFieldB>246</SubFieldB>
    </DetailTitle>
  </FormTitle>
</Items>
This output is well suited to being processed by an XML Map Connector so that it can be mapped into an XML format that is usable by another connector.
Macros
ファイルの命名規則にマクロを使用することで、組織の効率とデータの文脈的理解を高めることができます。マクロをファイル名に組み込むことで、識別子、タイムスタンプ、ヘッダー情報などの関連情報を動的に含めることができ、各ファイルに有益なコンテキストを付与できます。これにより、組織にとって重要な詳細をファイル名に反映させることができます。
CData Arc はこれらのマクロをサポートしており、すべて次の構文を使用します:%Macro%
| Macro | 説明 |
|---|---|
| ConnectorID | コネクタのConnectorID を返します。 |
| Ext | コネクタが処理中のファイルの拡張子を返します。 |
| Filename | コネクタが処理中のファイルのファイル名(拡張子を含む)を返します。 |
| FilenameNoExt | コネクタが処理中のファイルのファイル名(拡張子なし)を返します。 |
| MessageId | コネクタがアウトプットするメッセージのMessageId を返します。 |
| RegexFilename:pattern | コネクタで処理中のファイルのファイル名にRegEx パターンを適用します。 |
| Header:headername | コネクタが処理中のメッセージのヘッダー(headername)の値を返します。 |
| LongDate | システムの現在の日時を長い形式(例:Wednesday, January 24, 2024)で返します。 |
| ShortDate | システムの現在の日時をyyyy-MM-dd 形式(例:2024-01-24)で返します。 |
| DateFormat:format | システムの現在の日時を指定されたフォーマット(format)で返します。使用可能な日付フォーマットについては、サンプル日付フォーマット を参照してください。 |
| Vault:vaultitem | 指定されたvault 項目の値を返します。 |
例
%Ext% や%ShortDate% などの引数を必要としないマクロもありますが、引数を必要とするマクロもあります。引数を渡すマクロはすべて次の構文を用います:%Macro:argument%
以下は、引数を渡すマクロの例です。
- %Header:headername%:
headernameはメッセージのヘッダー名です。 - %Header:mycustomheader% は、インプットメッセージで設定された
mycustomheaderヘッダーの値を返します。 - %Header:ponum% は、インプットメッセージで設定された
ponumヘッダーの値に対応します。 - %RegexFilename:pattern%:
patternは正規表現パターンです。例えば、%RegexFilename:^([\w][A-Za-z]+)%はファイル名の最初の単語と照合し、大文字と小文字を区別せずに結果を返します(test_file.xmlはtestに変換されます)。 - %Vault:vaultitem%:
vaultitemは、vault のアイテム名です。例えば、%Vault:companyname%はVault に保存されているcompanynameアイテムの値を返します。 - %DateFormat:format%:
formatは使用可能な日付フォーマットです(詳細はサンプル日付フォーマット を参照してください)。例えば、%DateFormat:yyyy-MM-dd-HH-mm-ss-fff%はファイルの日付とタイムスタンプを返します。
以下の例に示すように、より詳細なマクロを作成することもできます。
- 複数のマクロを1つのファイル名にまとめる:
%DateFormat:yyyy-MM-dd-HH-mm-ss-fff%%EXT% - マクロの外側にテキストを含める:
MyFile_%DateFormat:yyyy-MM-dd-HH-mm-ss-fff% - マクロ内にテキストを含める:
%DateFormat:'DateProcessed-'yyyy-MM-dd_'TimeProcessed-'HH-mm-ss%