Salesforce Marketing Cloud
Version 25.3.9396
Version 25.3.9396
Salesforce Marketing Cloud
You can use the Salesforce Marketing Cloud connector from the CData Sync application to move data from any supported source to the Salesforce Marketing Cloud destination. To do so, you need to add the connector, authenticate to the connector, and complete your connection.
Add the Salesforce Marketing Cloud Connector
To enable Sync to use data from Salesforce Marketing Cloud, you first must add the connector, as follows:
-
Open the Connections page of the Sync dashboard.
-
Click Add Connection to open the Select Connectors page.
-
Click the Sources tab and locate the Salesforce Marketing Cloud row.
-
Click the Configure Connection icon at the end of that row to open the New Connection page. If the Configure Connection icon is not available, click the Download Connector icon to install the Salesforce Marketing Cloud connector. For more information about installing new connectors, see Connections.
Authenticate to Salesforce Marketing Cloud
After you add the connector, you need to set the required properties.
-
Connection Name: Enter a connection name of your choice.
-
Subdomain: Enter the subdomain of your Salesforce Marketing Cloud API.
Salesforce Marketing Cloud supports two API schema types. Select your schema below to proceed to the relevant section for your schema.
SOAP API
To connect to Salesforce Marketing Cloud through the SOAP API, specify the following properties:
-
Schema: Select SOAP.
-
Auth Scheme: Select the authentication method that you want to use to connect to Salesforce Marketing Cloud.
- OAuth
- OAuth Client
- Basic (default)
REST API
To connect to Salesforce Marketing Cloud through the REST API, specify the following properties:
-
Schema: Select REST.
-
Auth Scheme: Select the authentication method that you want to use to connect to Salesforce Marketing Cloud.
- OAuth (default)
- OAuth Client
SOAP Authentication Methods
OAuth
To connect with OAuth custom credentials, specify the following properties:
-
Auth Scheme: Select OAuth.
-
OAuth Client Id: Enter the client Id that you were assigned when you registered your application with an OAuth authorization server.
-
OAuth Client Secret: Enter the client secret that you were assigned when you registered your application with an OAuth authorization server.
After you specify the authentication scheme, complete the remaining steps for establishing your connection.
OAuth Client
To connect with an OAuth client, specify the following properties:
-
Auth Scheme: Select OAuthClient.
-
OAuth Client Id: Enter the client Id that you were assigned when you registered your application with an OAuth authorization server.
-
OAuth Client Secret: Enter the client secret that you were assigned when you registered your application with an OAuth authorization server.
After you specify the authentication scheme, complete the remaining steps for establishing your connection.
Basic
To connect with your user credentials, set the following properties:
-
Auth Scheme: Select Basic.
-
User: Enter the username that you use to authenticate to your Salesforce Marketing Cloud account.
-
Password: Enter the password that you use to authenticate to your Salesforce Marketing Cloud account.
After you specify the authentication scheme, complete the remaining steps for establishing your connection.
REST Authentication Methods
OAuth
To connect with OAuth custom credentials, specify the following properties:
-
Auth Scheme: Select OAuth.
-
OAuth Client Id: Enter the client Id that you were assigned when you registered your application with an OAuth authorization server.
-
OAuth Client Secret: Enter the client secret that you were assigned when you registered your application with an OAuth authorization server.
-
User Legacy Authentication: Select whether you want the connection to be made to the Salesforce Marketing Cloud REST API using legacy authentication. The default option is False.
After you specify the authentication scheme, complete the remaining steps for establishing your connection.
OAuth Client
To connect with an OAuth client, specify the following properties:
-
Auth Scheme: Select OAuthClient.
-
OAuth Client Id: Enter the client Id that you were assigned when you registered your application with an OAuth authorization server.
-
OAuth Client Secret: Enter the client secret that you were assigned when you registered your application with an OAuth authorization server.
-
User Legacy Authentication: Select whether you want the connection to be made to the Salesforce Marketing Cloud REST API using legacy authentication. The default option is False.
After you specify the authentication scheme, complete the remaining steps for establishing your connection.
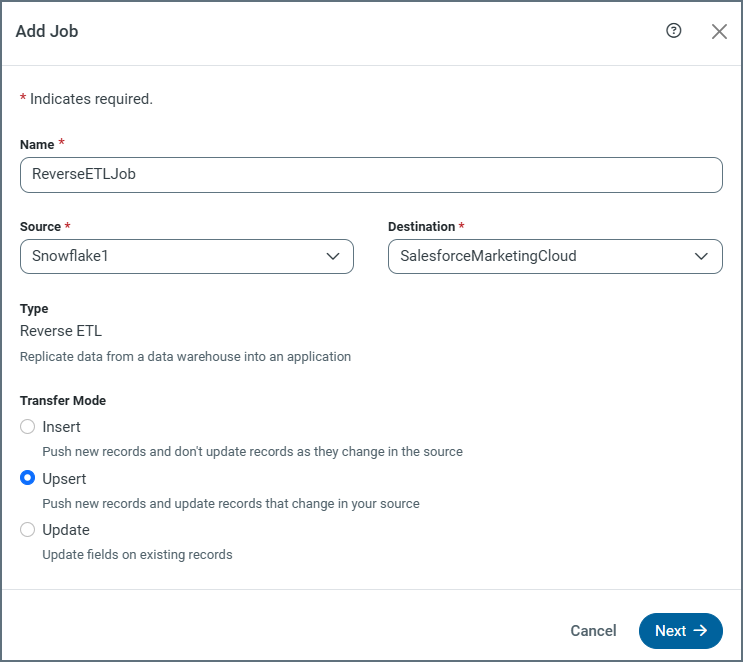
Salesforce Marketing Cloud as a Reverse ETL Destination
In the Sync application, you can configure Salesforce Marketing Cloud as a reverse ETL destination so that it can receive processed data from your source database or warehouse.
As a reverse ETL destination, Salesforce Marketing Cloud supports all three transfer modes (Insert, Upsert, and Update).
Supported Schemas
In Sync, the Salesforce Marketing Cloud destination supports two schemas: SOAP and REST. For both of these schemas, Insert mode behaves the same for all tables and requires no special configuration. However, the behavior of the Update and Upsert modes differs based on schema, as explained below.
SOAP Schema (default)
-
Update mode is supported for all standard and custom tables. For the AccountUser table, you must specify both primary keys as the delta snapshot key when you configure a task’s column mapping. (The delta snapshot key is the column (or set of columns) that are used to track changes when Sync processes data from multiple snapshots of a dataset.) For all other tables, you can specify one key from all of a table’s primary keys as the delta snapshot key.
-
Upsert mode is supported only for the standard tables Subscribers, List, Send, and Role, as well as for all custom tables and data extensions. For this transfer mode, you must specify all of the table’s primary keys as the delta snapshot key when you configure a task’s column mapping.
REST Schema
-
Update mode is supported for all tables. You can specify one key from all of the table’s primary keys as the delta snapshot key when you configure a task’s column mapping.
-
Upsert mode is supported only for the Contacts table. You can one key from all of the table’s primary keys as the delta snapshot key when you configure a task’s column mapping.
Transfer-Modes Summary
SOAP Schema
| Mode | Supported | Key Used for Matching | Notes |
|---|---|---|---|
| Insert | Yes | N/A (always creates new records) | Inserts new records. |
| Update | Yes | The AccountUser table requires both primary keys; other tables use any one key from all primary keys. | Updates existing records. |
| Upsert | Yes for the Subscribers, List, Send, and Role tables; also for all custom tables/data extensions. | All the table’s primary keys must be specified as the delta snapshot key. | Inserts or updates records depending on a match. |
REST Schema
| Mode | Supported | Key Used for Matching | Notes |
|---|---|---|---|
| Insert | Yes | N/A (always creates new records) | Inserts new records. |
| Update | Yes | Any one key of the table’s primary keys. | Updates existing records. |
| Upsert | Yes (for the Contacts table only) | You can use any one of the table’s primary keys. | Inserts or updates records depending on a match. |
For more information about reverse ETL jobs, see Reverse ETL.
Complete Your Connection
To complete your connection:
-
Define advanced connection settings on the Advanced tab. (In most cases, though, you should not need these settings.)
-
If you authenticate with OAuth, click Connect to Salesforce Marketing Cloud to connect to your Salesforce Marketing Cloud account.
-
Click Create & Test to create your connection.
More Information
For more information about interactions between CData Sync and Salesforce Marketing Cloud, see Salesforce Marketing Cloud Connector for CData Sync.