Sage Intacct
Version 25.3.9396
Version 25.3.9396
Sage Intacct
You can use the Sage Intacct connector from the CData Sync application to move data from any supported source to the Sage Intacct destination. To do so, you need to add the connector, authenticate to the connector, and complete your connection.
Prerequisites
In addition to creating a Sage Intacct account, you also need to perform these prerequisites:
-
Enable a Web Services subscription by navigating to Company > Admin > Subscriptions.
-
Create a Web-Services user account without UI access. Sage Intacct recommends that you create a Web-Services-only user, which you can do by navigating to Company > Admin and clicking the plus sign (+) next to Web Services users.
Note: Web Services users are programmatic users and never log into the UI. Therefore, both single sign-on and multifactor authentication are disabled automatically for them.
You can establish a connection to Sage Intacct using either the embedded credentials or with your own credentials.
Add the Sage Intacct Connector
To enable Sync to use data from Sage Intacct, you first must add the connector, as follows:
-
Open the Connections page of the Sync dashboard.
-
Click Add Connection to open the Select Connectors page.
-
Click the Sources tab and locate the Sage Intacct row.
-
Click the Configure Connection icon at the end of that row to open the New Connection page. If the Configure Connection icon is not available, click the Download Connector icon to install the Sage Intacct connector. For more information about installing new connectors, see Connections.
Authenticate to Sage Intacct
After you add the connector, you need to set the required properties.
-
Connection Name: Enter a connection name of your choice.
-
Company ID: Enter the identifier (Id) you use to identify your company when you log into Sage Intacct.
CData Sync supports authenticating to Sage Intacct in several ways. Select your authentication method below to proceed to the relevant section that contains the authentication details.
-
Basic (default)
Basic
To connect with your user credentials, set the following properties:
-
Auth Scheme: Select Basic.
-
User: Enter the username that you use to authenticate to your Sage Intacct account.
-
Password: Enter the password that you use to authenticate to your Sage Intacct account.
Okta
To connect with single sign-on (SSO) via Okta, specify the following properties:
-
Auth Scheme: Select OKTA.
-
User: Enter the username that you use to authenticate to your Okta account.
-
Password: Enter the password that you use to authenticate to your Okta account.
-
SSO Login URL: Enter the login URL that is used by your SSO provider.
-
SSO Properties: Enter a semicolon-separated list of the single sign-on (SSO) properties that you want to use (for example, SSOProperty1=Value1;SSOProperty2=Value2;…).
Azure Active Directory
To connect with single sign-on via Azure Active Directory, specify the following settings:
-
Auth Scheme: Select AzureAD.
-
SSO Properties – Enter the single sign-on (SSO) properties that you want to use (for example, SSOProperty1=Value1;SSOProperty2=Value2;…).
Sage Intacct as a Reverse ETL Destination
In the Sync application, you can configure Sage Intacct as a reverse ETL destination so that it can receive processed data from the source warehouse.
As a reverse ETL destination, Sage Intacct supports only the Insert and Update transfer modes. Upsert mode is not supported and is disabled in the Sync UI.
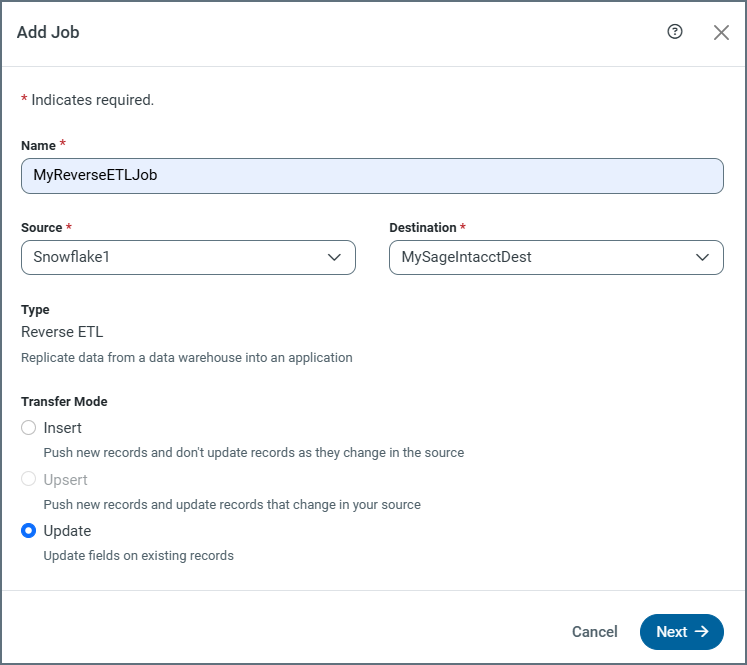
In Sage Intacct, updates are matched by the table’s primary key when a key is available. For standard tables without a primary key, the system-generated RECORDNO column is used to uniquely identify and update records.
Note: Bulk operations for Insert and Update are supported only for the current Sage Intacct API.
Transfer-Modes Summary
| Mode | Supported | Key Used for Matching | Bulk Support | Notes |
|---|---|---|---|---|
| Insert | Yes | N/A (always creates new records) | Yes (with current API) | Creates new records in Sage Intacct. |
| Update | Yes | Uses primary key or RECORDNO (standard tables) |
Yes (with current API) | Updates existing records. |
| Upsert | No | N/A | No | Not supported; disabled in the UI. |
For more information about reverse ETL jobs, see Reverse ETL.
Complete Your Connection
To complete your connection:
-
Define advanced connection settings on the Advanced tab. (In most cases, though, you should not need these settings.)
-
If you authenticate with AzureAD, click Connect to Sage Intacct to connect to your Sage Intacct account.
-
Click Create & Test to create your connection.
More Information
For more information about interactions between CData Sync and Sage Intacct, see Sage Intacct Connector for CData Sync.