Virtual Nodes
Version 23.4.8839
Version 23.4.8839
Virtual Nodes
Virtual nodes are special nodes added to the destination structure that do not directly appear in the output XML. Instead, these virtual nodes provide an opportunity to implement logic that affects the appearance and/or values of other (non-virtual) nodes in the output.
The XML Map connector supports three types of virtual nodes:
- Code Script
- Condition
- Loop
Code Script
A code script virtual node provides an opportunity to write custom ArcScript that does not need to return an output value. Often, these nodes use variables or the special _map item to store values that need to be referenced later in the mapping, but do not need to be output in the current context.
For example, the scenario described in the Map Item section is a good candidate for a virtual code script node. The sum of the line item costs needs to be returned as output outside of the Foreach loop where it is calculated. So, a virtual code script node in the Foreach loop can calculate the value and not output it. Then this value can be referenced as output in a non-virtual node outside the loop.
To create a code script virtual node, follow these steps:
- Right-click on a destination node and choose New > Code Script.
- Enter a Script Name.
- Supply the script. The editor validates your expression as you type, so if you see an Invalid Script message, you have a syntax issue. When you are finished, click Save.
Condition
A condition virtual node groups output elements together based on a shared condition. All children of the condition node appear in the output if the condition is true, and do not appear if the condition is false.
This is functionally equivalent to adding the same condition to each of the individual nodes independently. For conditions that affect many different nodes, it is usually more convenient to create a single condition node and then make all of the relevant output nodes a child of the condition node.
To create a condition virtual node, follow these steps:
- Right-click on a destination node and choose New > Condition.
- Click the funnel icon next to the new condition to create the condition rules. See Condition for details.
Loop
A loop virtual node functions the same as a Foreach mapping between parent nodes, except that the parent node does not appear in the output XML. This allows you to flatten repeated elements in the source into a non-hierarchical structure in the destination. This is easiest to understand via an example.
Take the following input XML:
<!-- example input -->
<Items>
  <DataReading>
    <Temperature>212.5</Temperature>
  </DataReading>
  <DataReading>
    <Temperature>9.2</Temperature>
  </DataReading>
  <DataReading>
    <Temperature>5.1</Temperature>
  </DataReading>
</Items>
This needs to be mapped to a flat structure that includes all of the DataReading data:
<!-- desired output -->
<Items>
  <OutputData>
    <Temperature>212.5</Temperature>
    <Temperature>9.2</Temperature>
    <Temperature>5.1</Temperature>
  </OutputData>
</Items>
You can accomplish this by establishing a Foreach relationship with a loop node in the destination corresponding to each DataReading element in the source:
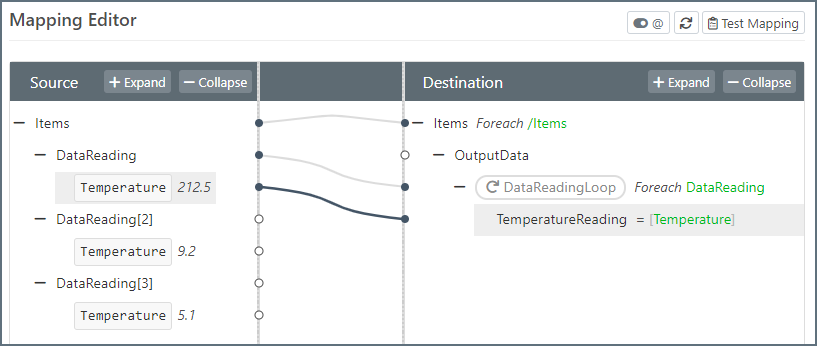
If the Foreach relationship was established between DataReading and OutputData, then the OutputData element would be repeated in the result. The loop node avoids this repetition of hierarchy and flattens the value into the single OutputData element.
To add the loop node shown in the example above, follow these steps:
- Right-click on the TemperatureReading node and choose New > Loop. Give the loop a meaningful name, then click Save.
- Drag the source DataReading node onto the loop to create the Foreach relationship.
- Map the source Temperature node to the destination TemperatureReading node.