Configure an AS2 Connection
Version 23.4.8839
Version 23.4.8839
Configure an AS2 Connection
Overview
CData Arc supports establishing an AS2 connection with a trading partner in a simple two-step process. First, the AS2 Profile should be configured with local AS2 details (identifier, private certificates, etc); then, an AS2 Connector is configured in the Flows page with the AS2 details for a specific trading partner.
Video Resources
Watch this short video to learn how to quickly setup an AS2 connector.
AS2 Profile Configuration
The Profile page contains an AS2 Profile tab where local AS2 details are configured. The two primary configuration details are:
- AS2 Identifier (the value identifies Arc to your trading partners as an AS2 entity)
- Private Certificate (the certificate that is used to decrypt incoming messages and sign outgoing messages)
These values (explained in detail below) should be set in the AS2 Profile:

AS2 Identifier
Your AS2 identifier is included in outgoing AS2 messages and identifies you as the sender; additionally incoming AS2 messages must be addressed to this identifier to be accepted by the application. AS2 identifiers have a few restrictions, for example they cannot include whitespace characters and they are case-sensitive. Other than this (and any further restrictions imposed by trading partners), AS2 identifiers can be any value so long as it is mutually agreed-upon.
Private Certificate
Your private certificate is used for digital cryptography (decryption, digital signatures). The private certificate contains a private key that is paired with your public encryption key; when a trading partner uses your public encryption key to secure an AS2 message, it ensures that only you can decrypt the message (with the paired private key).
Arc supports private certificates in PKCS#12 format (.pfx or .p12 files), and PEM-encoded public key certificates (.cer files).
Creating a New Certificate Pair
If you do not already have a private/public key pair to use for AS2 security, Arc supports creating a self-signed certificate. Self-signed certificates are common in the AS2 space, but some partners may require purchasing a certificate from a trusted Certificate Authority (CA).
To create a new certificate pair, click the Create Certificate button to open the certificate creation wizard:
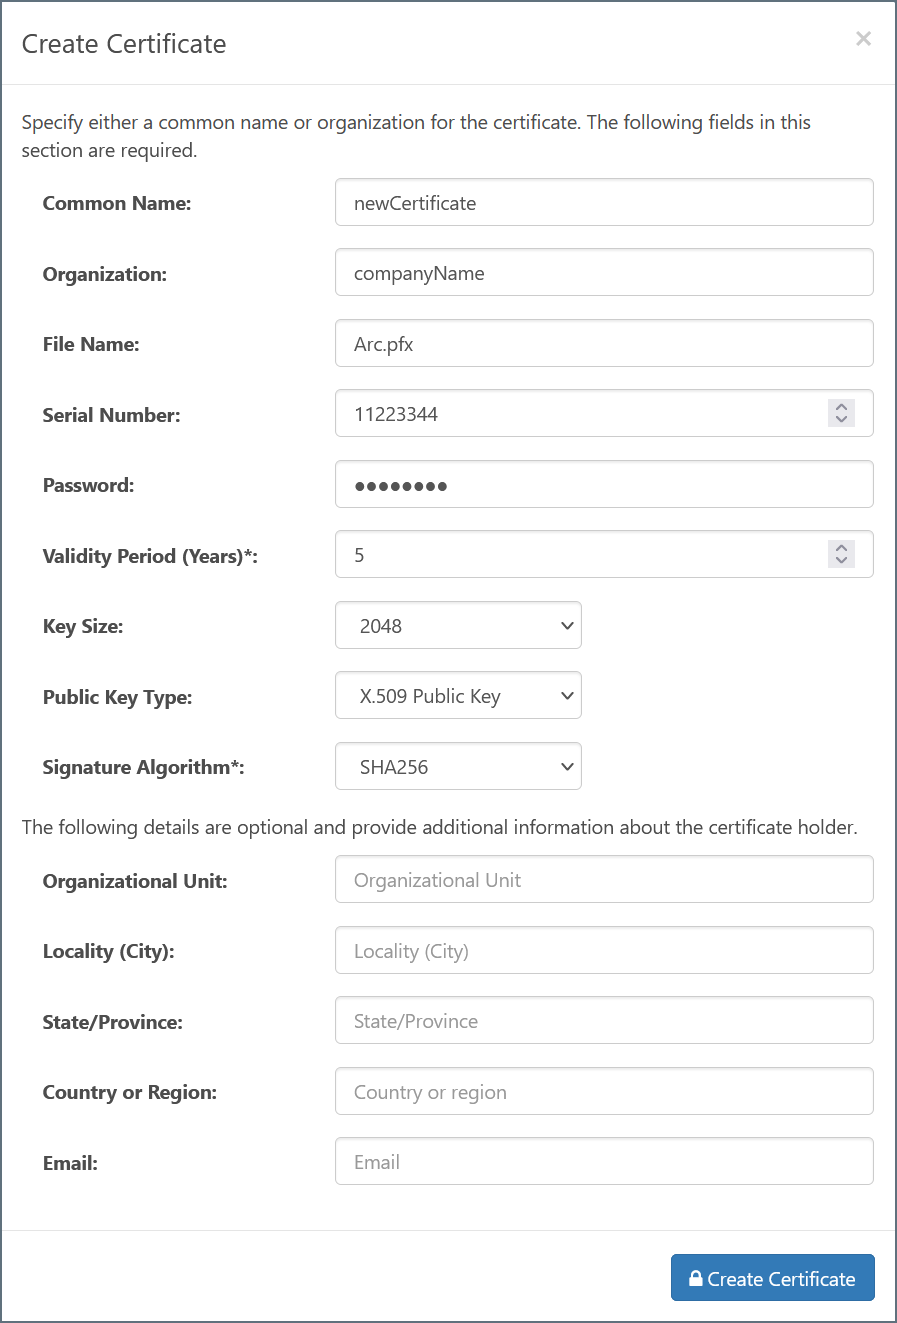
Within this wizard, configure the following required fields:
- Common Name - The hostname of the server using the certificate; used in conjunction with the serial number to identify the certificate
- Organization - The company or group to which the certificate belongs
- File Name - The name of the certificate file (with .pfx extension); the corresponding public key certificate will have the same name with a .cer extension
- Serial Number - A unique serial number that is used in conjunction with the common name to identify the certificate
- Password - The password required to access the private key
- Validity Period - Determines the expiration date of the certificate
- Key Size - Whether to create a 512, 1024, or 2048-bit key
- Signature Algorithm - The algorithm to use when applying a digital signature to the certificate, verifying its authenticity
The remaining fields can optionally be configured to provide further context and metadata to the certificate.
Once created, the new certificate files are placed in the ‘data’ directory for the application. When certificate files reside in the ‘data’ directory, then are included in the dropdown menu for any Certificate-type settings in the application.
Application URLs
The Application URLs section of the AS2 Profile tab defines the publicly-accessible endpoints where trading partners can send AS2 messages to Arc. The Base URL field in Settings → Advanced should be set to the base url leading to the machine/network where Arc is hosted (e.g. https://mydomain.com/Arc). The following endpoints are generated based on this domain value and the port on which the application’s web server is listening:
- Receiving URL (the endpoint where partners should send AS2 messages)
- Asynchronous MDN URL (the endpoint where partners should send asynchronous MDN receipts, if asynchronous MDNs are required)
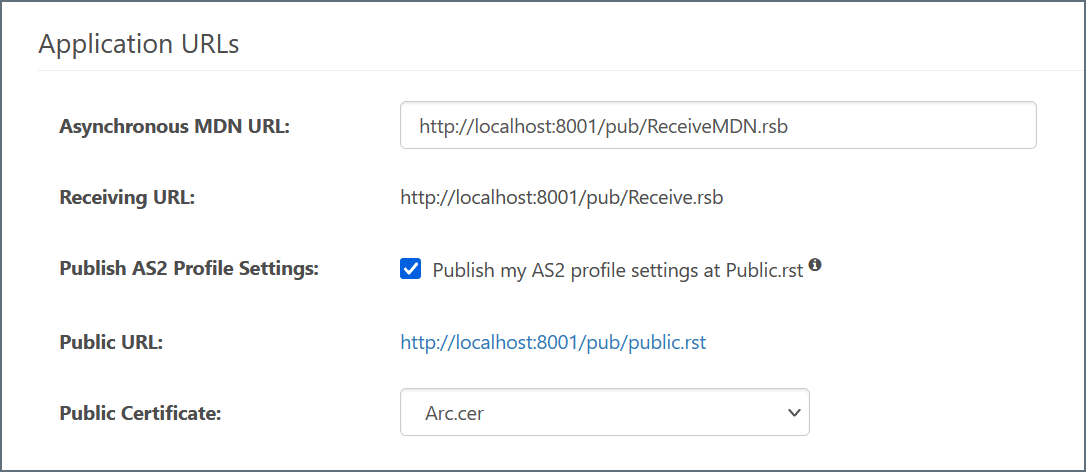
If the Publish my AS2 profile settings at Public.rst option is enabled, trading partners can view your AS2 profile details at the endpoint shown in Public URL. Sending your trading partners this URL may simplify the process of exchanging AS2 configuration details.
AS2 Connector Configuration
After the AS2 Profile is configured, navigate to the Flows page and create an instance of the AS2 Connector. Each AS2 Connector is configured with the AS2 details for a single trading partner.

Required Configuration Settings
AS2 configuration details must be solicited from the trading partner. At a minimum, the details that the trading partner provides must include:
- AS2 identifier
- URL/endpoint where outgoing AS2 messages should be sent
- Public certificate/key for encryption
Configure these values under the Trading Partner Info and Trading Partner Certificates of the AS2 Connector:
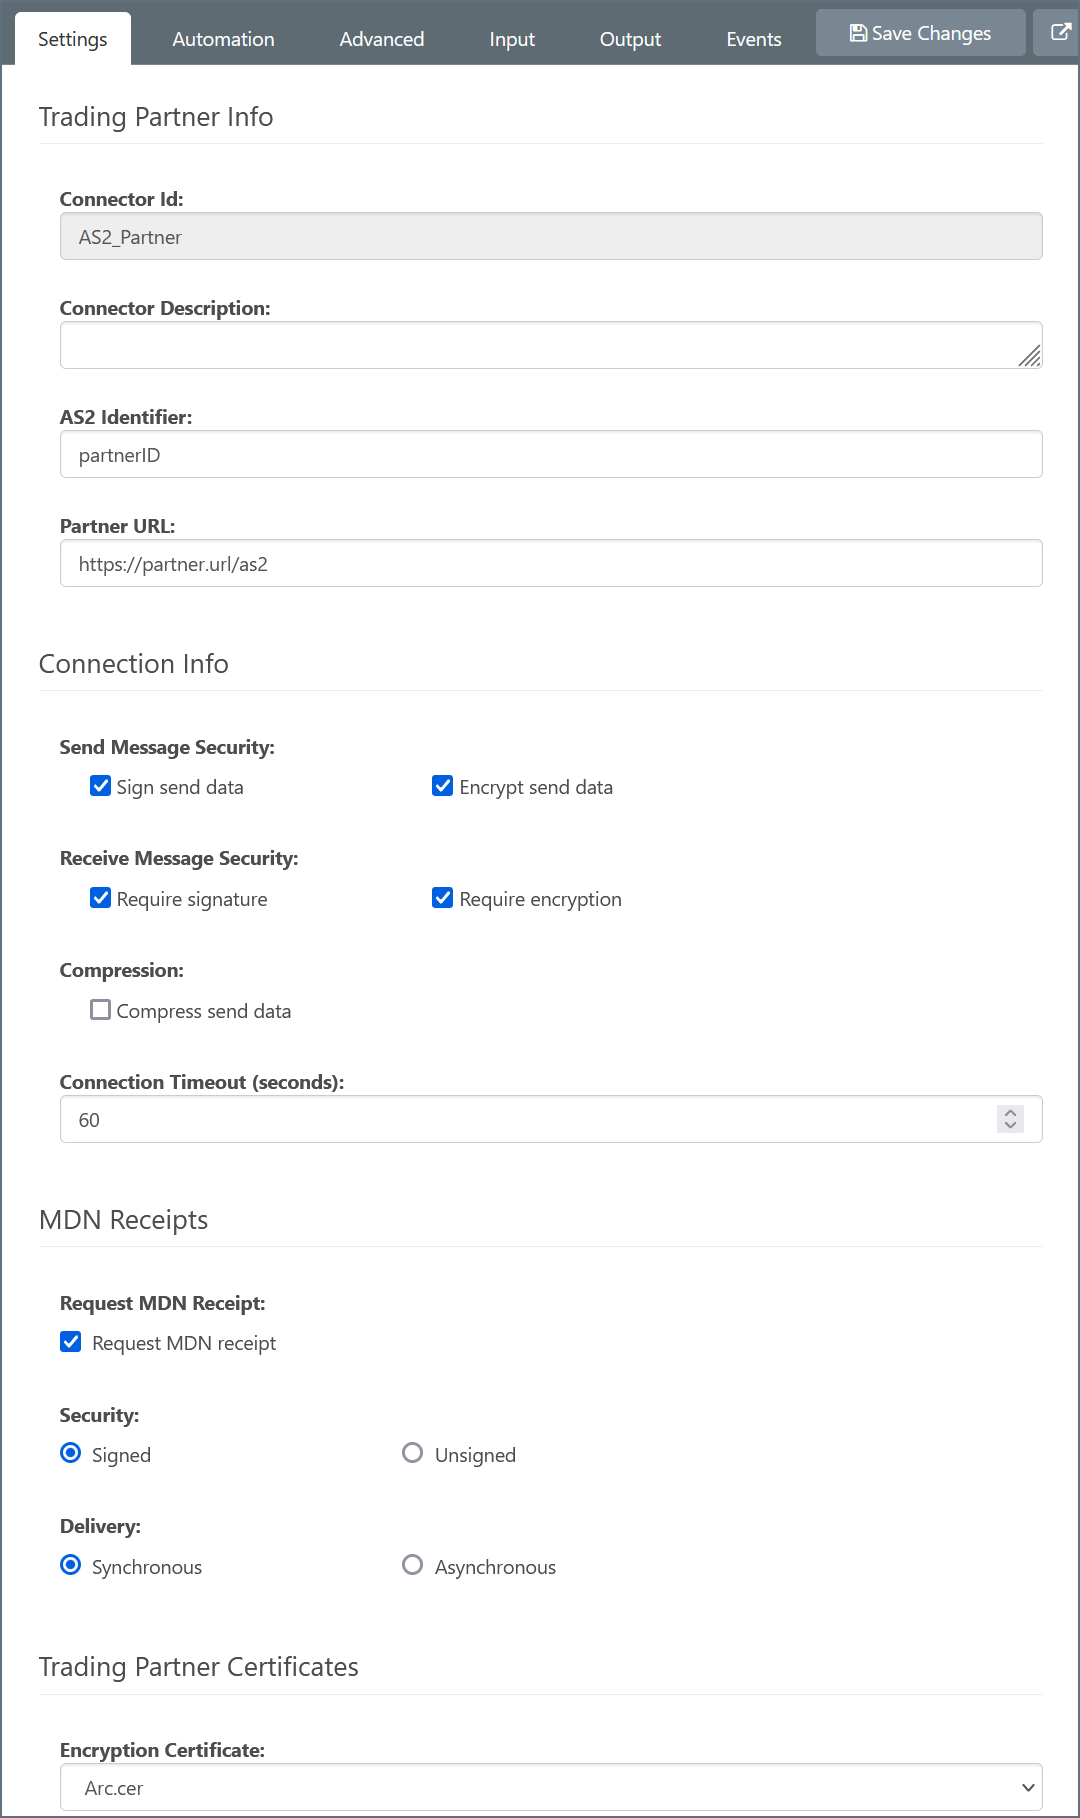
Additional Configuration Settings
Partners may additionally include further requirements:
- Synchronous vs Asynchronous MDNs (if not specified, assume Synchronous)
- SSL Server Certificates for connecting to an HTTPS server (configured under Trading Partner Certificates)
- Specific encryption or signature algorithms (configured in the Advanced tab under Encryption Algorithm and Signature Algorithm)
- A separate certificate (in addition to the encryption certificate) for verifying signatures (configured in the Advanced tab under Partner Signing Certificate)
Testing the AS2 Connection
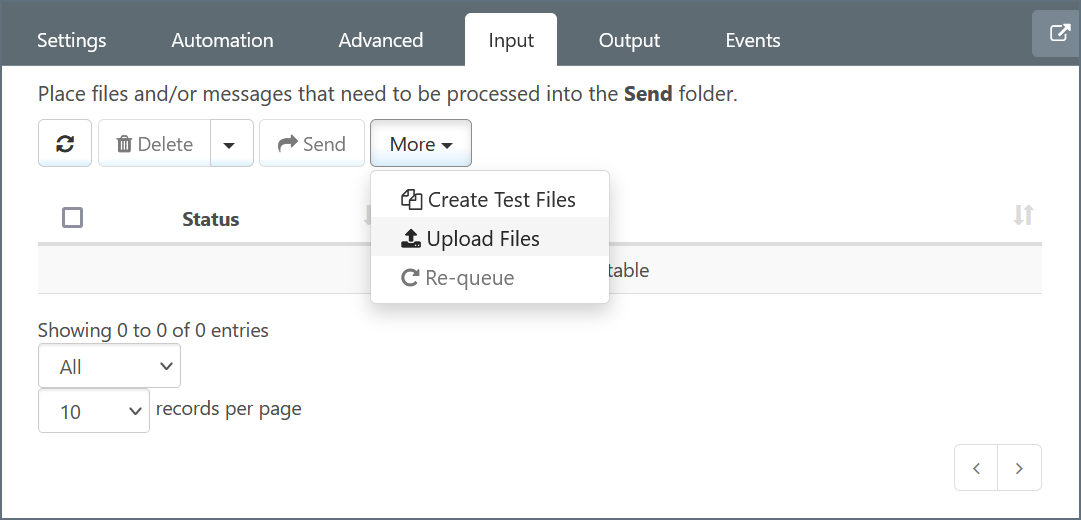
Once the AS2 Connector for a trading partner is configured, the connector supports generating dummy documents to test the outgoing connection. Navigate to the AS2 Connector’s Input tab, expand the ‘More’ dropdown, and select ‘Create Test Files’.
Unless Send Automation is disabled in the Automation tab, the connector will automatically attempt to process these test files. Any errors that occur when sending the test files to the configured partner are reported in the Input tab, including a log file with context and details on the error. The Log Level and Log Requests options can be set in the Advanced tab to further diagnose any connection issues.
Successfully processed files will be shown with a green ‘Sent’ status in the Input tab. Successfully sending test files establishes that the AS2 configuration is correct.
Providing AS2 Details to Trading Partners
In the same way that trading partners must provide AS2 configuration details in order to configure an AS2 Connector for that partner, you are responsible for providing AS2 configuration details to your partners.
At a minimum, you must provide your partner with:
- Your AS2 identifier
- Your public key/encryption certificate
- Your receiving URL
Public URL
The easiest way to provide this information to your partner is to enable the Publish my AS2 profile settings at Public.rst option in the AS2 Profile. The value in the Public URL field is a link that you can provide to your partner; from this link, your partner can view your AS2 configuration settings and download your public key/encryption certificate.
Note that this Public URL value is distinct from the Receiving URL field, which is where trading partners should send AS2 messages, and the Asynchronous MDN URL field, which is where trading partners should send asynchronous MDN receipts (if asynchronous MDNs are required).
Manually Provide Details
Alternatively, you can manually send your partner these details. The AS2 Identifier and Receiving URL values can be found in the AS2 Profile.
To send your partner the public key/encryption certificate, navigate to the .cer file on disk:
- Navigate to the root installation directory for Arc
- Open the ‘data’ folder in this root directory
- Find the ‘.cer’ file with the same filename as your Private Certificate in the AS2 Profile (the same filename but with a ‘.cer’ extension instead of ‘.pfx’)
- Copy this ‘.cer’ file and provide the copy to your partner
Sending AS2 Messages
Once an AS2 Connector has successfully established an outgoing AS2 connection, files can be securely and reliably sent to your trading partner.
Input Tab
Files that are placed in the Input tab for the configured AS2 Connector are scheduled to be sent by the connector.
If Send Automation is enabled in the Automation tab (enabled by default), the connector will automatically poll this folder for files to process. Otherwise, files can be manually sent via the connector’s Input tab. Within the Input tab, click the checkbox to the left of the target file(s) and click the Send button.
The Input tab can also be used to upload files into the Input folder:
The ‘Upload Files’ tool is not required to add files to the connector’s Input folder. Files can also be manually dropped into the Input folder by navigating to the filepath listed at the top of the Input tab.
Sending as Part of a Flow
In most configured workflows, files are processed by other Arc connectors before they should be sent out by the AS2 Connector. When another connector is connected to the AS2 Connector in a Flow, files are automatically passed into the AS2 Connector’s Input folder.
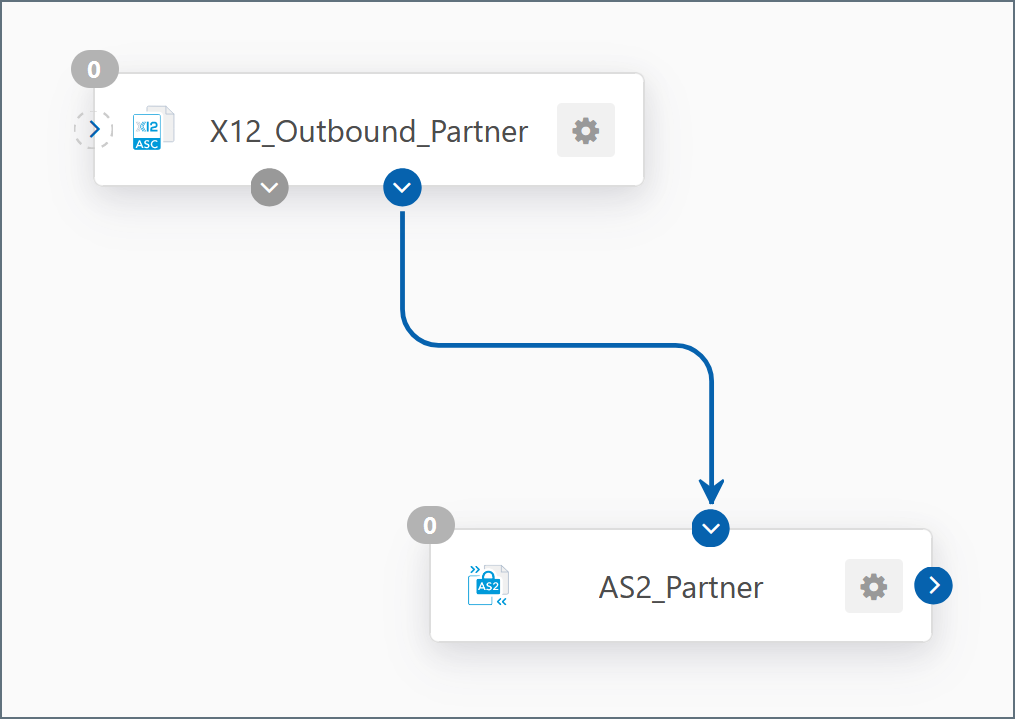
In the below flow, after a file is processed by the X12 Connector it is automatically added to the Input folder for the AS2 Connector:
Receiving MDN Receipts
The AS2 Connector automatically waits for MDN receipts if Request MDN receipt is enabled. If the MDN receipt contains a negative response (e.g. if the partner has rejected the exchange for some reason), the connector will report an error instead of a successful send.
If an Asynchronous MDN is requested, the connector will stay in ‘pending MDN’ status until the MDN is returned by the partner. Synchronous MDNs are recommended unless the files exchanged over AS2 are very large (e.g. 500MB).
Receiving AS2 Messages
When an AS2 message arrives on the Arc web server, the application attempts to route the message to a specific AS2 Connector. Arc uses the AS2 identifiers in the headers of the message (the ‘AS2-To’ and ‘AS2-From’ headers) to route the incoming file to the AS2 Connector configured for the partner that sent the message.
If the application cannot find an AS2 Connector configured for the incoming message (based on AS2 identifiers), an error is logged in the Application Log and the file is not received.
Output Tab
When the file received over AS2 is routed to a specific AS2 Connector (based on configured AS2 identifiers), the file arrives in the Output tab for the connector.
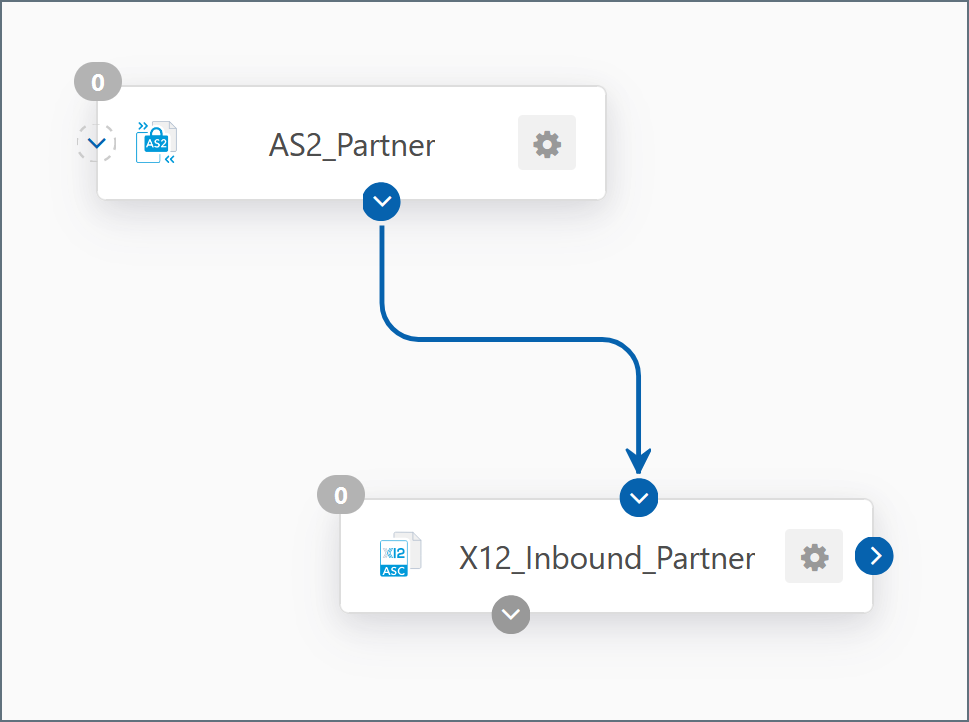
If the AS2 Connector is connected to other connectors in the Flow, files will not stay in the Output folder and will instead be passed along to the next connector in the flow. In the below Flow example, files that are received over AS2 (and routed to this AS2 Connector) will automatically be passed along to the X12 Connector for further processing:
If the AS2 Connector is not connected to another connector in the Flow, the files received by the AS2 Connector will remain in the Output folder. These files can be viewed in the Output tab of the connector, or by navigating on disk to the filepath displayed at the top of the Output tab.
Sending MDN Receipts
If the incoming AS2 message requests an MDN receipt, the AS2 Connector automatically generates and send the MDN. If an error occurs while receiving the AS2 message, this error is logged in Arc and included in the MDN receipt returned to the trading partner.
The settings required for sending MDN receipts is included in the incoming AS2 message and does not need to be explicitly configured in the AS2 Connector.