HL7 MLLP Connector
Version 23.4.8839
Version 23.4.8839
HL7 MLLP Connector
Health Level-7 is a set of standards for the transfer of clinical data used by hospitals and other healthcare providers. HL7 MLLP connectors support generating and parsing HL7 documents in conjunction with MLLP as the transport protocol.
Overview
HL7 MLLP connectors provide two sets of functionality:
- File transfer over the MLLP transport protocol
- EDI document parsing and generation according to the HL7 EDI standard
An HL7 MLLP connection is configured in two places. Configure the HL7 MLLP Profiles page with the settings that identify CData Arc as an HL7 and MLLP entity. Then configure individual HL7 MLLP connectors with the HL7 and MLLP details for each trading partner.
When an HL7 MLLP connector receives an inbound message from a trading partner, it verifies the HL7 identification details to confirm that the document was sent from and to the expected parties. Then it translates the document into XML for further processing in an Arc flow.
When an HL7 MLLP connector sends files to a trading partner:
- XML files are translated to HL7 before being sent
- HL7 documents are sent as-is
CData strongly recommends that you use the HL7 MLLP connector in conjunction with the XML Map connector to ensure that input and output XML is formatted correctly. See Use with the XML Map Connector for more information.
Profile Configuration
The HL7 MLLP Profile must be configured before connections can be established with individual HL7 MLLP connectors. Click Profiles on the top menu bar, then click the HL7 MLLP tab.
HL7 MLLP Profile Tab
Server Configuration
Settings for hosting a local MLLP server.
- Port The port on which to listen for incoming MLLP connections.
- Use SSL/TLS Whether to require incoming connections to use SSL/TLS encryption for transport security.
HL7 Personal Ids
- Application Namespace Id (MSH3.1) The application Id that identifies the local namespace for the HL7 protocol exchange.
- Application Universal Id (MSH3.2) The local application universal Id for the HL7 protocol exchange.
- Application Universal Id Type (MSH3.3) A type qualifier to provide context to the local application universal Id.
- Facility Namespace Id (MSH4.1) The facility Id that identifies the local namespace for the HL7 protocol exchange.
- Facility Universal Id (MSH4.2) The local facility universal Id for the HL7 protocol exchange.
- Facility Universal Id Type (MSH4.3) A type qualifier to provide context to the local facility universal Id.
Other Settings
Settings that rarely need to be modified.
- Inactivity Timeout The amount of time (in seconds) that the server allows clients to remain inactive before the connection is terminated.
Logging
Settings that govern the creation and storage of logs.
- Log Level The verbosity of logs generated by the connector. When you request support, set this to Debug.
- Log Rotate Interval The number of days to wait before creating a new log file.
- Log Delete Interval The number of days to wait before deleting old log files.
Miscellaneous
Miscellaneous settings are for specific use cases.
- Other Settings Enables you to configure hidden connector settings in a semicolon-separated list (for example,
setting1=value1;setting2=value2). Normal connector use cases and functionality should not require the use of these settings.
Connector Configuration
Once you configure the global HL7 MLLP profile settings, create and configure individual HL7 MLLP connectors for each trading partner on the Flows page.
Settings Tab
Connector Settings
Settings related to the core operation of the connector.
- Connector Id The static, unique identifier for the connector.
- Connector Type Displays the connector name and a description of what it does.
- Connector Description An optional field to provide a free-form description of the connector and its role in the flow.
- Remote Host The hostname or IP address of your remote host.
- Port The port on which to listen for incoming MLLP connections.
- Version The version of MLLP being used.
- Connection Timeout The length of time (in seconds) the connector waits for a connection response before throwing a timeout error.
- Use SSL/TLS Whether to require incoming connections to use SSL/TLS encryption for transport security.
HL7 Configuration
Settings related to the message headers. When converting HL7 documents into XML, the document headers are validated against these settings; when generating HL7 documents from XML, these settings are used to generate document headers.
- Application Namespace Id (MSH5.1) In conjunction with the other 5.X elements, identifies the application on the remote side of the HL7 exchange.
- Application Universal Id (MSH5.2) In conjunction with the other 5.X elements, identifies the application on the remote side of the HL7 exchange.
- Application Universal Id Type (MSH5.3) In conjunction with the other 5.X elements, identifies the application on the remote side of the HL7 exchange.
- Facility Namespace Id (MSH6.1) In conjunction with the other 6.X elements, identifies the facility on the remote side of the HL7 exchange.
- Facility Universal Id (MSH6.2) In conjunction with the other 6.X elements, identifies the facility on the remote side of the HL7 exchange.
- Facility Universal Id Type (MSH6.3) In conjunction with the other 6.X elements, identifies the facility on the remote side of the HL7 exchange.
Acknowledgments
Settings related to generating and requesting acknowledgments.
- Acknowledgment Type Whether or not acknowledgments should be generated and requested.
Automation Tab
Automation Settings
Settings related to the automatic processing of files by the connector.
- Send Whether files arriving at the connector are automatically sent as HL7 or XML messages.
- Retry Interval The number of minutes before a failed send is retried. A retry is triggered when the server does not respond to a send attempt, or responds negatively to communicate that the file was not received.
- Max Attempts The maximum number of times the connector processes the input file. Success is based on a successful server acknowledgement and validation of the receipt (when requested synchronously). If you set this to 0, the connect retries the file indefinitely.
- Resend Interval The number of minutes before unacknowledged messages are resent. A resend is triggered when the server receives the file, but an asynchronous MDN receipt is not provided within the expected timeframe.
- Max Attempts (async) The maximum number of times the connector processes the input file when asynchronous receipts are requested. Success is based on the return of an asynchronous receipt within the Resend Interval after a successful server acknowledgement. If a successful server acknowledgement is not returned, Max Attempts is applied instead. If this is set to 0, the connector resends the file indefinitely.
Performance
Settings related to the allocation of resources to the connector.
- Max Workers The maximum number of worker threads consumed from the threadpool to process files on this connector. If set, this overrides the default setting on the Settings > Automation page.
- Max Files The maximum number of files sent by each thread assigned to the connector. If set, this overrides the default setting on the Settings > Automation page.
Alerts Tab
Settings related to configuring alerts and Service Level Agreements (SLAs).
Connector Email Settings
Before you can execute SLAs, you need to set up email alerts for notifications. Clicking Configure Alerts opens a new browser window to the Settings page where you can set up system-wide alerts. See Alerts for more information.
Service Level Agreement (SLA) Settings
SLAs enable you to configure the volume you expect connectors in your flow to send or receive, and to set the time frame in which you expect that volume to be met. CData Arc sends emails to warn the user when an SLA is not met, and marks the SLA as At Risk, which means that if the SLA is not met soon, it will be marked as Violated. This gives the user an opportunity to step in and determine the reasons the SLA is not being met, and to take appropriate actions. If the SLA is still not met at the end of the at-risk time period, the SLA is marked as violated, and the user is notified again.
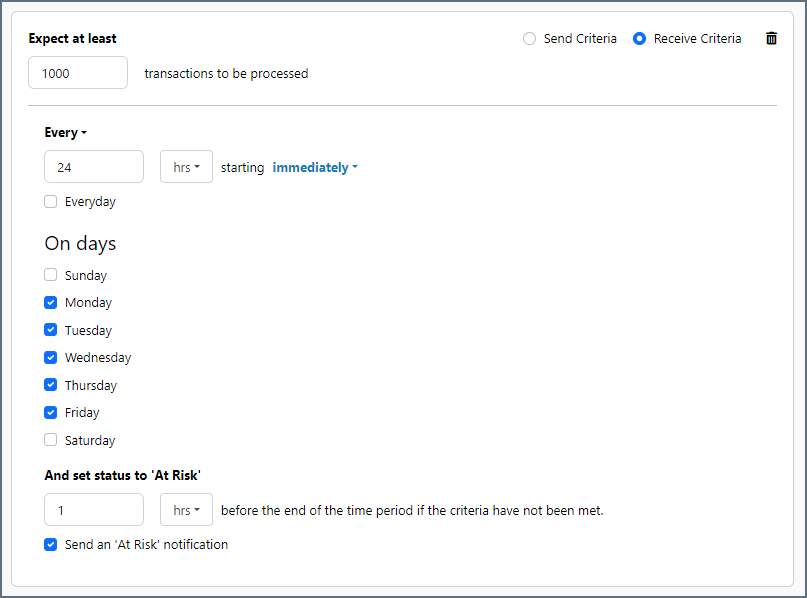
To define an SLA, click Add Expected Volume Criteria.
- If your connector has separate send and receive actions, use the radio buttons to specify which direction the SLA pertains to.
- Set Expect at least to the minimum number of transactions (the volume) you expect to be processed, then use the Every fields to specify the time frame.
- By default, the SLA is in effect every day. To change that, uncheck Everyday then check the boxes for the days of the week you want.
- Use And set status to ‘At Risk’ to indicate when the SLA should be marked as at risk.
- By default, notifications are not sent until an SLA is in violation. To change that, check Send an ‘At Risk’ notification.
The following example shows an SLA configured for a connector that expects to receive 1000 files every day Monday-Friday. An at-risk notification is sent 1 hour before the end of the time period if the 1000 files have not been received.
Advanced Tab
EDI Delimiters
Settings that specify which characters separate elements, segments, and so on.
- Data Element Separator The character that separates individual data elements in the document.
- Component Element Separator The character that separates elements within a composite data structure in the document.
- Segment Terminator The character that indicates the end of a segment in the document.
- Release Char The character that releases (escapes) the next character, overriding its usual meaning. This allows reserved characters to appear as data within documents, as long as they are preceded by the Release Char.
- Repetition Char The character that indicates repetition of element values.
- Suffix Appended to the Segment Terminator to distinguish segments.
Proxy Settings
These are a collection of settings that identify and authenticate to the proxy through which the HL7 MLLP connection should be routed. By default, this section uses the global settings on the Settings Page. Clear the checkbox to supply settings specific to your connector.
- Proxy Type The protocol used by a proxy-based firewall.
- Proxy Host The name or IP address of a proxy-based firewall.
- Proxy Port The TCP port for a proxy-based firewall.
- Proxy User The user name to use to authenticate with a proxy-based firewall.
- Proxy Password A password used to authenticate to a proxy-based firewall.
- Authentication Scheme Leave the default None or choose from one of the following authentication schemes: Basic, Digest, Proprietary, or NTLM.
Advanced Settings
Settings not included in the previous categories.
- Generate Description As When translating HL7 into XML, descriptions of the HL7 segments and elements can be provided as context for the HL7 data. Use this dropdown to choose whether to add this context as an XML comment or as XML attributes.
- Processing Delay The amount of time (in seconds) by which the processing of files placed in the Input folder is delayed. This is a legacy setting. Best practice is to use a File connector to manage local file systems instead of this setting.
- Strict Schema Validation Whether the connector should Ignore, Warn, or Fail when the following are detected: repeat counts above the allowed number, missing required elements or segments, invalid qualifier and code values, disallowed element lengths, and invalid element values.
- Local File Scheme A scheme for assigning filenames to messages that are output by the connector. You can use macros in your filenames dynamically to include information such as identifiers and timestamps. For more information, see Macros.
- TLS Enabled Protocols The list of TLS/SSL protocols supported when establishing outgoing connections. Best practice is to only use TLS protocols. Some obsolete operating systems do not support TLS 1.2.
- Validate Identifiers When checked, the connector ensures that the identifiers in the translated document match the identifiers specified in the connector configuration.
Message
- Save to Sent Folder Check this to copy files processed by the connector to the Sent folder for the connector.
- Sent Folder Scheme Instructs the connector to group messages in the Sent folder according to the selected interval. For example, the Weekly option instructs the connector to create a new subfolder each week and store all messages for the week in that folder. The blank setting tells the connector to save all messages directly in the Sent folder. For connectors that process many messages, using subfolders helps keep messsages organized and improves performance.
Logging
- Log Level The verbosity of logs generated by the connector. When you request support, set this to Debug.
- Log Subfolder Scheme Instructs the connector to group files in the Logs folder according to the selected interval. For example, the Weekly option instructs the connector to create a new subfolder each week and store all logs for the week in that folder. The blank setting tells the connector to save all logs directly in the Logs folder. For connectors that process many transactions, using subfolders helps keep logs organized and improves performance.
- Log Messages Check this to have the log entry for a processed file include a copy of the file itself. If you disable this, you might not be able to download a copy of the file from the Input or Output tabs.
Miscellaneous
Miscellaneous settings are for specific use cases.
- Other Settings Enables you to configure hidden connector settings in a semicolon-separated list (for example,
setting1=value1;setting2=value2). Normal connector use cases and functionality should not require the use of these settings.
Generating HL7 Documents
When generating HL7 files from XML, the connector applies transaction headers based on the HL7 Personal Ids on the HL7 MLLP Profile tab, and the HL7 Configuration in the connector. The remaining data comes from XML input files. See Use with the XML Map Connector for more information on generating the appropriate XML input files.
Files that arrive in the Input tab for the connector are packaged into HL7 documents and sent out over MLLP. Files can arrive in the Input tab either by dropping the file directly into the folder path on disk, or by connecting another Arc connector to the HL7 MLLP connector in the flow.
HL7 to XML
When converting HL7 documents into XML, the application verifies the interchange headings from the inbound document against the HL7 Personal Ids on the HL7 MLLP Profile tab, and the HL7 Configuration in the connector. The XML generated from the HL7 document is placed in the Output tab to be passed along in the flow for further processing. See Use with the XML Map Connector for more information on processing the translated XML.
Use With the XML Map Connector
In accordance with the typical Arc convention, the HL7 MLLP connector expects XML input and generates XML output. To ensure that these input and output files have the correct XML structure, CData strongly recommends that you use the XML Map connector as the previous step in the flow when generating outbound HL7 documents, or as the following step in the flow when receiving inbound HL7 documents.
The interaction between the XML Map connector and the HL7 MLLP connector is made simple by the Upload Test File feature. This feature is on the HL7 MLLP connector’s Input tab, under the More dropdown. Select this, then navigate to an HL7 file on disk that represents the structure of HL7 documents that the connector should process. The connector models the sample document as XML internally, and the XML Map connector can detect this XML model.
When an XML Map connector is connected to an HL7 MLLP connector in the flow, it detects any XML models generated from the Upload Test File feature. These models are made available as Source Template or Destination Template files in the XML Map connector (depending on where the XML Map connector is in the flow). These auto-detected templates are used to easily map data to or from the HL7 structure.
Note: XML Map connectors require both a source and destination template, so the remaining template must be set based on the structure the data originates from, or the structure it should be converted to. For example, if the data from the HL7 document needs to be inserted into a database, the other template in the XML Map connector would be the XML model of a database insert. See the XML Map connector’s Using the Mapping Editor for more information on creating the mapping between two template files.
Macros
Using macros in file naming strategies can enhance organizational efficiency and contextual understanding of data. By incorporating macros into filenames, you can dynamically include relevant information such as identifiers, timestamps, and header information, providing valuable context to each file. This helps ensure that filenames reflect details important to your organization.
CData Arc supports these macros, which all use the following syntax: %Macro%.
| Macro | Description |
|---|---|
| ConnectorID | Evaluates to the ConnectorID of the connector. |
| Ext | Evaluates to the file extension of the file currently being processed by the connector. |
| Filename | Evaluates to the filename (extension included) of the file currently being processed by the connector. |
| FilenameNoExt | Evaluates to the filename (without the extension) of the file currently being processed by the connector. |
| MessageId | Evaluates to the MessageId of the message being output by the connector. |
| RegexFilename:pattern | Applies a RegEx pattern to the filename of the file currently being processed by the connector. |
| Header:headername | Evaluates to the value of a targeted header (headername) on the current message being processed by the connector. |
| LongDate | Evaluates to the current datetime of the system in long-handed format (for example, Wednesday, January 24, 2024). |
| ShortDate | Evaluates to the current datetime of the system in a yyyy-MM-dd format (for example, 2024-01-24). |
| DateFormat:format | Evaluates to the current datetime of the system in the specified format (format). See Sample Date Formats for the available datetime formats |
| Vault:vaultitem | Evaluates to the value of the specified vault item. |
Examples
Some macros, such as %Ext% and %ShortDate%, do not require an argument, but others do. All macros that take an argument use the following syntax: %Macro:argument%
Here are some examples of the macros that take an argument:
- %Header:headername%: Where
headernameis the name of a header on a message. - %Header:mycustomheader% resolves to the value of the
mycustomheaderheader set on the input message. - %Header:ponum% resolves to the value of the
ponumheader set on the input message. - %RegexFilename:pattern%: Where
patternis a regex pattern. For example,%RegexFilename:^([\w][A-Za-z]+)%matches and resolves to the first word in the filename and is case insensitive (test_file.xmlresolves totest). - %Vault:vaultitem%: Where
vaultitemis the name of an item in the vault. For example,%Vault:companyname%resolves to the value of thecompanynameitem stored in the vault. - %DateFormat:format%: Where
formatis an accepted date format (see Sample Date Formats for details). For example,%DateFormat:yyyy-MM-dd-HH-mm-ss-fff%resolves to the date and timestamp on the file.
You can also create more sophisticated macros, as shown in the following examples:
- Combining multiple macros in one filename:
%DateFormat:yyyy-MM-dd-HH-mm-ss-fff%%EXT% - Including text outside of the macro:
MyFile_%DateFormat:yyyy-MM-dd-HH-mm-ss-fff% - Including text within the macro:
%DateFormat:'DateProcessed-'yyyy-MM-dd_'TimeProcessed-'HH-mm-ss%