REST Connector
Version 23.4.8839
Version 23.4.8839
REST Connector
REST connectors support building dynamic REST requests to consume RESTful API web services.
Overview
REST connectors expose a simple interface to build the headers, authorization, body, and HTTP method for a REST request. The request body can be set statically in the connector configuration or dynamically generated based on the files processed by the connector.
Connector Settings
Settings Tab
Configuration
Settings related to the core configuration of the connector.
- Connector Id The static, unique identifier for the connector.
- Connector Type Displays the connector name and a description of what it does.
- Connector Description An optional field to provide a free-form description of the connector and its role in the flow.
- Method & URL The HTTP method and target HTTP URL for the REST request. The method options are: GET, POST, PUT, PATCH, and DELETE.
Authentication
Settings related to authenticating with the REST service.
- Authentication Type The type of authentication to use with the REST service. Options vary based on your selection. See the Authenticating section for details.
Header
The Header section supports adding a list of HTTP headers to include in the outgoing REST request. Headers are specified as name-value pairs. You can use this section to specify the content-type of the message body when the Body Type is set to raw. See Static Requests for more information.
Body
Settings related to generating the body of the REST request. Not applicable when the HTTP method is set to GET.
- Body Type The type of body content supplied with the REST request. See Body Types for an explanation of each type.
TLS Server Authentication
Settings related to verifying the TLS server’s identity.
- TLS Server Certificate The public key certificate used to verify the identity of a TLS server. You can upload a certificate, leave the field blank to allow the underlying OS/JVM to perform certificate validation, or set it to
Any Certificateto trust the target server’s identity. Use Any Certificate with caution: the certificate verifies that you are connecting to the intended server.
Automation Tab
Automation Settings
Settings related to the automatic processing of files by the connector.
- Send A toggle that instructs the connector to automatically send files when they are ready.
- Retry Interval The interval the connector waits before retrying a failed send.
- Max Attempts The number of attempts the connector makes to send the message. Setting this value to 1 instructs the connector to only make the initial send attempt without retrying. The connector waits the duration specified by Retry Interval between each attempt.
- Receive A toggle that instructs the connector to automatically process files when they are ready and send them to the Output tab.
- Receive Interval The interval at which the connector processes all pending files and sends them to the Output tab. The next field depends on the selection here:
Hourly — A Minutes Past the Hour dropdown menu allows you to specify the number of minutes past the hour to process receive files.
Daily — A Time field appears to specify the time of day (in UTC) to process receive files.
Weekly — Two fields appear. Day allows you to select the day of the week for processing, and Time allows you to specify the time (in UTC) to process receive files.
Monthly — Two fields appear. Day allows you to select the day of the month for processing, and Time allows you to specify the time (in UTC) to process receive files.
Minute — A Minutes field appears to specify the number of minutes between processing intervals.
Advanced — A five-position Cron Expression field allows you to specify exact processing intervals. Highlight the field in the connector for more information about these expressions. - Minutes Past the Hour The minutes offset for an hourly schedule. Only applicable when Receive Interval is set to Hourly. For example, if this value is set to 5, the automation service sends requests at 1:05, 2:05, 3:05, etc.
Performance
Settings related to the allocation of resources to the connector.
- Max Workers The maximum number of worker threads consumed from the threadpool to process files on this connector. If set, this overrides the default setting on the Settings > Automation page.
- Max Files The maximum number of files sent by each thread assigned to the connector. If set, this overrides the default setting on the Settings > Automation page.
Alerts Tab
Settings related to configuring alerts and Service Level Agreements (SLAs).
Connector Email Settings
Before you can execute SLAs, you need to set up email alerts for notifications. Clicking Configure Alerts opens a new browser window to the Settings page where you can set up system-wide alerts. See Alerts for more information.
Service Level Agreement (SLA) Settings
SLAs enable you to configure the volume you expect connectors in your flow to send or receive, and to set the time frame in which you expect that volume to be met. CData Arc sends emails to warn the user when an SLA is not met, and marks the SLA as At Risk, which means that if the SLA is not met soon, it will be marked as Violated. This gives the user an opportunity to step in and determine the reasons the SLA is not being met, and to take appropriate actions. If the SLA is still not met at the end of the at-risk time period, the SLA is marked as violated, and the user is notified again.
To define an SLA, click Add Expected Volume Criteria.
- If your connector has separate send and receive actions, use the radio buttons to specify which direction the SLA pertains to.
- Set Expect at least to the minimum number of transactions (the volume) you expect to be processed, then use the Every fields to specify the time frame.
- By default, the SLA is in effect every day. To change that, uncheck Everyday then check the boxes for the days of the week you want.
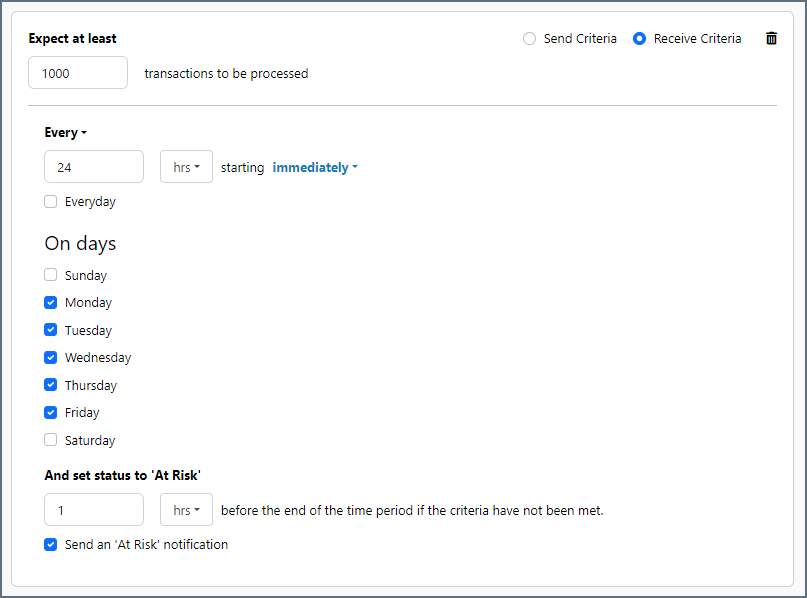
- Use And set status to ‘At Risk’ to indicate when the SLA should be marked as at risk.
- By default, notifications are not sent until an SLA is in violation. To change that, check Send an ‘At Risk’ notification.
The following example shows an SLA configured for a connector that expects to receive 1000 files every day Monday-Friday. An at-risk notification is sent 1 hour before the end of the time period if the 1000 files have not been received.
Advanced Tab
TLS Client Authentication
Settings related to client authentication when two-way TLS authentication is required.
- Private Certificate The private certificate presented during TLS client authentication.
- Certificate Password The password required to access the TLS client certificate.
Proxy Settings
Settings for using a proxy with the connector.
- Use Global A toggle that instructs the connector to use the proxy settings configured under the Settings tab of Arc.
- Proxy Type The type of proxy to use. Select None to not use a proxy. Otherwise, select Tunnel, SOCKS4, SOCKS5, or HTTP.
- Proxy Host The proxy server. Formatting depends on the Proxy Type selected.
- Proxy Port The port to use when connecting to the proxy.
- Proxy User The username to use when connecting to the proxy.
- Proxy Password The password for the associated username.
- Authentication Scheme The protocol to use when connecting to the proxy. Options include Basic, Digest, Proprietary, and NTLM.
Advanced Settings
Settings not included in the previous categories.
- ArcScript in Headers Allows for the evaluation of ArcScript expressions in the headers before the query is issued. See the URL section for examples.
- ArcScript in URL Allows for the evaluation of ArcScript expressions in the URL before the query is issued. See the Header section for examples.
- Output Error Responses By default, the connector does not output a message to the flow when the response is sent with a status code that does not indicate success. Enable this setting to have the connector output a message to the flow for these error responses. You can use the HTTP-Status-Code header to filter messages later in the flow.
- Chunked Encoding Whether to use HTTP Chunked Transfer Encoding when sending requests. This allows the application to send portions (chunks) of the message sequentially to avoid overloading the connection.
- Chunk Size The size, in bytes, of each chunk when Chunked Encoding is enabled.
- GET Request Body Allows GET requests to use the input message data as the body of the request.
- HTTP Version Whether to use HTTP 1.0, 1.1, or 2.0 when connecting to the REST service.
- Output Behavior By default, the connector outputs a message containing the
Responsedata. The other options allow you to output theInput Messageso it can be processed further, or to not output a message at all. - Processing Delay The amount of time (in seconds) by which the processing of files placed in the Input folder is delayed. This is a legacy setting. Best practice is to use a File connector to manage local file systems instead of this setting.
- Timeout The duration in seconds to wait for a response from the REST server before throwing a timeout error.
- Response Headers When set, the connector promotes the specified headers from the REST message as metadata on the downloaded message. You can specify multiple headers in a comma-separated list.
- Local File Scheme A scheme for assigning filenames to messages that are output by the connector. You can use macros in your filenames dynamically to include information such as identifiers and timestamps. For more information, see Macros.
- TLS Enabled Protocols The list of TLS/SSL protocols supported when establishing outgoing connections. Best practice is to only use TLS protocols. Some obsolete operating systems do not support TLS 1.2.
Message
Message settings determine how the connector searches for messages and manages them after processing. You can save messages to your Sent folder or you can group them based on a Sent folder scheme, as described below.
- Save to Sent Folder A toggle that instructs the connector to keep a copy of sent messages in the Sent folder.
- Sent Folder Scheme Instructs the connector to group files in the Sent folder according to the selected interval. For example, the Weekly option instructs the connector to create a new subfolder each week and store all sent files for the week in that folder. The blank setting instructs the connector to save all files directly in the Sent folder. For connectors that process many transactions, using subfolders can help keep files organized and improve performance.
Logging
- Log Level The verbosity of logs generated by the connector. When you request support, set this to Debug.
- Log Subfolder Scheme Instructs the connector to group files in the Logs folder according to the selected interval. For example, the Weekly option instructs the connector to create a new subfolder each week and store all logs for the week in that folder. The blank setting tells the connector to save all logs directly in the Logs folder. For connectors that process many transactions, using subfolders helps keep logs organized and improves performance.
- Log Messages Check this to have the log entry for a processed file include a copy of the file itself. If you disable this, you might not be able to download a copy of the file from the Input or Output tabs.
Miscellaneous
Miscellaneous settings are for specific use cases.
- Other Settings Enables you to configure hidden connector settings in a semicolon-separated list (for example,
setting1=value1;setting2=value2). Normal connector use cases and functionality should not require the use of these settings.
Establishing a Connection
A valid target URL is required to establish a connection to any REST service. The service URL can support various HTTP methods, and you should configure the Method based on the particular web service action or data set to retrieve. Some services might also require authentication or a set of custom headers in order to consume the service.
If the target URL is an HTTPS URL, set the TLS Server Certificate to the public key certificate identifying the server. To implicitly trust the target endpoint, set the field to Any Certificate.
Authenticating
The REST connector supports a number of authentication types, and each type has its own requirements:
-
Basic (plain text), Digest (encrypted), and NTLM require username-password authentication. These credentials are supplied to the REST service as headers in the request.
-
OAuth authentication requires an app registration in the REST service’s web portal or development console. The Callback URL to include in the app registration is shown in the Arc UI. Choose the Grant Type that applies to the REST service, and specify the remaining settings from the details shown in the REST service’s web portal or development console. Then click Get New Access Token to obtain the necessary tokens to interact with the service. Once the initial tokens have been retrieved, the application refreshes the tokens as they approach expiration.
-
Bearer Token authentication requires a token from the service’s web portal or development console.
-
AWS Signature authentication, for authenticating against Amazon, requires configuration credentials provided by Amazon: Access Key, Secret Key, and so forth.
Body Types
Use the connector Settings tab to specify how the body is configured, and what type of information is supplied. The following list describes each option in more detail.
- none: No body is supplied with the REST request.
- form-data: The body is supplied as a set of name-value pairs (fields). Use the dropdown list next to Name to select the field type.
- Static: Supply both the Name and the Value.
- XML: Supply the Name in the UI. The Value is dynamically read from the input file processed by the connector. For more information, see Dynamic Form Data.
- File: Each connector can have one body field set to File. This causes the input file to be sent in the body of the request. The Value field is greyed out since the connector uses the input file itself as the form data.
Note: The File option is incompatible with dynamic requests and other file requests. If you use this option, you can only combine it with static fields. - Header: Use the Value field to specify which header from the input message to read from for the body.
- ArcScript: The Value supplied is rendered as ArcScript, and the resulting value is used in the request body.
- x-www-urlencoded: The body is configured in the same way as form-data; however, the name-value pairs are encoded as a URL query string instead of multipart form data.
- raw: The body is set to the contents of the input file processed by the connector. Select the Content Type of the body using the dropdown, or by specifying it as a custom header in the Header section.
Static Requests
REST requests that have entirely static content (such as requests that use the HTTP GET method) do not require an input file, since the request content is configured entirely in the connector UI. Simply add any necessary name-value pairs as custom headers in the Header section or form data in the Body section.
Static requests can be automatically sent according to a schedule if Receive Automation is enabled. The response to each request is stored in the output folder or passed along to the next connector in the flow.
If Send Automation is enabled, files arriving at the connector input folder also trigger a static request. The content of the input file is ignored, and the request is sent according to the configuration in the UI.
Dynamic Requests
REST requests can be dynamically populated with data from files that arrive in the connector input folder.
Raw Input Data
If you set the Body Type of the request to raw, the content of input files are sent as the body of the REST request.
Use the Content Type dropdown to set the specific content type of the data. If the content type you need is not listed, you can add a Content-Type header in the Header section.
Dynamic Form Data
If you set the Body Type of the request to form-data or x-www-urlencoded, the connector looks for specific values from the input file to populate the request. For each name-value pair that is set to XML, the connector scans input files for an XML element that shares the same name as the field name, and that uses a specific XML structure, as shown below:
<Items>
  <FormData>
    <FieldName></FieldName>
  </FormData>
</Items>
To fit this structure, CData strongly recommends that you use an XML Map connector prior to the REST connector in the flow, as described below.
When the connector finds an element that matches the field name and required XML structure, the value in this element is used as the value in the name-value pair. For example, if the body has a dynamic field with the name CustomerID, and the input file has the XML shown below, the REST connector sets the value of the CustomerID field to 12354.
<Items>
  <FormData>
    <CustomerID>12354</CustomerID>
  </FormData>
</Items>
Dynamic Templates with XML Map
Use the XML Map connector in conjunction with the REST connector to easily build dynamic requests out of other XML data structures. The XML Map connector converts custom XML structures into the XML structure that the REST connector expects.
First, configure the REST connector with the set of dynamic (and static) Body fields that should be present in the request. Next, connect an XML Map connector to the REST connector in the Arc flow and save the flow changes. This allows the XML Map connector to detect which fields the REST connector expects in incoming input files.
Then, inside the XML Map connector, the Destination File dropdown includes the REST request schema. Select this as the Destination, and set the Source File to a custom XML structure. This populates the XML Map Mapping Editor, and you can drag and drop the data that needs to be included in the REST request from the source structure into the destination structure. Once the mapping is complete, the XML Map connector automatically converts files that match the source file into a valid REST request structure.
For more information on using the XML Map connector, please see the XML Map connector documentation.
URL
If you select Allow ArcScript in URL on the Advanced tab of the connector configuration pane, expressions in ArcScript can be evaluated to generate dynamic strings as URLs. For example, the following URL includes the date and time:
http://myendpoint.com/api?day=[_ | now('yyyyMMdd')]
The URL below includes a header on the incoming message for queries triggered through send automation:
http://myendpoint.com/api?customer=[_message.header:customerid]
Headers
If you select Allow ArcScript in Headers on the Advanced tab of the connector configuration pane, expressions in ArcScript can be evaluated to generate dynamic strings as header values. For example, the following header contains the date and time:
Timestamp [_ | now('yyyyMMdd')]
The header below contains a customer Id for queries triggered through send automation:
Customer [_message.header:customerid]
Macros
Using macros in file naming strategies can enhance organizational efficiency and contextual understanding of data. By incorporating macros into filenames, you can dynamically include relevant information such as identifiers, timestamps, and header information, providing valuable context to each file. This helps ensure that filenames reflect details important to your organization.
CData Arc supports these macros, which all use the following syntax: %Macro%.
| Macro | Description |
|---|---|
| ConnectorID | Evaluates to the ConnectorID of the connector. |
| Ext | Evaluates to the file extension of the file currently being processed by the connector. |
| Filename | Evaluates to the filename (extension included) of the file currently being processed by the connector. |
| FilenameNoExt | Evaluates to the filename (without the extension) of the file currently being processed by the connector. |
| MessageId | Evaluates to the MessageId of the message being output by the connector. |
| RegexFilename:pattern | Applies a RegEx pattern to the filename of the file currently being processed by the connector. |
| Header:headername | Evaluates to the value of a targeted header (headername) on the current message being processed by the connector. |
| LongDate | Evaluates to the current datetime of the system in long-handed format (for example, Wednesday, January 24, 2024). |
| ShortDate | Evaluates to the current datetime of the system in a yyyy-MM-dd format (for example, 2024-01-24). |
| DateFormat:format | Evaluates to the current datetime of the system in the specified format (format). See Sample Date Formats for the available datetime formats |
| Vault:vaultitem | Evaluates to the value of the specified vault item. |
Examples
Some macros, such as %Ext% and %ShortDate%, do not require an argument, but others do. All macros that take an argument use the following syntax: %Macro:argument%
Here are some examples of the macros that take an argument:
- %Header:headername%: Where
headernameis the name of a header on a message. - %Header:mycustomheader% resolves to the value of the
mycustomheaderheader set on the input message. - %Header:ponum% resolves to the value of the
ponumheader set on the input message. - %RegexFilename:pattern%: Where
patternis a regex pattern. For example,%RegexFilename:^([\w][A-Za-z]+)%matches and resolves to the first word in the filename and is case insensitive (test_file.xmlresolves totest). - %Vault:vaultitem%: Where
vaultitemis the name of an item in the vault. For example,%Vault:companyname%resolves to the value of thecompanynameitem stored in the vault. - %DateFormat:format%: Where
formatis an accepted date format (see Sample Date Formats for details). For example,%DateFormat:yyyy-MM-dd-HH-mm-ss-fff%resolves to the date and timestamp on the file.
You can also create more sophisticated macros, as shown in the following examples:
- Combining multiple macros in one filename:
%DateFormat:yyyy-MM-dd-HH-mm-ss-fff%%EXT% - Including text outside of the macro:
MyFile_%DateFormat:yyyy-MM-dd-HH-mm-ss-fff% - Including text within the macro:
%DateFormat:'DateProcessed-'yyyy-MM-dd_'TimeProcessed-'HH-mm-ss%