Configure an OFTP Connection
Version 23.4.8839
Version 23.4.8839
Configure an OFTP Connection
Overview
CData Arc supports establishing an OFTP connection with a trading partner in a simple two-step process. First, the OFTP Profile should be configured with local OFTP details (identifier, private certificates, etc); then, an OFTP Connector is configured in the Flows page with the OFTP details for a specific trading partner.
The OFTP protocol supports message routing and clearing-house servers, which can cause confusion when establishing a new connection. The SSID and SFID section at the end of this article helps explain message routing, SSIDs, SFIDs, and how these concepts are captured in Arc.
OFTP Profile Configuration
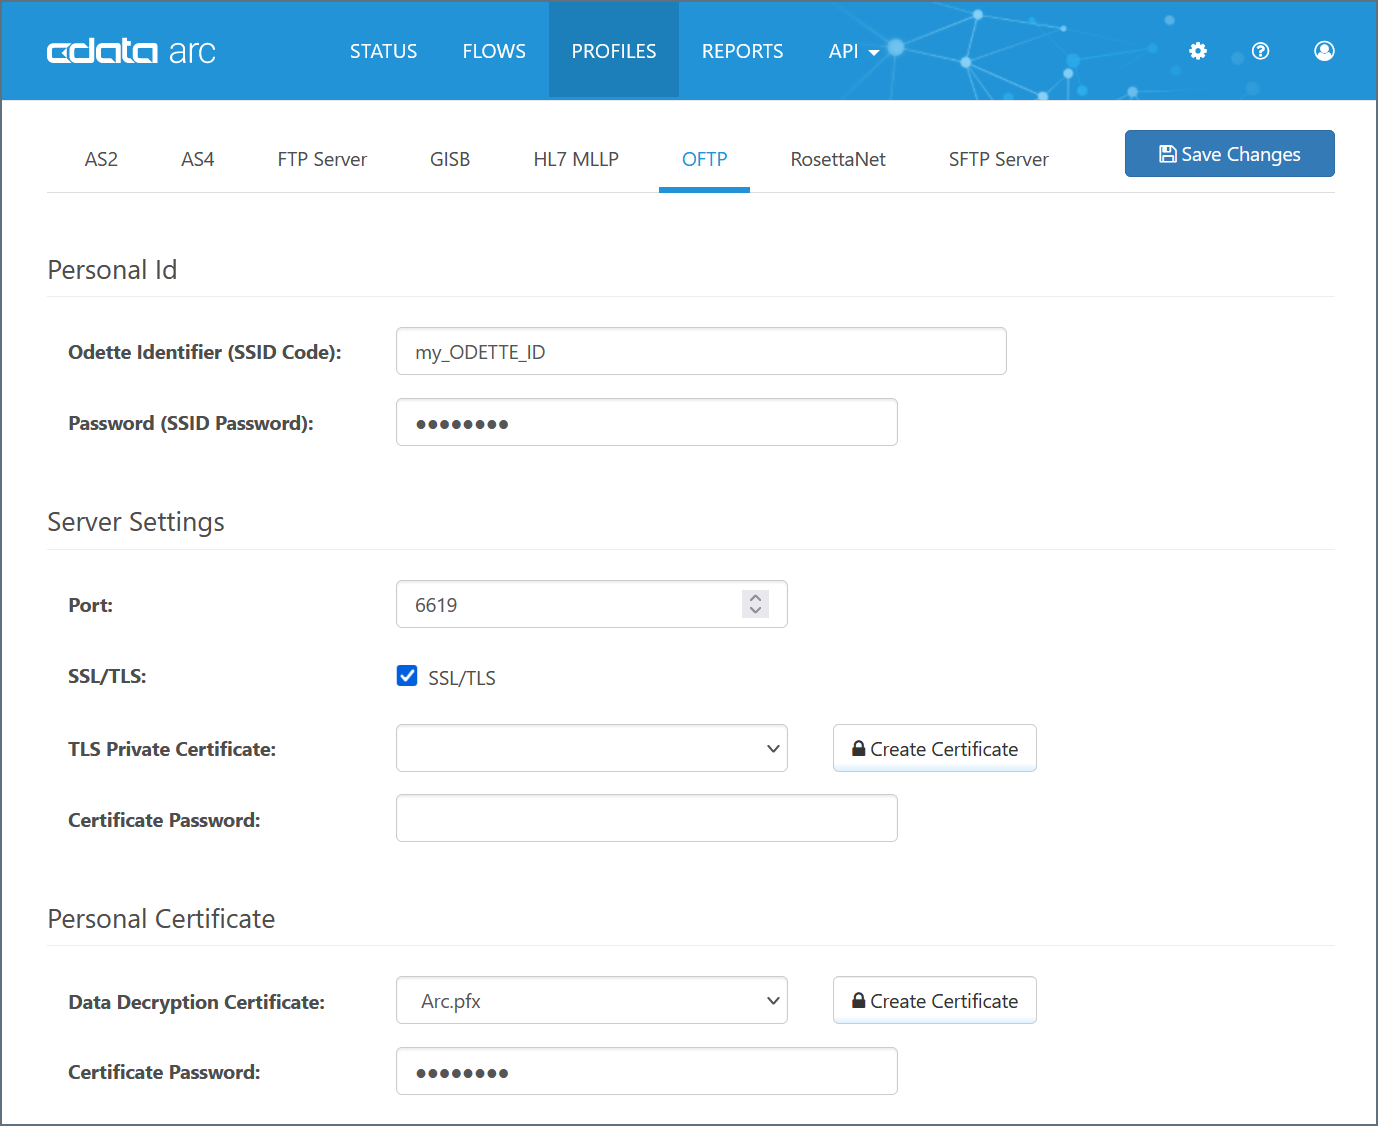
The Profile page contains an OFTP Profile tab where local OFTP details are configured. The primary configuration details are:
- ODETTE Identifier (the value provided by ODETTE that identifies you as an OFTP entity)
- Password (the password associated with your identifier; this is an arbitrary value that you provide to trading partners)
- Private Certificate (the certificate that is used to decrypt incoming messages and sign outgoing messages)
These values (explained in detail below) should be set in the OFTP Profile:
ODETTE Identifier
Your ODETTE identifier is assigned by ODETTE and identifies you as an OFTP entity. It is included in outgoing OFTP messages and identifies you as the sender, and incoming OFTP messages must be addressed to this identifier to be accepted by the application.
Note: OFTP uses two different values in conjunction to identify the recipient of a message: SSID and SFID. Sometimes these are the same value, and sometimes they are not, which may cause confusion. SSIDs and SFIDs (and how they relate to the settings in the application) are explained in detail in the SSID and SFID section.
Password
Unlike the Identifier, the password is an arbitrary value that you must agree upon with your trading partners (in other words, you can make up this value so long as you send tit to your partners such that they “agree” on what your password should be).
The password value must be known by both the sender and receiver in order to successfully send and receive an OFTP message.
Personal Certificate
Your personal certificate is used for digital cryptography (decryption, digital signatures). The personal certificate contains a private key that is paired with your public encryption key; when a trading partner uses your public encryption key to secure an OFTP message, it ensures that only you can decrypt the message (with the paired private key).
Arc supports private certificates in PKCS#12 format (.pfx or .p12 files), and PEM-encoded public key certificates (.cer files).
Arc includes a test pair of private and public key certificates (‘Arc.pfx’ and ‘Arc.cer’) that can be used to test the cryptographic aspects of OFTP (encryption, signatures) without needing to procure an external certificate pair. These certificates should not be used in live production transactions with a trading partner.
Creating a New Certificate Pair
If you do not already have a private/public key pair to use for OFTP security, Arc supports creating a self-signed certificate. Self-signed certificates are common in the OFTP space, but some partners may require purchasing a certificate from a trusted Certificate Authority (CA).
To create a new certificate pair, click the Create Certificate button to open the certificate creation wizard:
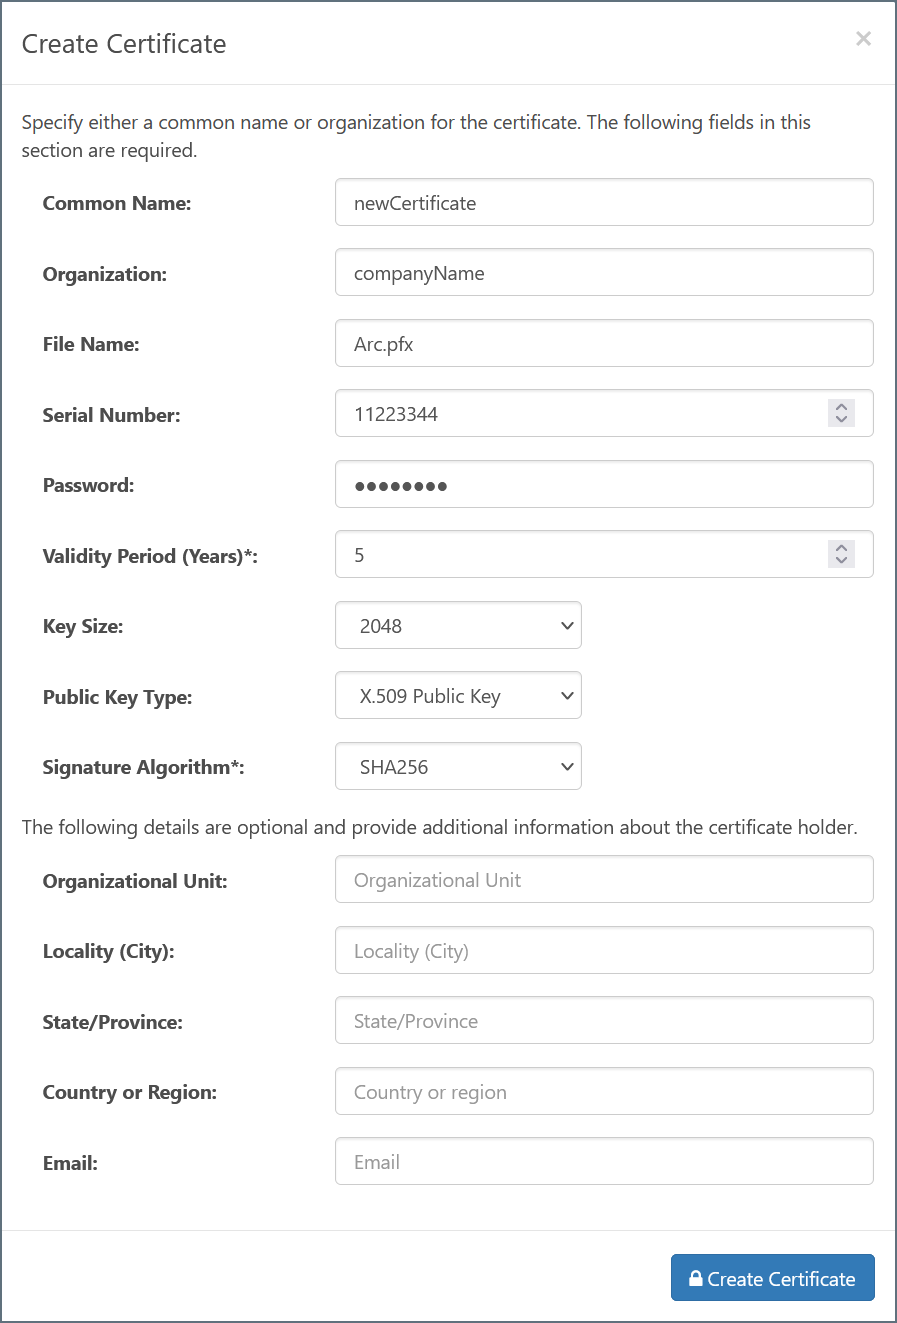
Within this wizard, configure the following required fields:
- Common Name - The hostname of the server using the certificate; used in conjunction with the serial number to identify the certificate
- Organization - The company or group to which the certificate belongs
- File Name - The name of the certificate file (with .pfx extension); the corresponding public key certificate will have the same name with a .cer extension
- Serial Number - A unique serial number that is used in conjunction with the common name to identify the certificate
- Password - The password required to access the private key
- Validity Period - Determines the expiration date of the certificate
- Key Size - Whether to create a 512, 1024, or 2048-bit key
- Signature Algorithm - The algorithm to use when applying a digital signature to the certificate, verifying its authenticity
The remaining fields can optionally be configured to provide further context and metadata to the certificate.
Once created, the new certificate files are placed in the ‘data’ directory for the application. When certificate files reside in the ‘data’ directory, then are included in the dropdown menu for any Certificate-type settings in the application.
Server Settings
The Server Settings section of the OFTP Profile tab defines the core parameters of the OFTP server that will listen for inbound messages. The Port field is the port on which inbound OFTP connections will be accepted, and the Use TLS setting determines whether these inbound connections must be encrypted with SSL/TLS security. If TLS is enabled, an SSL/TLS certificate must be set to identify the server. Note that this is not the same as the Personal Certificate field above, which is used for decrypting OFTP messages after they have been received over the connection channel.
Logging
Enabling server-side logging can be helpful for debugging OFTP connection issues. When debugging, it is recommended to set the Log Level to Debug. Logs can be configured to rotate (i.e. compressed and moved to an archive location) or be deleted according to the desired interval.
OFTP Connector Configuration
After the OFTP Profile is configured, navigate to the Flows page and create an instance of the OFTP Connector.
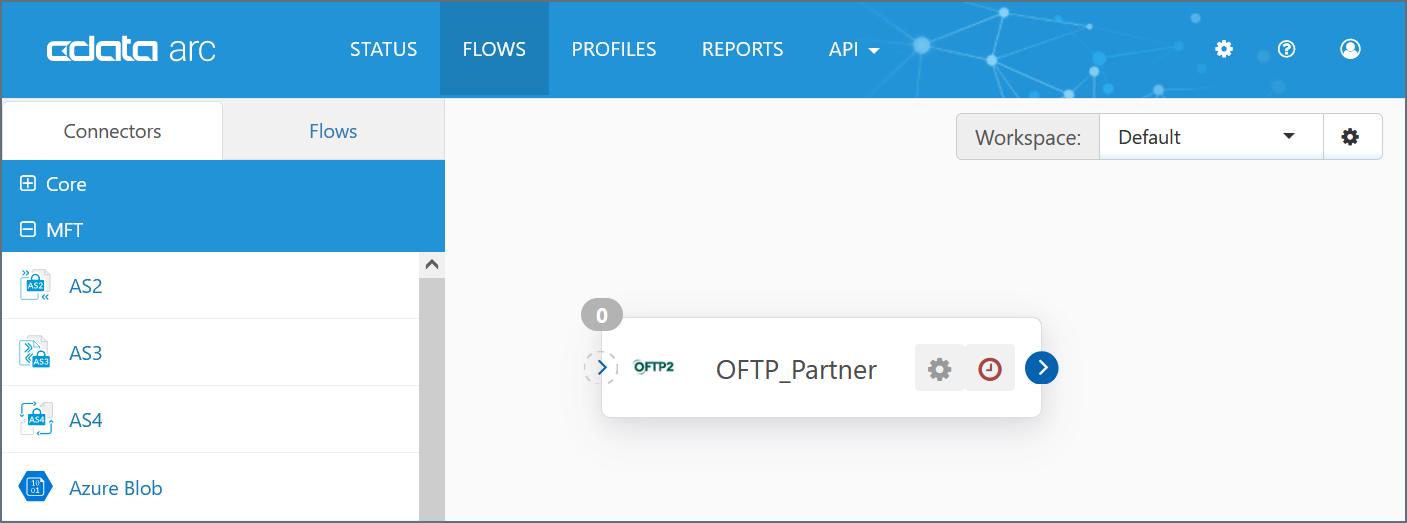
Typically, each OFTP Connector is configured with the OFTP details for a single trading partner; however, sometimes a partner may require two OFTP connectors. The details for when two connectors may be required, and how the configuration differs between the two, are explained in the SSID and SFID section.
Required Configuration Settings
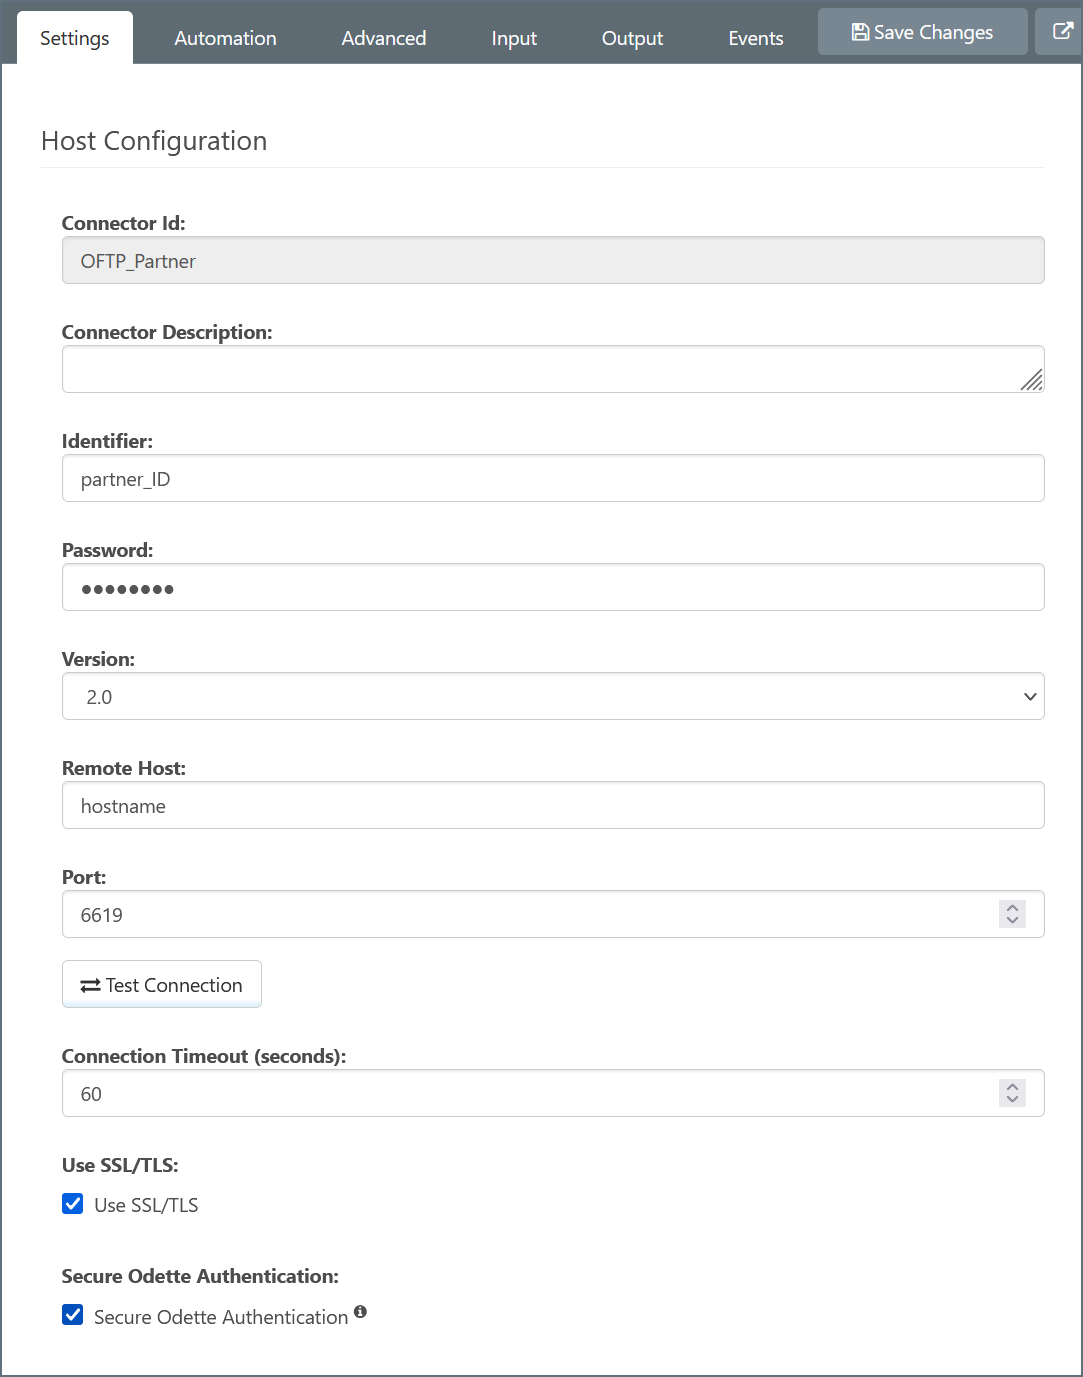
OFTP configuration details must be solicited from the trading partner. At a minimum, the details that the trading partner provides must include:
- ODETTE identifier
- Password
- Hostname/IP Address where outgoing OFTP messages should be sent
- Port where the remote host is listening
- Public certificate/key for encryption
Configure these values under the Host Configuration and Trading Partner Certificates of the OFTP Connector:
Identifiers: SSID vs SFID
The OFTP protocol uses Identifiers in two different ways (SSID and SFID), which may pose a challenge when configuring the appropriate Identifier in the OFTP Connector. To better understand these values and which should be configured in the connector, please see the SSID and SFID section.
Additional Configuration Settings
Partners may additionally include further requirements:
- SSL/TLS and an additional TLS Server Certificate (if not specified, assume not required)
- Secure ODETTE Authentication (if not specified, assume required)
- Virtual File Format (if not specified, assume unstructured)
Testing the OFTP Connection
Once the OFTP Connector for a trading partner is configured, the connector supports generating dummy documents to test the outgoing connection. Navigate to the OFTP Connector’s Input tab, expand the ‘More’ dropdown, and select ‘Create Test Files’.
Unless Send Automation is disabled in the Automation tab, the connector will automatically attempt to process these test files. Any errors that occur when sending the test files to the configured partner are reported in the Input tab, including a log file with context and details on the error. The Log Level field in the Advanced tab can be set to Debug to further diagnose any connection issues.
Successfully processed files will be shown with a green ‘Sent’ status in the Input tab. Successfully sending test files establishes that the OFTP configuration is correct.
Providing OFTP Details to Trading Partners
In the same way that trading partners must provide OFTP configuration details in order to configure an OFTP Connector for that partner, you are responsible for providing OFTP configuration details to your partners.
At a minimum, you must provide your partner with:
- Your ODETTE identifier
- Your password
- Your public key/encryption certificate
- Your receiving hostname/IP and port
Sending OFTP Messages
Once an OFTP Connector has successfully established an outgoing OFTP connection, files can be securely and reliably sent to your trading partner.
Input Tab
Files that are placed in the Input tab for the configured OFTP Connector are scheduled to be sent by the connector.
If Send Automation is enabled in the Automation tab (enabled by default), the connector will automatically poll this folder for files to process. Otherwise, files can be manually sent via the connector’s Input tab. Within the Input tab, click the checkbox to the left of the target file(s) and click the Send button.
The Input tab can also be used to upload files into the Input folder using the More dropdown button and the ‘Upload Files’ option.
The ‘Upload Files’ tool is not required to add files to the connector’s Input folder. Files can also be manually dropped into the Input folder by navigating to the filepath listed at the top of the Input tab, and files can arrive at the OFTP connector naturally if it is part of a connected FLow.
Sending as Part of a Flow
In most configured workflows, files are processed by other Arc connectors before they should be sent out by the OFTP Connector. When another connector is connected to the OFTP Connector in a Flow, files are automatically passed into the OFTP Connector’s Input folder.
Receiving Receipts
The OFTP Connector automatically waits for OFTP receipts if Request Signed Receipts is enabled. If the receipt contains a negative response (e.g. if the partner has rejected the exchange for some reason), the connector will report an error instead of a successful send.
Receiving OFTP Messages
When an OFTP message arrives on the Arc OFTP server, the application attempts to route the message to a specific OFTP Connector. Arc uses the ODETTE identifiers in the headers of the message to route the incoming file to the OFTP Connector configured for the partner that sent the message.
If the application cannot find an OFTP Connector configured for the incoming message (based on OFTP identifiers), an error is logged in the Application Log and the file is not received.
Output Tab
When the file received over OFTP is routed to a specific OFTP Connector (based on configured ODETTE identifiers), the file arrives in the Output tab for the connector.
If the OFTP Connector is connected to other connectors in the Flow, files will not stay in the Output folder and will instead be passed along to the next connector in the flow.
If the OFTP Connector is not connected to another connector in the Flow, the files received by the OFTP Connector will remain in the Output folder. These files can be viewed in the Output tab of the connector, or by navigating on disk to the filepath displayed at the top of the Output tab.
Sending Receipts
If the incoming OFTP message requests a signed receipt, the OFTP Connector automatically generates and returns the receipt. If an error occurs while receiving the OFTP message, this error is logged in Arc and included in the receipt returned to the trading partner.
The settings required for sending receipts is included in the incoming OFTP message and does not need to be explicitly configured in the OFTP Connector.
SSID and SFID
This section provides a conceptual overview of SSID and SFID values, message routing, and how the Arc settings are used to accomplish the desired connection parameters. A conceptual understanding of message routing in OFTP helps clarify the role of the SSID and SFID values in establishing a connection and transferring files.
Message Routing
When an OFTP client sends a file to an OFTP server, that client can request that the OFTP server forward the file along to another OFTP entity/server. This process of sending a file to serverA with the expectation that it will be routed to serverB is what is meant by ‘message routing.’
A common use of message routing is to have a single server act as a gateway, or clearing house, for multiple OFTP endpoints. For example, imagine that a company has three branches, each of which needs to receive unique OFTP messages. A single OFTP server may act as a clearing house for the entire company, receiving OFTP messages from outside and routing them internally to the appropriate OFTP endpoint (i.e. an OFTP server dedicated to each individual branch).
However, OFTP connections do not need to use message routing; a direct connection can be established from one endpoint to the other and messages can be passed without any intermediary steps.
SSID
When an OFTP client attempts to connect to an OFTP server, it informs the server of its identity by sending the server its ODETTE Identifier and associated password. If the server recognizes this ID and thus should allow the connection, the server sends back its own ODETTE Identifier and password. Only if both sides recognize the other (by ID) will the connection succeed.
These ID values are exchanged using ‘SSID’ commands, which stands for Start Session ID. Thus an SSID value can be thought of as the ID used to confirm the identity of the remote side when establishing an OFTP session (connection).
SFID
An SFID is also an ODETTE Identifier value, but it is used in a different way from the SSID. While the SSID is used to initiate a session (connection) with an OFTP server, the SFID is used to identify the ultimate recipient of a file. When a client sends a file over OFTP, it includes an SFID value to let the remote side know whether the file should be passed along (routed) to another OFTP entity.
So the SFID value may be the same as the SSID of the server, if the file is meant to stay at the target server. It may also be different, if the client is connecting to a clearing house (i.e.) gateway OFTP server, and that server needs to pass along (route) the file to the end recipient.
Using SSID and SFID Values in CData Arc
Configuring the correct SSID and SFID values in Arc depends on whether your OFTP trading partner requires message routing (e.g. connecting to a clearing house server in the ‘middle’) or not (files should be transferred directly to the receiving endpoint). If the trading partner provides two different Identifier values for the SSID and SFID, this indicates that the partner requires message routing.
Configuration When Routing Messages
If your partner requires message routing, two separate OFTP Connectors will need to be configured. One connector (call it connectorA) will be configured with the connection details for the clearing house server (i.e. the server in the middle), while the other connector (connectorB) will be configured with the connection details for the end recipient server.
The Identifier field in connectorA should have your partner’s SSID value, or the value used to identify the clearing house server. The Identifier field in connectorB should have your partner’s SFID value, or the value used to identify the end recipient server. Additionally, connectorB should have the Routing Partner field (under the Routing section in the settings tab) set to connectorA.
Once this setup is configured, files that should be sent to the partner should be uploaded/input to connectorB. This connector will use connectorA to connect to the clearing house server (as a result of setting Routing Partner), and send the file with the SFID value from the Identifier field in connectorB so that the file is routed along to the target destination.
Configuration When Transferring Files Directly
If your partner does not require message routing, then they should provide a single SSID/SFID value to identify their OFTP server. Only one OFTP Connector needs to be configured (in contrast to the two connectors required when message routing is involved), and the Identifier field in that connector should be set to this single SSID/SFID value provided by the partner.