Infor
Version 23.4.8839
Version 23.4.8839
Infor
The Infor connector supports transmitting EDI documents to and from the Infor CloudSuite Industrial (formerly Syteline) platform.
Overview
Infor connectors perform two functions when sending or receiving EDI documents to Infor CloudSuite Industrial. When sending, the connector converts XML documents into a flat file structure accepted by CloudSuite, then sends the resulting file to the remote data folder where it can be picked up by Infor. When receiving, the connector polls the data folder for flat files, which it then converts into XML.
Connector Configuration
This section contains all of the configurable connector properties.
Settings Tab
Configuration
Settings related to the core configuration of the connector.
- Connector Id The static, unique identifier for the connector.
- Connector Type Displays the connector name and a description of what it does.
- Connector Description An optional field to provide a free-form description of the connector and its role in the flow.
Infor System Configuration
Settings provided in the connection to the Infor system.
- Trading Partner Code The code identifying the documents in the Infor system.
Inbound
Folder locations for demand-side documents in the Infor system.
- Inbound Data Logic Folder The folder location for demand-side file pickup and drop-off.
- Inbound Archive Folder The folder location for archiving processed demand-side documents.
Outbound
Folder locations for outbound documents in the Infor system.
- Outbound Data Logic Folder The folder location for supply-side file pickup and drop-off.
- Outbound Archive Folder The folder location for archiving processed supply-side documents.
Message
- Save to Sent Folder Check this to copy files processed by the connector to the Sent folder for the connector.
- Sent Folder Scheme Instructs the connector to group messages in the Sent folder according to the selected interval. For example, the Weekly option instructs the connector to create a new subfolder each week and store all messages for the week in that folder. The blank setting tells the connector to save all messages directly in the Sent folder. For connectors that process many messages, using subfolders helps keep messsages organized and improves performance.
Logging
- Log Level The verbosity of logs generated by the connector. When you request support, set this to Debug.
- Log Subfolder Scheme Instructs the connector to group files in the Logs folder according to the selected interval. For example, the Weekly option instructs the connector to create a new subfolder each week and store all logs for the week in that folder. The blank setting tells the connector to save all logs directly in the Logs folder. For connectors that process many transactions, using subfolders helps keep logs organized and improves performance.
- Log Messages Check this to have the log entry for a processed file include a copy of the file itself. If you disable this, you might not be able to download a copy of the file from the Input or Output tabs.
Miscellaneous
Miscellaneous settings are for specific use cases.
- Other Settings Enables you to configure hidden connector settings in a semicolon-separated list (for example,
setting1=value1;setting2=value2). Normal connector use cases and functionality should not require the use of these settings.
Automation Tab
Automation Settings
Settings related to the automatic processing of files by the connector.
- Send Whether files arriving at the connector are automatically sent.
- Retry Interval The number of minutes before a failed send is retried.
- Max Attempts The maximum number of times the connector processes the file. Success is measured based on a successful server acknowledgement. If you set this to 0, the connector retries the file indefinitely.
- Receive Whether the connector should automatically query the data source.
- Receive Interval The interval between automatic query attempts.
- Minutes Past the Hour The minutes offset for an hourly schedule. Only applicable when the interval setting above is set to Hourly. For example, if this value is set to 5, the automation service downloads at 1:05, 2:05, 3:05, etc.
- Time The time of day that the attempt should occur. Only applicable when the interval setting above is set to Daily, Weekly, or Monthly.
- Day The day on which the attempt should occur. Only applicable when the interval setting above is set to Weekly or Monthly.
- Minutes The number of minutes to wait before attempting the download. Only applicable when the interval setting above is set to Minute.
- Cron Expression A five-position string representing a cron expression that determines when the attempt should occur. Only applicable when the interval setting above is set to Advanced.
Performance
Settings related to the allocation of resources to the connector.
- Max Workers The maximum number of worker threads consumed from the threadpool to process files on this connector. If set, this overrides the default setting on the Settings > Automation page.
- Max Files The maximum number of files sent by each thread assigned to the connector. If set, this overrides the default setting on the Settings > Automation page.
Alerts Tab
Settings related to configuring alerts and Service Level Agreements (SLAs).
Connector Email Settings
Before you can execute SLAs, you need to set up email alerts for notifications. Clicking Configure Alerts opens a new browser window to the Settings page where you can set up system-wide alerts. See Alerts for more information.
Service Level Agreement (SLA) Settings
SLAs enable you to configure the volume you expect connectors in your flow to send or receive, and to set the time frame in which you expect that volume to be met. CData Arc sends emails to warn the user when an SLA is not met, and marks the SLA as At Risk, which means that if the SLA is not met soon, it will be marked as Violated. This gives the user an opportunity to step in and determine the reasons the SLA is not being met, and to take appropriate actions. If the SLA is still not met at the end of the at-risk time period, the SLA is marked as violated, and the user is notified again.
To define an SLA, click Add Expected Volume Criteria.
- If your connector has separate send and receive actions, use the radio buttons to specify which direction the SLA pertains to.
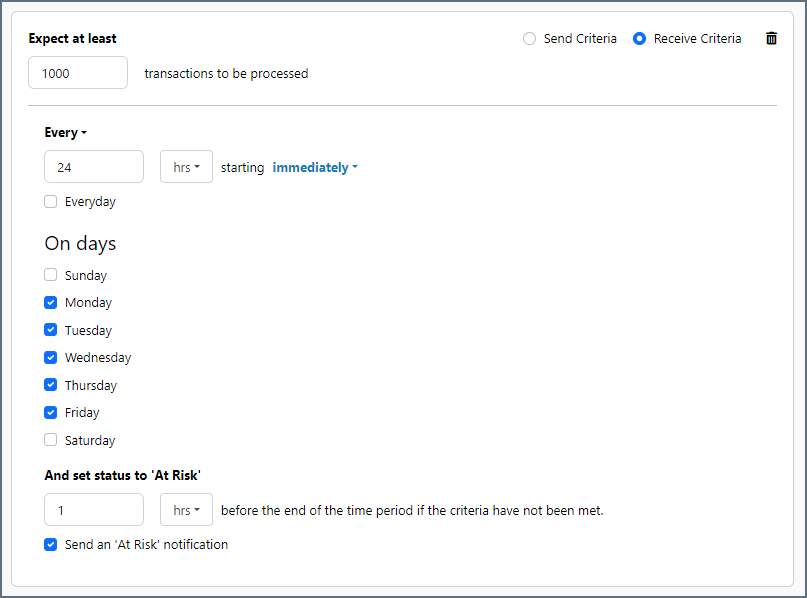
- Set Expect at least to the minimum number of transactions (the volume) you expect to be processed, then use the Every fields to specify the time frame.
- By default, the SLA is in effect every day. To change that, uncheck Everyday then check the boxes for the days of the week you want.
- Use And set status to ‘At Risk’ to indicate when the SLA should be marked as at risk.
- By default, notifications are not sent until an SLA is in violation. To change that, check Send an ‘At Risk’ notification.
The following example shows an SLA configured for a connector that expects to receive 1000 files every day Monday-Friday. An at-risk notification is sent 1 hour before the end of the time period if the 1000 files have not been received.
Establishing a Connection
The following settings are required to connect to Infor:
- Trading Partner Code identifies the documents in the Infor system.
- Inbound Data Logic Folder is for demand-side file pickup and drop-off.
- Inbound Archive Folder is for archiving processed demand-side documents.
- Outbound Data Logic Folder is for supply-side file pickup and drop-off.
- Outbound Archive Folder is for archiving processed supply-side documents.
After these fields have been specified, the connector can exchange documents with the Infor system.
Sending Files
After a connection to Infor has been established, XML files in the Input tab of the Infor connector are converted to the Infor standard flat file format and uploaded. If Send Automation is enabled on the Automation tab, the connector automatically polls this folder for processing.
Receiving Files
Files that are found when polling Infor CloudSuite are downloaded to the Infor connector Output tab. The standard flat file structure is automatically converted into XML. If the Infor connector is connected to other connectors in a flow, the file is passed to the next connector.