SAP IDoc Connector
Version 23.4.8839
Version 23.4.8839
SAP IDoc Connector
The SAP IDoc connector supports sending and receiving IDoc files to and from a variety of SAP systems. It is a data container that is used to exchange information between SAP and another process that can understand the syntax and semantics of the data.
Overview
IDoc connectors can connect to SAP using the following methods:
Windows
- NetWeaver RFC SDK
- Classic RFC SDK
- Classic RFC SDK with Unicode support
- SOAP (send-only)
Java
- Java connector (JCO)
- SOAP (send-only)
IDoc connectors can send and retrieve files formatted either as raw IDoc or as IDoc XML.
Connector Configuration
This section contains all of the configurable connector properties.
Settings Tab
Host Configuration
Settings related to establishing the connection to the SAP system.
- Connector Id The static, unique identifier for the connector.
- Connector Type Displays the connector name and a description of what it does.
- Connector Description An optional field to provide a free-form description of the connector and its role in the flow.
- Connect Type The method with which to connect to SAP. See the Establishing a Connection section for your method for additional information.
- SAP Host Hostname or IP address of the target SAP system.
- System Number The number by which the target SAP system is defined. Valid values are 0-99, and often this value should be 0.
Client Authentication
Settings related to authenticating against the SAP system.
- Client The client that is authenticating to the SAP system.
- User The username credential for authentication.
- Password The password for the specified user.
Receiver Options
Settings related to receiving IDoc files.
- IDoc Receiver Whether the connector should retrieve IDoc files from SAP.
- Program ID A unique name that identifies CData Arc to the SAP system.
- IDoc Format Whether to receive files as raw IDoc or IDoc XML.
Control Record Information Options
This section allows you to overwrite the control headers for IDoc files before sending them to SAP. This is useful when you are receiving IDoc files from one SAP system and sending them to another SAP system: in this situation you should change the control record without changing the IDoc file data. See Sending IDocs to SAP for more information.
Automation Tab
Automation Settings
Settings related to the automatic processing of files by the connector.
- Send Whether files arriving at the connector are automatically sent.
- Retry Interval The amount of time before a failed send is retried.
- Max Attempts The maximum number of times a failed send is retried.
Performance
Settings related to the allocation of resources to the connector.
- Max Workers The maximum number of worker threads consumed from the threadpool to process files on this connector. If set, this overrides the default setting on the Settings > Automation page.
- Max Files The maximum number of files sent by each thread assigned to the connector. If set, this overrides the default setting on the Settings > Automation page.
Alerts Tab
Settings related to configuring alerts and Service Level Agreements (SLAs).
Connector Email Settings
Before you can execute SLAs, you need to set up email alerts for notifications. Clicking Configure Alerts opens a new browser window to the Settings page where you can set up system-wide alerts. See Alerts for more information.
Service Level Agreement (SLA) Settings
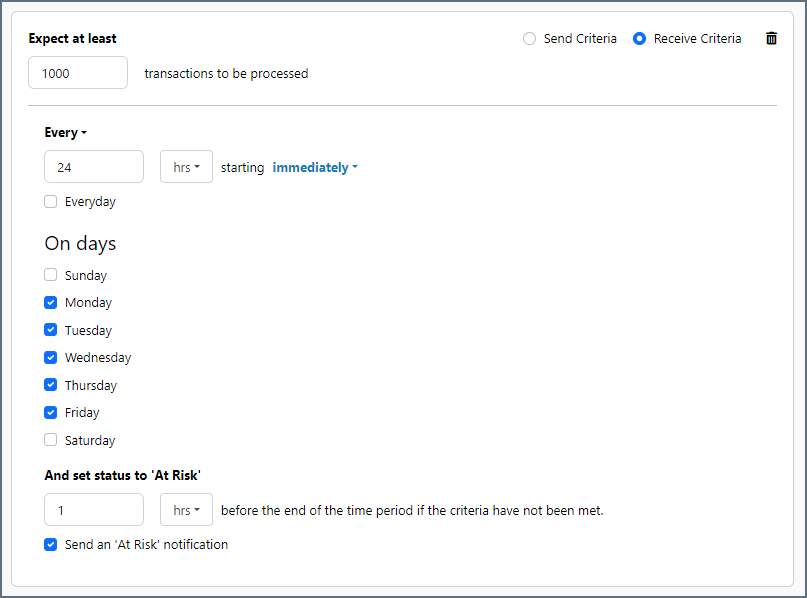
SLAs enable you to configure the volume you expect connectors in your flow to send or receive, and to set the time frame in which you expect that volume to be met. CData Arc sends emails to warn the user when an SLA is not met, and marks the SLA as At Risk, which means that if the SLA is not met soon, it will be marked as Violated. This gives the user an opportunity to step in and determine the reasons the SLA is not being met, and to take appropriate actions. If the SLA is still not met at the end of the at-risk time period, the SLA is marked as violated, and the user is notified again.
To define an SLA, click Add Expected Volume Criteria.
- If your connector has separate send and receive actions, use the radio buttons to specify which direction the SLA pertains to.
- Set Expect at least to the minimum number of transactions (the volume) you expect to be processed, then use the Every fields to specify the time frame.
- By default, the SLA is in effect every day. To change that, uncheck Everyday then check the boxes for the days of the week you want.
- Use And set status to ‘At Risk’ to indicate when the SLA should be marked as at risk.
- By default, notifications are not sent until an SLA is in violation. To change that, check Send an ‘At Risk’ notification.
The following example shows an SLA configured for a connector that expects to receive 1000 files every day Monday-Friday. An at-risk notification is sent 1 hour before the end of the time period if the 1000 files have not been received.
Advanced Tab
Language Settings
Settings related to communication language.
- Language The language value to be used when connecting to the SAP system. Set this to the ISO 639-1 value for the language the SAP system uses.
Gateway
Settings related to communicating with SAP through a gateway.
- Gateway Host The hostname or IP address of the gateway through which to connect.
- Gateway Service The gateway service to use.
Logon Load Balancing
Settings related to logging in to the SAP system as a group to enable load balancing.
- Message Server The service name of the load balancer.
- System ID Identifies the SAP system.
- Logon Group The group to use when load balancing.
Secure Network Communications (SNC)
Settings related to using an external security product to enhance the SAP connection security.
- SNC Name The SNC name for the machine making the connection.
- SNC Partner Name The SNC name of the SAP system the connector is connecting to.
- SNC Quality of Protection Level The level of protection added by the SNC product.
- SNC Library The path to the external security product’s library.
Advanced Settings
Settings not included in the previous categories.
- Processing Delay The amount of time (in seconds) by which the processing of files placed in the Input folder is delayed. This is a legacy setting. Best practice is to use a File connector to manage local file systems instead of this setting.
- Refresh Schema When enabled, the connector attempts to update the schema it uses for parsing when a parsing error occurs. The schema is updated by reaching out to the SAP system and querying for the appropriate schema.
Message
Message settings determine how the connector searches for messages and manages them after processing. You can save messages to your Sent folder or you can group them based on a Sent folder scheme, as described below.
- Save to Sent Folder A toggle that instructs the connector to keep a copy of sent messages in the Sent folder.
- Sent Folder Scheme Instructs the connector to group files in the Sent folder according to the selected interval. For example, the Weekly option instructs the connector to create a new subfolder each week and store all sent files for the week in that folder. The blank setting instructs the connector to save all files directly in the Sent folder. For connectors that process many transactions, using subfolders can help keep files organized and improve performance.
Logging
Settings that govern the creation and storage of logs.
- Log Level The verbosity of logs generated by the connector. When you request support, set this to Debug.
- Log Subfolder Scheme Instructs the connector to group files in the Logs folder according to the selected interval. For example, the Weekly option instructs the connector to create a new subfolder each week and store all logs for the week in that folder. The blank setting tells the connector to save all logs directly in the Logs folder. For connectors that process many transactions, using subfolders helps keep logs organized and improves performance.
- Log Messages Check this to have the log entry for a processed file include a copy of the file itself. If you disable this, you might not be able to download a copy of the file from the Input or Output tabs.
Miscellaneous
Miscellaneous settings are for specific use cases.
- Other Settings Enables you to configure hidden connector settings in a semicolon-separated list (for example,
setting1=value1;setting2=value2). Normal connector use cases and functionality should not require the use of these settings.
Establishing a Connection
Using NetWeaver RFC SDK
The following libraries from the NetWeaver RFC SDK must be placed into the Arc www\\bin\\x64 folder (www\\bin\\x86 on 32-bit operating systems):
- sapnwrfc.dll
- icudt30.dll
- icuin30.dll
- icuuc30.dll
- libicudecnumber.dll
- libsapucum.dll
Notes:
-
The .dll names might be different based on the version of the SAP RFC SDK you have installed. The examples above are for version 3.0.
-
You need to add the
sapgw00service to your listed services for the NetWeaver SDK connection to work on your client machine. You can add it to the services file atC:\\Windows\\System32\\drivers\\etc\\services.
Using Classic RFC SDK
The non-Unicode library does not require anything other than librfc32.dll. Place librfc32.dll into the Arc www\\bin\\x64 folder (www\\bin\\x86 on 32-bit operating systems).
Note: These libraries are provided in both x86 and x64, so you must use the same platform that the process is using. If the application is running on on a 64-bit version of Windows, the process is 64-bit.
Using Classic RFC SDK with Unicode Support
The following libraries from the SAP RFC SDK must be placed into the Arc www\\bin\\x64 folder (www\\bin\\x86 on 32-bit operating systems):
- librfc32u.dll
- icudt30.dll
- icuin30.dll
- icuuc30.dll
Notes:
-
The .dll names might be different based on the version of the SAP RFC SDK you have installed. The examples above are for version 3.0.
-
These libraries are provided in both x86 and x64, so you must use the same platform that the process is using. If the application is running on on a 64-bit version of Windows, the process is 64-bit.
Using the Java Connector
To use the Java connector, add sapjco3.jar to the lib folder of your Java servlet container.
Using SOAP
SOAP can only be used to send IDocs to SAP. You must use a different connection type to receive IDocs from SAP.
Note: This requires enabling SOAP connections on the SAP system.
Configuring Services
In addition to the dependencies above, the following services must be added to %WINDIR%\\system32\\drivers\\etc\\services, or /etc/services if your system is running Linux or Mac OS X. If SAP NetWeaver is already installed on the machine, no further action is required.
| Service Name | Connector Number/Protocol |
|---|---|
| sapdp00 | 3200/tcp |
| sapdp01 | 3201/tcp |
| sapdp02 | 3202/tcp |
| sapdp03 | 3203/tcp |
| sapdp04 | 3204/tcp |
| sapdp05 | 3205/tcp |
| sapdp06 | 3206/tcp |
| sapdp07 | 3207/tcp |
| sapdp08 | 3208/tcp |
| sapdp09 | 3209/tcp |
| sapdp10 | 3210/tcp |
| sapdp11 | 3211/tcp |
| sapdp12 | 3212/tcp |
| sapdp13 | 3213/tcp |
| sapdp14 | 3214/tcp |
| sapdp15 | 3215/tcp |
| sapdp16 | 3216/tcp |
| sapdp17 | 3217/tcp |
| sapdp18 | 3218/tcp |
| sapdp19 | 3219/tcp |
| sapdp20 | 3220/tcp |
| sapdp21 | 3221/tcp |
| sapdp22 | 3222/tcp |
| sapdp23 | 3223/tcp |
| sapdp24 | 3224/tcp |
| sapdp25 | 3225/tcp |
| sapdp26 | 3226/tcp |
| sapdp27 | 3227/tcp |
| sapdp28 | 3228/tcp |
| sapdp29 | 3229/tcp |
| sapdp30 | 3230/tcp |
| sapdp31 | 3231/tcp |
| sapdp32 | 3232/tcp |
| sapdp33 | 3233/tcp |
| sapdp34 | 3234/tcp |
| sapdp35 | 3235/tcp |
| sapdp36 | 3236/tcp |
| sapdp37 | 3237/tcp |
| sapdp38 | 3238/tcp |
| sapdp39 | 3239/tcp |
| sapdp40 | 3240/tcp |
| sapdp41 | 3241/tcp |
| sapdp42 | 3242/tcp |
| sapdp43 | 3243/tcp |
| sapdp44 | 3244/tcp |
| sapdp45 | 3245/tcp |
| sapdp46 | 3246/tcp |
| sapdp47 | 3247/tcp |
| sapdp48 | 3248/tcp |
| sapdp49 | 3249/tcp |
| sapdp50 | 3250/tcp |
| sapdp51 | 3251/tcp |
| sapdp52 | 3252/tcp |
| sapdp53 | 3253/tcp |
| sapdp54 | 3254/tcp |
| sapdp55 | 3255/tcp |
| sapdp56 | 3256/tcp |
| sapdp57 | 3257/tcp |
| sapdp58 | 3258/tcp |
| sapdp59 | 3259/tcp |
| sapdp60 | 3260/tcp |
| sapdp61 | 3261/tcp |
| sapdp62 | 3262/tcp |
| sapdp63 | 3263/tcp |
| sapdp64 | 3264/tcp |
| sapdp65 | 3265/tcp |
| sapdp66 | 3266/tcp |
| sapdp67 | 3267/tcp |
| sapdp68 | 3268/tcp |
| sapdp69 | 3269/tcp |
| sapdp70 | 3270/tcp |
| sapdp71 | 3271/tcp |
| sapdp72 | 3272/tcp |
| sapdp73 | 3273/tcp |
| sapdp74 | 3274/tcp |
| sapdp75 | 3275/tcp |
| sapdp76 | 3276/tcp |
| sapdp77 | 3277/tcp |
| sapdp78 | 3278/tcp |
| sapdp79 | 3279/tcp |
| sapdp80 | 3280/tcp |
| sapdp81 | 3281/tcp |
| sapdp82 | 3282/tcp |
| sapdp83 | 3283/tcp |
| sapdp84 | 3284/tcp |
| sapdp85 | 3285/tcp |
| sapdp86 | 3286/tcp |
| sapdp87 | 3287/tcp |
| sapdp88 | 3288/tcp |
| sapdp89 | 3289/tcp |
| sapdp90 | 3290/tcp |
| sapdp91 | 3291/tcp |
| sapdp92 | 3292/tcp |
| sapdp93 | 3293/tcp |
| sapdp94 | 3294/tcp |
| sapdp95 | 3295/tcp |
| sapdp96 | 3296/tcp |
| sapdp97 | 3297/tcp |
| sapdp98 | 3298/tcp |
| sapdp99 | 3299/tcp |
| sapgw00 | 3300/tcp |
| sapgw01 | 3301/tcp |
| sapgw02 | 3302/tcp |
| sapgw03 | 3303/tcp |
| sapgw04 | 3304/tcp |
| sapgw05 | 3305/tcp |
| sapgw06 | 3306/tcp |
| sapgw07 | 3307/tcp |
| sapgw08 | 3308/tcp |
| sapgw09 | 3309/tcp |
| sapgw10 | 3310/tcp |
| sapgw11 | 3311/tcp |
| sapgw12 | 3312/tcp |
| sapgw13 | 3313/tcp |
| sapgw14 | 3314/tcp |
| sapgw15 | 3315/tcp |
| sapgw16 | 3316/tcp |
| sapgw17 | 3317/tcp |
| sapgw18 | 3318/tcp |
| sapgw19 | 3319/tcp |
| sapgw20 | 3320/tcp |
| sapgw21 | 3321/tcp |
| sapgw22 | 3322/tcp |
| sapgw23 | 3323/tcp |
| sapgw24 | 3324/tcp |
| sapgw25 | 3325/tcp |
| sapgw26 | 3326/tcp |
| sapgw27 | 3327/tcp |
| sapgw28 | 3328/tcp |
| sapgw29 | 3329/tcp |
| sapgw30 | 3330/tcp |
| sapgw31 | 3331/tcp |
| sapgw32 | 3332/tcp |
| sapgw33 | 3333/tcp |
| sapgw34 | 3334/tcp |
| sapgw35 | 3335/tcp |
| sapgw36 | 3336/tcp |
| sapgw37 | 3337/tcp |
| sapgw38 | 3338/tcp |
| sapgw39 | 3339/tcp |
| sapgw40 | 3340/tcp |
| sapgw41 | 3341/tcp |
| sapgw42 | 3342/tcp |
| sapgw43 | 3343/tcp |
| sapgw44 | 3344/tcp |
| sapgw45 | 3345/tcp |
| sapgw46 | 3346/tcp |
| sapgw47 | 3347/tcp |
| sapgw48 | 3348/tcp |
| sapgw49 | 3349/tcp |
| sapgw50 | 3350/tcp |
| sapgw51 | 3351/tcp |
| sapgw52 | 3352/tcp |
| sapgw53 | 3353/tcp |
| sapgw54 | 3354/tcp |
| sapgw55 | 3355/tcp |
| sapgw56 | 3356/tcp |
| sapgw57 | 3357/tcp |
| sapgw58 | 3358/tcp |
| sapgw59 | 3359/tcp |
| sapgw60 | 3360/tcp |
| sapgw61 | 3361/tcp |
| sapgw62 | 3362/tcp |
| sapgw63 | 3363/tcp |
| sapgw64 | 3364/tcp |
| sapgw65 | 3365/tcp |
| sapgw66 | 3366/tcp |
| sapgw67 | 3367/tcp |
| sapgw68 | 3368/tcp |
| sapgw69 | 3369/tcp |
| sapgw70 | 3370/tcp |
| sapgw71 | 3371/tcp |
| sapgw72 | 3372/tcp |
| sapgw73 | 3373/tcp |
| sapgw74 | 3374/tcp |
| sapgw75 | 3375/tcp |
| sapgw76 | 3376/tcp |
| sapgw77 | 3377/tcp |
| sapgw78 | 3378/tcp |
| sapgw79 | 3379/tcp |
| sapgw80 | 3380/tcp |
| sapgw81 | 3381/tcp |
| sapgw82 | 3382/tcp |
| sapgw83 | 3383/tcp |
| sapgw84 | 3384/tcp |
| sapgw85 | 3385/tcp |
| sapgw86 | 3386/tcp |
| sapgw87 | 3387/tcp |
| sapgw88 | 3388/tcp |
| sapgw89 | 3389/tcp |
| sapgw90 | 3390/tcp |
| sapgw91 | 3391/tcp |
| sapgw92 | 3392/tcp |
| sapgw93 | 3393/tcp |
| sapgw94 | 3394/tcp |
| sapgw95 | 3395/tcp |
| sapgw96 | 3396/tcp |
| sapgw97 | 3397/tcp |
| sapgw98 | 3398/tcp |
| sapgw99 | 3399/tcp |
Logging on to SAP
The following settings are required to connect with your SAP system.
- SAP Host Host name of the target system. Host names can be regular host names defined in a
hostsfile, an IP address like123.123.123.123, or an SAProuter address such as/H/hostname/S/connector/H/host/S/connector/... - System Number The number by which the target system is defined. The valid range is 0 to 99, but in general this is 0.
- Client The client authenticating to the SAP system.
- User The user that is authenticating to the SAP system.
- Password The password for the authenticating user.
Gateway
When connecting to SAP via a gateway, use the options in the Gateway section of the Advanced tab.
Load Balancing
To log on via load balancing, set the properties in the Logon Load Balancing section of the Advanced tab.
Secure Network Communications (SNC)
To enable secure network communications, check the Enable SNC box in the Secure Network Communications (SNC) section of the Advanced tab. Set SNC Library to the .dll of the SNC library you want to use to connect with SAP.
Sending IDocs to SAP
Once you have configured the IDoc connector to connect to your SAP system, you can begin sending IDoc files to SAP. The IDoc connector can send files formatted in raw IDoc or XML IDoc.
You can configure the connector to automatically insert control record information into the IDoc being sent to SAP: the DOCREL, SNDPOR, SNDPRT, and so on. This makes it easier to process outgoing IDocs to the configured system. Configure these settings in the Control Record Information Options section of the Settings tab.
Before sending an IDoc to your SAP system, make sure that you have properly configured a partner profile in SAP. If no partner profile in SAP matches the control record information in the IDoc you are sending, the data will not be processed by your SAP system. See Test Sending an IDoc to SAP for more information on setting up a partner profile.
Tip: You can use transaction code WE60 to search for segment documentation for different IDoc types.
Test Sending an IDoc to SAP
To test sending an IDoc to SAP, you first need to configure your SAP system to have a partner profile for Arc. The following steps describe how to do this with an ORDERS IDoc.
-
Create a partner: Go to transaction code WE20 and define a partner profile. Set Partn Type to KU for Customer and Partner No to a valid customer number.
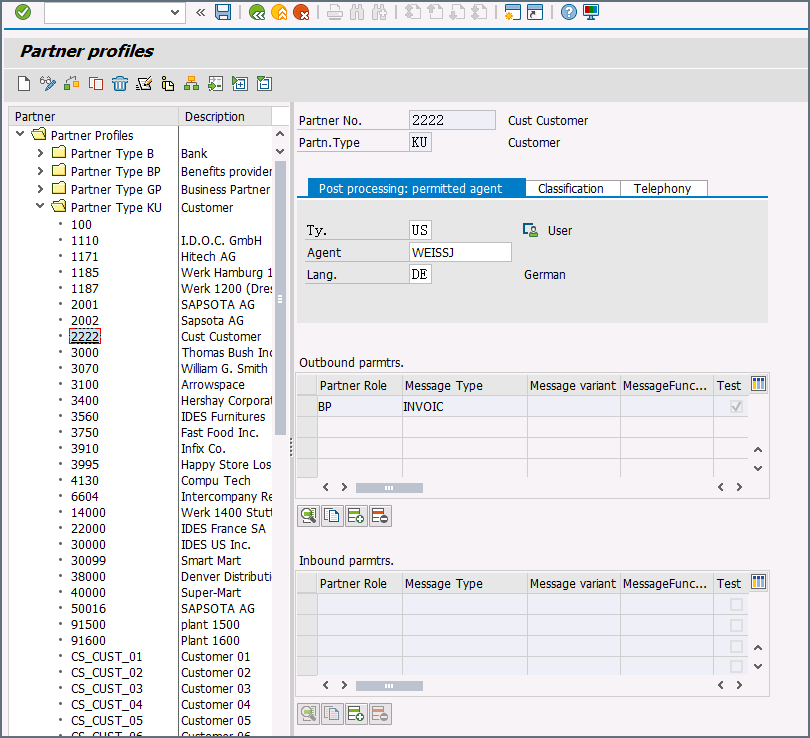
-
Add an inbound parameter for the ORDERS document: The message type for this document is ORDERS. On the Inbound Options tab, set Process code to ORDE to tell SAP how to create a sales order when a purchase order ORDERS document is received by the SAP system.
-
Assign the customer to a sales division: The customer configured in step one must be assigned to a sales organization, distribution channel, and division. Go to transaction VOE2 to configure these settings in the EDSDC table.
Receiving IDocs from SAP
Once you have configured the IDoc connector to connect to your SAP system, you can begin receiving IDoc files from SAP. The IDoc connector can receive files formatted in raw IDoc or XML IDoc.
To receive files from SAP, create an RFC destination for Arc. You can then check Enable IDoc Receiver in the Receiver Options section of the Settings tab, then enter the Program Id that you registered in your SAP system for Arc.
Test Receiving an IDoc from SAP
This example describes how to configure your SAP system to send a MATMAS IDoc to Arc.
- Define a logical system: First, go to transaction SALE. Then navigate to Basic Settings > Logical Systems > Define Logical System. Create a new entry with a valid name (for example, Arc) and description.
-
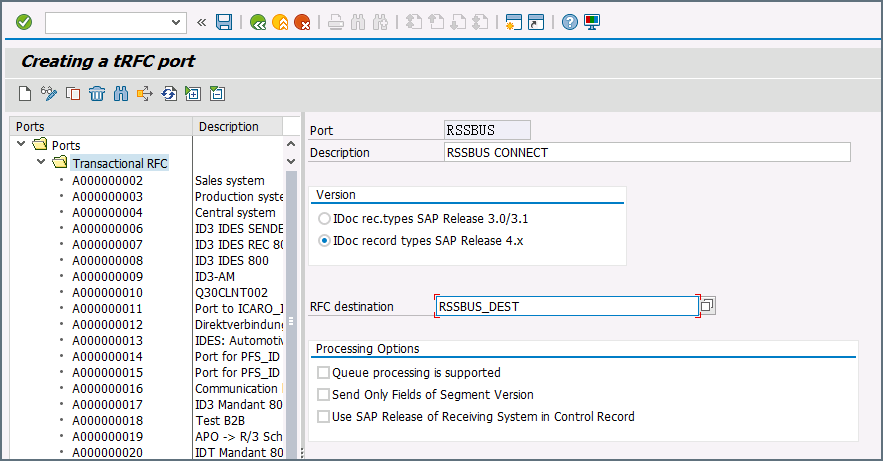
Create an RFC destination: Open transaction code SM59. Click the create button and fill in the fields for the RFC destination described below.
- RFC Destination A unique name for the new destination (for example, Arc_DEST).
- Connection Type T for TCP/IP.
- Description A description for the destination.
- Program Id A unique name that will be set in Arc to identify the destination.
- Activation Type Select Registered Server Program.
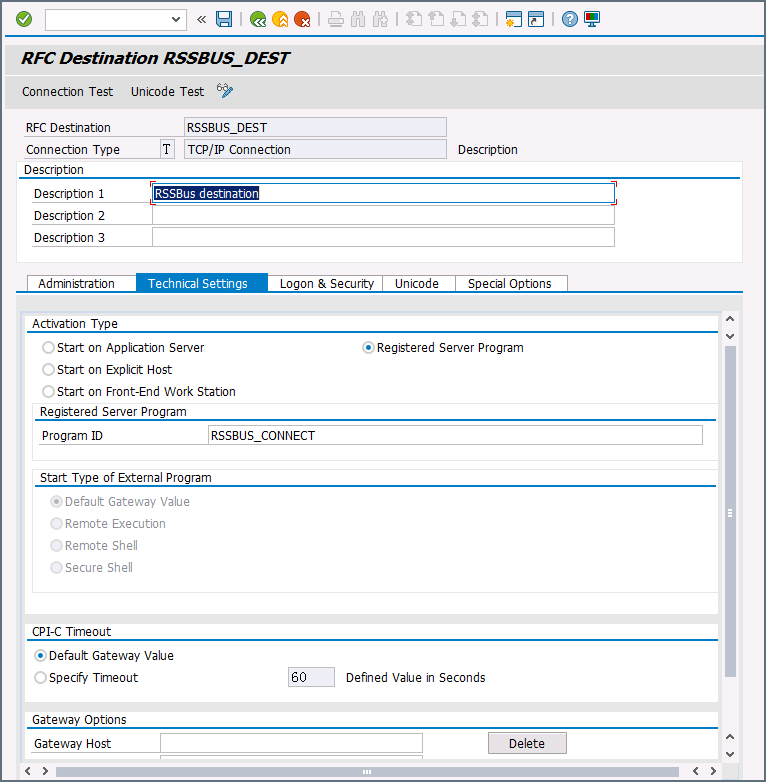
After you save the settings, test the connection to make sure you can successfully connect to Arc.
-
Create a processing connector: Go to transaction code WE21. Create a new Transactional RFC connector with a unique name and the same destination you created in step 2.
-
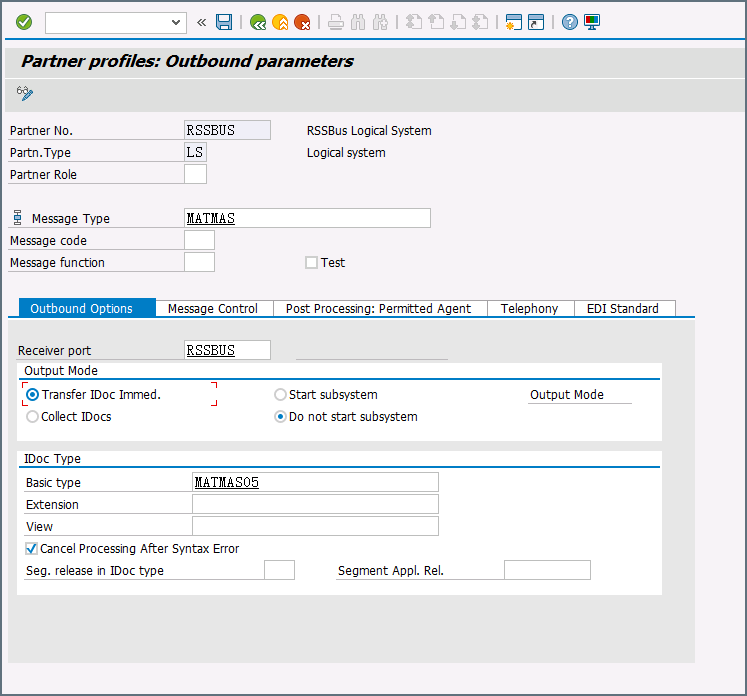
Create a partner profile: Open transaction WE20. Create a partner profile for the logical system that you added in step 1. Next, add an outbound parameter for the MATMAS document. Set the Message Type to MATMAS. On the Outbound Options tab, set the Receiver port to the value of the connector you configured in step 3, set the Output Mode to Transfer IDoc Immed, and set the IDoc Basic type to MATMAS05.
- Send a test IDoc: Use transaction BD10 to send a test IDoc to Arc for a specified material number. You need to configure the Message Type and Logical System before sending the message. Use transaction BD87 to monitor outgoing messages and process them again if necessary.
Macros
Using macros in file naming strategies can enhance organizational efficiency and contextual understanding of data. By incorporating macros into filenames, you can dynamically include relevant information such as identifiers, timestamps, and header information, providing valuable context to each file. This helps ensure that filenames reflect details important to your organization.
CData Arc supports these macros, which all use the following syntax: %Macro%.
| Macro | Description |
|---|---|
| ConnectorID | Evaluates to the ConnectorID of the connector. |
| Ext | Evaluates to the file extension of the file currently being processed by the connector. |
| Filename | Evaluates to the filename (extension included) of the file currently being processed by the connector. |
| FilenameNoExt | Evaluates to the filename (without the extension) of the file currently being processed by the connector. |
| MessageId | Evaluates to the MessageId of the message being output by the connector. |
| RegexFilename:pattern | Applies a RegEx pattern to the filename of the file currently being processed by the connector. |
| Header:headername | Evaluates to the value of a targeted header (headername) on the current message being processed by the connector. |
| LongDate | Evaluates to the current datetime of the system in long-handed format (for example, Wednesday, January 24, 2024). |
| ShortDate | Evaluates to the current datetime of the system in a yyyy-MM-dd format (for example, 2024-01-24). |
| DateFormat:format | Evaluates to the current datetime of the system in the specified format (format). See Sample Date Formats for the available datetime formats |
| Vault:vaultitem | Evaluates to the value of the specified vault item. |
| ARCKEY | Evaluates to the key for the external message archive. |
| CIMTYP | Evaluates to the custom extension defined by the user. |
| CREDAT | Evaluates to the creation date of the IDoc. |
| CRETIM | Evaluates to the creation time of the IDoc. |
| DIRECT | Evaluates to the direction of the IDoc (it indicates if the IDoc is inbound or outbound). |
| DOCNUM | Evaluates to the unique number assigned to the IDoc. |
| DOCREL | Evaluates to the SAP release number for the IDoc. |
| EXPRSS | Evaluates to the value of the EXPRSS flag. |
| IDOCTYP | Evaluates to the name of the basic type of the IDoc. |
| MANDT | Evaluates to the client number. |
| MESCOD | Evaluates to the message code. |
| MESFCT | Evaluates to the message function. |
| MESTYP | Evaluates to the message type. |
| OUTMOD | Evaluates to the output mode. |
| RCVLAD | Evaluates to the recipient’s logical address. |
| RCVPFC | Evaluates to the recipient’s partner function. |
| RCVPOR | Evaluates to the receiver port value. |
| RCVPRN | Evaluates to the receiver partner number. |
| RCVPRT | Evaluates to the receiver partner type. |
| RCVSAD | Evaluates to the recipient’s address. |
| REFGRP | Evaluates to the message group (such as EDI Message Group). |
| REFINT | Evaluates to the transmission file (such as EDI Interchange). |
| REFMES | Evaluates to the message (such as EDI Message) |
| SERIAL | Evaluates to the EDI serialization field. |
| SNDLAD | Evaluates to the sender’s logical address. |
| SNDPFC | Evaluates to the sender’s partner function. |
| SNDPOR | Evaluates to the sender’s port. |
| SNDPRN | Evaluates to the sender’s partner number. |
| SNDPRT | Evaluates to the sender’s partner type. |
| SNDSAD | Evaluates to the sender’s address. |
| STATUS | Evaluates to the status of the IDoc. |
| STD | Evaluates to a flag indicating the EDI standard. |
| STDMES | Evaluates to the EDI message type. |
| STDVRS | Evaluates to the EDI standard, version and release. |
| TABNAM | Evaluates to the name of the table structure. |
| TEST | Evaluates to the value of the test flag. |
Examples
Some macros, such as %Ext% and %ShortDate%, do not require an argument, but others do. All macros that take an argument use the following syntax: %Macro:argument%
Here are some examples of the macros that take an argument:
- %Header:headername%: Where
headernameis the name of a header on a message. - %Header:mycustomheader% resolves to the value of the
mycustomheaderheader set on the input message. - %Header:ponum% resolves to the value of the
ponumheader set on the input message. - %RegexFilename:pattern%: Where
patternis a regex pattern. For example,%RegexFilename:^([\w][A-Za-z]+)%matches and resolves to the first word in the filename and is case insensitive (test_file.xmlresolves totest). - %Vault:vaultitem%: Where
vaultitemis the name of an item in the vault. For example,%Vault:companyname%resolves to the value of thecompanynameitem stored in the vault. - %DateFormat:format%: Where
formatis an accepted date format (see Sample Date Formats for details). For example,%DateFormat:yyyy-MM-dd-HH-mm-ss-fff%resolves to the date and timestamp on the file.
You can also create more sophisticated macros, as shown in the following examples:
- Combining multiple macros in one filename:
%DateFormat:yyyy-MM-dd-HH-mm-ss-fff%%EXT% - Including text outside of the macro:
MyFile_%DateFormat:yyyy-MM-dd-HH-mm-ss-fff% - Including text within the macro:
%DateFormat:'DateProcessed-'yyyy-MM-dd_'TimeProcessed-'HH-mm-ss%