Jobs Page
Version 24.3.9120
Version 24.3.9120
Jobs Page
A CData Sync job is a unit of execution that includes the source connection, the destination connection, and a set of one or more tasks that represent data flows for different tables. All the tasks within a job are executed sequentially, which enables you to order data flows as you see fit.
The following sections explain the features of the Jobs summary page as well as the following tasks:
Viewing Your Jobs
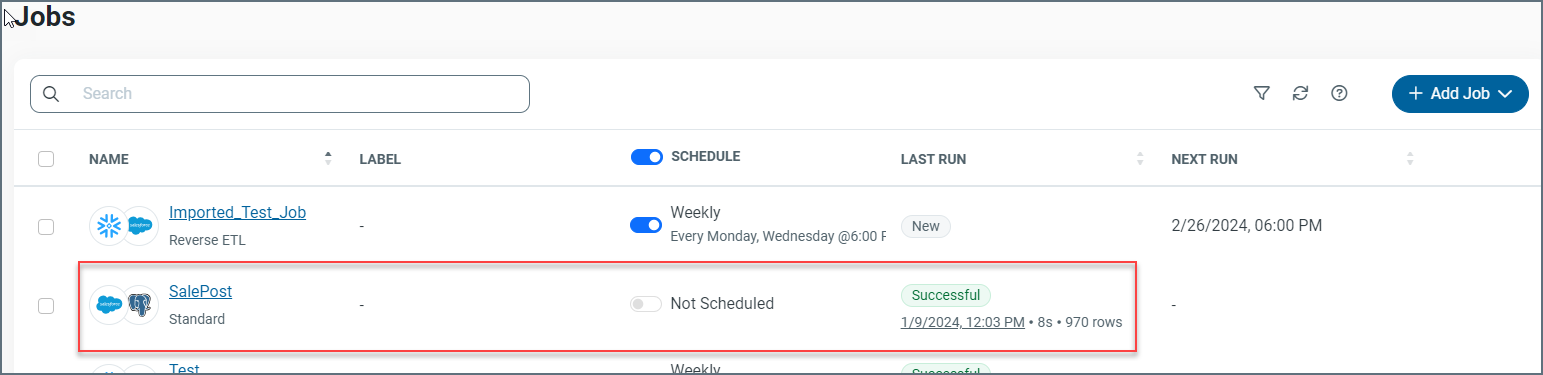
You can view a list of all your jobs from the Jobs page. The table on this page summarizes your jobs and enables you to manage them from one access point.
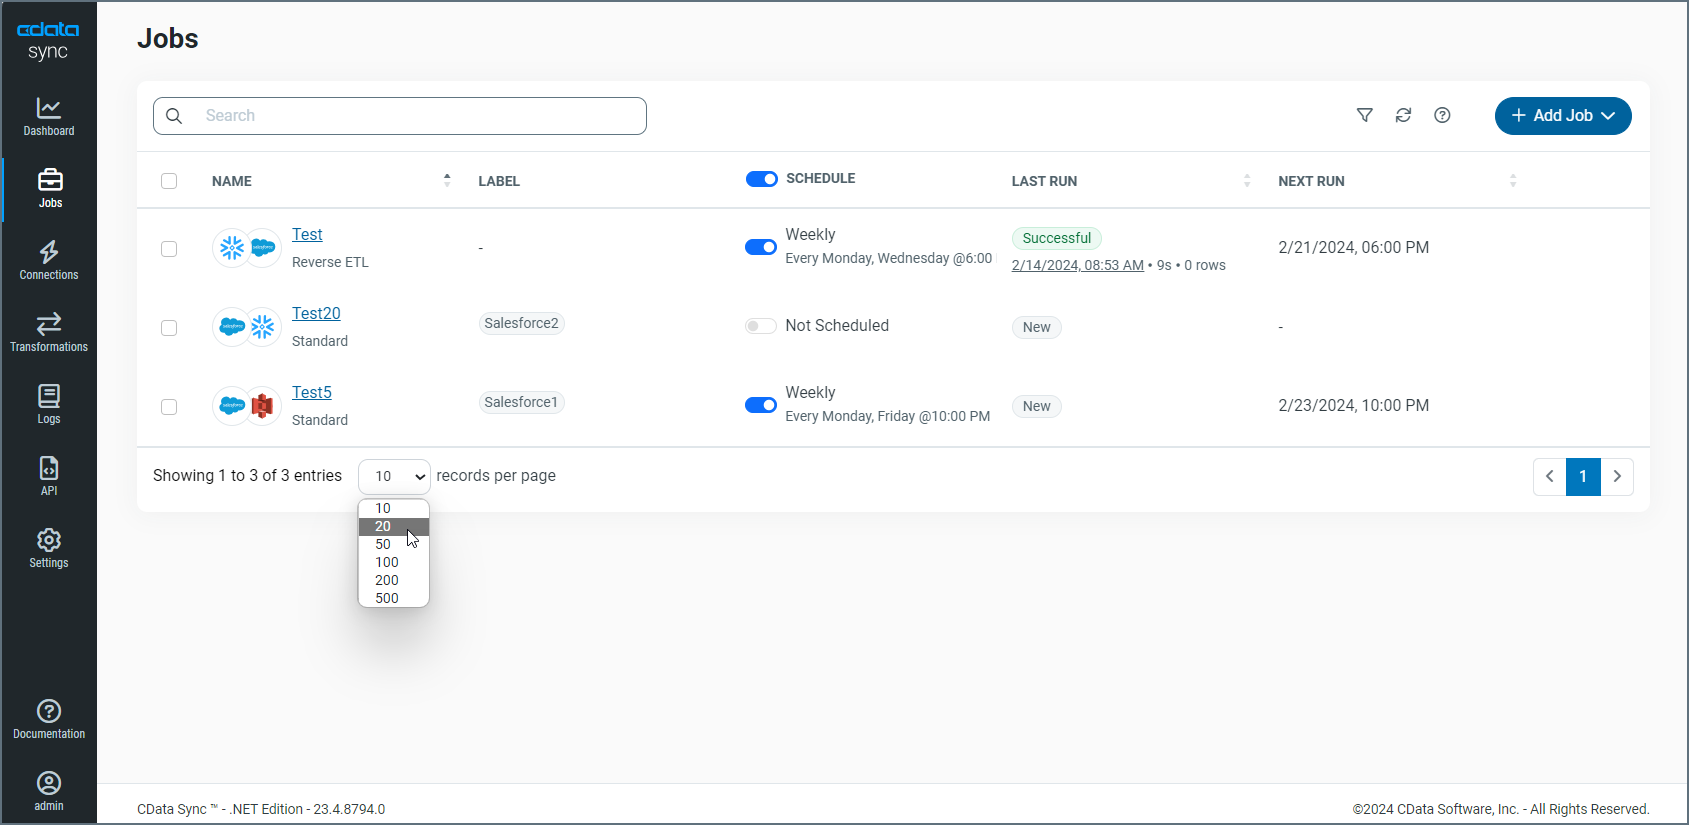
The job records are displayed in rows, with columns that provide details about each job. As shown above, you can specify the number of rows that you want to display on the page by selecting a number from the X records per page list at the bottom of the page.
Sync provides details about your jobs in five columns:
-
NAME - Lists the name of the job, the source and destination connectors, and the job type.
-
LABEL - Displays labels that you assign to your job. You add labels in either of these ways:
-
Select . . . > Add Labels at the end of the job row.
-
Click Add Labels in the Labels section on the Overview tab in the job settings.
-
-
SCHEDULE - Specifies the run schedule for your job. For more details, see Enabling and Disabling the Scheduler.
-
LAST RUN - Specifies the last date and time that the job ran, how long the job took to run, and the number of rows that were affected.
-
NEXT RUN - Specifies the next date and time that the job will run.
If you click a job name, Sync opens the Settings page for that job.
You can organize your job list in ascending or descending order for the NAME, LAST RUN, or NEXT RUN columns. To order the columns, simply click the up (▲) and down (▼) arrows next to the column by which you want to sort.
In addition, you can filter the table by job type, source connection, destination connection, label, and status. After you set filters, you can clear all filter options by clicking Reset. Sync also enables you to save filters that you define so that you can use them later.
To save a filter:
-
Choose your filter options.
-
Select Saved Filters > Add Saved Filter.

This selection opens the Add Saved Filter dialog box.
-
Enter a name for your filter. Then, click Add Saved Filter.
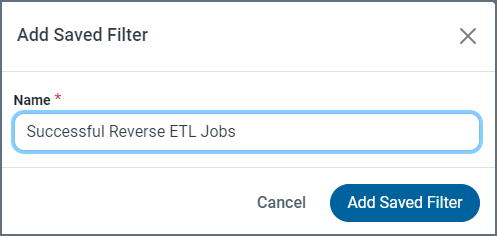
After you save the filter, the filter name appears in the Saved Filter list. Then, you can choose that filter from the list any time that you want to apply it.
Adding a New Job
Adding a job requires preconfigured source and destination connections. After you define a source connection to your data source and a destination connection to your database, follow these steps to create a new job:
-
Click Jobs in the navigation bar to open the Jobs page.
-
Click Add Job (upper right corner). This action opens the Add Job dialog box where you can enter job information.
-
Enter a job name and select the source and destination connections.

-
Select a job type.
-
Click Add Job to create your new job.
From your specific job page (Jobs > YourJobName), you can set your job to run on a schedule, set incremental replication, and create email notifications. In addition, you can view your logs and job history to obtain more information or to troubleshoot errors.
Cloning a Job
Instead of adding an entirely new job, you can clone an existing job. Cloning a job creates a new job by copying the settings and tasks from the existing job. Follow these steps to clone a job.
-
Locate the job that you want to clone and select Clone from the options menu (…). This option opens the Clone Job dialog box, where you can define what you want to clone.
-
Enter a name for your new job.
-
(Optional) Select the Choose a different Source and Destination option if you want to change the current source or destination.
Note: For a cloned job, the new source connection must be of the same connection type as that of the original job. For example, if the original job uses a Salesforce source connection, the new job must also use a Salesforce source connection. However, you can select a different destination connection.
-
Select any of the following optional settings that you want to use.
Tasks - Copies all Tasks from the original job. Note: If you use a different source connection, you must verify that all the tables you add as tasks exist in your source before you run the job.
Events - Copies all Events from the original job.
Additional Settings - Copies notification, schedule, logging, and advanced settings from the original job.
-
-
Click Clone Job. Then, your cloned job is displayed in the job table on the Jobs page.
Exporting a Job
You can also export a job from the Jobs page to a location on your machine.
To export a job, select … > Export from the end of the row of the job that you want to export.
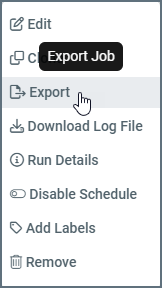
The resulting SYNCJOB file contains the details of the exported job, including the source, destination, tasks, and additional settings.
Sync exports the job to your Downloads folder. From there, you can move it to any other location on your machine.
Importing a Job
Sync enables you to import a job from your machine to the Jobs list.
To import a job:
-
Select Add Job > Import Job from the Jobs page. This action opens the Import Job dialog box.
-
Click Choose File to open an explorer window where you can select the job that you want to import. (The job file must be a SYNCJOB file, as shown below.) Then, click Import to expand the dialog box.
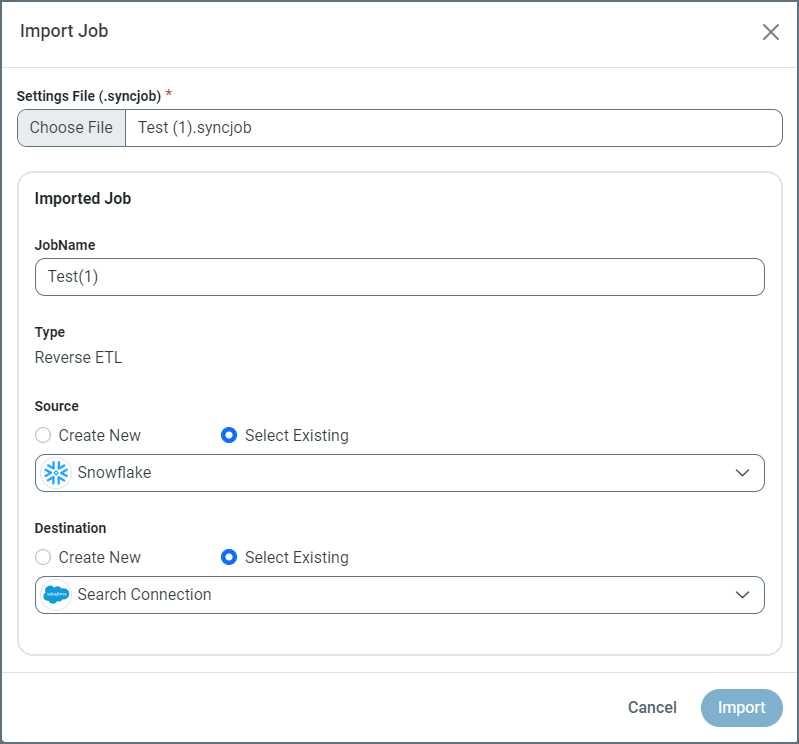
-
Keep the original job name or modify it, as necessary. Then, choose whether to create a new source and destination or to select an existing source and destination.
-
Click Import to import the job into the Jobs list.
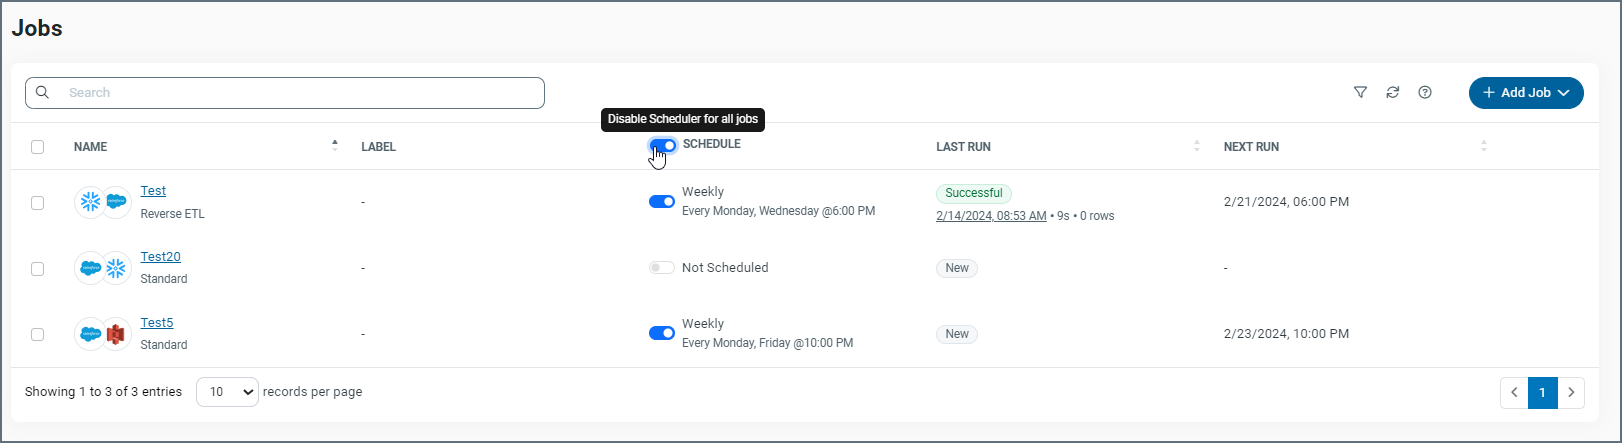
Enabling and Disabling the Scheduler
You can enable or disable the schedule via these two methods:
-
the Schedule column on the main Jobs page (for all jobs)
-
the Schedule option on the Overview tab of the job-settings page (for an individual job)
On the main Jobs page, you enable or disable the scheduler for all jobs by toggling the Schedule button in the SCHEDULE column.
Starting and Stopping Jobs
You can start a job by positioning your cursor over the entry for the job and clicking the Run Job (▷) icon.
When a job is running, you cancel that run by clicking the Stop Job Run (■) icon.
More Information
For more information about Sync jobs and how they work, see Jobs.