OFTP Connector
Version 22.0.8473
Version 22.0.8473
OFTP Connector
The OFTP Connector sends and receives files via the OFTP protocol.
Overview
OFTP connections are configured in two places: the OFTP Profile section of the Profile page, and individual OFTP connectors in the Flows page. In the OFTP Profile section, the local OFTP entity should be identified via an Odette Identifier, and settings for the local OFTP server should be configured. Each OFTP connector should be configured to make outbound connections to a single trading partner, i.e a single OFTP entity.
For information on routing an OFTP message through a separate OFTP entity (e.g. a clearinghouse), please see the Message Routing section.
Profile Configuration
The OFTP Profile must be configured before connections can be established with individual OFTP connectors.
OFTP Profile Tab
Personal Id
Settings for identifying the local profile.
- Odette Identifier (SSID Code) Your Odette identifier. This value will be included in outgoing transmissions to identify the sender, and incoming messages must be addressed to this identifier. Odette identifiers are provided by the Odette organization.
- Password (SSID Password) The password associated with the Odette Identifier. This can be a value of your choosing, as long as your trading partners have the same value configured on their systems.
Server Settings
Settings related to the OFTP server implementation.
- Port The port on which the server will listen for incoming connections.
- Use SSL/TLS Whether SSL/TLS must be negotiated to connect to the server.
- SSL Private Certificate If SSL is enabled, an SSL certificate is required to verify the server’s identify.
- Certificate Password The password required to access the SSL certificate.
Personal Certificate
Settings related to the private decryption and signature certificate.
- Data Decryption Certificate The certificate that will be used to decrypt incoming messages and sign outgoing messages. This certificate should never be shared with any external parties. Click the Create Certificate button to generate a new self-signed certificate that is ready to use in an OFTP transaction; a corresponding public key certificate will also be generated with the same filename and a ‘.cer’ extension.
- Certificate Password The password required to access the Data Decryption Certificate.
Optional Certificate Settings
These optional settings allow you to define parameters for the certificate. You can hover over a field for more information about what it does.
Advanced Settings
The value for Inactivity Timeout specifies the length of time (in seconds) to wait before closing inactive connections to the server.
Lockouts
These settings allow you to specify the parameters around locking out server access after a certain number of failed attempts. You can hover over a field for more information about what it does.
Trusted IP Addresses
This section defines the IP addresses that are allowed to make connections. The following functions are available:
- Add Opens a modal to enter a new IP address range.
- Edit Opens a modal to modify the selected IP address range.
- Delete Deletes the selected IP address range from the list.
The following restrictions apply to this feature:
localhostcannot be modified or removed from the list.- Any IP addresses outside of the defined ranges will be rejected.
- Ranges are supported. For example, the entry
100.10.100.1-15indicates that IP addresses between100.10.100.1and100.10.100.15are allowed. - CIDR notation is supported. For example, the entry
100.10.100.0/24indicates that IP addresses between100.10.100.0and100.10.100.255are allowed. - Wildcard patterns are supported. For example, the entry
100.10.100.*indicates that IP addresses beginning with100.10.100are allowed.
Logging
Settings that govern the creation and storage of logs.
- Log Level Specifies the type of information to log in the connector’s Logs directory:
- None — Does not create any logs.
- Error — Creates logs only when the connector encounters an error.
- Warning — Creates logs only when the connector issues a warning.
- Info — Logs general information about the workflow, including any errors and warnings (if applicable).
- Debug — Logs detailed debugging information for both successful and failed workflows.
- Trace — Logs detailed trace information for both successful and failed workflows.
Please note that Debug and Trace may log sensitive information including message contents and SSL certificates. Although connection properties (such as passwords) are masked, please review logs of this level for sensitive information before sharing them outside of your organization.
- Log Rotate Interval The number of days a log file should be used before another log file is started.
- Log Delete Interval The number of days a log file should be maintained before it is deleted.
Connector Configuration
After configuring the OFTP Profile, OFTP Connectors can be created in the Flows page and configured for a specific trading partner.
Settings Tab
Host Configuration
Settings related to the remote OFTP entity to connect to.
- Connector Id The static name of the connector. All connector-specific files are held in a folder by the same name within the Data Directory.
- Connector Description An optional field to provide free-form description of the connector and its role in the flow.
- Identifier The Odette Identifier for the remote OFTP entity (the trading partner’s identifier).
- Password The password associated with the partner’s identifier.
- Version The version of the OFTP protocol to use when exchanging files.
- Remote Host The hostname or IP address of the remote OFTP server.
- Port The port on which to connect to the remote OFTP server.
- Use SSL Whether negotiate SSL/TLS when connecting to the remote OFTP server.
- Secure Odette Authentication Whether to perform application-layer encryption and decryption. Both a signing and encryption certificate must be specified to perform this authentication.
Connection Info
Settings related to the OFTP connection parameters.
- Virtual File Format The OFTP file format to be used when transmitting files.
- Virtual File Security Whether to sign and/or encrypt outgoing messages.
- Compression Whether to compress outgoing messages.
- Request Signed Receipts Whether outgoing messages should cause a signed receipt to be returned.
Trading Partner Certificates
Settings related to the public key certificates provided by the trading partner.
- Encryption Certificate The public key certificate used for encryption when sending messages. This certificate must be paired with the trading partner’s private decryption certificate, and the trading partner should provide this public key certificate when sharing OFTP configuration details.
- SSL Server Certificate The public key certificate used to verify the identity of an SSL/TLS server. Only necessary if the partner’s OFTP system requires SSL/TLS. If the trading partner does not provide an SSL server certificate, this setting can be left blank, to allow the underlying OS/JVM to perform certificate validation, or it can be set to ‘Any Certificate’ to unconditionally trust the target server’s identity.
Routing
Settings related to routing an OFTP message through a separate OFTP entity.
- Routing Partner If outgoing OFTP messages should be routed through an OFTP entity that is separate from the target OFTP entity, then this field should be set to the OFTP connector that is configured to connect to the intermediary OFTP server. For example, if the connector needs to send files to serverA and route the file through serverB, then the connector should be configured to connect to serverA and this field should be set to an OFTP connector configured to connect to serverB.
Automation Tab
Automation Settings
Settings related to the automatic processing of files by the connector.
- Send A toggle that instructs the connector to automatically send files when they are ready.
- Retry Interval The interval the connector will wait before retrying a failed send.
- Max Attempts The number of attempts the connector will make to send the message. Setting this value to 1 instructs the connector to only make the initial send attempt without retrying. The connector waits the duration specified by Retry Interval between each attempt.
- Max Attempts (async) The maximum number of times the connector will process the input file when asynchronous receipts are requested. Success is based on the return of an asynchronous receipt within the Resend Interval after a successful server acknowledgement (if a successful server acknowledgement is not returned, Max Attempts is applied instead). If this is set to 0, the connector will resend the file indefinitely.
- Receive A toggle that instructs the connector to automatically process files when they are ready and send them to the Output tab.
- Receive Interval The interval at which the connector will process all pending files and send them to the Output tab. The next field depends on the selection here:
Hourly — A Minutes Past the Hour dropdown menu allows you to specify the number of minutes past the hour to process receive files.
Daily — A Time field appears for specifying the time of day (in UTC) to process receive files.
Weekly — Two fields appear. Day allows you to select the day of the week for processing, and Time allows you to specify the time (in UTC) to process receive files.
Monthly — Two fields appear. Day allows you to select the day of the month for processing, and Time allows you to specify the time (in UTC) to process receive files.
Minute — A Minutes field appears for specifying the number of minutes between processing intervals.
Advanced — A five-position Cron Expression field allows you to specify exact processing intervals. Highlight the field in the connector for more information about these expressions.
Performance
Settings related to the allocation of resources to the connector.
- Max Workers The maximum number of worker threads that will be consumed from the threadpool to process files on this connector. If set, overrides the default setting from the Profile tab.
- Max Files The maximum number of files that will be processed by the connector each time worker threads are assigned to the connector. If set, overrides the default setting from the Profile tab.
Advanced Tab
Optional Certificates (PEM/CER Format)
Settings related to additional certificates to use for enhanced security.
- Auth Challenge Certificate The public key certificate to present when challenged by the server to verify authenticity.
- Verification Certificate The public key certificate to use when verifying digital signatures on incoming messages.
- Receipt Verification Certificate The public key certificate to use when verifying digital signatures on incoming receipts.
- Rollover Certificate An additional certificate to use for authentication. Useful when an overlap period between certificate change is needed.
- Rollover Verification Certificate An additional certificate to use for signature verification. Useful when an overlap period between certificate change is needed.
Alternate Local Profile
Settings that override the OFTP configuration in the Profile page for this specific OFTP connector. Setting an alternate local profile allows the use of different local certificates and identifiers for certain trading partners.
- SSID Your Odette identifier. Overrides Odette Identifier in the Profile section. The OFTP Server will use the Alternate SSID and Password from this partner. When sending, this ID will be used as both the file sender and for session authentication, unless overridden by the relaying partner. If SSID and SFID are both set, the SFID will be used when sending the file.
- Password The local identifier password.
- SFID When accepting incoming OFTP files, CData Arc will process messages in this connector as though they were relayed from the local OFTP profile. Incoming network connections will still be greeted with the SSID and password from the OFTP profile (unless overridden in this section). If SSID and SFID are both set, the SFID will be used when sending the file.
- Private Certificate The certificate that will be used to decrypt incoming messages and sign outgoing messages. Overrides Data Decryption Certificate in the Profile section.
- Certificate Password The password required to access the local private certificate.
TLS Client Authentication
Settings related to client authentication when two-way TLS authentication is required.
- Use Profile Settings Instructs the connector to use the private certificate from the Profile tab
- Private Certificate The private certificate presented during SSL client authentication.
- Certificate Password The password required to access the SSL client certificate.
Automatic Certificate Identification
The fields in this section allow you to specify patterns that allow the connector to automatically identify certificates. The default wildcard character in each field instructs the connector to not search for each pattern.
Proxy Settings
Proxy Settings
Settings for using a proxy with the connector.
- Use Global A toggle that instructs the connector to use the proxy settings configured under the Settings tab of Arc.
- Proxy Type The type of proxy to use. Select None to not use a proxy. Otherwise, select Tunnel, SOCKS4, SOCKS5, or HTTP.
- Proxy Host The proxy server. Formatting depends on the Proxy Type selected.
- Proxy Port The port to use when connecting to the proxy.
- Proxy User The username to use when connecting to the proxy.
- Proxy Password The password for the associated username.
- Authentication Scheme The protocol to use when connecting to the proxy. Options include Basic, Digest, Proprietary, and NTLM.
Advanced Settings
- Credit Count The maximum credit value to be sent in the initial connection (SSID command).
- Encryption Algorithm The algorithm to use when encrypting outgoing messages.
- Exchange Buffer Size The data exchange buffer size, in bytes, to be sent in the initial connection (SSID command).
- Enforce Protocol Version Whether to accept protocol versions not configured for this partner.
- File Description Map The map to set file description text for sending files. A semi-colon-delimited list of glob patterns for matching filenames. For example, ‘INVOICE*=This is an invoice;*ORDER.*=This is an order’
- Max Record Size When the virtual file format is Fixed or Variable, this field determines the maximum size of each record. The default record size is 128.
- File Hash Algorithm The file hash algorithm to use.
- Receipt Hash Algorithm The receipt hash algorithm to use.
- Processing Delay The amount of time (in seconds) that the processing of files placed in the Input folder will be delayed by. This is useful when outisde processes write files directly to the Input folder.
- Received Filename Format Incoming files will be written to the Receive Folder using this filename convention. The following macros may be used to ensure that unique filenames are generated:
%VirtualFilename%
%VirtualFileDate%
%GUID% - TLS Enabled Protocols The list of SSL/TLS protocols supported when establishing outgoing connections. It is strongly recommended to only use TLS protocols. Some obsolete operating systems do not support TLS 1.2.
- Virtual Filename Map The map from local filenames to outgoing virtual filenames when sending files. A semi-colon-delimited list of glob patterns for matching filenames. For example, ‘INVOICE*=filename1;*ORDER.*=filename2’
Message
Settings that determine how the connector will search for messages and handle them after processing.
- Save to Sent Folder A toggle that instructs the connector to keep a copy of sent messages in the Sent folder.
- Sent Folder Scheme Instructs the connector to group files in the Sent folder according to the selected interval. For example, the Weekly option instructs the connector to create a new subfolder each week and store all sent files for the week in that folder. The blank setting tells the connector to save all files directly in the Sent folder. For connectors that process many transactions, using subfolders can help keep files organized and improve performance.
Logging
- Log Level Specifies the type of information to log in the connector’s Logs directory:
- None — Does not create any logs.
- Error — Creates logs only when the connector encounters an error.
- Warning — Creates logs only when the connector issues a warning.
- Info — Logs general information about the workflow, including any errors and warnings (if applicable).
- Debug — Logs detailed debugging information for both successful and failed workflows.
- Trace — Logs detailed trace information for both successful and failed workflows.
Please note that Debug and Trace may log sensitive information including message contents and SSL certificates. Although connection properties (such as passwords) are masked, please review logs of this level for sensitive information before sharing them outside of your organization.
- Log Subfolder Scheme Instructs the connector to group files in the Logs folder according to the selected interval. For example, the Weekly option instructs the connector to create a new subfolder each week and store all logs for the week in that folder. The blank setting tells the connector to save all logs directly in the Logs folder. For connectors that process many transactions, using subfolders can help keep logs organized and improve performance.
- Log Messages A toggle that instructs the connector to save a copy of the most recent message in the Logs directory. Note that the connector only keeps one message per subfolder, and the connector overrides the previously-saved message when it runs again.
Miscellaneous
Settings for specific use cases.
- Other Settings Allows configuration of hidden connector settings in a semicolon-separated list, like
setting1=value1;setting2=value2. Normal connector use cases and functionality should not require use of these settings.
Establishing a Connection
The following settings are required to establish an outgoing OFTP connection:
- Identifier (the trading partner’s identifier)
- Password (associated with the trading partner’s identifier)
- Remote Host
- Port
After establishing a connection, the appropriate trading partner certificates must be configured before files can be securely transferred.
Send and Receive Files
After the OFTP profile and partner-specific OFTP Connectors have been configured, files can be securely sent and received.
Send Files
Within an OFTP Connector, the Input tab displays the files that should be sent to the target trading partner. If Send Automation is enabled, files that reach the Input/Send Folder of the connector will automatically be packaged and sent. Successful transmissions are indicated by a green ‘Sent’ status, while warning and error statuses are represented in yellow and red. The log files for failing or successful transmissions can be accessed by expanding the row associated with the transmitted file.
The Create Test Files button can be used to generate a simple series of test files to send to the trading partner.
Resend and Retry
An OFTP Resend is triggered when the trading partner is expected to return an asynchronous receipt, but fails to do so within the Resend Interval duration (by default this is 60 minutes). The application then attempts to resend the transmission. The application will continue re-sending the message until a receipt is received or the Max Attempts (async) is exhausted.
A Retry is triggered when the protocol response from the trading partner’s system indicates that the server has not received the transmission. This can indicate a networking or connectivity issue, which are often transient. The application will retry the transmission every Retry Interval minutes until the transmission is received or the Max Attempts is exhausted.
Receive Files
Within an OFTP Connector, the Output tab displays the files that have been received by the application and routed to the connector. Files are routed to a specific OFTP Connector based on the Odette Identifier present in the incoming OFTP message. Each file row can be expanded to display a list of available logs for the transmission.
These files are available in the Output/Receive Folder of the connector. If the connector is connected to other connectors in the flow, files will automatically be moved from the Output/Receive Folder of the OFTP Connector to the Send directory of the next connector in the flow.
Message Routing
Each OFTP connector is configured to connect to a single OFTP entity. Sometimes OFTP involves a routing scenario, where a file originating at one OFTP entity (call it serverA) needs to pass through another OFTP entity (call it serverB) to reach the destination OFTP entity (call it serverC).
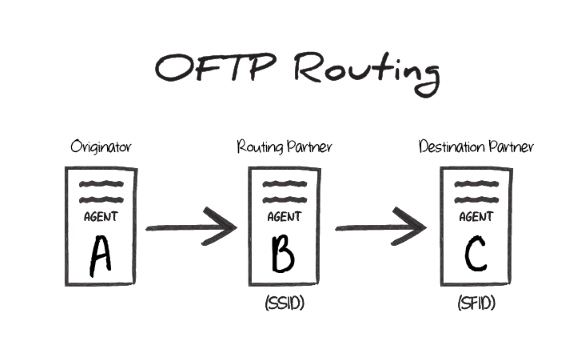
In this scenario, the Odette Identifier of serverB is the SSID value during the transfer, and the Odette Identifier of serverC is the SFID. In other words, the SSID identifies the ‘middleman’ server that the originator connects to, and the SFID identifies the target entity that this ‘middleman’ should forward/route the OFTP message to.
OFTP Routing in CData Arc
To accomplish this routing scenario in Arc, configure one OFTP Connector to connect to serverB (i.e. the ‘middleman’ server) and another OFTP Connector to connect to serverC (i.e. the destination server).
The OFTP Connector configured to connect to serverC must also have the Routing Partner field set to the OFTP Connector that is configured to connect to serverB.
Files to send out to the destination server should be processed by the OFTP Connector configured to connect to serverC. The other OFTP Connector (targeting serverB) is used behind-the-scenes to route the message, but does not directly process files within the Flow.
SSID vs SFID
If a partner provides a single identifier that they call an SFID, configure a single OFTP connector to connect with this entity, and use the SFID as the SSID. If the partner provides an SFID value and an SSID value, the SFID corresponds to serverC in the above scenario, and the SSID corresponds to serverB.