Importing and Exporting
Version 22.0.8473
Importing and Exporting
You can import and export individual connectors, flows, and entire workspaces from the Flows window in CData Arc. You import and export these components from either of the following file types:
-
ARCFLOW files (.arcflow extension): An ARCFLOW file stores exported flows, connectors, or a workspace that you can import into different instances of Arc. This file type stores only one workspace at a time.
-
ARC files (.arc extension): An ARC stores global application data that you can import into different instances of Arc. This file can contain multiple workspaces and settings as well as users, reports, or other global data.
Importing
This section provides steps for importing your data using various methods: using drag-and-drop functionality, using an ARCFLOW file, and using an ARC file. The section also explains how to resolve conflicts in your files, import sensitive data, and specify the data that you want to import.
Importing with Drag-and-Drop Functionality
If you drag an ARCFLOW file into the Flows canvas, the application imports the connectors that are in the ARCFLOW file.
After you import the file and refresh the page, the new connectors appear at positions in the flow according to the imported settings. If the new connectors are not immediately visible, they might be available in the Flows section of the toolbox on the left side of the page or in a different part of the workspace.
Importing Connectors, Flows, or a Workspace
To import a connector, flow, or workspace:
-
Click the Settings icon (gear) to the right of the Workspace field in the upper right corner of the Flows page.
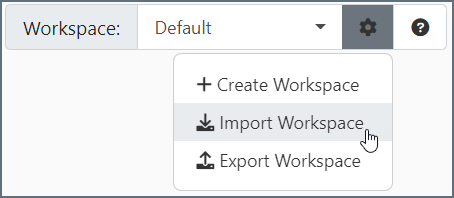
Then, select Import Workspace to open the Workspace Import dialog.
-
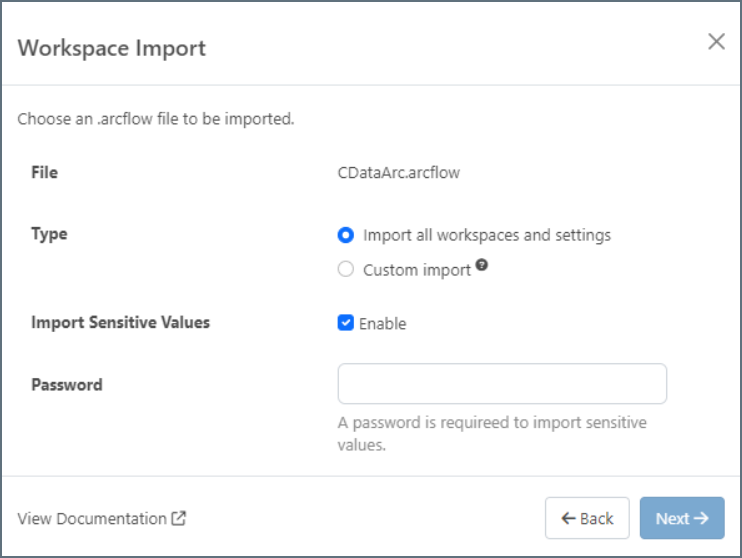
Select the file that you want to use. Then, configure the import options that you want. See Setting Import Options for details about these settings.
-
Click Next to start the import process.
The resulting ARCFLOW file contains the connectors, flows, and workspace that you want to import.
After you import the file and refresh the page, the new connectors appear at positions in the flow according to the imported settings. If the new connectors are not immediately visible, they might be available in the Flows section of the toolbox on the left side of the page.
Importing Multiple Workspaces and Global Application Data
To import multiple workspaces and global application data:
-
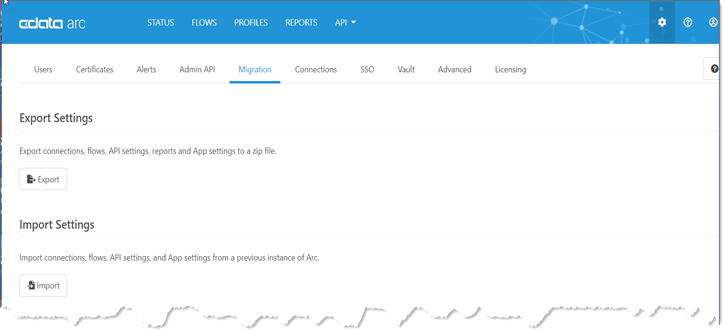
Click the Settings icon in the blue header of the Flows page to open a Settings pane.

-
Click the Migrations tab. This tab enables you to perform a full import of the application, which includes all of the application’s data and settings.
-
Click Import under the Import Settings category. This action opens the Application Settings Import dialog.
-
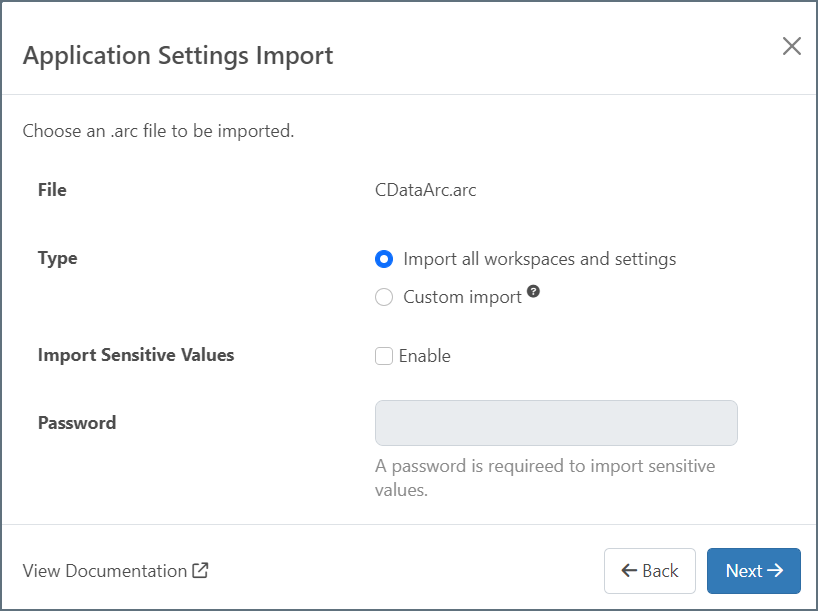
Select the file that you want to use. Then, configure the settings that you want. See Setting Import Options for details about these settings.
-
Click Next to start the import process.
Note: If there are any conflicts in your file, the Resolve Import Conflicts dialog is displayed before you can continue the import. See Resolving Import Conflicts for details about the options in that dialog.
The resulting ARC file contains the workspaces and global application data that you want to import.
Setting Import Options
When you import data, set the following options to choose the file to import, specify what data in the file to import, and to specify whether to import sensitive data.
-
File: Select the ARC or ARCFLOW file that you want to import.
-
Type: Select the type of import that you want. Choose the appropriate option below to import all workspaces and data to create a custom import:
-
Import all workspaces and settings: This option imports everything that your file contains. This setting is the default value for Type.
-
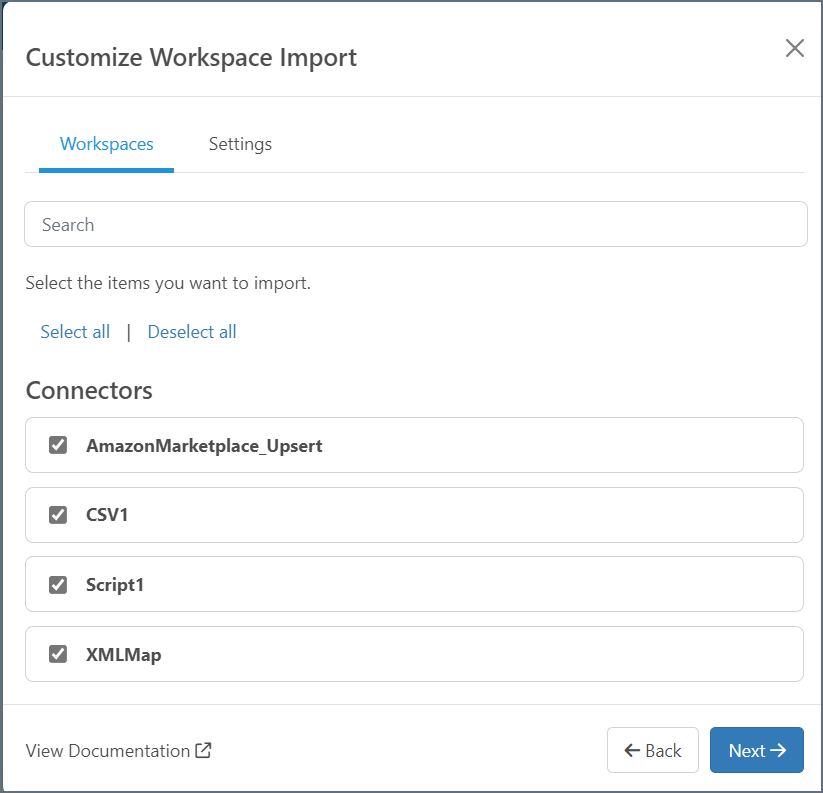
Custom import: This option enables you to select which components that you want to export in the Customize Workspace Import dialog (for ARCFLOW files) or the Customize Application Settings Import dialog (for ARC files). For example, the following image shows the Customize Workspace Import dialog. The Customize Application Settings Import dialog is similar.
-
-
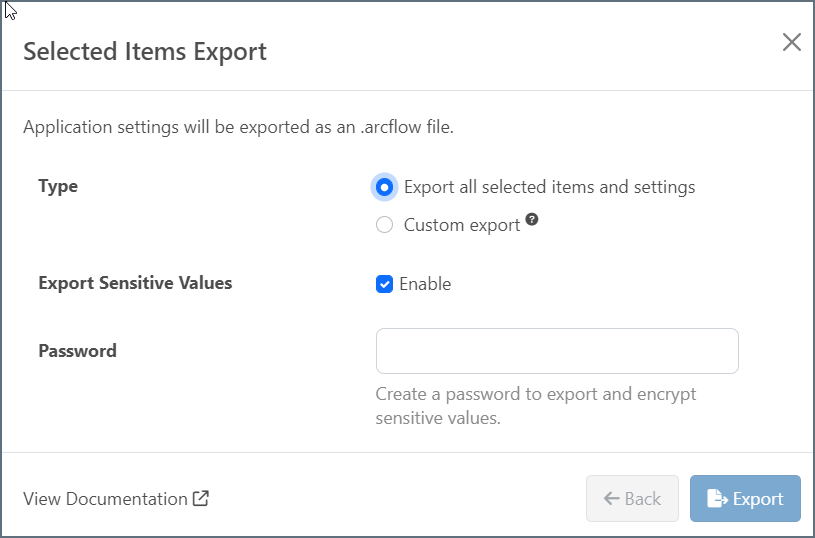
Import Sensitive Values: To import sensitive values, you must specify the Import Sensitive Values option explicitly in the Workspace Import dialog (ARCFLOW files) or in the Application Settings Import dialog (ARC files). To do so, select the Enable checkbox to the right of that option, as shown in this example:
When this option is enabled, you must provide a password.
When you enter a password, Arc decrypts the sensitive values that are saved in port.cfg files, adds them to the export file, and encrypts them with the password that you provide.
-
If you provide a password that does not match that of the file, Arc displays an error and does not import any information.
-
If you do not enter a password, Arc masks and excludes sensitive values from the export file.
-
Resolving Import Conflicts
When you import a file, your file might contain conflicts. If your file contains conflicts, the Resolve Import Conflicts dialog is displayed.
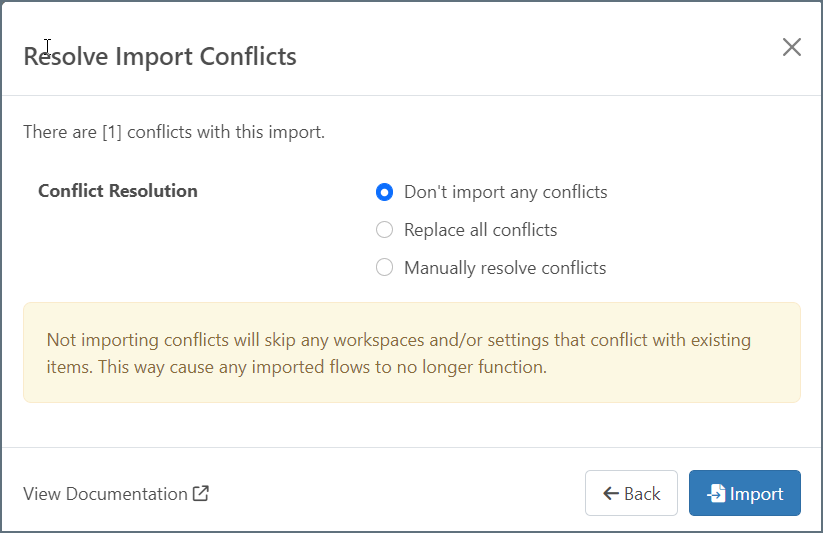
This dialog provides three methods that you can use to resolve the conflicts:
-
Don’t import any conflicts: No resources in the imported file overwrite anything that already exists in the application. This method is the default option. Note: This option, potentially, can cause any imported flows not to function as expected.
-
Replace all conflicts: All the resources in the imported file are accepted, overwriting any resources that might already exist. Note: This option, potentially, can cause any overwritten flows not to function as expected.
-
Manually resolve conflicts: With this option, you are presented with another dialog where you can select exactly which resources you want to replace (the Replace option in the dialog) and which resources you want to skip (the Don’t Import option in the dialog).
If you select either of the first two methods, you then can click Import to continue the process.
If you select the third method, either the Review Flow Import Conflicts dialog (ARCFLOW files) or the Review Application Settings Import Conflicts dialog (ARC files) is displayed, as shown in this example:
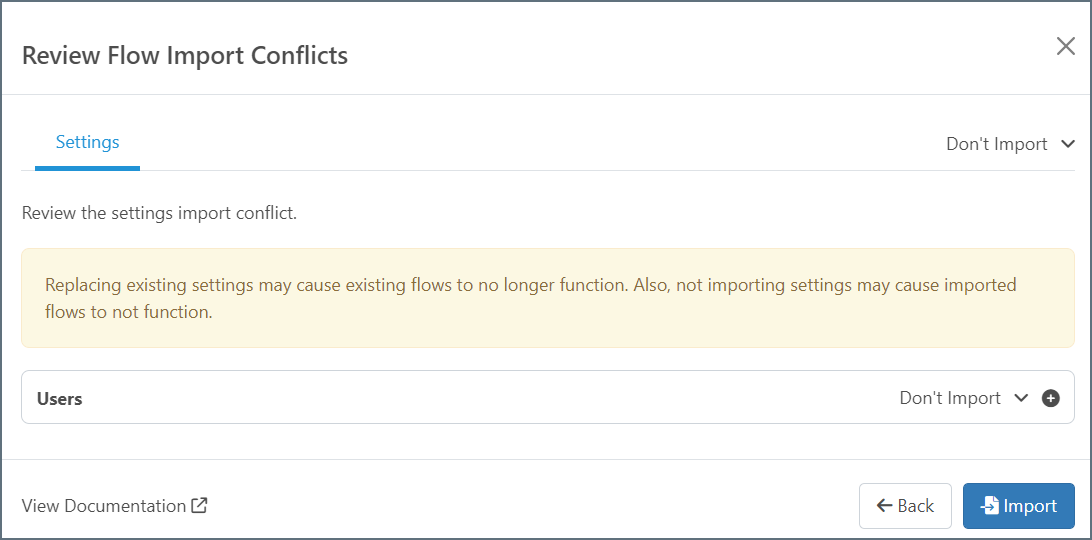
After you manually resolve the conflicts there, click Import to continue the process.
Exporting
This section provides steps for how export individual connectors, flows, and workspaces. The section also explains how to import sensitive data and specify the data that you want to export.
Exporting an Individual Connector
To export individual connectors in an ARCFLOW file:
-
Right-click a connector within the flow and select Export Connector Settings.
-
Configure the export options in the Selected Items Export dialog. See Setting Export Options for details about these options.
-
Click Export.
The resulting ARCFLOW file contains the connector that you want to export.
Exporting a Flow
To export multiple connectors within a single Flows canvas:
-
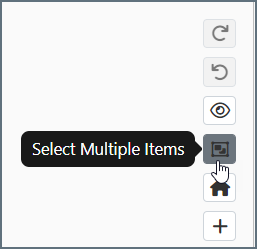
Enable multi-select mode via the Select Multiple Items button on the lower right of the page.
-
Click and drag the multi-select cursor in the flow to create a box that contains each of the connectors that you want.
-
Release the cursor to select the connectors in the box.
-
Right-click any of the selected connectors and select Export Connector Settings.
-
Configure the export options that you want in the Selected Items Export dialog. See Setting Export Options for details about these options.
-
Click Export.
Exporting a Workspace
To export a workspace:
-
Click Settings (the gear icon) to the right of the Workspace field on the upper right corner of the Flows window.
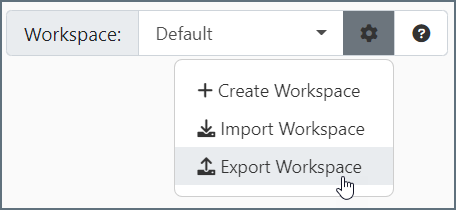
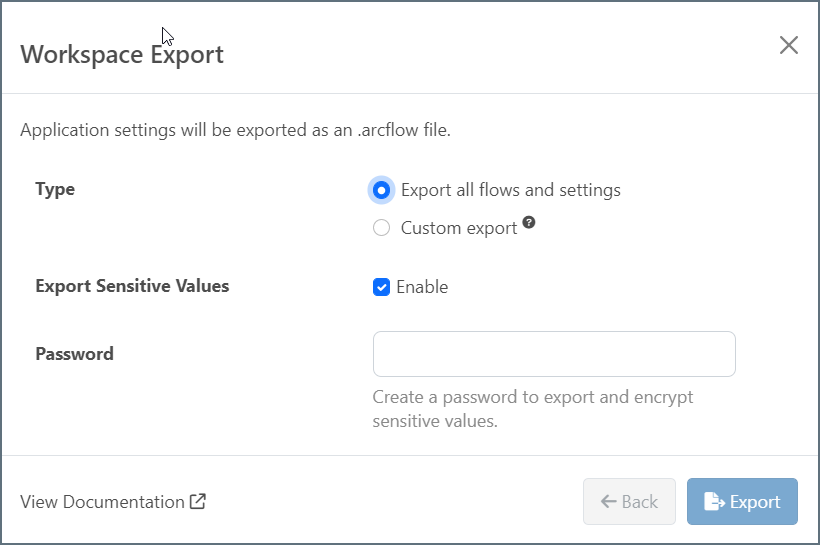
Then, select Export Workspace to open the Workspace Export dialog.
-
Configure the export options that you want. See Setting Export Options for details about these options.
-
Click Export to continue the export process.
The resulting ARCFLOW file contains all the connector-settings files for the specified workspace that you want to export.
Exporting Multiple Workspaces and Global Application Configuration Data
To export multiple workspaces and global application data:
-
Click Settings (the gear icon) in the blue header of the Flows window to open the Settings pane.
-
Click the Migrations tab. On this tab, you can select global settings for exports and imports. This tab enables you to perform a full export of the application, which includes all of the application’s data and settings.
-
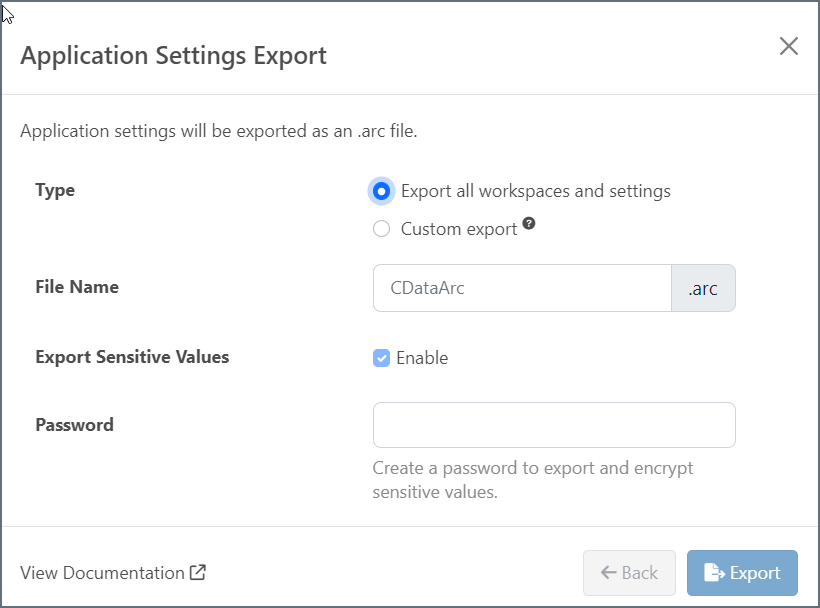
Click Export under the Export Settings category. This action opens the Application Settings Export dialog.
-
Configure the settings that you want. See Setting Export Options for details about these options.
Note: For global exports, the Export Sensitive Values setting is selected by default, and you must provide a password.
-
Click Export to start the export process.
The resulting ARC file contains the workspaces and global application data.
Setting Export Options
When you export data, set the following options to choose the file to use, to specify what data in the file to export, and to specify whether to export sensitive data.
-
File: Select the ARC or ARCFLOW file that you want to export.
-
Type: Select the type of export that you want. Choose the appropriate option below to export all workspaces and data or to create a custom export:
-
Export all workspaces and settings: This option exports everything that your file contains. This setting is the default value for Type.
-
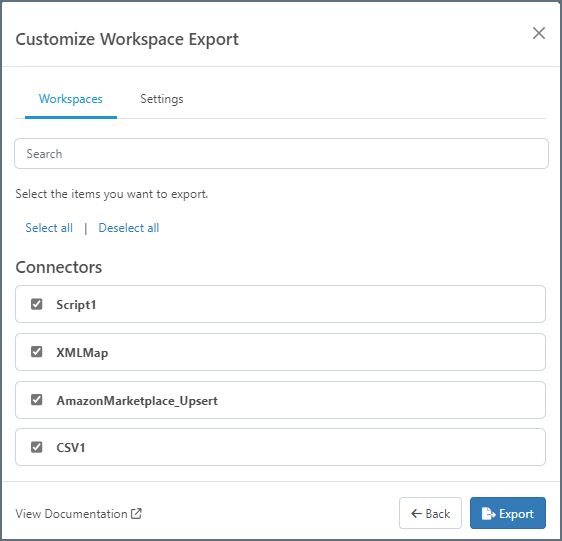
Custom export: This option enables you to select which components that you want to export in the Customize Workspace Export dialog (ARCFLOW files) or the Customize Application Settings Export dialog (ARC files). For example, the following image shows the Customize Workspace Export dialog. The Customize Application Settings Export dialog is similar.
-
-
Export Sensitive Values: To export sensitive values, you must specify the Export Sensitive Values setting explicitly in the Workspace Export dialog for ARCFLOW files. To do so, select the Enable checkbox to the right of that option, as shown in this example:
When this option is enabled, you must provide a password.
Note: For ARC files that you are exporting, you must provide a password. So, this option is enabled by default in the Application Settings Export dialog.
When you enter a password, Arc decrypts the sensitive values that are saved in port.cfg files, adds them to the export file, and encrypts them with the password that you provide.
For ARCFLOW files only: If you do not enter a password, Arc masks and excludes sensitive values from the export file.