SAP IDoc Connector
Version 22.0.8473
Version 22.0.8473
SAP IDoc Connector
The IDoc Connector supports sending and receiving IDoc files to and from a variety of SAP systems.
Overview
IDoc Connectors can connect to SAP using any of the following methods:
Windows
- NetWeaver RFC SDK
- Classic RFC SDK
- Classic RFC SDK with Unicode Support
- SOAP (send-only)
Java
- Java Connector (JCO)
- SOAP (send-only)
IDoc Connectors can send and retrieve files formatted either as raw IDoc or as IDoc XML.
Connector Configuration
This section contains all of the configurable connector properties.
Settings Tab
Host Configuration
Settings related to establishing the connection to the SAP system.
- Connector Id The static name of the connector. All connector-specific files are held in a folder by the same name within the Data Directory.
- Connector Description An optional field to provide free-form description of the connector and its role in the flow.
- Connect Type The method with which to connect to SAP.
- SAP Host Hostname or IP address of the target SAP system.
- System Number The number by which the target SAP system is defined. Valid values are 0-99, and often this value should be 0.
Client Authentication
Settings related to authenticating against the SAP system.
- Client The client that is authenticating to the SAP system.
- User The username credential for authentication.
- Password The password credential for authentication.
Receiver Options
Settings related to receiving IDoc files.
- Enable IDoc Receiver Whether the connector should retrieve IDoc files from SAP.
- Program ID A unique name that identifies CData Arc to the SAP system.
- IDoc Format Whether to receive files as raw IDoc or IDoc XML.
Control Record Information Options
This section allows for overwriting the control headers for IDoc files before sending them to SAP. This is useful when receiving IDoc files from one SAP system and sending them to another SAP system: in this case the control record should be changed without changing the IDoc file data.
Automation Tab
Automation Settings
Settings related to the automatic processing of files by the connector.
- Send Whether files arriving at the connector will automatically be sent.
- Retry Interval The amount of time before a failed send is retried.
- Max Attempts The maximum number of times a failed send will be retried.
Advanced Tab
Performance
Settings related to the allocation of resources to the connector.
- Max Workers The maximum number of worker threads that will be consumed from the threadpool to process files on this connector. If set, overrides the default setting from the Profile tab.
- Max Files The maximum number of files that will be processed by the connector each time worker threads are assigned to the connector. If set, overrides the default setting from the Profile tab.
Language Settings
Settings related to communication language.
- Language The language value to be used when connecting to the SAP system. This should be set to the ISO 639-1 for the language the SAP system uses.
Gateway
Settings related to communicating with SAP through a gateway.
- Gateway Host The hostname or IP address of the gateway through which to connect.
- Gateway Service The gateway service to use.
Logon Load Balancing
Settings related to logging in to the SAP system as a group to enable load balancing.
- Message Server The service name of the load balancer.
- System ID Identifies the SAP system.
- Logon Group The group to use when load balancing.
Secure Network Communications (SNC)
Settings related to using an external security product to enhance the SAP connection security.
- SNC Name The SNC name for the machine making the connection.
- SNC Partner Name The SNC name of the SAP system the connector is connecting to.
- SNC Quality of Protection Level The level of protection added by the SNC product.
- SNC Library The path to the external security product’s library.
Logging
Settings that govern the creation and storage of logs.
- Log Level Specifies the type of information to log in the connector’s Logs directory:
- None — Does not create any logs.
- Error — Creates logs only when the connector encounters an error.
- Warning — Creates logs only when the connector issues a warning.
- Info — Logs general information about the workflow, including any errors and warnings (if applicable).
- Debug — Logs detailed debugging information for both successful and failed workflows.
- Trace — Logs detailed trace information for both successful and failed workflows.
Please note that Debug and Trace may log sensitive information including message contents and SSL certificates. Although connection properties (such as passwords) are masked, please review logs of this level for sensitive information before sharing them outside of your organization.
- Log Subfolder Scheme Instructs the connector to group files in the Logs folder according to the selected interval. For example, the Weekly option instructs the connector to create a new subfolder each week and store all logs for the week in that folder. The blank setting tells the connector to save all logs directly in the Logs folder. For connectors that process many transactions, using subfolders can help keep logs organized and improve performance.
- Log Messages A toggle that instructs the connector to save a copy of the most recent message in the Logs directory. Note that the connector only keeps one message per subfolder, and the connector overrides the previously-saved message when it runs again.
- Rotate log files The number of days a log file should be used before another log file is started.
- Delete log files The number of days a log file should be maintained before it is deleted.
Other Settings
Settings not included in the previous categories.
- Parent Connector The connector from which settings should be inherited, unless explicitly overwritten within the existing connector configuration. Must be set to a connector of the same type as the current connector.
- RefreshSchemaOnError When enabled, the connector will attempt to update the schema it uses for parsing when a parsing error occurs. The schema is updated by reaching out to the SAP system and querying for the appropriate schema.
- Log Messages Whether logs from processed files will include a copy of the file itself.
- Save to Sent Folder Whether files processed by the connector should be copied to the Sent folder for the connector.
Miscellaneous
Settings for specific use cases.
- Other Settings Allows configuration of hidden connector settings in a semicolon-separated list, like
setting1=value1;setting2=value2. Normal connector use cases and functionality should not require use of these settings.
Establishing a Connection
Using NetWeaver RFC SDK
The following libraries from the NetWeaver RFC SDK must be placed into the www\bin\x64 folder of Arc (www\bin\x86 on 32-bit operating systems):
- sapnwrfc.dll
- icudt30.dll
- icuin30.dll
- icuuc30.dll
- libicudecnumber.dll
- libsapucum.dll
Note that the .dll names may be different depending on the version of the SAP RFC SDK installed. The examples above are for version 3.0.
Also note that you will need to add the “sapgw00” service to your listed services for the NetWeaver SDK connection to work on your client machine. This can be added to the services file at the location “C:\Windows\System32\drivers\etc\services”.
Using Classic RFC SDK
The non-Unicode library does not require anything other than librfc32.dll. Place librfc32.dll into the www\bin\x64 folder of Arc (www\bin\x86 on 32-bit operating systems). Please note that these libraries are provided in both x86 and x64, so you must use the same platform that the process is using. If the application is running on on a 64-bit version of Windows, the process is 64-bit.
Using Classic RFC SDK with Unicode support
The following libraries from the SAP RFC SDK must be placed into the www\bin\x64 folder of Arc (www\bin\x86 on 32-bit operating systems):
- librfc32u.dll
- icudt30.dll
- icuin30.dll
- icuuc30.dll
Note that the .dll names may be different depending on the version of the SAP RFC SDK installed. The examples above are for version 3.0. Please note that these libraries are provided in both x86 and x64, so you must use the same platform that the process is using. If the application is running on on a 64-bit version of Windows, the process is 64-bit.
Using the Java Connector
In order to use the Java Connector, the sapjco3.jar must be added to the lib folder of your Java servlet container.
Using SOAP
SOAP can only be used for sending IDocs to SAP. In order to receive IDocs from SAP, a different connection type must be used.
Note that this requires enabling SOAP connections on the SAP system.
Configuring Services
In addition to the dependencies above, the following services must be added to %WINDIR%\system32\drivers\etc\services, or /etc/services if your system is running Linux or Mac OS X. If SAP NetWeaver is already installed on the machine, then no further action is required.
| Service Name | Connector Number/Protocol |
|---|---|
| sapdp00 | 3200/tcp |
| sapdp01 | 3201/tcp |
| sapdp02 | 3202/tcp |
| sapdp03 | 3203/tcp |
| sapdp04 | 3204/tcp |
| sapdp05 | 3205/tcp |
| sapdp06 | 3206/tcp |
| sapdp07 | 3207/tcp |
| sapdp08 | 3208/tcp |
| sapdp09 | 3209/tcp |
| sapdp10 | 3210/tcp |
| sapdp11 | 3211/tcp |
| sapdp12 | 3212/tcp |
| sapdp13 | 3213/tcp |
| sapdp14 | 3214/tcp |
| sapdp15 | 3215/tcp |
| sapdp16 | 3216/tcp |
| sapdp17 | 3217/tcp |
| sapdp18 | 3218/tcp |
| sapdp19 | 3219/tcp |
| sapdp20 | 3220/tcp |
| sapdp21 | 3221/tcp |
| sapdp22 | 3222/tcp |
| sapdp23 | 3223/tcp |
| sapdp24 | 3224/tcp |
| sapdp25 | 3225/tcp |
| sapdp26 | 3226/tcp |
| sapdp27 | 3227/tcp |
| sapdp28 | 3228/tcp |
| sapdp29 | 3229/tcp |
| sapdp30 | 3230/tcp |
| sapdp31 | 3231/tcp |
| sapdp32 | 3232/tcp |
| sapdp33 | 3233/tcp |
| sapdp34 | 3234/tcp |
| sapdp35 | 3235/tcp |
| sapdp36 | 3236/tcp |
| sapdp37 | 3237/tcp |
| sapdp38 | 3238/tcp |
| sapdp39 | 3239/tcp |
| sapdp40 | 3240/tcp |
| sapdp41 | 3241/tcp |
| sapdp42 | 3242/tcp |
| sapdp43 | 3243/tcp |
| sapdp44 | 3244/tcp |
| sapdp45 | 3245/tcp |
| sapdp46 | 3246/tcp |
| sapdp47 | 3247/tcp |
| sapdp48 | 3248/tcp |
| sapdp49 | 3249/tcp |
| sapdp50 | 3250/tcp |
| sapdp51 | 3251/tcp |
| sapdp52 | 3252/tcp |
| sapdp53 | 3253/tcp |
| sapdp54 | 3254/tcp |
| sapdp55 | 3255/tcp |
| sapdp56 | 3256/tcp |
| sapdp57 | 3257/tcp |
| sapdp58 | 3258/tcp |
| sapdp59 | 3259/tcp |
| sapdp60 | 3260/tcp |
| sapdp61 | 3261/tcp |
| sapdp62 | 3262/tcp |
| sapdp63 | 3263/tcp |
| sapdp64 | 3264/tcp |
| sapdp65 | 3265/tcp |
| sapdp66 | 3266/tcp |
| sapdp67 | 3267/tcp |
| sapdp68 | 3268/tcp |
| sapdp69 | 3269/tcp |
| sapdp70 | 3270/tcp |
| sapdp71 | 3271/tcp |
| sapdp72 | 3272/tcp |
| sapdp73 | 3273/tcp |
| sapdp74 | 3274/tcp |
| sapdp75 | 3275/tcp |
| sapdp76 | 3276/tcp |
| sapdp77 | 3277/tcp |
| sapdp78 | 3278/tcp |
| sapdp79 | 3279/tcp |
| sapdp80 | 3280/tcp |
| sapdp81 | 3281/tcp |
| sapdp82 | 3282/tcp |
| sapdp83 | 3283/tcp |
| sapdp84 | 3284/tcp |
| sapdp85 | 3285/tcp |
| sapdp86 | 3286/tcp |
| sapdp87 | 3287/tcp |
| sapdp88 | 3288/tcp |
| sapdp89 | 3289/tcp |
| sapdp90 | 3290/tcp |
| sapdp91 | 3291/tcp |
| sapdp92 | 3292/tcp |
| sapdp93 | 3293/tcp |
| sapdp94 | 3294/tcp |
| sapdp95 | 3295/tcp |
| sapdp96 | 3296/tcp |
| sapdp97 | 3297/tcp |
| sapdp98 | 3298/tcp |
| sapdp99 | 3299/tcp |
| sapgw00 | 3300/tcp |
| sapgw01 | 3301/tcp |
| sapgw02 | 3302/tcp |
| sapgw03 | 3303/tcp |
| sapgw04 | 3304/tcp |
| sapgw05 | 3305/tcp |
| sapgw06 | 3306/tcp |
| sapgw07 | 3307/tcp |
| sapgw08 | 3308/tcp |
| sapgw09 | 3309/tcp |
| sapgw10 | 3310/tcp |
| sapgw11 | 3311/tcp |
| sapgw12 | 3312/tcp |
| sapgw13 | 3313/tcp |
| sapgw14 | 3314/tcp |
| sapgw15 | 3315/tcp |
| sapgw16 | 3316/tcp |
| sapgw17 | 3317/tcp |
| sapgw18 | 3318/tcp |
| sapgw19 | 3319/tcp |
| sapgw20 | 3320/tcp |
| sapgw21 | 3321/tcp |
| sapgw22 | 3322/tcp |
| sapgw23 | 3323/tcp |
| sapgw24 | 3324/tcp |
| sapgw25 | 3325/tcp |
| sapgw26 | 3326/tcp |
| sapgw27 | 3327/tcp |
| sapgw28 | 3328/tcp |
| sapgw29 | 3329/tcp |
| sapgw30 | 3330/tcp |
| sapgw31 | 3331/tcp |
| sapgw32 | 3332/tcp |
| sapgw33 | 3333/tcp |
| sapgw34 | 3334/tcp |
| sapgw35 | 3335/tcp |
| sapgw36 | 3336/tcp |
| sapgw37 | 3337/tcp |
| sapgw38 | 3338/tcp |
| sapgw39 | 3339/tcp |
| sapgw40 | 3340/tcp |
| sapgw41 | 3341/tcp |
| sapgw42 | 3342/tcp |
| sapgw43 | 3343/tcp |
| sapgw44 | 3344/tcp |
| sapgw45 | 3345/tcp |
| sapgw46 | 3346/tcp |
| sapgw47 | 3347/tcp |
| sapgw48 | 3348/tcp |
| sapgw49 | 3349/tcp |
| sapgw50 | 3350/tcp |
| sapgw51 | 3351/tcp |
| sapgw52 | 3352/tcp |
| sapgw53 | 3353/tcp |
| sapgw54 | 3354/tcp |
| sapgw55 | 3355/tcp |
| sapgw56 | 3356/tcp |
| sapgw57 | 3357/tcp |
| sapgw58 | 3358/tcp |
| sapgw59 | 3359/tcp |
| sapgw60 | 3360/tcp |
| sapgw61 | 3361/tcp |
| sapgw62 | 3362/tcp |
| sapgw63 | 3363/tcp |
| sapgw64 | 3364/tcp |
| sapgw65 | 3365/tcp |
| sapgw66 | 3366/tcp |
| sapgw67 | 3367/tcp |
| sapgw68 | 3368/tcp |
| sapgw69 | 3369/tcp |
| sapgw70 | 3370/tcp |
| sapgw71 | 3371/tcp |
| sapgw72 | 3372/tcp |
| sapgw73 | 3373/tcp |
| sapgw74 | 3374/tcp |
| sapgw75 | 3375/tcp |
| sapgw76 | 3376/tcp |
| sapgw77 | 3377/tcp |
| sapgw78 | 3378/tcp |
| sapgw79 | 3379/tcp |
| sapgw80 | 3380/tcp |
| sapgw81 | 3381/tcp |
| sapgw82 | 3382/tcp |
| sapgw83 | 3383/tcp |
| sapgw84 | 3384/tcp |
| sapgw85 | 3385/tcp |
| sapgw86 | 3386/tcp |
| sapgw87 | 3387/tcp |
| sapgw88 | 3388/tcp |
| sapgw89 | 3389/tcp |
| sapgw90 | 3390/tcp |
| sapgw91 | 3391/tcp |
| sapgw92 | 3392/tcp |
| sapgw93 | 3393/tcp |
| sapgw94 | 3394/tcp |
| sapgw95 | 3395/tcp |
| sapgw96 | 3396/tcp |
| sapgw97 | 3397/tcp |
| sapgw98 | 3398/tcp |
| sapgw99 | 3399/tcp |
Logging on to SAP
The following settings are required for connecting with your SAP system.
- SAP Host Host name of the target system. Host names can be regular host names defined in a “hosts” file, an IP address like “123.123.123.123”, or an SAProuter address such as “/H/hostname/S/connector/H/host/S/connector/…”
- System Number The number by which the target system is defined. The valid range is 0 to 99, but in general, this is 0.
- Client The client authenticating to the SAP system.
- User The user that is authenticating to the SAP system.
- Password The password used to authenticate to the SAP system.
Gateway
When connecting to your SAP via a Gateway, use the options available in the Gateway section found in the Advanced tab of this connector’s settings.
Load Balancing
To log on via Load Balancing, set the properties in the Advanced->Load Balancing section.
Secure Network Communications (SNC)
You can enable Secure Network Communications (SNC) on the Advanced tab. Set the SNC Library setting to the .dll of the SNC library you wish to use to connect with SAP.
Sending IDocs to SAP
Once you have configured the IDoc Connector to connect to your SAP system, you can begin sending IDoc files to SAP. The IDoc Connector can send files formatted in raw IDoc or XML IDoc.
You can configure the connector to automatically insert control record information into the IDoc being sent to SAP such as the DOCREL, SNDPOR, SNDPRT, etc. This makes it easier to process outgoing IDocs to the configured system. These settings can be configured in the section Control Record Information of the Connector Settings page.
Before sending an IDoc to your SAP system, you need to make sure that you have properly configured a correct partner profile in SAP. If no partner profile in SAP matches the control record information in the IDoc you are sending, the data will not be processed by your SAP system. You can read more information about setting up a partner profile in the testing section below.
You can use transaction code WE60 to search for segment documentation for different IDoc types.
Test Sending an IDoc to SAP
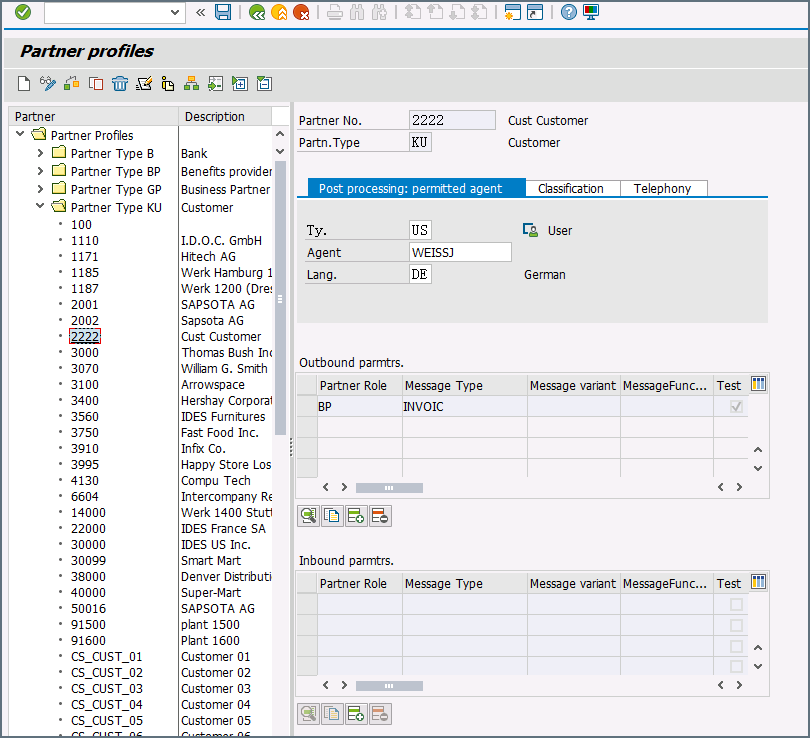
To test sending an IDoc to SAP, you first need to configure your SAP system to have a partner profile for Arc. The following steps will show you how to do this with an ORDERS IDoc.
-
Create a partner: Go to transaction code WE20 and define a partner profile. You’ll need to set the partner type to KU for “Customer” and the partner number to a valid customer number.
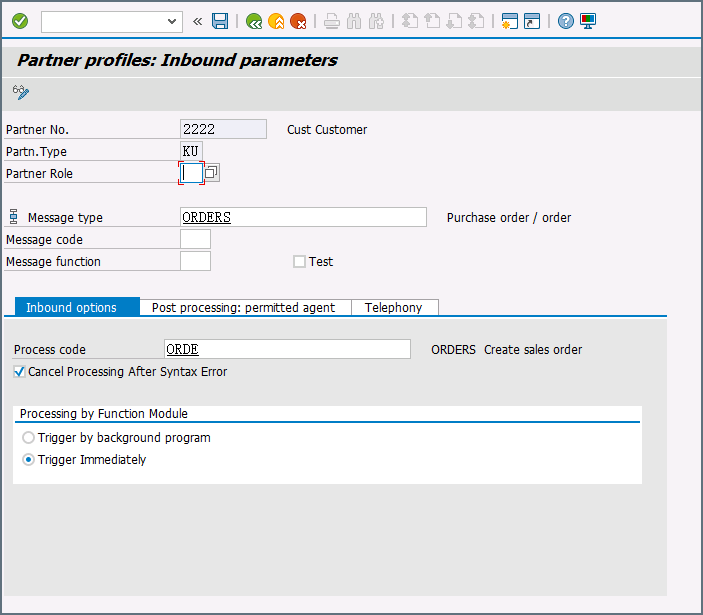
-
You then need to add an inbound parameter for the ORDERS document. The message type for this document is ORDERS and on the Inbound Options tab, you will need to set the process code as ORDE to tell SAP how to create a sales order when the purchase order ORDERS document is received by the SAP system.
-
Assign the customer to a sales division: The customer configured in step one must be assigned to a sales organization, distribution channel, and division. Go to transaction VOE2 to configure these settings in the EDSDC table.
Receiving IDocs from SAP
Once you have configured the IDoc Connector to connect to your SAP system, you can begin receiving IDoc files from SAP. The IDoc Connector can receive files formatted in raw IDoc or XML IDoc.
To receive files from SAP, create an RFC destination for Arc. You can then select the Enable IDoc Receiver option on the Settings page for your connector and enter the program Id that you registered in your SAP system for Arc.
Test Receiving an IDoc from SAP
This example will describe the steps to configure your SAP system to send a MATMAS IDoc to Arc.
- Define a logical system: First, go to transaction SALE. Next go to Basic Settings -> Logical Systems -> Define Logical System. Create a new entry with a valid name (e.g., Arc) and description.
-
Create an RFC destination: Open transaction code SM59. Click the create button and fill in the fields for the RFC destination described below.
- RFC Destination A unique name for the new destination (for example, Arc_DEST).
- Connection Type ‘T’ for TCP/IP.
- Description A description for the destination.
- Program Id A unique name that will be set in Arc to identify the destination.
- Activation Type Select Registered Server Program.
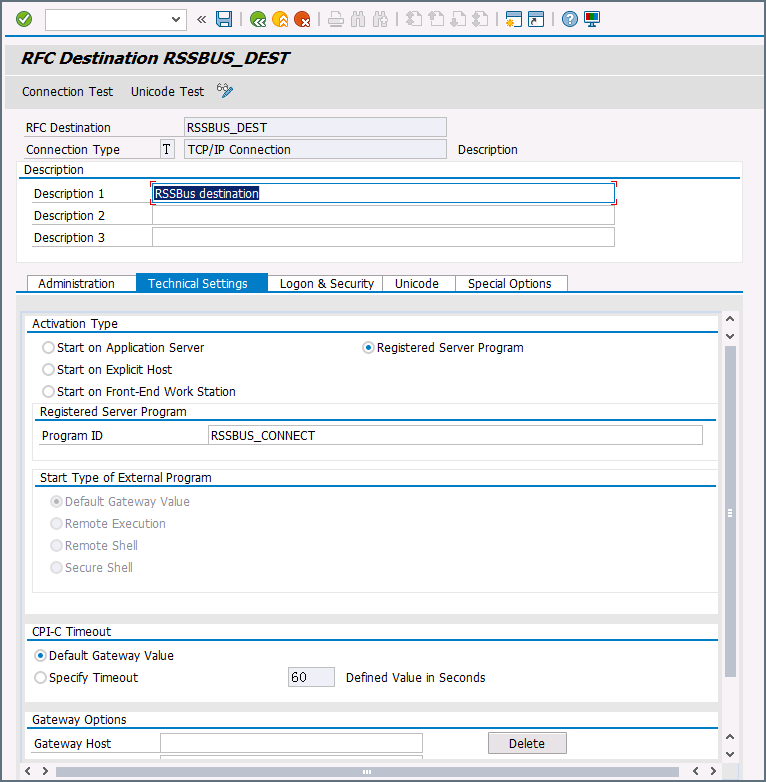
Once you’ve saved the settings, you can test the connection to see if you can successfully connect to Arc.
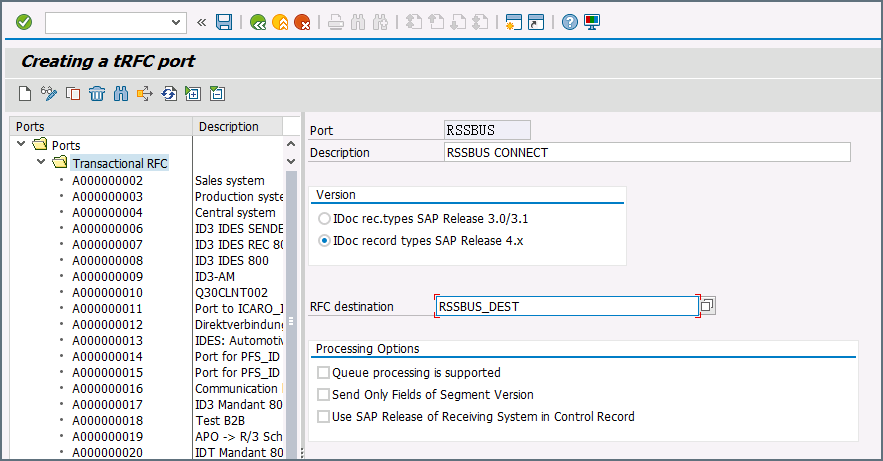
-
Create a processing connector: Go to transaction code WE21. Create a new Transactional RFC connector with a unique name and the same destination you created in step 2.
-
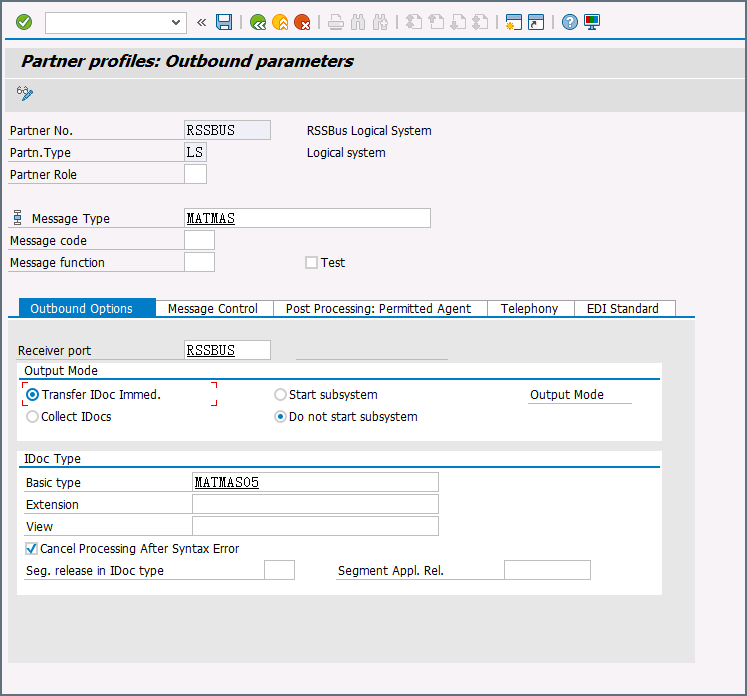
Create a partner profile: Open transaction WE20. Create a partner profile for the logical system that was added in step 1. Next add an outbound parameter for the MATMAS document. The message type should be MATMAS. In the Outbound Options section, the receiver connector should be the same as the connector configured in step 3, the output mode should be set to “Transfer IDoc Immed.”, and the IDoc basic type should be set to MATMAS05.
- Send a test IDoc: Use transaction BD10 to send a test IDoc to Arc for a specified material number. You will need to configure the Message Type and Logical System before sending the message. You can use transaction BD87 to monitor outgoing messages and process them again if necessary.