Cross-Platform Edition
Version 24.3.9159
Version 24.3.9159
Cross-Platform Edition
The Cross-Platform edition of CData Arc includes an embedded Eclipse Jetty web server so that you can run Arc without any external server configuration. In addition, the installation includes a WAR file that can be deployed to any Java servlet container like Apache Tomcat, Eclipse Jetty, or IBM WebSphere.
The embedded Jetty server requires that JDK 11 or later is installed on the machine. Deploying to an external Java servlet container requires Servlet 3.0 (Jetty 8+, Tomcat 7+, WebSphere 8+, and so on).
Note: No matter how you choose to deploy Arc, the files and folders in AppDirectory must be readable and writable by the user who runs the application. The service installer that is included with the Java Edition setup uses cdataarc as this user.
If the application was run previously as a different user and you want to restore the necessary permissions for an cdataarc user to run the application, you should use a command similar to this example:
sudo chown -R cdataarc:cdataarc /opt/arc
Windows
In Windows, Arc is installed as a service by default. To access the application, you must first ensure that the service is running. Once the service is running, you can access the Arc admin console by opening a web browser and entering http://localhost:8080/ in the URL field.
You can also run the application without the service through a java command. CData recommends using the service, but this method can be useful for certain configurations.
Starting and Stopping the Service
You can start and stop the service in any of the following ways:
-
Start menu shortcuts (recommended)
-
Command prompt commands
Start Menu Shortcuts
The Arc installer creates start menu shortcuts that allow you to easily use the application. To access these shortcuts, open the Start menu and expand the CData Arc folder. These shortcuts are available:
-
Launch CData Arc Admin Console: Opens a web browser window in your default web browser to the admin console URL, http://localhost:8080/. If the service is not running, the web browser returns an error.
-
Start CData Arc: Starts the Arc service. By default, this service runs when Windows starts so you do not need to run this command every time you run the application.
-
Stop CData Arc: Stops the Arc service. This action is necessary when you upgrade Arc.
Services Management Console
To open the Services Management Console, open the start menu and type services. Select the Services application that appears.
Scroll down to the service called CData Arc. If that service is running, the Status column says Running. Right-click the service to access options to Start, Stop, and Restart it.
Command Prompt
Advanced users can use a Windows command prompt to issue commands manually to the service. Open a command prompt and change the directory to the installation folder (by default, C:\Program Files\CData\CData Arc).
Note: You can also use a Microsoft PowerShell window to issue these commands, but the syntax is slightly different. Modify the commands accordingly if you use PowerShell.
To start the Arc service, issue this command:
arc.exe -start
Use the following commands to restart or stop the service:
arc.exe --restart --ServiceName "CData Arc"
arc.exe --stop --ServiceName "CData Arc"
Launching Without the Service
To run Arc without starting the service, open a command prompt in the installation folder. Issue the following command to start the application:
java -jar arc.jar
Linux
After you install Arc to a location of your choice, you can run Arc as a service or run the application manually. CData recommends using a service if you use Arc for critical applications.
Running Arc as a Service
Running Arc as a service enables the application to run independently from any user process and to restart automatically upon rebooting. This is the preferred method critical applications.
CData recommends creating a daemon to manage the Arc application on Linux. A script that is included in the installation package can do this automatically. You can also create the daemon manually if necessary.
The safest way to configure the Arc daemon is to run the script that is included in the installation package, provided that the system uses the systemd daemon manager:
bash ./service.sh
This script creates a daemon called arc.service. You can then use systemctl to manage the daemon:
systemctl enable arc
systemctl start arc
Running the Standalone Application
To start Arc without creating a service, use the terminal to open the arc.jar file in the installation directory with a configuration file argument, as shown here:
java -jar arc.jar
Configuring the Embedded Jetty Server
Arc comes pre-configured to work immediately in any environment. However, you can customize the way you access the data that is exposed in Arc by generating the arc.properties file in the Arc installation directory (for Windows, this is C:\Program Files\CData\CData Arc by default).
Generating the arc.properties File
Before you can make any customizations to the embedded Jetty server, you must create the arc.properties file. Run the following command in the installation directory where arc.jar is located:
java -jar arc.jar -GenerateProperties
This creates the arc.properties file in the installation directory. The file contains parameters that you can modify to change the port or to enable TLS/SSL.
Note: Once you have generated this file, upgrades to Arc do not overwrite it.
Changing the Port
To change the port on which the embedded server listens:
-
Locate the
arc.propertiesfile inInstallationDirectoryand open it in a text editor. -
Locate the following line where the port is set:
cdata.http.port=8080 -
Change this value to the port number that you want.
Enabling TLS/SSL
To enable TLS/SSL connections (HTTPS), you also need to modify the arc.properties file in InstallationDirectory, as follows:
-
Set the
cdata.tls.keyStoreTypesetting to the type of keystore to use. Valid values include jks, pkcs12, and jceks. -
Set the
cdata.tls.keyStorePathsetting to the path of the keystore to use. Note that ${cdata.home} might be used to refer toInstallationDirectory. -
Set the
cdata.tls.keyStorePasswordsetting to the password for the keystore. -
Set the
cdata.tls.portsetting to the port that should be used to host the server. -
(Optional) Set the
cdata.http.portsetting to an empty string to disable plaintext connections.
The final result should look like this:
;; HTTP
cdata.http.port=

;; TLS
cdata.tls.port=8443
cdata.tls.keyStoreType=PKCS12
cdata.tls.keyStorePath=${cdata.home}/mycertificate.pfx
cdata.tls.keyStorePassword=mypassword
Note: If you obtain an external private key for configuration in Arc, be sure to change the owner of the certificate to the service account that is used to host Arc (cdataarc:cdataarc).
Generating a Jetty XML File
In most deployments, the arc.properties file provides the full range of necessary configuration options for the embedded Jetty server. However, if you require a more complex deployment, you can generate a Jetty XML file that serves as a starting point for further modifications. To generate this file, run the following command in the Arc installation directory where arc.jar is located:
java -jar arc.jar -GenerateXML
When the command completes, the arc.xml configuration file appears in the webapp folder. As long as it remains in that folder, it is used to start the application.
Starting and Stopping the Server
If you use the service.sh script to set up an Arc service, see Running as a Service. Otherwise, the Running In-Process section is applicable.
Running In-Process
Start the embedded Jetty server by executing the arc.jar file that is extracted from the application download during setup. You can use standard Java syntax, as shown below, to execute this file and start the server:
java -jar arc.jar
To stop the server, pass the -stop parameter to this command:
java -jar arc.jar -stop
Running as a Service
You can manipulate the Arc service by using standard system service commands, referencing arc as the name of the service.
To start the service, submit this command:
systemctl start arc
To stop the service, submit this command:
systemctl stop arc
To restart the service, submit this command:
systemctl restart arc
Configuring LDAP Authentication
The following steps configure Arc to use LDAP to authenticate users if you use the embedded Jetty web server.
Configure arc.properties
If it doesn’t already exist, generate the default arc.properties file with the following command:
java -jar arc.jar -GenerateProperties
The following mandatory setting instructs the embedded Jetty server to use LDAP for authentication:
cdata.loginService.ldap.enabled=true
You might want to section this off inside the file in the same way as other sections:
;; LDAP
cdata.loginService.ldap.enabled=true
Insert any additional settings that are required by your specific LDAP server, along with the minimum settings required by Arc. At a minimum, Arc requires the following:
cdata.loginService.ldap.hostname
cdata.loginService.ldap.bindDn
cdata.loginService.ldap.bindPassword
The full list of available settings is below:
cdata.loginService.ldap.userIdAttribute
cdata.loginService.ldap.debug
cdata.loginService.ldap.forceBindingLogin
cdata.loginService.ldap.bindPassword
cdata.loginService.ldap.roleMemberAttribute
cdata.loginService.ldap.useLdaps
cdata.loginService.ldap.roleBaseDn
cdata.loginService.ldap.bindDn
cdata.loginService.ldap.userPasswordAttribute
cdata.loginService.ldap.hostname
cdata.loginService.ldap.userRdnAttribute
cdata.loginService.ldap.roleObjectClass
cdata.loginService.ldap.port
cdata.loginService.ldap.authenticationMethod
cdata.loginService.ldap.userBaseDn
cdata.loginService.ldap.contextFactory
cdata.loginService.ldap.userObjectClass
cdata.loginService.ldap.roleNameAttribute
Following is an example of what a complete LDAP section of arc.properties might look like:
;; LDAP
cdata.loginService.ldap.enabled=true
cdata.loginService.ldap.bindDn="CN=ldapuser,DC=example,DC=org"
cdata.loginService.ldap.hostname="127.0.0.1"
cdata.loginService.ldap.bindPassword="Adminpassword1"

cdata.loginService.ldap.port="1389"
cdata.loginService.ldap.debug=true
cdata.loginService.ldap.authenticationMethod="simple"
cdata.loginService.ldap.userBaseDn="DC=example,DC=org"
cdata.loginService.ldap.userRdnAttribute="cn"
cdata.loginService.ldap.userPasswordAttribute="userPassword"
cdata.loginService.ldap.forceBindingLogin="true"
cdata.loginService.ldap.roleBaseDn="DC=example,DC=org"
cdata.loginService.ldap.roleNameAttribute="cn"
cdata.loginService.ldap.roleMemberAttribute="member"
cdata.loginService.ldap.useLdaps="false"
Create LDAP Users in Arc
In order for users to log into Arc via your LDAP server, you must add each LDAP user to Arc. This allows Arc to cross-reference the user trying to log in with the configured LDAP server. Follow these steps to create each user (see User Management and Roles for more details on managing users):
- Start Arc and log in as an Arc admin user.
- Create all LDAP users who need access to Arc. Click the gear icon in the navbar and choose Users. The Arc users must be identical to the LDAP users. For example, if your LDAP users are
user01anduser02, you must use the same usernames in Arc.
Once you have added all users, you can stop the application.
Test the Configuration
Once you have created the arc.properties file with the necessary LDAP settings, added your LDAP users to Arc, and confirmed that their configuration is correct based on your LDAP server’s requirements, you are ready to test the functionality.
Start Arc using java -jar arc.jar or by starting the Arc service. When you are presented with the login screen, try to log in using one of your LDAP users. Enter the username and password as it exists on the LDAP server (which must be identical to how you entered it in the Users section of Arc).
The login process checks the logged in user against the users configured in Arc and then against the LDAP server to ensure that the user is present and allowed to access the application. If the configuration was successful, you will be logged into the application as that user.
Configuration in Tomcat
Deploy the WAR File
You have two options for deploying a WAR file to Tomcat.
-
Copy the WAR file into the
webappsfolder. -
Deploy the WAR file from within the management console in Tomcat. The Apache Tomcat documentation covers this method in more detail. See the documentation for your version of Tomcat.
It is possible that the WAR file might exceed the default maximum size allowed for file uploads in Tomcat. To overcome errors during deployment, you can edit the web.xml file of the manager application to allow larger files. Depending on your Tomcat configuration, this file might reside in /usr/share/tomcat7-admin/manager/WEB-INF or in a similar directory. In this file, you can change the size, in bytes, of the maximum allowed file size. For example, to allow deployment of a 200MB WAR file, edit the following values to change the maximum allowed file size:
<multipart-config>
     <!-- 200 MB max -->
  <max-file-size>209715200</max-file-size>
  <max-request-size>209715200</max-request-size>
  <file-size-threshold>0</file-size-threshold>
</multipart-config>
Configure the Java Authentication and Service (JAAS)
To enable Arc to manage users dynamically within the application, you must configure the JAAS as described in the following guide. This guide uses arc.xml to control the configuration of Tomcat and define any context overrides. CData recommends that you use arc.xml instead of server.xml to control the Tomcat configuration. We also recommend that you relocate any application context overrides, such as APP_DIRECTORY or APP_DB, to arc.xml where the JAASRealm module is defined.
Note: This is a required first step for any Tomcat setup with Arc.
Create the Login Module
Create a JAAS configuration file with the name jaas.config in this folder: $CATALINA_BASE/conf/.
Include the following content in jaas.config to use standard authentication:
Arc {
  arc.LoginModule required;
};
Note: If you want to use LDAP, continue with the standard login module setup. Once that’s complete, follow the steps in Using LDAP to Authenticate Users.
Create (or Modify) the JAASRealm Module
-
Check to see whether you have an
arc.xmlfile in$CATALINA_BASE/conf/Catalina/localhost/. If you do, editarc.xmland add the XML context block below. Ifarc.xmldoes not exist at that path, you need to create it, then add the XML context block below. This should be the only content inarc.xml.<Context> <Realm className="org.apache.catalina.realm.JAASRealm" appName="Arc" userClassNames="arc.SimplePrincipal" roleClassNames="arc.GroupPrincipal" /> </Context>Note: Depending on how your Tomcat instance is configured, this path might be slightly different. In this example,
Catalinarefers to the engine name, andlocalhostis the host name defined inserver.xml. -
Update the
<Host/>element in yourserver.xmlconfiguration file for the Tomcat server by setting thecopyXMLattribute to true, as shown below:<Host name="localhost" appBase="webapps" unpackWARS="true" autoDeploy="true" copyXML="true"> ... </Host>Note: If an application-specific context is present in
server.xml, it takes precedence overarc.xml. CData recommends usingarc.xmloverserver.xmlfor any context overrides. For example:<Context path="Arc"> ... </Context>
Make the Login Module Visible
The Java virtual machine (JVM) must be directed to the login module (jaas.config) for the configuration to be visible. Set the java.security.auth.login.config system property on the JVM to the path of the jaas.config file by appending the following line to the $CATALINA_BASE/conf/catalina.properties file:
java.security.auth.login.config=${catalina.base}/conf/jaas.config
Use LDAP to Authenticate Users
Before you can configure Arc to use LDAP with Tomcat, follow the Configure the Java Authentication and Service (JAAS) instructions so that you can create your admin user, which is required before you can add LDAP users to Arc. Once you have configured the login module and can successfully log into Arc as the admin user, follow these steps to configure LDAP support.
-
Log in to Arc as the admin user. To create all LDAP users who need access to Arc, click the Settings gear icon on the navbar and choose Users. The Arc users must be identical to the LDAP users. For example, if your LDAP users are
user01anduser02, you must use the same usernames in Arc. -
Modify the
$CATALINA_BASE/conf/jaas.configfile that you created in Create the Login Module to work with your LDAP server. You must add some configuration options tojaas.config.a. Ensure that the LDAP login module is required by adding
com.sun.security.auth.module.LdapLoginModule REQUIRED. You also need to make the login module you created previously optional. To do this, setarc.LoginModule optional;.b. Add the required LDAP module configuration options. At a minimum, the following options are needed:
userProvider,authIdentity,userFilteranduseSSL. The values that you provide for these options are specific to your LDAP server and requirements: consult your server admin and/or your LDAP documentation to determine the values. Here is an example of what you can expect it to look like: notice thatarc.loginModuleis set tooptionalandcom.sun.security.auth.module.LdapLoginModuleis set toREQUIRED.Arc { com.sun.security.auth.module.LdapLoginModule REQUIRED userProvider="ldap://openldap:1389/ou=users,dc=example,dc=org" authIdentity="CN={USERNAME},OU=users,DC=example,DC=org" userFilter="(cn={USERNAME})" useSSL=false; debug=false; arc.LoginModule optional; };Note: If any value contains the special token
{USERNAME}, that token is replaced with the supplied username value at login.
Once you complete these steps, your LDAP users can log into Arc.
Configure Data Directory Permissions
Give the user of the process that runs the Java servlet container Read/Write access to the data directory in the appropriate location, as follows:
-
Windows:
C:\ProgramData\CData\Arc\ -
Linux:
~/cdata/arc
Restart the Tomcat server for the changes to take effect. You can now log in to the application.
Configuration in WebSphere
To configure Arc in Websphere, follow these steps.
Create the Arc application in WebSphere
Note: This guide describes a basic installation of Arc in WebSphere. If you need more of a custom Websphere installation, consult with your internal team to understand what additional settings or options might need to be included.
-
In WebSphere, navigate to Applications > New Application > New Enterprise Application.
- Upload Arc.war
- Choose Fast path and click Next.
-
The Install New Application page opens with six steps on the left hand side.
- Select installation options: Optionally, change the name of the application from
arc_warto the application name you want. - Map modules to servers: Map the Arc module to your desired server.
- Map virtual hosts for Web modules: Set the virtual host you want to use for the Arc module.
- Map context roots for Web modules: Optionally, define the path at which the application will be reachable on the server. The default is
/. - Metadata for modules: Optionally, choose whether to enable the metadata-complete attribute.
- Summary: Review the summary of your setup. When you are satisfied, click Finish.
- Select installation options: Optionally, change the name of the application from
Configure the WebSphere Class Loader
For WebSphere to load the application resources correctly, you must follow these steps:
- In WebSphere, navigate to Application > Application Types > WebSphere enterprise applications.
- Select the application you created for Arc.
- Under the Detail Properties section, select Class loading and update detection.
- Choose Classes loaded with local class loader first (parent last).
- Choose Single class loader for application.
- Click OK. Then click Save.
Configure the Java Authentication and Service (JAAS)
The following process is required to configure the JAAS and to enable Arc to manage users dynamically in the WebSphere Application Server:
-
Navigate to Security > Global security > Enable application security and check the Enable application security checkbox. This enables application (Arc) level security, which is required to use the Arc login module you are creating in the following steps.
- Add the arc.LoginModule to the system login, as follows:
- Navigate to Security > Global security > Java Authentication and Authorization Service > System logins > WEB_INBOUND.
- Click New to add a new entry named
arc.LoginModule. - Select the Use login module proxy check box.
- Select OPTIONAL under Authentication strategy.
- Add isWebSphere under Custom properties and set it to true.
- Click OK. Then click Save.
- Use the set order button on the WEB_INBOUND page to change the order of the modules so that arc.LoginModule has a module order of 1.
-
Create groups:
- Navigate to Users and Groups > Manage Groups > Create.
- Create cdata_admin, cdata_standard, and cdata_support groups.
-
Map groups to roles:
- Navigate to Applications > Application Types > WebSphere enterprise applications > YourArcApplicationName_war > Security role to user/group mapping.
- Map the cdata_admin group to the cdata_admin role.
- Map the cdata_standard group to the cdata_standard role.
- Map the cdata_support group to the cdata_support role.
- Map All Authenticated in Application’s Realm to the cdata_user role.
-
Set the
com.ibm.ws.webcontainer.AllowQueryParamWithNoEqualproperty to true:- Navigate to Server > Server Types > Web Sphere Application Servers and select the server on which Arc is hosted.
- Select Container Settings > Web Container Settings > Web Container.
- Select Additional Properties > Custom Properties.
- Add this new property:
com.ibm.ws.webcontainer.AllowQueryParamWithNoEqual - Set the value to true.
- Restart WebSphere.
Now Arc is accessible and ready to use with the Arc login module. This securely manages users at the application level. To configure LDAP, read the following section.
Use LDAP to Authenticate Users
Before you can configure Arc to use LDAP with WebSphere, follow the Configure the Java Authentication and Service (JAAS) instructions to create your local admin user. That user is required before you can add LDAP users to Arc. Once you have configured the login module and can successfully log into Arc as the admin user, follow these steps to configure LDAP support.
-
Log in to Arc as the local admin user. To create your LDAP users in Arc, click the settings gear icon in the nav bar and choose Users. The Arc users must be identical to the users in your LDAP server. For example, if your LDAP users are
user01anduser02, you must use the same usernames in Arc. -
Add the LDAP repository to WebSphere.
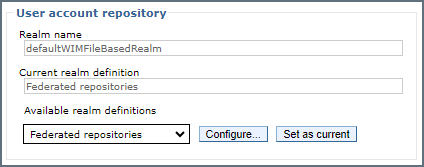
- In WebSphere, navigate to Security > Global security. In the User account repository section, ensure Federated repositories is selected in Available realm definitions. Click Configure.
- This opens the Federated repositories page. Locate the Repositories in the realm table and click Add repositories.

- On the next page, click New repository and select LDAP repository.
- On the configuration screen that opens, enter the details about your LDAP server. Required fields are marked with an asterisk, but you must consult your LDAP server documentation to determine any other necessary settings that need to be entered. Basic required settings include:
- Directory type
- Primary host name
- Port
- Bind distinguished name (DN)
- Bind password
- Once you have entered the setting values, click Ok.
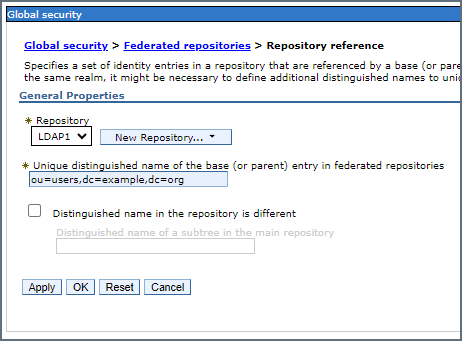
- On the Repository reference screen that opens, enter the distinguished base name of your LDAP server, and click OK. For example:
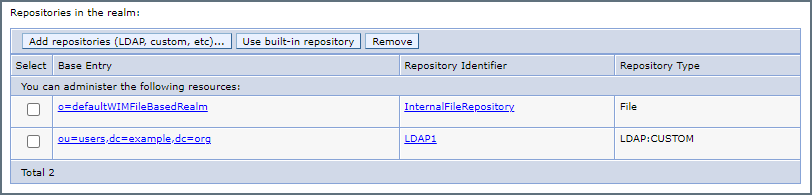
- Test your LDAP configuration by clicking your LDAP repository identifier in the table. In the following example, it is LDAP1:
- The general properties of your new LDAP repository appear. Locate the LDAP Test Query button near the bottom under Related Items.
- Enter the authentication details, add a search filter if you want, and click Test Query. If the query succeeds, the results of your search are returned from your LDAP server. If you encounter an error, consult the WebSphere documentation or the documentation for your LDAP server.
- Save your changes and restart WebSphere to complete the process. Once successfully configured, users signing into Arc are authenticated via LDAP.
- In WebSphere, navigate to Security > Global security. In the User account repository section, ensure Federated repositories is selected in Available realm definitions. Click Configure.
Debug Settings
If you are having configuration issues with LDAP or the arc.LoginModule, follow these steps to enable debug logging for the WebSphere logs.
arc.LoginModule
-
Navigate to Security > Global security > Java Authentication and Authorization Service > System logins > WEB_INBOUND > arc.LoginModule.
- Add debug under Custom Properties and set the value to true.
-
Navigate to Troubleshooting > Logs and trace > YourArcServer > Change log detail levels > Runtime.
- Enter the following in the text box:
Arc.*=all: arc.LoginModule=all - Check the box for Save runtime changes to configuration as well.
- Click OK to save changes. Restart WebSphere.
- Enter the following in the text box:
ltpaLoginModule and wsMapDefaultInboundLoginModule
-
Navigate to Security > Global security > Java Authentication and Authorization Service > System logins > WEB_INBOUND, add a debug custom property for each module, and set its value to true.
-
Navigate to Troubleshooting > Logs and trace > YourArcServer > Change log detail levels > Runtime and add the following
com.ibm.ws.security.server.lm.ltpaLoginModule=all: com.ibm.ws.security.server.lm.wsMapDefaultInboundLoginModule=all.- Check the box for Save runtime changes to configuration as well.
- Click OK to save changes. Restart WebSphere.
Configure Data Directory Permissions
Give the user of the process that runs the Java servlet container Read/Write access to the data directory:
-
Windows:
C:\ProgramData\CData\Arc\ -
Linux:
~/cdata/arc
Restart the WebSphere server for the changes to take effect. You can now log into the application.
Configuration in Jetty
Although Arc comes with an embedded Jetty web server, you can also use the application with an external Jetty setup.
Deploy the WAR File and arc.xml
Copy arc.war into the webapps folder of ${JETTY_BASE}. Also place the arc.xml file in the same ${JETTY_BASE} folder. If you do not have arc.xml you need to create it. At a minimum, for a standard configuration of Jetty your arc.xml file needs to contain the following content:
<?xml version="1.0" encoding="UTF-8"?><!DOCTYPE Configure PUBLIC "-//Jetty//Configure//EN" "http://www.eclipse.org/jetty/configure.dtd">
<Configure id="arcServer" class="org.eclipse.jetty.webapp.WebAppContext">
  <Set name="contextPath">/</Set>
  <Set name="war">/var/lib/jetty/webapps/arc.war</Set>
  <Set name="securityHandler">
    <New class="org.eclipse.jetty.security.ConstraintSecurityHandler">
      <Set name="loginService">
        <New class="org.eclipse.jetty.jaas.JAASLoginService">
          <!-- This name is the same as **login-config > realm-name** in web.xml.  -->
          <Set name="name">ArcRealm</Set>
          <!-- LoginModuleName must match the name of your LoginModule, as declared in your login-module configuration file. -->
          <Set name="loginModuleName">Arc</Set>
          <!-- Set the principal class name for the custom role. -->
          <Set name="roleClassNames">
            <Array type="java.lang.String">
              <Item>arc.GroupPrincipal</Item>
            </Array>
          </Set>
        </New>
      </Set>
    </New>
  </Set>
</Configure>
Configure the Java Authentication and Service (JAAS)
To configure the JAAS and to enable Arc to manage application users, you must perform the steps described in the following sections.
Add the JAAS Module
Submit the following command to install the JAAS module:
java -jar start.jar --add-modules=deploy,jsp,http,jaas
Create the Arc Login Module
Create a login configuration file called login.config and place it at this path: {JETTY_BASE}/etc/login.conf. Place the following content in the login.config file:
Arc {
    arc.LoginModule required debug=true;
};
Update the Security Handler
The Security Handler configuration is in the arc.xml configuration file. If you created the arc.xml file using the content in Deploy the WAR File and Arc.xml, you can skip this step because this change is already present in that content. Otherwise, modify the securityHandler block as follows:
<Set name="securityHandler">
  <New class="org.eclipse.jetty.security.ConstraintSecurityHandler">
   <Set name="loginService">
     <New class="org.eclipse.jetty.jaas.JAASLoginService">
          <!-- This name is the same as **login-config > realm-name** in web.xml.  -->
       <Set name="name">ArcRealm</Set>
          <!-- LoginModuleName must match the name of your LoginModule, as declared in your login-module configuration file. -->
       <Set name="loginModuleName">Arc</Set>
       <!-- Set the principal class name for the custom role. -->
       <Set name="roleClassNames">
           <Array type="java.lang.String">
             <Item>arc.GroupPrincipal</Item>
           </Array>
         </Set>
     </New>
   </Set>
  </New>
</Set>
LDAP in Jetty
In order to configure LDAP when running Arc in Jetty, you need to configure Arc to run in Jetty using the standard Arc login module. Once Arc is up and running in Jetty using the Arc login module, follow these steps to configure Jetty to use LDAP for user authentication.
- Add LDAP Users to Arc.
- Login as your Admin user to add LDAP users to Arc. To create your LDAP users in Arc, click the settings gear icon in the nav bar and choose Users. The Arc users must be identical to the users in your LDAP server. For example, if your LDAP users are
user01anduser02, you must use the same usernames in Arc. - When you have finished, stop Arc.
- Login as your Admin user to add LDAP users to Arc. To create your LDAP users in Arc, click the settings gear icon in the nav bar and choose Users. The Arc users must be identical to the users in your LDAP server. For example, if your LDAP users are
- Create the JAAS configuration for the Jetty LDAP login module in login.conf.
- Open the login.conf file located at
${JETTY_BASE}/etc/login.confand add a JAAS configuration for the Jetty LDAP module. A number of configuration settings are available, but the configuration of your JAAS depends on your specific requirements and your LDAP server configuration. Find the list of available JAAS configurations settings in the Jetty documentation, as well as below:debug useLdaps contextFactory hostname port bindDn bindPassword authenticationMethod forceBindingLogin userBaseDn userRdnAttribute userIdAttribute userPasswordAttribute userObjectClass roleBaseDn roleNameAttribute roleMemberAttribute roleObjectClass - Here is an example of a login.conf file that is configured with an LDAP server. Remember, the required settings and values are dependent on your specific requirements and your LDAP server configuration. To determine the settings and values required for your setup, consult with your LDAP administrator or the documentation for your LDAP server.
 Arc {
 arc.LoginModule optional debug=true;
 org.eclipse.jetty.jaas.spi.LdapLoginModule optional
 debug="true"
 contextFactory="com.sun.jndi.ldap.LdapCtxFactory"
 hostname="openldap"
 port="1389"
 bindDn="CN=ldapuser,DC=example,DC=org"
 bindPassword="Adminpassword1"
 authenticationMethod="simple"
 forceBindingLogin="true"
 userBaseDn="OU=users,DC=example,DC=org"
 userRdnAttribute="cn"
 userPasswordAttribute="userPassword"
 roleBaseDn="DC=example,DC=org"
 roleNameAttribute="cn"
 roleMemberAttribute="member"
 useLdaps="false";
 };
Notice that thearc.LoginModuleand theorg.eclipse.jetty.jaas.spi.LdapLoginModuleare both set to optional. This allow both login modules to be used when trying to authenticate a user. If one login module fails to authenticate a user, the login falls back to the second module. If both login modules fail to authenticate a user, the login fails altogether. - Once login.conf has been updated with the necessary LDAP configuration, restart Arc. If it is configured correctly, your LDAP users can now log into Arc.
- Open the login.conf file located at
Configure Data Directory Permissions
Give the user of the process that runs the Java servlet container Read/Write access to the data directory:
-
Windows:
C:\ProgramData\CData\Arc\ -
Linux:
~/cdata/arc
Restart the Jetty server for the changes to take effect. You can now log into the application.
User Management
Upon initial startup, Arc prompts you for the creation of a user with username and password credentials. After the first user is created, you can add, delete, and manage users on the Users tab of the Settings page in the application.
When you deploy Arc to an external Java servlet (that is, when you are not using the embedded server that is included with the application), JAAS configuration is required in order to allow Arc to manage users. The previous sections detail the process of JAAS configuration for each specific external servlet.
Find and Configure the Application Directory
The Arc ApplicationDirectory folder contains all the data that is used by the application: configuration data, application data, logging data, certificates, and so on. The default location of ApplicationDirectory depends on whether Arc is hosted via the embedded web server or via an external Java servlet container.
For the embedded web server, ApplicationDirectory is the same as InstallationDirectory. By default, that location is the following:
/opt/arc
When Arc is hosted in an external Java servlet container, ApplicationDirectory is relative to the home directory of the user who is running the server:
~/arc
In this path, ‘~’ resolves to the home directory of the user who is running the server that hosts the application.
You can configure the ApplicationDirectory folder, which is useful in a variety of scenarios:
-
clustering multiple instances of Arc
-
using a shared network drive for application data
-
embedding Arc within other systems that access the same folders
Changing ApplicationDirectory moves the application’s data files. However, it does not move other application resources like EXE files, JAR files, and so on. These resources are held in the InstallationDirectory folder, which might be the same as ApplicationDirectory, but the location of those resources does not change if ApplicationDirectory is changed.
Embedded Java Server
When you use the Cross-Platform Edition with the embedded Jetty server, by default the ApplicationDirectory is the InstallationDirectory. To modify this, generate the arc.properties file. Open the file in a text editor, then set the cdata.app.directory setting to the path of the desired directory. The following example demonstrates what this might look like when you set the data directory to a shared folder on a mounted drive:
cdata.app.directory=/mnt/shared/arc
If Arc can locate the cdata.app.directory path and it has the appropriate permissions to read and write at that path, it creates the data folder in the specified directory.
External Java Server
When you use the Cross-Platform Edition with an external Java servlet (any server other than the Jetty server that is included with the application), the details of configuring the application data directory depend upon the specific servlet that is used. Using the syntax that is appropriate for the specific servlet, the AppDirectory environment variable must be set to the path of the directory that you want.
If Arc can locate the AppDirectory path and it has the appropriate permissions to read and write at that path, it creates the data folder in the specified directory.
Configure the Application Database
The Arc application database stores several tables of application data, including the following:
- Transaction Log: metadata for each transaction that is processed by the application
- Application Log: application-level errors and events
- Access Log: requests to the application’s web endpoint
- Audit Log: user-made changes to the Arc configuration
By default, Arc uses a Derby database that resides in ApplicationDirectory as the application database. However, you can configure the application to use an enterprise database like SQL Server, PostgreSQL, or MySQL.
Embedded Java Server
When you use the Cross-Platform Edition with the embedded Jetty server, the default application database is a Derby database in the ApplicationDirectory. To modify this, generate the arc.properties file. Open the file in a text editor, then set the cdata.app.db setting to a Java Database Connectivity (JDBC) connection string that contains the appropriate connection parameters for the database that you want. The following examples illustrate this setting for the MySQl, PostgreSQL, and SQl databases:
MySQL
cdata.app.db=jdbc:cdata:mysql:server=localhost;port=3306;database=mysql;user=MyUserName;password=MyPassword
PostgreSQL
cdata.app.db=jdbc:cdata:postgresql:server=localhost;port=5432;database=postgresql;user=MyUserName;password=MyPassword
SQL Server
cdata.app.db=jdbc:cdata:sql:server=localhost;database=sqlserver;user=MyUserName;password=MyPassword
If Arc can establish a connection successfully with the cdata.app.db connection string, it uses that database as the application database.
Note: To reduce the possibility of deadlocks when using SQL Server as your application database, CData recommends that you ensure that READ_COMMITTED_SNAPSHOT is enabled.
Generating an Encrypted Database Connection String
Arc provides the ability to generate an encrypted connection string for your application database connection. You can use this encrypted connection string to specify the application database without storing your login credentials in plain text in the Arc configuration files. To generate an encrypted connection string, issue the following command in the installation directory where arc.jar is located, substituting your connection information for the example string in quotation marks:
java -jar arc.jar -EncryptConnectionString "jdbc:cdata:mysql:Server=serverName;Port=1234;Database=databaseName;User=userName;Password=passwordSample"
After you issue the command, the command window prints the encrypted string. For example:
ENCRYPTEDA:5TWyjE0U4GBEVNkd51SqbMXaBwVGqj5uyMfTHt48y/F5l3sDPZynNnPMb/ppXzuFTzFPywA1/SSKUgLy9nAuvA7RAdZj7WsKI1xAgDMmEFNQ68/lHjFYZpS10sIaoUloyZVDkj4uLHTZ0SaMD5PPUA==
You can then use this encrypted string in place of the plain text value for cdata.app.db as shown above.
External Java Server
When you use the Cross-Platform Edition with an external Java servlet (any server other than the Jetty server that is included with the application), the details for configuring the application database depend upon the specific servlet that is used. Using the syntax that is appropriate for the specific servlet, choose one of the following approaches when you configure the server:
-
Define a JNDI data source to include the connection properties for the target database.
-
Set the
APP_DBenvironment variable to a JDBC connection string.
If Arc can use the JDNI data source or the APP_DB connection string to arc to a database, it uses that database as the application database.
Login Lockouts
Arc automatically locks out users who enter incorrect passwords too many times in order to prevent brute-force attacks. By default, a user who enters six incorrect passwords within five minutes is locked out for thirty minutes.
You can modify the lockout settings by editing the XML configuration file that governs the web-server behavior. These three settings are relevant to lockouts:
-
LockoutFailedAttempts: the number of incorrect passwords that trigger a lockout. Set LockoutFailedAttempts to 0 to disable lockouts.
-
LockoutMinutes: the duration of the lockout. The default duration is thirty minutes.
-
LockoutTimeCheckPeriod: the period after which the number of failed attempts is reset to 0. The default period is five minutes.
Embedded Jetty Server
You can modify lockout settings by generating the arc.properties file and adding a comma-separated list of name:value pairs to initParameters, as shown below:
cdata.initParameters=LockoutFailedAttempts:0
Tomcat
The syntax for editing the lockout settings the Tomcat arc.xml file is the following:
<Context>
  <Parameter name="LockoutFailedAttempts" value="0" />
</Context>
Common Issues and Solutions
This section lists common issues that you can encounter when you deploy Arc in a Java environment. The recommended solution for each issue is included. For additional help, contact CData Technical Support at [email protected].
Issue
Arc fails to start, or it starts by using an AppDirectory other than what is expected
This error might indicate that Arc does not have the permissions that are required to access ApplicationDirectory. (ApplicationDirectory is a folder that stores critical information regarding the configuration of jobs, connections, transformations, and so on.) One possible cause for this error is running Arc as a local user before you set it up as a service. In this case, it is possible that certain resources created by the application were created under the local user. As a result, those resources are not available when you run Arc as a service.
Recommended Solution
In a Linux operating environment, the easiest way to ensure that the service account (or any other account that you want to use to run Arc) can access ApplicationDirectory is to use the chown command. For example, if ApplicationDirectory is in the default Linux location and Arc should run under the service account, the following command should resolve the error:
sudo chown -R cdataarc:cdataarc /opt/arc