Veeva Vault
Version 25.3.9414
Version 25.3.9414
Veeva Vault
CData Sync アプリケーションからVeeva Vault コネクタを使用して、サポートされている任意のデータソースから同期先のVeeva Vault へデータを移動できます。これを行うには、コネクタを追加し、コネクタへの認証を行い、接続を完了する必要があります。
Veeva Vault コネクタを追加
Sync でVeeva Vault のデータを使用できるようにするには、まず以下の手順でコネクタを追加する必要があります。
-
Sync のダッシュボードから接続ページを開きます。
-
接続を追加をクリックしてコネクタを選択ページを開きます。
-
データソースタブをクリックしてVeeva Vault 行に移動します。
-
行末にある接続を設定アイコンをクリックして、新しい接続ページを開きます。接続を設定アイコンが利用できない場合は、コネクタをダウンロードアイコンをクリックしてVeeva Vault コネクタをインストールします。新規コネクタのインストールについて詳しくは、接続を参照してください。
Veeva Vault への認証
コネクタを追加したら、必須プロパティを設定する必要があります。
-
Connection Name: Enter a connection name of your choice.
-
URL: Enter the URL for your Veeva Vault host (for example, https://MyVault.veevavault.com).
CData Sync supports authenticating to Veeva Vault in several ways. Select your authentication method below to proceed to the relevant section that contains the authentication details.
Basic
ユーザー資格情報で接続するには、次のプロパティを設定します。
-
Auth Scheme:Basic を選択。
-
User:Veeva Vault アカウントへの認証に使用するユーザー名を入力。
-
Password:Veeva Vault アカウントへの認証に使用するパスワードを入力。
Azure Active Directory
To connect with your Azure Active Directory credentials, specify the following properties:
-
Auth Scheme: Select AzureAD.
-
Azure Tenant: Enter the Veeva Vault tenant that is used to access data, either by name (for example, contoso.omnicrosoft.com) or by identifier (Id).
-
OAuth Client Id: Enter the client Id that you were assigned when you registered your application with an OAuth authorization server.
-
OAuth Client Secret: Enter the client secret that you were assigned when you registered your application with an OAuth authorization server.
-
(Optional) Open ID Connect Profile ID: Enter the Id of your OAuth2.0 / Open ID Connect profile.
Azure Active Directory with OpenID Connect
To connect via OpenID Connect with Azure Active Directory, specify the following properties:
-
Auth Scheme: Select AzureADOpenID.
-
OAuth JWT Cert: Enter your Java web tokens (JWT) certificate store.
-
OAuth JWT Cert Type: Enter the type of key store that contains your JWT Certificate. The default type is PEMKEY_BLOB.
-
(Optional) OAuth JWT Cert Password: Enter the password for your OAuth JWT certificate.
-
(Optional) OAuth JWT Cert Subject: Enter the subject of your OAuth JWT certificate.
Okta
Okta を介したシングルサインオン(SSO)で接続するには、次のプロパティを指定します。
-
Auth Scheme:OKTA を選択。
-
User:Okta アカウントへの認証に使用するユーザー名を入力。
-
Password:Okta アカウントへの認証に使用するパスワードを入力。
-
SSO Login URL:シングルサインオン(SSO)プロバイダーが使用するログインURL を入力。
-
SSO Properties:使用するシングルサインオン(SSO)プロパティをセミコロン区切りで入力(例えば、SSOProperty1=Value1;SSOProperty2=Value2;…)。
-
SSO Exchange Url: Enter the URL that is used for consuming the SAML response and exchanging it for service specific credentials.
Veeva Vault as a Reverse ETL Destination
In the Sync application, you can configure Veeva Vault as a reverse ETL destination so that it can receive processed data from the source warehouse.
As a reverse ETL destination, Veeva Vault supports all three transfer modes (Insert, Upsert, and Update).
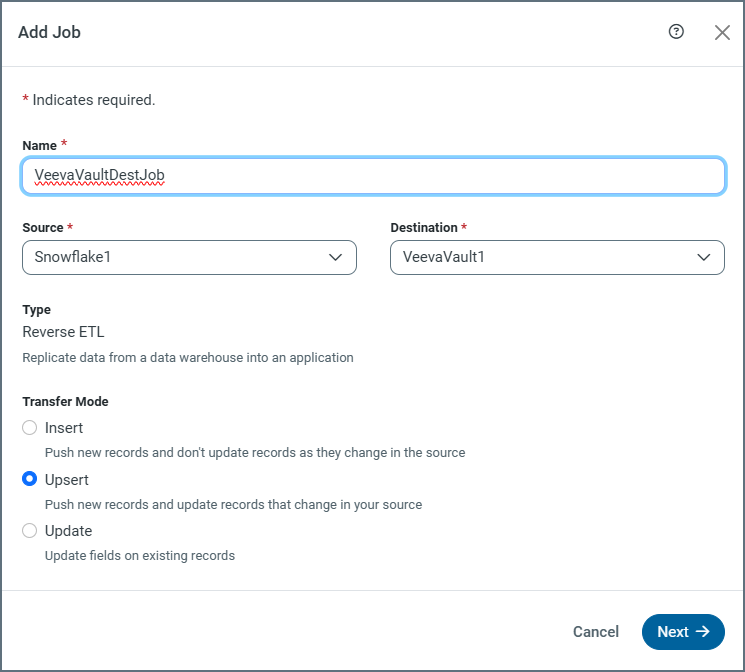
In Veeva Vault, updates are matched by using either the object’s primary key (or a system-generated identifier) or unique columns. For Upsert mode, only unique columns are used for matching.
Note: Bulk operations for Insert, Upsert, and Update are supported only for the current Veeva Vault API.
Transfer-Modes Summary
| Mode | Supported | Key Used for Matching | Bulk Support | Notes |
|---|---|---|---|---|
| Insert | Yes | N/A (always creates new records) | Yes (with current API) | Creates new records in Veeva Vault. |
| Update | Yes | Primary key (or system-generated Id) or unique columns | Yes (with current API) | Updates existing records. |
| Upsert | Yes | Unique columns | Yes (with current API) | Updates existing records if a matching key or unique column exists. If no match exists, a new record is inserted. |
For more information about reverse ETL jobs, see Reverse ETL.
Complete Your Connection
To complete your connection:
-
高度な設定タブで接続の高度な設定を定義します。(ただし、ほとんどの場合これらの設定は必要ありません。)
-
AzureAD or AzureADOpenID で認証する場合は、Veeva Vault への接続 をクリックしてVeeva Vault アカウントに接続します。
-
作成およびテストをクリックして接続を作成します。
詳細情報
CData Sync とVeeva Vault の連携について、詳しくはVeeva Vault Connector for CData Sync を参照してください。