Salesforce Marketing Cloud Account Engagement
Version 25.3.9414
Version 25.3.9414
Salesforce Marketing Cloud Account Engagement
CData Sync アプリケーションからSalesforce Marketing Cloud Account Engagement コネクタを使用して、サポートされている任意のデータソースから同期先のSalesforce Marketing Cloud Account Engagement へデータを移動できます。これを行うには、コネクタを追加し、コネクタへの認証を行い、接続を完了する必要があります。
Salesforce Marketing Cloud Account Engagement コネクタを追加
Sync でSalesforce Marketing Cloud Account Engagement のデータを使用できるようにするには、まず以下の手順でコネクタを追加する必要があります。
-
Sync のダッシュボードから接続ページを開きます。
-
接続を追加をクリックしてコネクタを選択ページを開きます。
-
データソースタブをクリックしてSalesforce Marketing Cloud Account Engagement 行に移動します。
-
行末にある接続を設定アイコンをクリックして、新しい接続ページを開きます。接続を設定アイコンが利用できない場合は、コネクタをダウンロードアイコンをクリックしてSalesforce Marketing Cloud Account Engagement コネクタをインストールします。新規コネクタのインストールについて詳しくは、接続を参照してください。
Salesforce Marketing Cloud Account Engagement への認証
コネクタを追加したら、必須プロパティを設定する必要があります。
-
Connection Name: Enter a connection name of your choice.
-
Business Unit ID: Enter your business-unit identifier (Id). This Id is required when you use an authentication scheme of OAuth 2.0. Your Salesforce Marketing Cloud Account Engagement business-unit Id begins with “0Uv” and is 18 characters long. You can locate your Id from Marketing Setup in Salesforce.
CData Sync supports authenticating to Salesforce Marketing Cloud Account Engagement in several ways. Select your authentication method below to proceed to the relevant section that contains the authentication details.
- OAuth (default)
- OAuth Password
- OAuth JWT
OAuth
CData Sync は、接続するための組み込みOAuth アプリケーションを提供します。アプリケーションを使用するには、Auth Scheme でOAuth を選択します。追加のプロパティは必要ありません。
OAuth Password
To connect with the Password OAuth grant type, specify the following properties:
-
Auth Scheme: Select OAuthPassword.
-
User: Enter the username that you use to authenticate to Salesforce Marketing Cloud Account Engagement.
-
Password: Enter the password that you use to authenticate to Salesforce Marketing Cloud Account Engagement.
-
Security Token: Enter the security token that you use to authenticate to Salesforce Marketing Cloud Account Engagement.
OAuth JWT
To connect with Salesforce Marketing Cloud Account Engagement, specify the following properties:
-
Auth Scheme: Select OAuthJWT.
-
OAuth JWT Cert: Enter your Java web tokens (JWT) certificate store.
-
OAuth JWT Cert Type: Enter the type of key store that contains your JWT certificate. The default type is PEMKEY_BLOB.
-
OAuth JWT Issuer – Enter the issuer of your Java web token. Typically, the issuer is either the client Id or the email address of the OAuth application.
-
(Optional) OAuth JWT Cert Password: Enter the password for your OAuth JWT certificate.
-
(Optional) OAuth JWT Cert Subject: Enter the subject of your OAuth JWT certificate that is used to locate a matching certificate in the store. This property supports partical matches and a wildcard operator (*) to select the first certicate.
-
(Optional) OAuth JWT Subject: Enter the user subject that is used to locate a matching certificate in the store. This property supports partical matches and a wildcard operator (*) to select the first certicate.
Salesforce Marketing Cloud Account Engagement as a Reverse ETL Destination
In the Sync application, you can configure Salesforce Marketing Cloud Account Engagement as a reverse ETL destination so that it can receive processed data from your source database or warehouse.
Currently, the only supported object for this destination is the Prospects table, and all three transfer modes (Insert, Upsert, and Update) are available for that table. Other tables are not supported because the API does not provide bulk operations for them at this time.
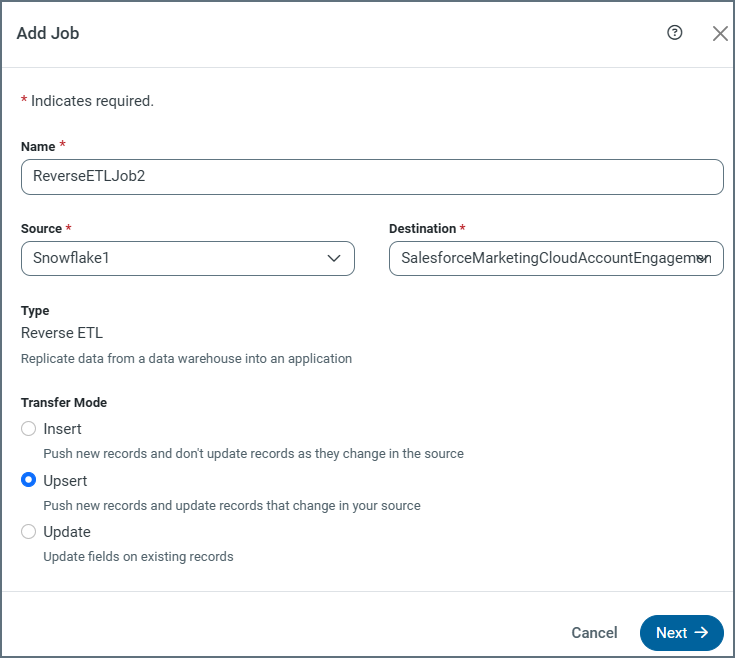
In Salesforce Marketing Cloud Account Engagement, you can use Email, ID, or SalesforceID as the delta snapshot key for updates (Update mode) to the Prospects table. For Upsert mode, you can use either Email or SalesforceID as the delta snapshot key.
Note: If you choose to use Email, be aware of the implications of the Salesforce Marketing Cloud Account Engagement feature Allow Multiple Prospects with the Same Email Address (AMPSEA):
-
AMPSEA was enabled by default since June 14, 2016, and it cannot be turned off for business units that were created after that date or when the feature is enabled by an administrator.
-
When multiple prospects share the same email, operations that match on
Emailmight resolve to the prospect with the most recent activity, which can lead to unexpected updates because the value forEmailis not unique.
As a result of this behavior, Salesforce recommends that you use SalesforceID (the CRM ID) for imports whenever possible.
Transfer-Modes Summary
| Mode | Supported | Key Used for Matching | Notes |
|---|---|---|---|
| Insert | Yes | N/A (always inserts) | Creates new records in the Prospects table. |
| Update | Yes | Use either ID, SalesforceID, or Email |
Updates existing records in the Prospects table only. |
| Upsert | Yes | Use either SalesforceID or Email |
Updates existing records if a matching key exists. If no match exists, a new record is inserted. |
Complete Your Connection
To complete your connection:
-
Specify the following properties:
-
Schema: Select the Salesforce Marketing Cloud Account Engagement version that you want to use. The default version is SalesforcePardotV5.
-
(Optional) Is Demo Account: Select whether the provided account is a demo account. The default selection is False.
-
-
高度な設定タブで接続の高度な設定を定義します。(ただし、ほとんどの場合これらの設定は必要ありません。)
-
OAuth で認証する場合は、Salesforce Marketing Cloud Account Engagement への接続 をクリックしてSalesforce Marketing Cloud Account Engagement アカウントに接続します。
-
作成およびテストをクリックして接続を作成します。
詳細情報
CData Sync とSalesforce Marketing Cloud Account Engagement の連携について、詳しくはSalesforce Marketing Cloud Account Engagement Connector for CData Sync を参照してください。