Oracle
Version 23.4.8843
Version 23.4.8843
Oracle
You can use the Oracle connector from the CData Sync application to move data from any supported source to the Oracle destination. This page explains how to set up both the Oracle database and the Oracle Autonomous Database as Sync destinations:
Configure Oracle Database as a Destination
To allow Sync to use data from Oracle, you must establish a connection to Oracle. Follow these steps to connect Oracle to your Sync account:
-
Open the Connections page of the Sync dashboard and click the Sources tab.
-
Click the Oracle tile to open the Connections/Configure page. If the Oracle tile does not appear on the tab, see Connections for instructions about how to add it.
-
Enter connection settings on the Settings tab:
-
Connection Name - Enter a connection name of your choice.
-
Connection Type - Select the connection type. The default value for this setting is SID.
-
User - Enter the username that you use to authenticate to the Oracle database.
-
Password - Enter the password that you use to authenticate to the Oracle database.
-
Host - Enter the host name or the IP address of the server that hosts your Oracle database. The default value for this setting is localhost.
-
Port - Enter the port number of the server that hosts the Oracle database. The default port value is **1521.
-
SID - Enter the system Id for your Oracle account. The default SID value is ORCL.
-
-
Click Create & Test to create the connection.
-
Define advanced connection settings on the Advanced tab. (In most cases, though, you should not need these settings.)
Windows Edition
CData Sync uses the Oracle Database client driver to connect to your Oracle Server. If you have not done so already, download the client from the Oracle ODAC Downloads page.
When you download the Oracle Database client, ensure that the bitness matches the bitness of Sync. In addition, when you install the client, select either the Runtime or the Administrator installation type.
Java Edition
The Java edition of CData Sync uses the Java Database Connectivity (JDBC) driver to connector to your Oracle Server. If you have not done so already, download the driver from the Oracle JDBC and UCP Downloads page.
Copy the JDBC driver into the libs directory and restart the server.
-
Windows:
C:\ProgramData\CData\sync\libs -
UNIX or Mac OS X:
~/cdata/sync/libs
Configure Oracle Autonomous Database as a Destination
The Oracle Autonomous Database has been supported for some time as a source for CData Sync software, via the OCI driver. Now, you can set up the database as a destination as well in Sync 21.0.8179.0 or later, as explained in the following sections.
Step 1: Obtain and Install the Required DLLs and Libraries
The first step is to obtain and install the required DLLs and libraries. This procedure differs depending on whether you use the Microsoft Windows (.NET) edition or the Java edition of Sync. The following sections explain the procedure for each edition.
Microsoft Windows (.NET) Edition
If you use Oracle Database as a Sync destination already, and you can use Oracle.ManagedDataAccess.Client as the provider class for the connection destination, this first step is not necessary. However, if you have never set up Sync or have never used Oracle Database as a destination, you need to set up the necessary driver.
For the Windows edition of Sync, follow the steps in the sections below for the whichever of these scenarios is true for you:
-
The Oracle Database or the Oracle Database client is installed on the same server as Sync.
-
The Oracle Database or the Oracle Database client is not installed on the same server as Sync.
The Oracle Database or Oracle Database Client Is Installed on the Same Server as CData Sync
-
Locate the Oracle.ManagedDataAccess.dll file in the
ORACLE_HOME\odp.net\managed\commonfolder. (TheORACLE _HOMEfolder typically specifies a location likeC:\app\oracle\product\19.0.0\client_1.) -
Copy the Oracle.ManagedDataAccess.dll file and paste it into
C:\Program Files\CData\CData Sync\www\bin. -
Restart Sync.
Important: Verify that the paths for ORACLE_HOME and its \bin subfolder are set in the environment variables. These paths should be set already if you installed Oracle using normal procedures.
These steps complete the installation of the required DLLs and libraries. You can move on to Step 2: Adding Oracle Autonomous Database as a CData Sync Destination.
The Oracle Database or Oracle Database Client Is Not Installed on the Same Server as CData Sync
-
Download and install the Oracle Data Access Components (ODAC) for Windows.
Note: At the time of this writing, the 64-bit ODAC 19.3.1 file in the 64-bit ODAC OUI comes with release notes and installation instructions per the Oracle .NET and Visual Studio Downloads web page.
-
Extract the downloaded file and execute setup.exe to install the components.
-
Locate the Oracle.ManagedDataAccess.dll file in the
ORACLE_HOME\odp.net\managed\commonfolder. (TheORACLE _HOMEfolder typically specifies a location likeC:\app\oracle\product\19.0.0\client_1.) -
Copy the Oracle.ManagedDataAccess.dll file and paste it into
C:\Program Files\CData\CData Sync\www\bin. -
Restart Sync.
These steps complete the installation of the required DLLs and libraries. You can move on to Step 2: Adding Oracle Autonomous Database as a CData Sync Destination.
Java Edition
For the Java edition of Sync, follow these steps:
-
Download the zipped JDBC driver (ojdbc8.jar) and companion JAR files (ojdbc8-full.tar.gz) for your version of Oracle Database.
-
Extract the downloaded ojdbc8-full.tar.gz file.
-
Copy the following files from the extracted file into the libs subdirectory of the Sync installation directory:
-
ojdbc8.jar
-
oraclepki.jar
-
osdt_core.jar
-
osdt_cert.jar
-
-
Restart Sync.
These steps complete the installation of the required DLLs and libraries. You can move on to step 2 in the next section.
Step 2: Add Oracle Autonomous Database as a CData Sync Destination
Now, you can add Oracle Autonomous Database as a Sync destination. This step involves connecting with Mutual TLS (mTLS), with client certificate authentication. So, you need to download and set up the wallet for mTLS. If you choose to use a TLS connection (without client certificate authentication) instead, you do not need to set up a wallet. However, to use the TLS connection, you must limit the connection source via the access control list (ACL) in the database settings.
For step 2, you need to perform the following tasks:
-
Set up connection information.
-
Add the destination connection.
Setting Up Connection Information
To obtain the connection information that you need to create an Oracle Autonomous Database destination:
-
Navigate to the Autonomous Database management window for the database that you want to connect to in Oracle Cloud.
-
Click the DB Connection tab in the Autonomous Database Details window.
-
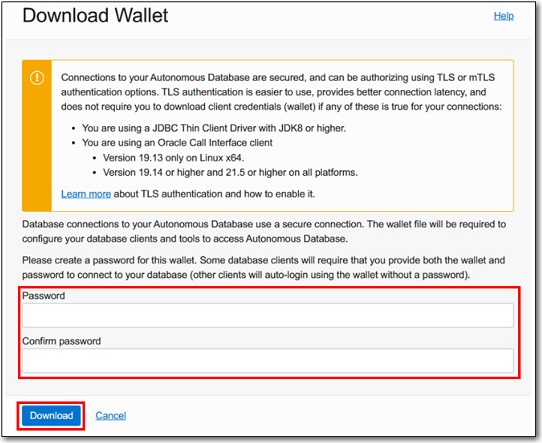
Download the wallet file by selecting Wallet instance in the Wallet type field. Then, click Download wallet.
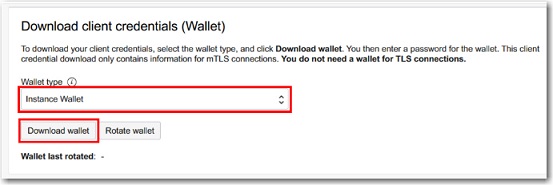
You will be asked for the password to encrypt the private key. Set an appropriate password in the Download Wallet modal. Then, click Download to download a ZIP file that contains the wallet.
Note: The password that you set here is not used in Sync.
After you click Download, the Database Connection modal is displayed.
-
Save a copy of the string (in the Connection Strings section of the modal) for the Transparent Network Substrate (TNS) name to which you want to connect. You need this string later in the process.
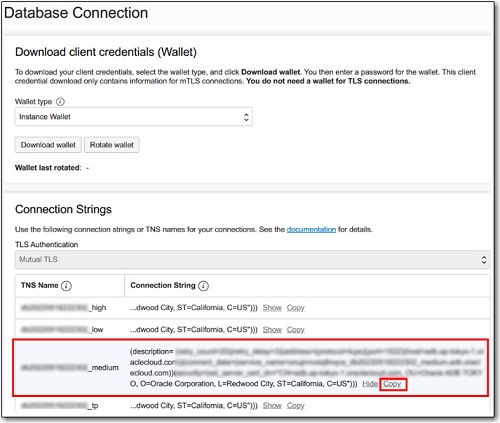
At this point, your connection information is ready.
Adding the Destination Connection
Now you can add the destination connection in Sync, as follows:
-
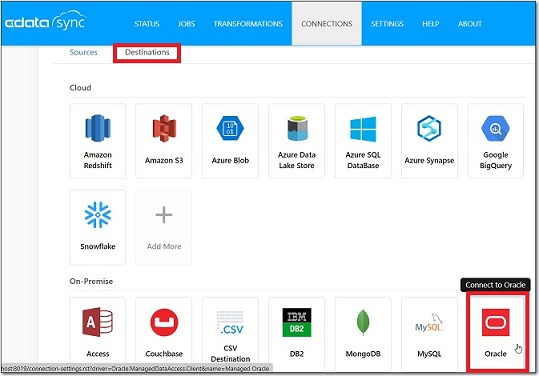
Open the Sync application and click the Connections tab.
-
Click the Destination tab on the Connections page. Then, click the Oracle tile (for both the .NET and Java editions), as shown below.
-
Enter the values below for the following fields on the Connections Settings page:
-
Name: ConnectionName (a name of your choosing)
-
Provider Class: Oracle.ManagedDataAccess.Client
-
Settings Format: Property List
-
Connection Type: Data Source (choose from the drop-down list)
-
User: YourDatabaseUserName
-
Password: YourPassword
-
Data Source: The connection string you copied in step 4 of the section “Setting Up Connection Information.” The key is setting the connection string in the data source. At this point, you need to unzip the wallet ZIP file that you downloaded earlier to the
C:\ProgramData\CData\sync\data\directory (folder). Then, specify that path in the connection string, as shown in this example:
-
-
Click Test Connection to verify that the connection is successful.
If your connection is not successful, the problem might be that Sync cannot read the wallet file. Make sure that the directory (folder) that you specify in for the MY_WALLET_DIRECTORY= parameter can be accessed by the user account of the process in which Sync is running.
Note: The wallet ZIP file that you downloaded contains various files. However, you only need the cwallet.sso file to connect with Sync. The other key files in the wallet have the private key encrypted with the password that you set in the downloading process. However, because the cwallet.sso file is stored with the private key unencrypted, you can connect to the client certificate without entering the password. Therefore, in this example, you can connect just by specifying the C:\ProgramData\CData\sync\data\Wallet_XXX\cwallet.sso directory (folder).