Notifications
Version 23.4.8843
Version 23.4.8843
Notifications
You can configure CData Sync to notify you via email after a job run is completed. Notification emails contain information regarding the overall job run, including the status of each query.
You set notifications for a job, configure an SMTP server connection, and enable notifications for your job, as explained in the following sections.
Configuring the SMTP Server Connection
To configure the SMTP server connection:
-
Navigate to the Settings page and click the Notifications tab.
-
Click Configure in the Email Server Settings box to open the Email Server Settings dialog box.
-
Configure the following properties for the SMTP mail server that is used to send notifications:
-
SMTP Server - Enter the name of the SMTP mail server.
-
Port - Enter the port on which to connect to the SMTP server. The default port is 25.
-
Use CData Sync proxy Settings - Select Enable if you want SMTP to use proxy settings on the Advanced tab on the Settings page. By default, the Enable checkbox is not selected.
-
From - Enter the email address to display in the From field. The default address is [email protected].
-
SSL Mode - Select the Secure Sockets Layer (SSL) mode that you want to use. The default value is STARTTLS.
-
Authentication - Select the authentication scheme that you want to use. After you select your scheme, fill out any associated properties, as shown below.
-
None - Select this scheme if you do not want to use authentication.
-
OAuth 2.0 - When you select this scheme, you also must set the following properties:
-
Username - Enter the username that you use to authenticate to the SMTP Server.
-
Auth URL - Enter the authorization URL for the OAuth service.
-
Access Token URL - Enter the URL from which to retrieve the OAuth access token.
-
Client Id - Enter the client Id that you were assigned when you registered your application with an OAuth authorization server.
-
Client Secret - Enter the client secret that you were assigned when you registered your application with an OAuth authorization server.
-
Refresh Token URL - Enter the URL from which to refresh the OAuth token.
-
Scope - Enter the scope for which to obtain the initial access and refresh token.
After you specify these properties, click Connect.
-
-
Basic Auth - When you select this scheme, you also must set the following properties:
-
Username - The username that you use to authenticate to the SMTP server.
-
Password - The password that you use to authenticate to the SMTP server.
-
-
-
-
Click Save to save your settings and to return to the Notifications tab on the Settings page.
Enabling Notifications for a Job
To configure email notifications for a job:
-
Open your job and click the Overview tab.
-
Click Configure in the Notifications category (in the right pane).
Note: If you did not set your email server settings previously, Sync opens the Config Email Server Settings dialog box. You must define those settings before you can enable notifications for your job. To do so, click Confirm in the dialog box. Define your email server settings in the Email Server Settings dialog box. Then continue to step 2.
-
Set the following options in the Notification dialog box:
-
To - The email to which to send notifications.
-
Subject - The subject for notification emails.
-
Only send notifications on errors - An option that you can select to specify that notification emails should be sent only when the job encounters an error. If you do not select this option, Sync sends notifications after each job run.
-
-
Click Save to save your notifications configuration.
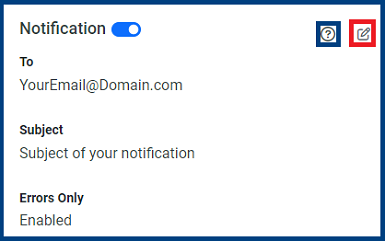
After you save your configuration, the Notification category on the Overview tab displays the settings that you defined. A blue switch appears to the right of Notification, which means that notifications are enabled. You can toggle that switch to enable or disable notifications. When you disable notifications, the switch is gray.
If you need to modify the notification settings, click the edit icon (shown below in a red square). If you need additional help, click the documentation icon (blue square).
Send Notifications to a Microsoft Teams Channel
You can send email to a Microsoft Teams channel by using a channel email address in the To field of the mail settings on the Notifications tab in CData Sync. Once the channel email is added to a job, Sync sends alerts to the channel with the results of the job execution.
Note: You need to configure the connection to your SMTP server to enable Sync to send the alerts. Without that connection, Sync cannot send emails.
For details about how to obtain a channel email address for a Teams channel, see Send an email to a channel in Teams.
Send Notifications to a Slack Channel
You can send email to a Slack channel by using a channel email address in the To field of the mail settings on the Notifications tab in Sync. Once the channel email is added to a job, Sync sends alerts to the channel with the results of the job execution.
Note: You need to configure the connection to your SMTP server to enable Sync to send the alerts. Without that connection, Sync cannot send emails.
For details about how to obtain a channel email address for a Slack channel, see Send emails to Slack.