.NET Edition
Version 23.4.8843
Version 23.4.8843
.NET Edition
The Microsoft Windows version of the CData Sync comes packaged with a stand-alone embedded web server and can also be hosted in Microsoft Internet Information Services (IIS). This section describes various options for hosting the application in Windows.
If you do not have experience with IIS, the embedded server is recommended. The embedded server is deployed automatically at installation and provides a simple interface for server-level administration tasks such as configuring logging, running the application as a service, and enabling SSL/TLS.
Embedded Server
This section shows how to configure the stand-alone, embedded web server, including how to host TLS/SSL connections and configure the Cloud Gateway, a reverse SSH tunnel.
When the application is hosted in the stand-alone server, you can run it as a Windows service, as follows:
-
Right-click the Sync icon in the taskbar and click Server Options.
-
Select the Run as a Windows Service option.
-
Save your changes.
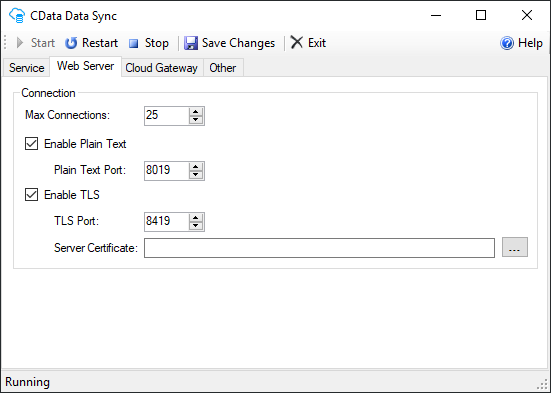
Host TLS/SSL Connections (Embedded Server)
You can require TLS as well as offer services in plaintext. The following steps enable you to host TLS/SSL connections in the stand-alone server that is included with the .NET Edition of the application. (To deploy TLS/SSL for the Cross-Platform Edition, see the documentation for the Java servlet that you use to host the application.)
-
Right-click the icon for the application in the Windows system tray and click Server Options.
-
Select Enable TLS on the Web Server tab. Then, select a port on which you want to listen for TLS connections.
-
Click the button on the right end of the Server Certificate list box to select a private key certificate. The certificate with a private key must be installed to the Local Computer certificate store. If no certificates in the list match that criterion, click Create New Certificate to create a simple certificate for this purpose.
After you save your changes, the server restarts and begin serving TLS requests.
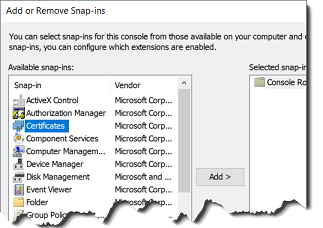
Manage Personal Certificates
If you want to manage the certificates that are available in the Certificate Selection dialog, you can locate them in the Personal certificate store for your local computer. To add a certificate to the Windows store:
-
Launch Microsoft Management Console by entering mmc from the Windows Start menu.
-
Select File > Add/Remove Snap-In.
-
Select Certificates from the Available Snap-Ins table and click Add.
-
Select Computer Account > Local Computer.
-
Select Certificates (Local Computer) > Personal > Certificates to display the available certificates. The certificates for which a private key is available show a small key icon superimposed over the certificate icon.
To import a certificate from the local disk into this store, select Action > All Tasks > Import. After the import wizard finishes running, the certificates are available in the Application Certificate Selection dialog.
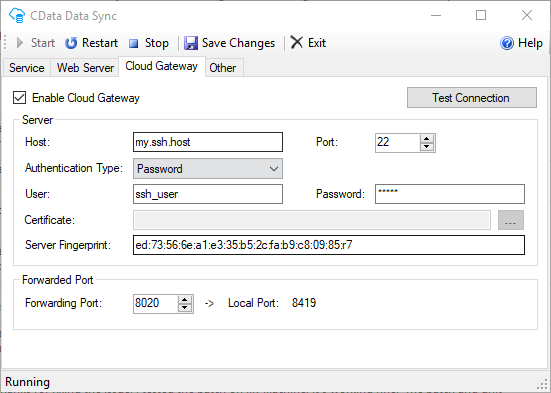
Cloud Gateway
The Cloud Gateway feature in Sync provides a simple way to expose the application to the internet without the need for firewall changes. As long as a publicly accessible Secure Shell (SSH) server is available, you can access Sync via a port on the publicly accessible SSH server by using an SSH reverse tunnel.
To use this functionality, right-click the Sync icon in the system tray and select Server Options. On the Cloud Gateway tab in the CData Data Sync dialog, as shown below, and enter the following information:
-
Host - The SSH server to which Sync should connect.
-
Port - The port on which the SSH host listens for connections. Most SSH servers listen on port 22, which is the default value.
-
Authentication Type - The type of authentication to use. Supported authentication types are Password, Public Key, Multi-Factor, and Keyboard Interactive.
-
User - The username that Sync uses to authenticate to the SSH server.
-
Password - The password that you use to authenticate (if one is required by the Authentication Type that you choose).
-
Certificate - The certificate that Sync uses to authenticate to the SSH server with public-key authentication.
-
Server Fingerprint - The SSH host-key fingerprint of the SSH server. This value is read-only and is purely informational.
-
Forwarding Port - The port on which the publicly available SSH server listens for connections to forward to Sync.
In addition, you might need to change the configuration of your SSH server to enable port forwarding. The default SSH server configuration might not always enable port forwarding to non-localhost addresses. For example, if you are connecting to an OpenSSH server, the GatewayPorts property must be set to yes or clientspecified in the SSH server configuration file.
After you enter this information, click Test Connection to test the connection to the SSH server and verify the validity of the information that you provided. If the test is successful, once the application is restarted, Sync is accessible via the forwarding port on the SSH host. For example, suppose that you specify the SSH server My.SSH.Host with a forwarding port of 8401. If you then enter https://My.SSH.Host:8401 in a browser, any communication is forwarded to the local machine where Sync is running. As a result, public access is allowed despite the fact that the server is not directly accessible.
Windows Authentication
By default, the embedded web server uses ASP.NET forms-based authentication, where you must enter a username and password combination into a webform (that is, a login portal) to grant access to the administration console. Sync also supports Windows Active Directory authentication to grant application access to specific Windows users or security groups.
To enable Windows authentication, simply open the configuration UI for the embedded web server as follows:
-
Right-click the Sync icon in the system tray and select Server Options.
-
Toggle the Authentication Type field on the Web Server tab.
By default, access is granted to the current Windows user that is managing the web server. To configure the users and groups permitted to access the application, add new users on the Users tab of the Settings page in the application.
Users must be added within the application by using the syntax DOMAIN\Username. You must add users individually because you cannot grant access to an entire group at this time.
Configuration in IIS
The instructions in this section cover several versions of IIS and Windows. If you have difficulty following any of these steps, see Troubleshooting. If your version is not covered in this section, or if you have other questions, contact CData Support for assistance.
IIS 8, 8.5, and 10
Create a New Web Application
Note: This example uses the default website.
To host the application on your website:
-
Open the IIS Manager.
-
Select YourNode > Sites on the Connections panel.
-
Right-click your website and select Add Application.
-
Enter the following information in the Add Application dialog that is displayed:
-
Alias - The name for the application (for example, “sync”).
-
Application Pool - The application pool that is associated with the application. The instructions in this section use DefaultAppPool.
-
Physical Path - The path to the
wwwdirectory that resides in the directory where the Sync application is installed. The default location for this directory isC:\\Program Files\\CData\\CData Sync\\www.
-
Configure Directory Permissions
The application must have full access to the Sync application directory for full functionality.
In Sync 2020 and earlier, the data directory and the application installation directory were the same (C:\Program Files\CData\CData Sync), by default. If you upgrade from an earlier version of Sync to Sync 2021, this likely is still your data directory.
In Sync 2021, the data directory is split from the application installation directory. The program executables still install in C:\Program Files\CData\Sync. However, the data files moved to C:\ProgramData\CData\sync\.
The application directory contains the following folders:
-
connections -
data -
db -
downloads -
locks -
logs -
profiles
The installation directory (InstallationDirectory) contains the following items:
-
program executables (CData.Sync.exe, CData.Exe) and configuration files
-
the
wwwfolder and subfolders
To set permissions, locate the application directory for your Sync installation and follow these steps:
-
Right-click the folder and click Properties. On the Security tab, select Edit > Add.
-
Enter the following text in the Enter the object names to select box. Substitute the name of your application pool for YourApplicationPool in the line below (example:
IIS AppPool\\DefaultAppPool):IIS AppPool\\[YourApplicationPool] -
Ensure that the application pool has the following permissions:
-
Read
-
Write
-
Modify
-
Read & Execute
-
List Folder Contents
-
Note: You can also use the command line to allow access to the application pool, as shown in this example:
icacls "www" /grant "IIS APPPOOL\\DefaultAppPool":(OI)(M)
Prevent Application Processes from Unloading
IIS can close a web application for several reasons, including when an idle timeout is exceeded or when IIS deems that the application pool’s resource use is too high. This action might halt background tasks from occurring in your application. Ensure that the application stays running by modifying the following settings:
-
Enable the optional Application Initialization feature.
In Windows Server 2012 R2 and Windows Server 2016, open Server Manager and select Dashboard > Quick Start > Add Roles and Features to open the Add Roles and Features wizards. In the Server Roles step, select Web Server (IIS) > Web Server > Application Development > Application Initialization.
In Windows 8 and Windows 10, open the Control Panel and select Programs and Features > Turn Windows Features On or Off. Then, select Internet Information Services > World Wide Web Services > Application Development Features > Application Initialization.
-
On the Connections panel in IIS Manager, select Application Pools > YourApplicationPool > Advanced Settings. Then configure these settings:
-
Under the General settings, set Start Mode to AlwaysRunning.
-
Under the Process Model settings, set the Idle Timeout property to 0.
If you use IIS 8, ensure that the Start Automatically property in the General settings is set to True.
-
Under the CPU section, set the LimitInterval property to 0.
-
Under the Recycling section, set the Regular Time Interval property to 0.
-
Under the Recycling section of the Generate Recycle Event Log Entry node, set Regular Time Interval to False.
-
Configure ASP.NET App Pool Recycling
IIS recycles regularly so that it can clean up the ASP.NET app pool processes. You can schedule recycling during off-peak hours instead by navigating to the Recycling section and setting Specific Time to True. Then, enter the time (in the format hh:mm:ss) that you want recycling to start.
Preloading Applications
The IIS preloading feature improves performance by allowing the application to run before a user connects. To enable this feature, right-click the web application associated with Sync in the Connections pane and select Manage Application > Advanced Settings. In the PreloadEnabled menu, select True.
When PreloadEnabled is set to True, IIS simulates a user request to the default page of the website or virtual directory so that the application initializes.
Confirm Settings
To open the application and confirm your settings, navigate to http://localhost/sync. If you receive errors, see Troubleshooting.
IIS 7 and 7.5
Create a New Web Application
To host the application on your website, follow the steps below.
Note: This example uses the default website.
-
On the Connections panel in IIS Manager, select YourServer > Sites. Then, right-click your website and select Add Application.
-
In the Add Application dialog, enter the following information:
-
Alias - The name for the application (for example, “sync”).
-
Application Pool - The application pool that is associated with the application. (This example uses DefaultAppPool as the application pool.)
-
Physical Path - The path to the
wwwdirectory, which resides in the directory where Sync is installed. The default location for this directory isC:\\Program Files\\CData\\CData Sync\\www.
-
Configure Permissions
See Configure Permissions for IIS 8, 8.5, and 10 above. The information about configuring permissions is applicable across IIS versions.
Prevent Application Processes from Unloading
IIS can close a web application for several reasons, including when an idle timeout is exceeded or when IIS deems that the application pool’s resource use is too high. This action might halt background tasks from occurring in your application.
This version of IIS does not have configuration settings that enable the web application to run continuously. To ensure that the application pool is always running so that background tasks occur, you need to configure a script to issue an HTTP request periodically to the application.
In IIS 7.5, you can ensure that the application continues running by modifying the settings in the following steps:
-
Install the Application Initialization Extension for IIS 7.5. You can download the extension on the Application Initialization Module for IIS 7.5 page.
-
On the Connections panel in IIS Manager, select Application Pools > YourApplicationPool > Advanced Settings. Then, configure these settings:
-
Under the General settings, set Start Automatically to True.
-
Under the Process Model settings, set the Idle Timeout property to 0.
-
Under the CPU section, set the LimitInterval property to 0.
-
Under the Recycling section, set the Regular Time Interval property to 0.
-
Under the Recycling section of the Generate Recycle Event Log Entry node, set Regular Time Interval to False.
-
-
In the ApplicationHost.config file, which is located in
C:\\Windows\\System32\\inetsrv\\config\\, add startMode=”AlwaysRunning” and autoStart=”True” to the appropriate <applicationPools> entry, as shown below:<applicationPools> <add name="DefaultAppPool" managedRuntimeVersion="v4.0" startMode="AlwaysRunning" autoStart="true"/> </applicationPools>
Configuring ASP.NET App Pool Recycling
IIS recycles regularly so that it can clean up the ASP.NET application-pool processes. You can schedule recycling during off-peak hours instead by navigating to the Recycling section and setting Specific Time to True. Then, enter the time (in the format hh:mm:ss) that you want recycling to start.
Preloading Applications
The IIS preloading feature improves performance by enabling the application to run before a user connects. To enable this feature, edit the ApplicationHost.config file (C:\\Windows\\System32\\inetsrv\\config\\ApplicationHost.config) and add the preloadEnabled attribute to the <application> element that is associated with the application. The application node is a child element of the <sites> node, as shown in the following example:
<sites>
   <site name="Default Web Site" id="1">
   <application path="/sync" applicationPool="DefaultAppPool"  preloadEnabled="true">
   ...
When PreloadEnabled is set to true, IIS simulates a user request to the default page of the website or virtual directory so that the application initializes.
Confirm Settings
To open the application and confirm your settings, navigate to http://localhost/sync. If you receive errors, see Troubleshooting.
Host TLS/SSL Connections (IIS)
You can use SSL/TLS to protect the confidentiality of your business-critical and mission-critical communications with trading partners. The following steps assume that you already have a certificate that you can use to enable SSL/TLS on your server.
-
In IIS Manager, click your website’s node from the Connections pane.
-
Click Bindings in the Actions pane.
-
Click Add and select HTTPS.
-
Choose the server certificate.
If you want to require TLS/SSL, double-click the SSL Settings icon in the workspace while your website’s node is still selected. Select Require SSL and click Apply in the Actions pane.
Troubleshooting
The sections below provide resolutions for several common errors.
The application stops responding sometime after I log out.
IIS is unloading your application, possibly, after it times out from inactivity. By default, IIS terminates the worker process that is assigned to the application after twenty minutes of inactivity. The section Prevent Application Processes from Unloading,” in the steps to set up your version of IIS, explains how to override this feature.
In IIS 7.5, 8, and 8.5, you can ensure that the application continues to run by modifying the configuration settings in the IIS Manager.
Versions of IIS before IIS 7.5 do not have configuration settings to runt the web application continuously. To ensure that the application pool always runs so that background tasks occur, you need to configure a script to issue an HTTP request periodically to the application.
Visiting http://localhost/application results in a “Page Cannot Be Displayed” error (an HTTP 404 error).
This issue can happen if ASP.NET is not enabled. To confirm whether ASP.NET is enabled, navigate to http://localhost/sync/favicon.ico. If this page loads successfully, then ASP.NET is not enabled.
If you run IIS7 or later, select Control Panel > Programs (or Programs and Features) > Turn Windows Features On or Off > Internet Information Services > World Wide Web Services > Application Development Features. Then, select the check box next to ASP.NET.
If you use Windows Server 2003, open the Internet Information Services Manager and expand the local computer node. Then, select Web Service Extensions > ASP.NET > Allow. You might also need to follow the steps below.
If you run IIS 6 or earlier:
-
Open the Windows command prompt and navigate to the .NET Framework version installation (for example,
C:\\WINDOWS\\Microsoft.NET\\Framework\\v2.0.50727). -
Submit the
aspnet_regiis -i</b>command. If you use a 64-bit processor, you might need to change Framework to Framework64. The output should resemble the following:
   C:\\WINDOWS\\Microsoft.NET\\Framework\\v2.0.50727>aspnet\_regiis -i
     Start installing ASP.NET (2.0.50727).
     ...
     Finished installing ASP.NET (2.0.50727).
Restart IIS by submitting the iisreset command. The output should resemble the following:
  C:\\WINDOWS\\Microsoft.NET\\Framework\\v2.0.50727>iisreset

  Attempting stop...
  Internet services successfully stopped
  Attempting start...
  Internet services successfully restarted
The section is locked at a parent level. Locking is either by default (overrideModeDefault=”Deny”), or set explicitly by a location tag with overrideMode=”Deny” or the legacy allowOverride=”false”.
This error can occur if ASP.NET is not installed.
IIS 8 and 8.5
First, determine the version of the ASP.NET CLR that is used by your application pool. You need to install the version of ASP.NET that ships the same ASP.NET CLR. For example, ASP.NET 4.5 uses CLR version 4.0. You can find the CLR version in the IIS Manager by clicking Application Pools on the Connections panel. The .NET CLR Version property is displayed in the list of application pools.
In Windows Server 2012:
-
Open Server Manager and select Dashboard > Quick Start > Add roles and features. The Add Roles and Features wizard opens.
-
Select Web Server (IIS) > Web Server > Application Development.
-
Select the appropriate version of ASP.NET.
In Windows 8:
-
Open the Control Panel and select Programs and Features > Turn Windows Features On or Off.
-
Select Internet Information Services > World Wide Web Services > Application Development Features > Application Development,
-
Select the appropriate version of ASP.NET.
IIS 7 and 7.5
In Windows 7:
-
Open the Control Panel and select Programs and Features > Turn Windows Features On or Off.
-
Select Internet Information Services > World Wide Web Services > Application Development Features > ASP.NET.
In Windows Server 2008:
-
Open Server Manager and click Add Role Services.
-
Select Web Server > Application Development > ASP.NET.
User Management
Upon first starting, Sync prompts for the creation of a user with username and password credentials. After this first user is created, you can add, delete, and manager users on the Users of the via the Settings page in the application.
For more information about user management and roles, see User Roles.
Find and Configure the Application Directory
The Sync application directory (ApplicationDirectory) contains all the data that is used by the application: job and connection data, application data, logging data, and so on. Typically, ApplicationDirectory defaults to the following location:
C:\\ProgramData\\CData\\Sync
You can configure ApplicationDirectory to reside in a different folder, which is useful in a variety of scenarios:
-
clustering multiple instances of Sync
-
using a shared network drive for application data
-
embedding Sync within other systems that access the same folders
Changing the application directory moves the application’s data files, but it does not move other application resources (for example, EXE files, DLL files, and so on).
Web.Config
ApplicationDirectory is configured in the Web.Config file within the www folder of the installation directory.
This file contains a commented-out AppDirectory block that describes the following <appSettings> tag. You should set the path to the application directory as the ‘AppDirectory’ key with <appSettings>.
You can set ApplicationDirectory to any local or network path for which the application has read and write permissions.
Configure the Application Database
The Sync application database stores several tables of application data, including the following tables:
-
Jobs
-
Tasks
-
Connections
-
History (both Jobs and Tasks)
-
Application Settings
-
Application Log (application-level errors and events)
-
Audit Log (user-made changes to the Sync configuration)
By default, Sync uses an SQLite database in ApplicationDirectory as the application database. However, you can configure ApplicationDirectory to use an enterprise database like SQL Server, PostgreSQL, or MySQL.
You configure ApplicationDirectory in the Web.Config file within the www folder of the installation directory.
This file contains a commented-out <AppDb> block that that describes the following <connectionStrings> tag. The connection string and provider name for the target database should be set within the ‘AppDb’ key.
Login Lockouts
Sync automatically locks out users who enter incorrect passwords too many times in order to prevent brute-force attacks. By default, a user who enters six incorrect passwords within five minutes is locked out for thirty minutes when the seventh try fails.
You can modify these settings by editing the Web.Config file within the www folder of InstallationDirectory. The following settings are relevant to lockouts:
-
LockoutFailedAttempts - The number of incorrect passwords that trigger a lockout. Set this 0 to disable lockouts.
-
LockoutMinutes - The duration of the lockout. The default duration is thirty minutes.
-
LockoutTimeCheckPeriod - The period after which the number of failed attempts is reset to 0. The default period is five minutes.
You can configure each of these settings in the <appSettings> tag in the Web.Config file, as shown in this example:
<appSettings>
     <add key="LockoutFailedAttempts" value="0"/>
</appSettings>"