Jobs
Version 23.4.8843
Version 23.4.8843
Jobs
A CData Sync job is a unit of execution that includes the source connection, the destination connection, and a set of one or more tasks that represent data flows for different tables. All the tasks within a job are executed sequentially, which enables you to order data flows as you see fit.
The following sections explain how to create a new job, how to clone a job, and how to manage jobs. It also explains the option menu for a job and how to specify the settings for a job.
Creating a New Job
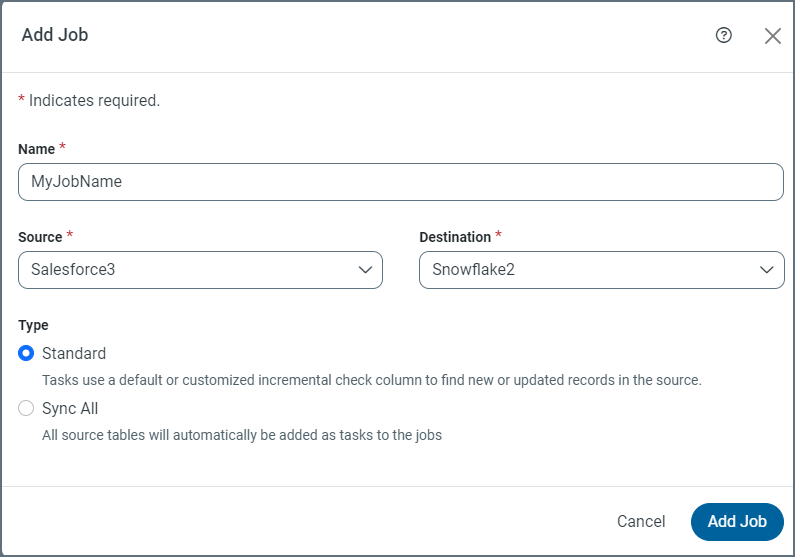
Creating a job requires preconfigured source and destination connections. After you define a source connection to your data source and a destination connection to your database, follow these steps to create a new job:
-
Click Jobs in the navigation bar to open the Jobs page.
-
Click Add Job (upper right corner). This action opens the Add Job dialog box where you can enter job information.
-
Enter a job name and select the source and destination connections. (Note: Job names must not include illegal characters. If you use an illegal character, Sync generates an error message.)
-
Select a replication type. The default setting is Standard.
-
Standard: Add one or more source tables as Tasks to the Job. Each task uses either a default or a customized incremental check column to find new or updated records in the source.
-
Change Data Capture: Each task uses the native change-data-capture mechanism in the source to retrieve changes.
-
Sync All: When creating this job, all source tables are added automatically as tasks to the jobs.
-
Load Folder: All files from a folder or container will be loaded into a single destination table during execution.
-
-
Click Add Job to create your new job.
From your specific job page (Jobs > YourJobName), you can set your job to run on a schedule, set incremental replication, and create email notifications. In addition, you can view your logs and job history to obtain more information or to troubleshoot errors.
Understanding the Options Menu for a Job
After you create a job, an options menu (…) becomes available. To see the menu, position your cursor over the right end of the job row.
The menu contains the following options:
-
Edit - Enables you to edit your job settings.
-
Clone - Enables you to create a copy of the job.
-
Download Log File - Downloads the log files from the last run.
-
Run Details - Opens a dialog box that displays information about your job run. The dialog box contains three tabs of information:
-
Details: This tab displays the run date, the run status, the amount of time it took to run the job, and the number of rows affected.
-
Tasks: This tab displays a list of tasks that ran and results of that run.
If you click the Show Filter icon, a status menu is displayed above the table columns. This menu enables you to choose whether to display tasks of all status types (All Status), tasks that are only of type Success, or tasks that are only of type Failed. To refresh the table, click Refresh Table.
-
Logs: This tab lists the logs that are available for your job. You can download individual logs here by clicking the download icon to right of the log name. You can also download all logs by clicking Download All Log Files.
-
-
Remove - Permanently deletes a job.
Cloning a Job
Instead of creating an entirely new job, you can clone an existing job. Cloning a job creates a new job by copying the settings and tasks from the existing job. Follow these steps to clone a job.
-
Locate the job that you want to clone and select Clone from the options menu (…). This option opens the Clone Job dialog box, where you can define what you want to clone.
-
Enter a name for your new job.
-
(Optional) Select the Choose a different Source and Destination option if you want to change the current source and destination.
-
Select any of the following optional settings that you want to use.
Tasks - Copies all Tasks from the original job. Note: If you use a different source connection, you must verify that all the tables you add as tasks exist in your source before you run the job.
Events - Copies all Events from the original job.
Additional Settings - Copies notification, schedule, logging, and advanced settings from the original job.
-
-
Click Clone Job. Then, your cloned job is displayed in the job table on the Jobs page.
Specifying Job Settings
On the main Jobs page, you can specify settings for a job by selecting Edit from the options menu. This option opens a job settings page for that specific job that contains the following five tabs: Overview, Task, Job History, Events, and Advanced.
Overview Tab
The Overview tab contains four settings categories:
-
Last Run: This category displays whether the last run was successful or whether it failed.
-
Settings: This category displays current settings for job type, destination schema, logfile verbosity, and parallel processing.
-
Incremental Replication - When you click Configure in this category, Sync opens the Incremental Replication dialog box, which enables you to define various replication settings. For more details and steps to configure these settings, see Setting Your Initial Replication Job.
-
Schedule - When you click Configure in this category, Sync opens the Schedule dialog box where you can control the frequency of your job run. For more details and steps to configure the schedule, see Scheduling-Jobs.
-
Notification - When you click Configure in this category, Sync opens the Notification dialog box where you can request that Sync notify you via email after a job run is completed. For more details and steps to configure notifications, see Notifications.
Task Tab
The Task tab enables you to add, edit, and remove tasks for a job. For more details and steps to configure tasks, see Tasks.
Job History Tab
The Job History tab enables you to monitor current job runs and review previous runs. The table on this tab displays status of the job run, the number of records that were affected, and the run time. For more details and for steps to download and archive logs, see Logs and History.
Events Tab
At times, you might need to integrate external information into data-flow tasks. The Events tab enables you to create events that execute before and after a job run. For details about how to include query parameters or to trigger other external processes via your task, see Events.
Advanced Tab
The Advanced tab enables you to configure replication options so you can fine-tune how your data is extracted from your source and how it is replicated to your database.
Managing Jobs
The Jobs page in the admin console provides a table of configured jobs in the Sync application. From there, you can easily manage and monitor existing jobs as well as to add new jobs to the application.
Manage Operations for Individual Jobs
You can manage a job by positioning your cursor over the entry for the job and performing any of the following actions:
-
Click Run Job (▷) to start a job run.
-
Click Stop Job Run (■) to cancel a running job.
Manage Bulk Job Operations
You can run certain bulk operations on one or more jobs from the main Jobs page. To specify operations for a single job, select the checkbox to the left of the job. To specify an operation for multiple files, select the Name checkbox at the top of the jobs table.
The bulk operations appear in a black task bar above the job table.
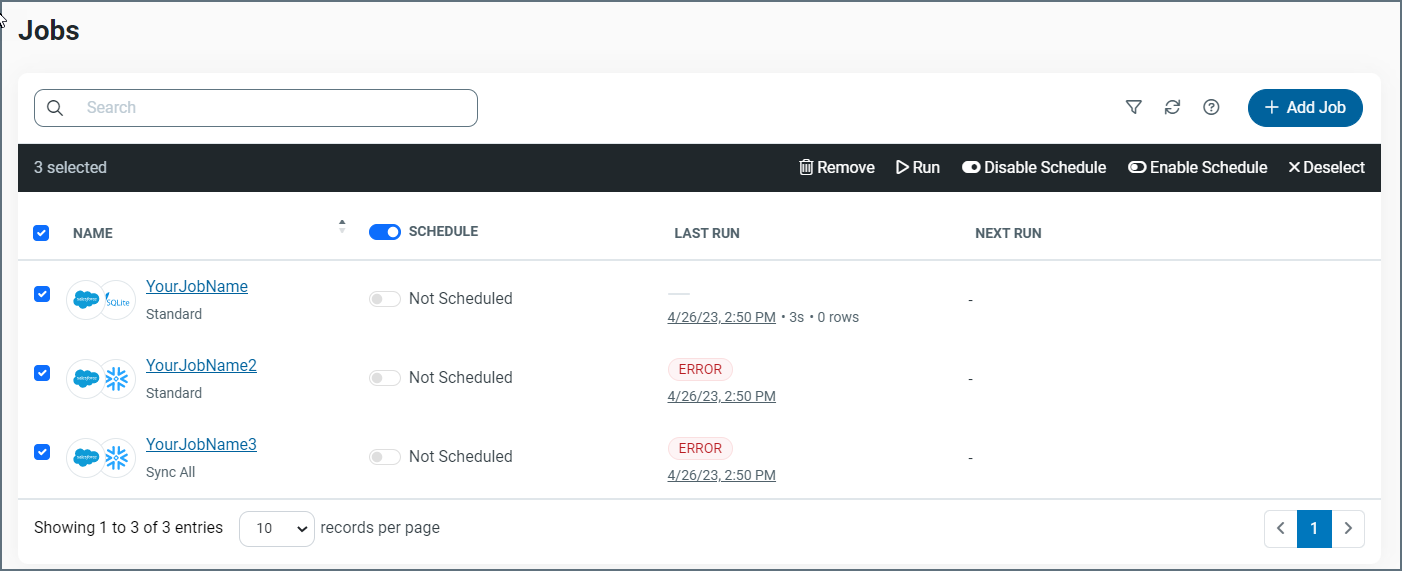
To use the Enable Schedule and Disable Schedule buttons, you must have a schedule set for your job (or jobs). To disable the scheduler, select the checkbox for your job or jobs and click Disable Schedule. To re-enable the scheduler, click Enable Schedule.
You can also deselect jobs, run jobs, or remove jobs by clicking the appropriate button on the task bar.