Email Send Connector
Version 26.2.9686
Version 26.2.9686
Email Send Connector
The Email Send connector sends messages via an SMTP mail server.
Key Capabilities
- SMTP-based email delivery using a user-specified server or SendGrid, with OAuth 2.0 support for modern providers
- Template mode for dynamic content generation from XML data or ArcScript
- Attachment mode for sending files with customizable message bodies
- Support for multiple recipients (To, CC, and BCC) with dynamic field population
Overview
An Email Send connector connects to an SMTP server (user-specified or SendGrid) delivery service to send files as outgoing email messages. Input files processed by the connector can be sent directly as email attachments, or data can be parsed from input files and included in the outgoing message via a scripting template. For more information on creating a scripting template, see the Templates sections.
Note: OAuth 2.0 configuration for Outlook and Gmail mail servers are the two most common connection configurations made in the Email Send connector. You can access additional guides and resources for these two mail servers in the CData Community. See Using OAuth 2.0 in the Email Send and Receive Connectors.
Connector Configuration
This section contains all of the configurable connector properties.
Email Config
Establish a Connection
To allow Arc to send emails, you must first establish an Email Send connection. Once established, connections can be shared across multiple Email Send connectors. There are two ways to establish this connection:
- Add an Email Send connector to your flow. Then use the Connection dropdown to select an existing connection or click Create to add a new connection.
- Open the Arc Settings page, then open the Connections tab. Click Add, select Email Send, and click Next. (Note: If you create the connection this way, you must still select it from the Connection dropdown on the connector.)
Complete the following properties:
- Email Protocol Whether to use a user-specified SMTP server or SendGrid. If you choose SendGrid, only TLS Type remains. All other fields are SMTP-related.
- API Key Your SendGrid API key. Not applicable for Arc Cloud implementations.
- Host The hostname or IP address of the SMTP server.
- Port The port on which to connect to the SMTP server. Typical values include 143 and 993.
- Authentication Mechanism The type of authentication to use to login to the server. The options vary based on your choice.
- Password (Basic and NTLM) The password to the IMAP server.
- Auth URL (OAuth 2.0) The authorization URL for the service. This is the URL you are directed to when clicking the Connect button to log in and grant permission to the application.
- Access Token URL (OAuth 2.0) The URL to the access token.
- Client Id (OAuth 2.0) The client Id assigned when you registered for OAuth.
- Client Secret (OAuth 2.0) The secret assigned when you registered for OAuth.
- Scope (OAuth 2.0) A list of scopes that the application should have access to.
- Callback URL (OAuth 2.0) The URL where the service you connect to returns tokens to provide access. Services often require you to whitelist the URLs that are allowed, so this is the value to use when configuring the application registration with your service.
- None No authentication is required.
- User The username to login to the SMTP server. Not visible when the Authentication Mechanism is set to None.
- TLS Type The method used to negotiate TLS/SSL when connecting to the server:
STARTTLS: A plain text connection is established. Afterwards, TLS/SSL can be started with an explicit command.
SSL/TLS: Negotiation occurs immediately without first establishing a plain text connection.
None (Plain Text): A plain text connection is established, and no TLS/SSL is used. Automatic: The appropriate TLS/SSL negotiation method is detected and applied based on the port number. STARTTLS is used for standard mail ports (25, 587), and TLS/SSL is used for port 465.
The following settings are required to establish a network-level connection to the SMTP server:
- Host
- Port
- TLS Type
Once network-level connectivity has been established, the following settings are required to access the messages stored on the server:
- User
- Password or OAuth 2.0 authentication credentials
- Mailbox
The only setting SendGrid expects is TLS Type.
Use the Add and Test button to verify that the connector can reach the server.
Additional Configuration
Settings for the outgoing email message. Most of these fields can include dynamic data from the outgoing file (see Dynamic Fields for more information).
- Message Type Specifies the method for handling the message:
Attachment: Send files that arrive at the connector as attachments. See Attachment Mode for more information and an example.
Template: Interpret the message body as an ArcScript template that reads values from the input file. For more information on creating a scripting template, see Template Mode. - To The email address of the outgoing email message recipient. Use a comma-separated list to send to multiple recipients.
- Show From Opens a field to enter the email address of the sender of the outgoing email message. The connector attempts to automatically determine the value for this field based on the User credential passed to the SMTP server.
- Show Cc / Show Bcc Opens fields to enter an email address to carbon copy (CC) or blind carbon copy (BCC). Use a comma-separated list to send to multiple recipients.
- Subject The subject line for the outgoing email message.
- Message Body The email body.
Settings Tab
Email Send Configuration
Settings for the name and description of the connector.
- Connector Id The static, unique identifier for the connector.
- Connector Type Displays the connector name and a description of what it does.
- Connector Description An optional field to provide a free-form description of the connector and its role in the flow.
Advanced Tab
Advanced Settings
Extra settings related to processing.
- Allow ArcScript in Attachment mode Check this to permit the evaluation of ArcScript in the message body when the Message Type is Attachment.
- Attachment Filter A glob pattern filter to apply to messages before they are sent. The pattern can be positive or negative. For example,
*.edionly sends files with a.ediextension and-*.tmpexcludes files with a.tmpextension. You can provide a comma-separated list of filters. Later filters take priority unless you use an exact match. - Outgoing Server Public Certificate The public key certificate used to verify the identity of a TLS/SSL server. If the target server uses TLS/SSL, set this field to the certificate that identifies the server. If the server’s certificate is not available, you can leave this setting blank to allow the underlying OS/JVM to perform certificate validation, or set it to
Any Certificateto implicitly trust the server’s identity. - Extension Map A comma separated list of name-value pairs for determining the Content-Type header value for attachments. For example, .txt=text/plain, .dat=application/edi-x12, .edi=application/edifact
Note: Including a Content-Type header on input messages overrides the content type determined by this setting. - Processing Delay The amount of time (in seconds) by which the processing of files placed in the Transactions tab is delayed. This is a legacy setting. Best practice is to use a File connector to manage local file systems instead of this setting.
Proxy Settings
Settings for using a proxy with the connector.
- Use Global A toggle that instructs the connector to use the proxy settings configured under the Settings tab of Arc.
- Proxy Type The type of proxy to use. Select None to not use a proxy. Otherwise, select Tunnel, SOCKS4, SOCKS5, or HTTP.
- Proxy Host The proxy server. Formatting depends on the Proxy Type selected.
- Proxy Port The port to use when connecting to the proxy.
- Proxy User The username to use when connecting to the proxy.
- Proxy Password The password for the associated username.
- Authentication Scheme The protocol to use when connecting to the proxy. Options include Basic, Digest, Proprietary, and NTLM.
Message
Message settings determine how the connector searches for messages and manages them after processing. You can save messages to your Sent folder or you can group them based on a Sent folder scheme, as described below.
- Save to Sent Folder Check this to copy files processed by the connector to the Sent folder for the connector.
- Sent Folder Scheme Instructs the connector to group files in the Sent folder according to the selected interval. For example, the Weekly option instructs the connector to create a new subfolder each week and store all sent files for the week in that folder. The blank setting instructs the connector to save all files directly in the Sent folder. For connectors that process many transactions, using subfolders can help keep files organized and improve performance.
Logging
Settings that govern the creation and storage of logs.
- Log Level The verbosity of logs generated by the connector. When you request support, set this to Debug.
- Log Subfolder Scheme Instructs the connector to group files in the Logs folder according to the selected interval. The Weekly option (which is the default) instructs the connector to create a new subfolder each week and store all logs for the week in that folder. Leaving this setting blank tells the connector to save all logs directly in the Logs folder. For connectors that process many transactions, using subfolders helps keep logs organized and improves performance.
- Log Messages Check this to have the log entry for a processed file include a copy of the file itself. If you disable this, you might not be able to download a copy of the file from the Transactions tab.
Miscellaneous
Miscellaneous settings are for specific use cases.
- Other Settings Enables you to configure hidden connector settings in a semicolon-separated list (for example,
setting1=value1;setting2=value2). Normal connector use cases and functionality should not require the use of these settings.
Automation Tab
Automation Settings
- Send A toggle that instructs the connector to automatically send files when they are ready.
- Retry Interval The interval the connector waits before retrying a failed send.
- Max Attempts The number of attempts the connector makes to send the message. Setting this value to 1 instructs the connector to only make the initial send attempt without retrying. The connector waits the duration specified by Retry Interval between each attempt.
Performance
Settings related to the allocation of resources to the connector.
- Max Workers The maximum number of worker threads consumed from the threadpool to process files on this connector. If set, this overrides the default setting on the Performance Settings portion of the Advanced Settings page.
- Max Files The maximum number of files sent by each thread assigned to the connector. If set, this overrides the default setting on the Performance Settings portion of the Advanced Settings page.
Alerts Tab
Settings related to configuring alerts.
Before you can execute Service Level Agreements (SLAs), you need to set up email alerts for notifications. By default, Arc uses the global settings on the Alerts tab. To use other settings for this connector, toggle Override global setting on.
By default, error alerts are enabled, which means that emails are sent whenever there is an error. To turn them off, uncheck the Enable checkbox.
Enter a Subject (mandatory), then optionally enter a comma-separated list of Recipient emails.
SLAs Tab
Settings related to configuring Service Level Agreements (SLAs).
SLAs enable you to configure the volume you expect connectors in your flow to send or receive, and to set the time frame in which you expect that volume to be met. CData Arc sends emails to warn the user when an SLA is not met, and marks the SLA as At Risk, which means that if the SLA is not met soon, it will be marked as Violated. This gives the user an opportunity to step in and determine the reasons the SLA is not being met, and to take appropriate actions. If the SLA is still not met at the end of the at-risk time period, the SLA is marked as violated, and the user is notified again.
To define an SLA, toggle Expected Volume on, then click the Settings tab.
![]()
- If your connector has separate send and receive actions, use the radio buttons to specify which direction the SLA pertains to.
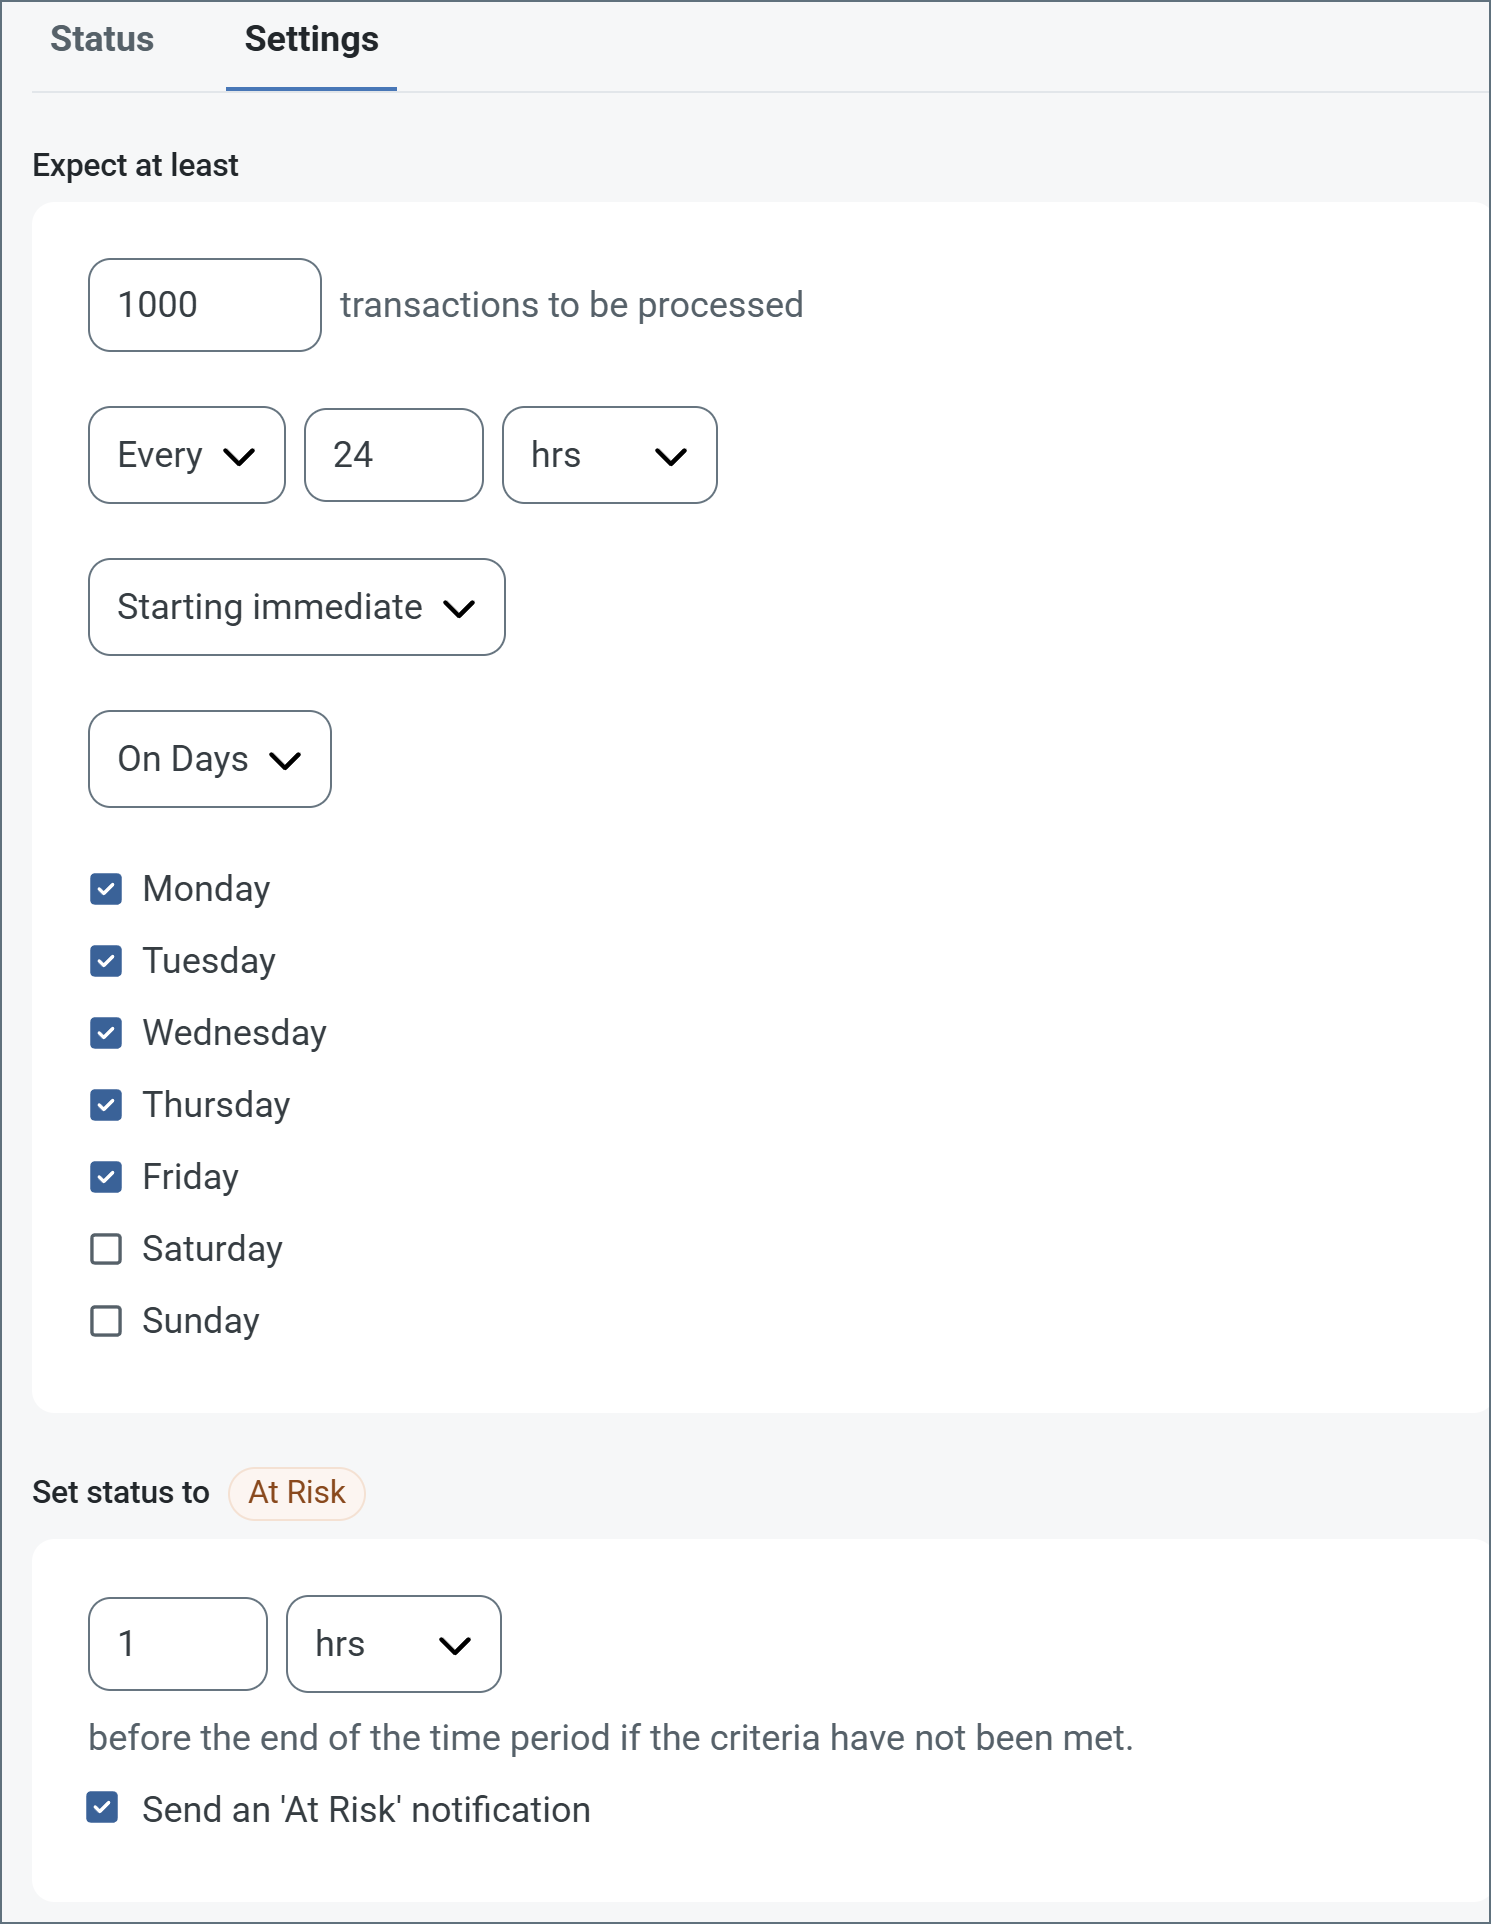
- In the Expect at least portion of the window:
- Set the minimum number of transactions you expect to be processed (the volume)
- Use the Every fields to specify the time frame
- Indicate when the SLA should go into effect. If you choose Starting on, complete the date and time fields.
- Check the boxes for the days of the week that you want the SLA to be in effect. Use the dropdown to choose Everyday if necessary.
- In the Set status to ‘At Risk’ portion of the window, specify when the SLA should be marked as at risk.
- By default, notifications are not sent until an SLA is in violation. To change that, check Send an ‘At Risk’ notification.
The following example shows an SLA configured for a connector that expects to receive 1000 files every day Monday-Friday. An at-risk notification is sent 1 hour before the end of the time period if the 1000 files have not been received.
Note: You can turn off SLA alerts if necessary. This can be useful during maintenance windows. Click Settings on the navbar, then navigate to Alerts > General Alerts. Click the tablet and pencil icon to edit, and uncheck the SLA Alerts setting.
Transactions Tab
This tab lists all messages associated with the connector. Use the search bar to find specific messages, or click the funnel icon to apply a filter. You can filter by tracked headers, time, and/or status.
Sending Emails
The Email Config tab determines the email message to be sent:
- If Message Type is set to Attachment, files processed by the connector are sent as email attachments, and you should specify the body of the message in the message text editor. See Attachment Mode for more information.
- If Message Type is set to Template, the message text editor is treated as an ArcScript template. In the scripting template, values can be parsed out from the files processed by the connector and included in the email body. See Template Mode for more information.
To send multiple attachments in a single email, you need to construct a batch group containing all the attachments you want to include, then send that batch group to the Email Send connector for processing.
Dynamic Fields
The To, From, CC, BCC, and Subject fields support dynamic information from the outgoing file (for example, the filename and the connectors that have processed the file).
The file information is available through the _message item. The _message item has a collection of attributes with a header: prefix that corresponds to each of the headers available in the outgoing file. These headers include the filename, any metadata related to processing the file within the Arc flow, and any custom headers promoted to the file via scripting.
The _message item and the header attributes are referenced in square brackets like any other ArcScript item:
[_message.header:headerName]
For example, the Subject could be set to the following value to include the filename of the outgoing file:
[_message.header:filename]
Template Mode
Setting Message Type to Template instructs the connector to interpret the message body as an ArcScript template. The template uses a simple syntax to interact with the input file and retrieve values to use in the email body. These values can be combined with static text to generate a standard body format that is dynamically populated based on the files processed by the connector.
To use Template mode, the connector must receive an XML file as an input. Templates can only parse information from XML files.
Basic Template
For an example of a template message, consider the following input XML document:
<Lead>
  <Company>ABC, Inc.</Company>
  <Email>[email protected]</Email>
  <FirstName>John</FirstName>
  <Description>Blue Widget</Description>
</Lead>
This file contains a list of attributes—Company, Email, FirstName, Description—inside of Lead tags. The ArcScript expression to pass the Email field into a message would look like this:
[document.lead_email]
There are three components to this expression:
- The document item, which points to the currently open file.
- The lead_email attribute, which points to ‘[email protected]’.
- Square brackets (
[]), which indicate the use of a formatter rather than literal characters.
An email body template for the XML input file above might look like this:
Hi [document.lead_firstname],
<br>
We saw that you might be interested in the following product:
<br>
[document.lead_description]
<br>
Would you like to set up a demo to learn more about how we can help you with your work at [document.lead_company]?
This message would generate the following email:
Hi John,

We saw that you might be interested in the following product:

Blue Widget

Would you like to set up a demo to learn more about how we can help you with your work at ABC, Inc.?
Refer to the Scripting section for more information about ArcScript.
XPath Formatting
The XPath formatter (written as xpath in expressions) provides an alternative approach to retrieving dynamic values from files. This approach might be more familiar to users already using ArcScript elsewhere in Arc. XPath requires input files to be XML files.
Using the same input file example as above:
<Lead>
  <Company>ABC, Inc.</Company>
  <Email>[email protected]</Email>
  <FirstName>John</FirstName>
  <Description>Blue Widget</Description>
</Lead>
The XPath expression to return the email address would be:
[xpath(/Lead/Email)]
There are three components to this expression:
- xpath followed by parentheses, which denotes the expression as an XPath expression.
- The path to the data, with each level delineated by slashes.
- Square brackets (
[]), which indicate the use of a formatter rather than literal characters.
Using the XPath Formatter in Template Mode
Consider the following XML:
<Items>
    <projectName>myProject</projectName>
    <assignee>Bob Ross</assignee>
    <dueDate>02/27/2024</dueDate>
    <resources>
        <description>http://mydomain.com/desc</description>
        <images>http://mydomain.com/images</images>
        <colors>http://mydomain.com/colors</colors>
    </resources>
</Items>
An email body template that uses xpath expressions for the XML input file above might look like this:
Hi [xpath(/Items/assignee)],
<br>
You have a new project to start working on. The name of the project is [xpath(/Items/projectName)].
<br>
All the resources you need can be found at the following links:
<br>
<ul>
  <li>Description: [xpath(/Items/resources/description)]</li>
  <li>Images: [xpath(/Items/resources/images)]</li>
  <li>Colors: [xpath(/Items/resources/colors)]</li>
</ul>
<br>
The due date for this project is [xpath(/Items/dueDate)].
This message would generate the following email:
Hi Bob Ross,

You have a new project to start working on. The name of the project is myProject.

All the resources you need can be found at the following links:

  - Description: http://mydomain.com/desc
  - Images: http://mydomain.com/images
  - Colors: http://mydomain.com/colors

The due date for this project is 02/27/2024.
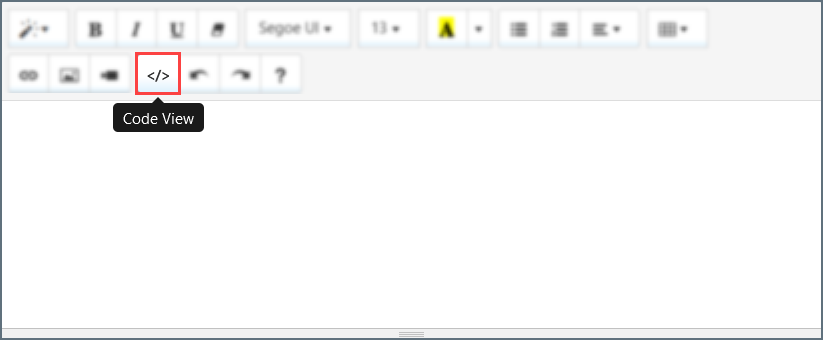
Code View Editor
The Code View editor enables the creation of custom ArcScript for advanced processing of information from XML files. To open the Code View editor, click the Code View button in the message editor.
In this mode, ArcScript expressions can be used to process multiple data entries at once. The following input file example includes a list of names:
<record>
  <to>Dave</to>
  <items>
    <item>
      <first_name>James</first_name>
      <last_name>Satchel</last_name>
    </item>
    <item>
      <first_name>John</first_name>
      <last_name>Smith</last_name>
    </item>
    <item>
      <first_name>Gina</first_name>
      <last_name>Newberry</last_name>
    </item>
  </items>
</record>
The following message written in the Code View editor incorporates data from this input file using ArcScript:
Hi [document.record_to],
<br>
Here are the people you were asking about:
<br>
<arc:set attr="xml.xpath" value="/record/items/item" />
<arc:call op="xmlDOMSearch" in="xml">
  <arc:set attr="first.names" value="[xpath(first_name)]" />
  <arc:set attr="last.names" value="[xpath(last_name)]" />
  <arc:enum attr="first.names">
    [_value]
  </arc:enum>
  <arc:enum attr="last.names">
    [_value]
  </arc:enum>
  <br>
</arc:call>
This code loops over all of the first and last name values in the input XML file and prints them in the body of the message. When run with the input file above, the final email looks like this:
Hi Dave,

Here are the people you were asking about:

James Satchel
John Smith
Gina Newberry
Refer to the Scripting section for more information about ArcScript and custom expressions.
Attachment Mode
If you set Message Type to Attachment, type your email message body into the editor. If necessary, you can reference headers on the input message to enrich the body of the email. The Email Send connector then evaluates those headers, and attaches the input file to the outbound email.
Note: This relies on a previous step in the flow to promote the necessary values as headers onto the message. Depending on the content of the file, you can do this with various Operations and connector settings.
Consider the following XML:
<Items>
    <projectName>myProject</projectName>
    <assignee>Bob Ross</assignee>
    <dueDate>02/27/2024</dueDate>
    <resources>
        <description>http://mydomain.com/desc</description>
        <images>http://mydomain.com/images</images>
        <colors>http://mydomain.com/colors</colors>
    </resources>
</Items>
The email body might look like this:
Hi [_message.header:assignee],
<br>
You have a new project to start working on. The name of the project is [_message.header:projectname].
<br>
All the resources you need can be found at the following links:
<br>
<ul>
  <li>Description: [_message.header:description]</li>
  <li>Images: [_message.header:images]</li>
  <li>Colors: [_message.header:colors]</li>
</ul>
<br>
The due date for this project is [_message.header:duedate].
This message would generate the following email, and include the input file as an attachment:
Hi Bob Ross,

You have a new project to start working on. The name of the project is myProject.

All the resources you need can be found at the following links:

  - Description: http://mydomain.com/desc
  - Images: http://mydomain.com/images
  - Colors: http://mydomain.com/colors

The due date for this project is 02/27/2024.