Configure a Connector
Version 26.2.9686
Version 26.2.9686
Configure a Connector
This section contains all of the configurable connector properties.
Settings Tab
Connector Details
Settings that determine how the API can be accessed.
- Connector Id The static, unique identifier for the connector.
- Connector Type Displays the connector name and a description of what it does.
- Connector Description An optional field to provide a free-form description of the connector and its role in the flow.
- API Endpoint The URL to which the custom API is published. To access a specific resource, append a slash and the resource name to this URL value.
- API Documentation The URL to which the documentation for the custom API is published.
Connection
Settings related to the database connection. Click Add Connection to configure a connection.
- Select Connector The type of database to connect to. The remaining connection fields vary based on your database choice. The most common fields are described below, but you should review the connector documentation for your database if you need additional information.
- Server The host name or IP address of the server hosting the database.
- Auth Scheme The type of auth scheme to use for authenticating the connection. When you select an auth scheme, additional fields appear. The connector documentation for your database contains details on these fields. Not applicable for DB2.
- Port The port on which to connect to the database host.
- Database The name of the database to connect to.
- User The user credential that has permission to access the database.
- Password The password credential associated with the specified User.
Tables Tab
The Tables tab lists all API resources exposed by the connector. Each resource is generated from a table or view present in the connected database. Adding a new table or view exposes new database data to a web API call via the connector. See API Resources for details.
Stored Procedures Tab
The Stored Procedures tab lists all API actions exposed by the connector. Each action is generated from a stored procedure present in the connected database. Adding a new stored procedure exposes new database data to a web API call via the connector. See API Actions for details.
Users Tab
The Users tab lists all users authorized to make API calls to the connector. It lets you:
- Create users with their associated authtokens and OAuth 2.0 credentials
- Define HTTP method privileges (GET, POST, PUT, MERGE, PATCH, and DELETE)
- Specify how many requests each user can make per hour
- Specify how many concurrent requests are permitted
You can add, edit, and delete users on this tab. See Users and Authentication for details on each field.
Note: The request settings here override settings in the Default Rate Limits section of the Server tab.
Server Tab
Trusted IP Addresses
The following functions are available in the Trusted IP Addresses section:
- Add Enter a new IP address range.
- Edit Modify the selected IP address range.
- Delete Deletes the selected IP address range from the list.
The following restrictions apply to this feature:
localhostcannot be modified or removed from the list.- Any IP addresses outside of the defined ranges are rejected.
- Ranges are supported. For example, the entry
100.10.100.1-15indicates that IP addresses between100.10.100.1and100.10.100.15are allowed. - Classless inter-domain routing (CIDR) notation is supported. For example, the entry
100.10.100.0/24indicates that IP addresses between100.10.100.0and100.10.100.255are allowed. - Wildcard patterns are supported. For example, the entry
100.10.100.*indicates that IP addresses beginning with100.10.100are allowed.
Note: In order for clients to reach the server, a clear network path is required. In cloud environments you might need to make changes in three places:
- The networking rules in the cloud console.
- The firewall rules on the machine hosting the application. For example, when using an Amazon AMI, you might use an Uncomplicated Firewall (UFW) to allow traffic on the desired port. A common strategy in Linux environments is to forward traffic from ports lower than 1024 to a non-standard port higher than 1024, while configuring the application to use the non-standard port. This avoids permission issues associated with non-root users binding to ports lower than 1024.
- The Network Access portion of the Security tab.
Default Rate Limits (Per User)
Settings restricting the number of API requests allowed.
See Rate Limiting for more information.
- Max Requests Per Hour The limit to the number of requests a single user can issue in an hour.
- Max Concurrent Requests The limit to the number of concurrent requests a user can issue.
Cross-Origin Resource Sharing (CORS)
Settings governing the use of CORS to serve cross-origin resources.
- Enable cross-origin resource sharing (CORS) Whether or not CORS is enabled. The rest of these options are only available when you check this box.
- Allow all domains without ‘*‘ If enabled, domain origins are not restricted to a specific list.
- Access-Control-Allow-Origin The comma-delimited list of domain origins to allow. Included as an HTTP response header.
- Access-Control-Allow-Credentials Whether or not user credentials such as cookies are allowed in cross-origin requests. Included as an HTTP response header.
- Access-Control-Allow-Methods The comma-delimited list of methods to allow. Included as an HTTP response header.
- Access-Control-Allow-Headers The comma-delimited list of headers to allow. Included as an HTTP response header.
- Access-Control-Max-Age The maximum duration (in seconds) that Access-Control response header values can be cached.
OData
Settings related to OData feature support.
- Server-Side Paging Size The number of results per-page returned by an OData request. Set this option to 0 to return all results.
- Default Format The OData format to be used when the client does not specify a format.
- Default Version The OData version to be used when the client does not specify a version.
- Date Time Format The format to use when returning date-time information.
- Base URL The fully qualified URL of the OData endpoint. If unspecified, Arc attempts to create the base URL based on the incoming request.
- Authtoken in URL Check this to allow the connector to pass the authtoken in query string parameters for authentication. See Using Auth Tokens as Query String Parameters for more information.
Advanced Tab
Message
- Save to Sent Folder Check this to copy files processed by the connector to the Sent folder for the connector.
- Sent Folder Scheme Instructs the connector to group messages in the Sent folder according to the selected interval. For example, the Weekly option instructs the connector to create a new subfolder each week and store all messages for the week in that folder. The blank setting tells the connector to save all messages directly in the Sent folder. For connectors that process many messages, using subfolders helps keep messsages organized and improves performance.
Logging
- Log Level The verbosity of logs generated by the connector. When you request support, set this to Debug.
- Log Subfolder Scheme Instructs the connector to group files in the Logs folder according to the selected interval. The Weekly option (which is the default) instructs the connector to create a new subfolder each week and store all logs for the week in that folder. Leaving this setting blank tells the connector to save all logs directly in the Logs folder. For connectors that process many transactions, using subfolders helps keep logs organized and improves performance.
- Log Messages Check this to have the log entry for a processed file include a copy of the file itself. If you disable this, you might not be able to download a copy of the file from the Transactions tab.
Miscellaneous
Miscellaneous settings are for specific use cases.
- Other Settings Enables you to configure hidden connector settings in a semicolon-separated list (for example,
setting1=value1;setting2=value2). Normal connector use cases and functionality should not require the use of these settings.
Alerts Tab
Settings related to configuring alerts.
Before you can execute Service Level Agreements (SLAs), you need to set up email alerts for notifications. By default, Arc uses the global settings on the Alerts tab. To use other settings for this connector, toggle Override global setting on.
By default, error alerts are enabled, which means that emails are sent whenever there is an error. To turn them off, uncheck the Enable checkbox.
Enter a Subject (mandatory), then optionally enter a comma-separated list of Recipient emails.
SLAs Tab
Settings related to configuring Service Level Agreements (SLAs).
SLAs enable you to configure the volume you expect connectors in your flow to send or receive, and to set the time frame in which you expect that volume to be met. CData Arc sends emails to warn the user when an SLA is not met, and marks the SLA as At Risk, which means that if the SLA is not met soon, it will be marked as Violated. This gives the user an opportunity to step in and determine the reasons the SLA is not being met, and to take appropriate actions. If the SLA is still not met at the end of the at-risk time period, the SLA is marked as violated, and the user is notified again.
To define an SLA, toggle Expected Volume on, then click the Settings tab.
![]()
- If your connector has separate send and receive actions, use the radio buttons to specify which direction the SLA pertains to.
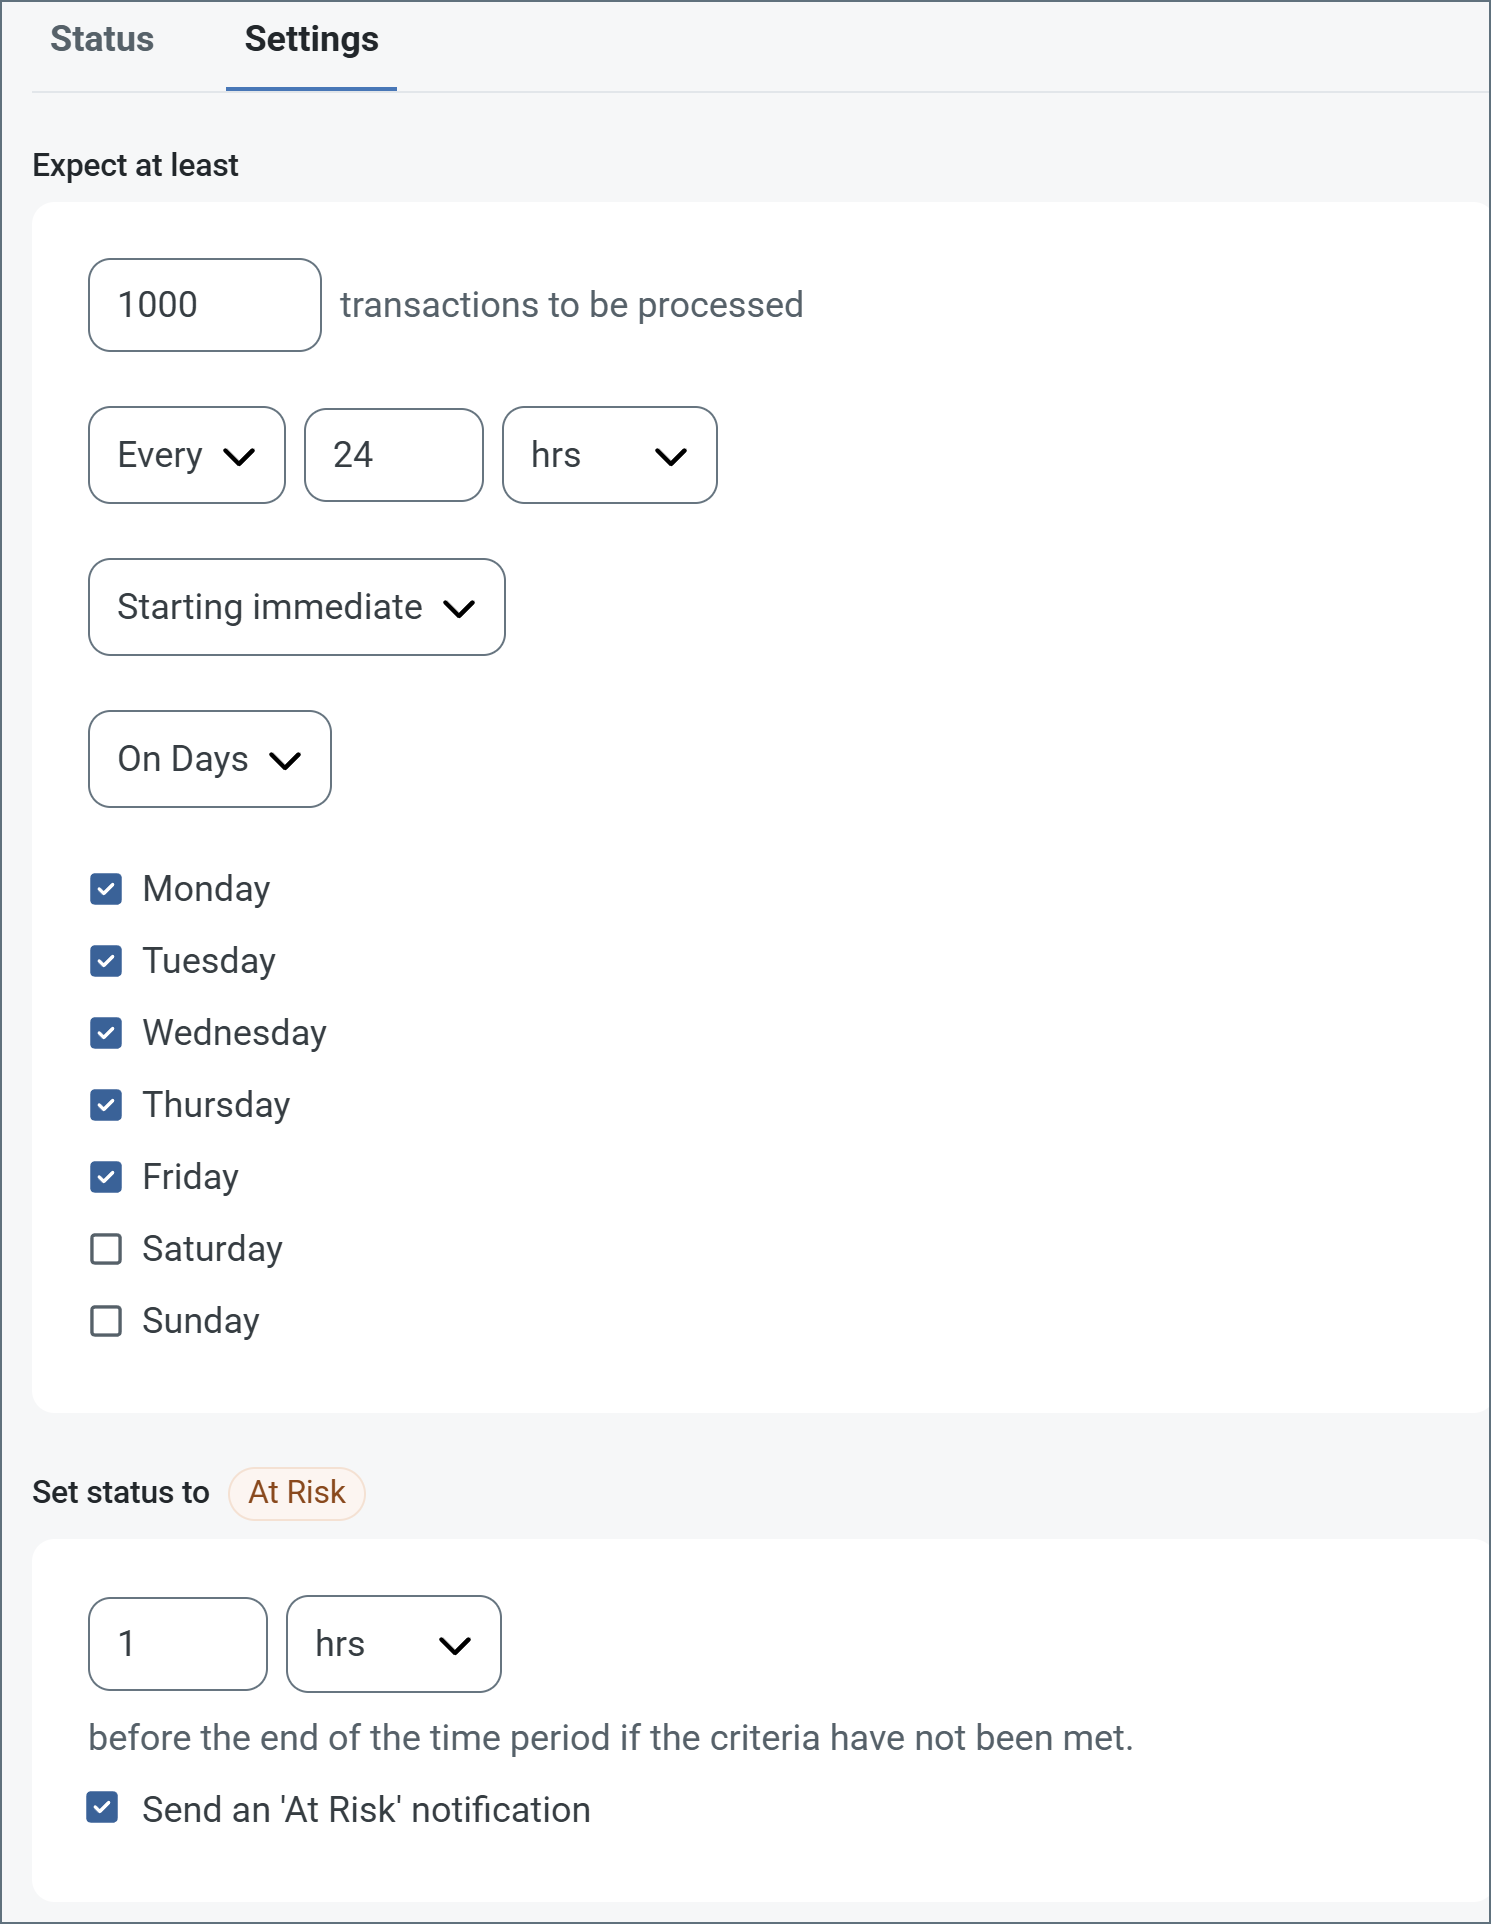
- In the Expect at least portion of the window:
- Set the minimum number of transactions you expect to be processed (the volume)
- Use the Every fields to specify the time frame
- Indicate when the SLA should go into effect. If you choose Starting on, complete the date and time fields.
- Check the boxes for the days of the week that you want the SLA to be in effect. Use the dropdown to choose Everyday if necessary.
- In the Set status to ‘At Risk’ portion of the window, specify when the SLA should be marked as at risk.
- By default, notifications are not sent until an SLA is in violation. To change that, check Send an ‘At Risk’ notification.
The following example shows an SLA configured for a connector that expects to receive 1000 files every day Monday-Friday. An at-risk notification is sent 1 hour before the end of the time period if the 1000 files have not been received.
Note: You can turn off SLA alerts if necessary. This can be useful during maintenance windows. Click Settings on the navbar, then navigate to Alerts > General Alerts. Click the tablet and pencil icon to edit, and uncheck the SLA Alerts setting.