Configuring OAuth JWT Authentication for DBAmp
Configuring OAuth JWT Authentication for DBAmp
This page explains how to configure OAuth JWT authentication for DBAmp. The process consists of the following steps, which should be completed in this order:
Note: If you already created the OAuth JWT authentication certificate and the Salesforce external client app, you can skip directly to Configuring DBAmp for OAuth JWT Authentication.
Creating a Certificate for OAuth JWT Authentication
OAuth JWT authentication requires a certificate that Salesforce uses to validate token requests. The following steps describe one simple method for creating the required certificate.
Note: This method is only one possible approach. You can use any method that produces a compatible certificate.
Create the Certificate
To create a certificate:
-
Download and install the KeyStore Explorer.
-
Open the KeyStore Explorer and click Create a new KeyStore.
-
Select either JKS or PKCS12 in the New KeyStore Type dialog box.
-
Right-click the key list and select Generate Key Pair. On the page that appears, specify these settings:
-
Under Algorithm Selection, select RSA.
-
Specify an alias and password of your choice.
-
-
After the key pair is generated, right-click the key pair and select Export > Export Certificate Chain.
-
In the Export Certificate Chain dialog box, select X.509, as shown below. Then click Export to save your filename.cer file (where filename is the alias that you specified earlier) to a location of your choice.
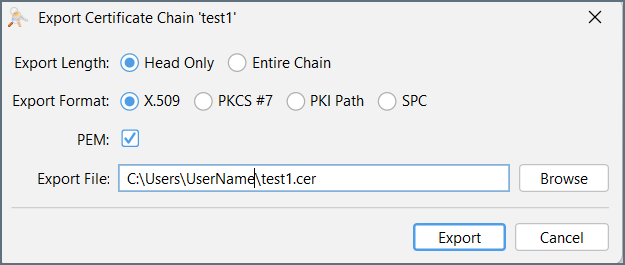
Note: Record the location where you save the filename.cer file. You need to upload this file in the next section when you configure the external client app in Salesforce.
-
While you are still in the KeyStore Explorer, export the key pair as follows:
-
Right-click the key pair and select Export > Export Key Pair.
-
Select PKCS#12 as the format.
-
Save the output file and make a note of its location.
-
Continue to the next section to create and configure a Salesforce external client app.
Creating and Configuring a Salesforce External Client App
This section explains how to create and configure the Salesforce external client app and how to obtain the OAuth JWT consumer key and secret that you use later when you configure DBAmp for OAuth JWT authentication.
Create the External Client App
To create the Salesforce external client app:
-
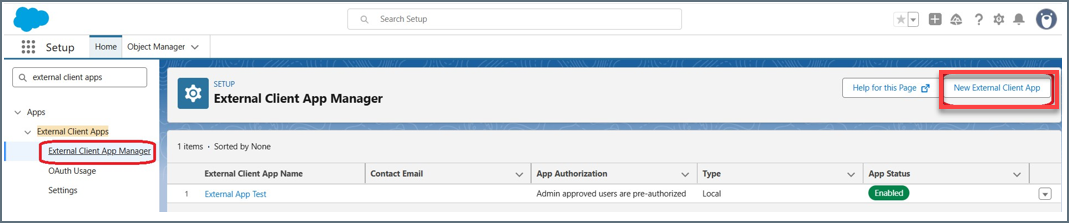
On the Setup page in the Salesforce UI, enter External Client Apps in the Quick Find search. In the search results, select External Client App Manager.
-
In the upper right corner of the External Client App Manager, select New External Client App (shown below) to open the Basic Information page.
-
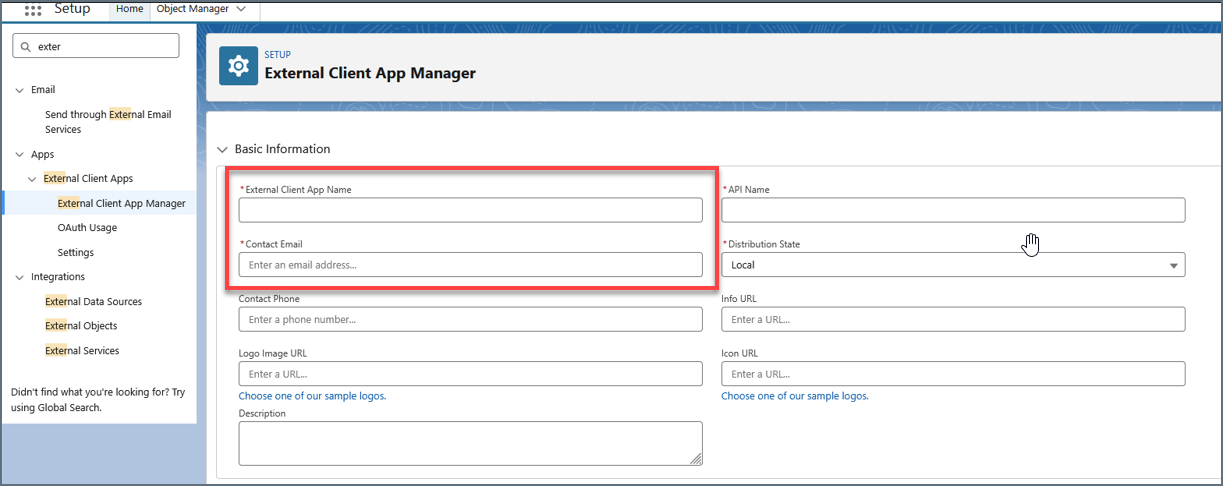
Enter a name for your external client app and your email address.
-
Under API (Enable OAuth Settings) (on that same page):
-
Select Enable OAuth.
-
Enter a value in the Callback URL text box.
Note: This type of authentication does not require a URL, but the application will not be created if this box is left blank.) Enter any URL that is in this format: http://localhost:33333.
-
-
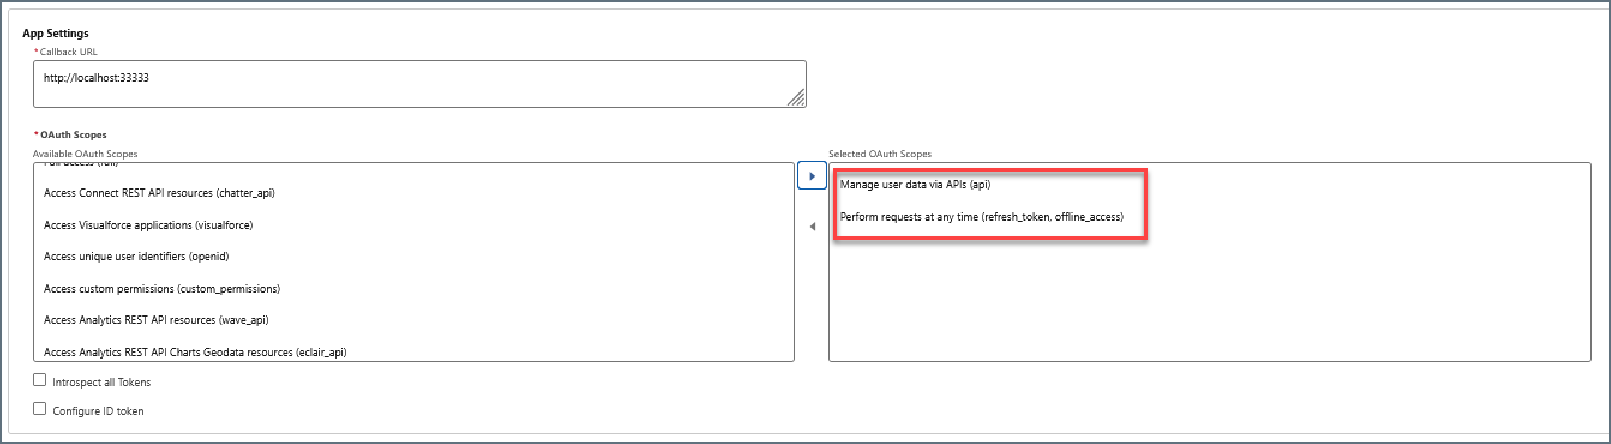
Under OAuth Scopes, select the scope of permissions that your app should request from the user from the Available OAuth Scopes list box. After you select each permission, click the arrow (►) to the right of that box to move your selection to the Selected OAuth Scopes box. You must select the Manage user data via APIs and Perform requests at any time permissions; any other permissions are optional.
-
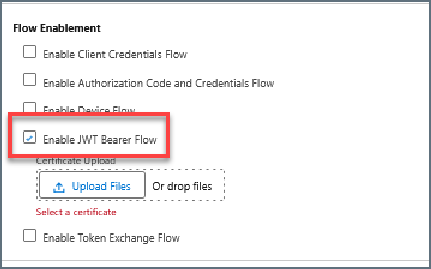
Under Flow Enablement, select Enable JWT Bearer Flow and click the Upload Files button that appears to upload your certificate file. You need to upload the filename.cer file that you created earlier.
-
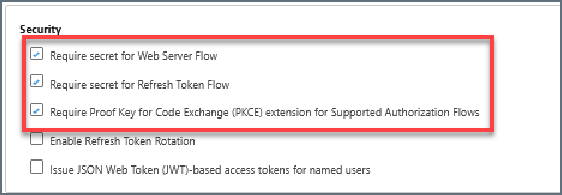
Under Security, select these settings:
-
Require Proof Key for Code Exchange (PKCE) Extension for Supported Authorization Flows
-
Require Secret for Web Server Flow
-
Require Secret for Refresh Token Flow
Do not enable any settings below those three.
After you complete this step, click Create at the bottom of the page to create the external client app. Then, complete the following steps to set policies for the app.
-
-
On the Policies page for the app, click Edit.
-
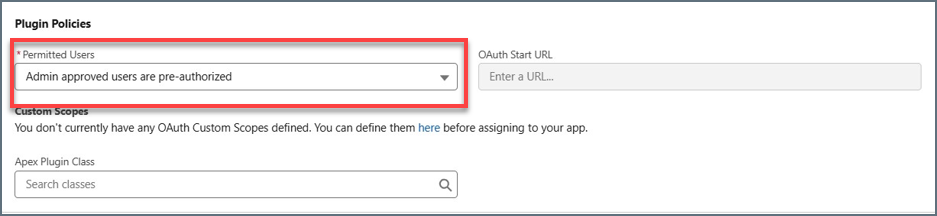
Locate the Plugin Policies section and select Admin approved users are pre-authorized (under Permitted Users).
-
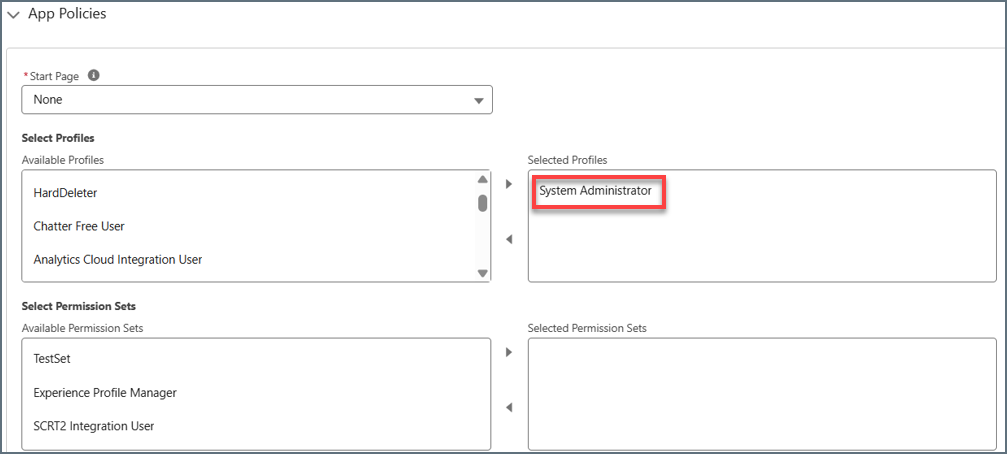
Under App Policies, make sure that the profile of your intended DBAmp user appears in the Selected Profiles section of your app.
-
Click Save to save your policy settings.
Obtain the OAuth JWT Consumer Key and Secret
Now that you have the external client application, you must obtain the OAuth JWT consumer key as follows.
-
On the Setup page in the Salesforce UI, enter External Client Apps in the Quick Find search box. In the search results, select External Client App Manager.
-
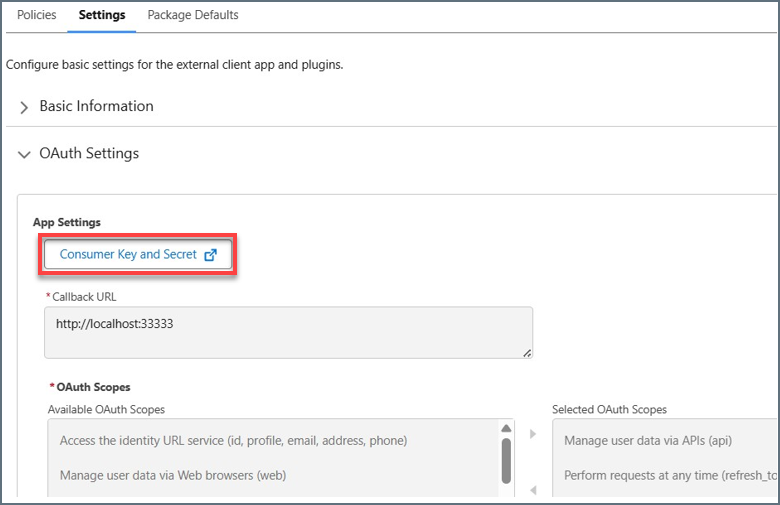
In the External Client App Manager, select YourAppName > Settings.
-
Under OAuth Settings, click Consumer Key and Secret to obtain the key and secret. Save the key and secret so you can enter it for the OAuthJWTIssuer property in the next section.
Now you can continue to the final step where you configure DBAmp for OAuth JWT authentication.
Configuring CData DBAmp for OAuth JWT Authentication
To configure DBAmp for OAuth JWT authentication, you need to configure the authentication scheme, add an OAuth JWT user, and update your linked server’s security settings.
Configure the Authentication Scheme
To configure the authentication scheme:
-
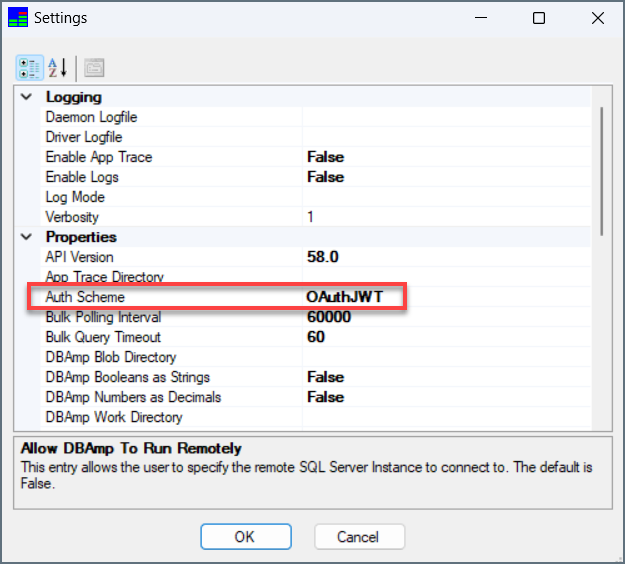
Open DBAmp and select Configuration > Settings.
-
Set Auth Scheme to OAuthJWT, as shown below:
-
Click OK.
After this change, the Add Users option becomes available on the Configuration menu, which you use in the next section.
Add an OAuth JWT User
To add an OAuth JWT user:
-
Select Configuration > Add Users to open the Add Users dialog box.
-
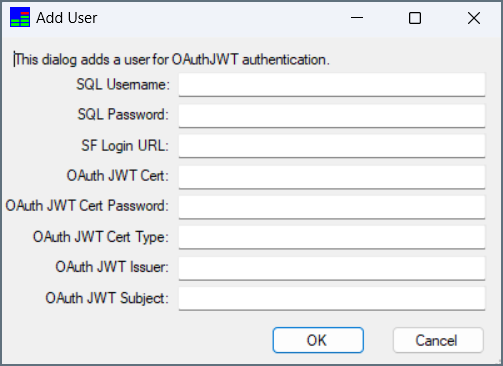
Click Add to open the Add User dialog box.
-
Configure the fields in the Add User dialog box, as follows:
-
SQL Username: Enter a name of your choice. This name corresponds to the value for Remote Login on your linked server. This name serves only as an identifier that connects the linked server to the OAuth JWT user. Note that the name does not need to be a Salesforce name.
-
SQL Password: Enter a password. This password corresponds to the value for With password: on the linked server. The password does not need to be a Salesforce password. This password serves only as an identifier that connects the linked server to the OAuth JWT user.
-
SF Login URL: Enter your Salesforce login URL:
-
For most production organizations, enter https://login.salesforce.com.
-
For sandbox organizations, enter https://test.salesforce.com.
-
If it is required by your organization, enter your MyDomain login URL.
-
-
OAuthJWTCert: Enter your Java web tokens (JWT) certificate store.
-
If you set this property to PFXFILE, specify the full file path to the PKCS#12 file that you created in step 5 in Create the Certificate.
-
If you set this property to PFXBLOB, specify the binary contents of the PKCS#12 file.
-
-
OAuthJWTCertPassword: Leave this field blank if the certificate does not require a password. Otherwise, set this value to the certificate password (for example, if you set a password earlier for Password for Output File, you should enter that value here).
-
OAuthJWTCertType: Select the certificate type. Supported values are USER, MACHINE, PFXFILE, PFXBLOB, JKSFILE, JKSBLOB, PEMKEY_FILE, PEMKEY_BLOB, PUBLIC_KEY_FILE, PUBLIC_KEY_BLOB, SSHPUBLIC_KEY_FILE, SSHPUBLIC_KEY_BLOB, P7BFILE, PPKFILE, XMLFILE, XMLBLOB, BCFKSFILE, and BCFKSBLOB.
Note: If you followed the example earlier in Creating a Certificate for OAuth JWT Authentication, set this value to PFXFILE and the OAuthJWTCert value to the location of the file that was generated when you exported the private key.
-
OAuthJWTIssuer: Set this value to the OAuth consumer key that you obtained earlier in Obtain the OAuth JWT Consumer Key and Secret.
-
OAuthJWTSubject: Set this value to the Salesforce username that has permission to use the external client app.
-
-
Click OK to exit the Add User dialog box.
-
Click OK to exit the Add Users dialog box.
Update Security Settings for Your Linked Server
After you add the OAuth JWT user, you need to update the security settings for your linked server.
-
Open the linked server properties.
-
On the Security tab:
-
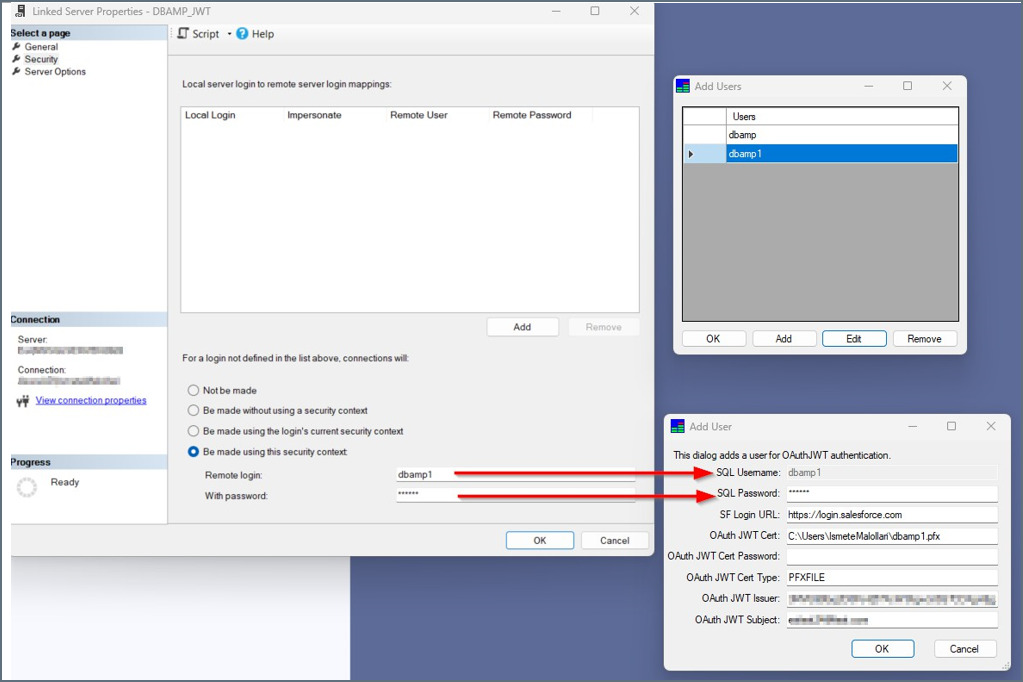
Set Remote Login to the value that you specified earlier in the DBAmp SQL Username field.
-
Set With password: to the value that you specified earlier in the DBAmp SQL Password field.
The following image illustrates the mapping between the linked server properties and the DBAmp configuration settings:
-
-
After you update the security settings, restart the daemon service in DBAmp by selecting Configuration > Daemon Console > Restart. This action ensures that the daemon service applies all of the setting and security updates to the configuration.