Installing and Configuring DBAmp
- Installing the CData DBAmp Windows Service
- Creating the DBAmp Linked Server
- Installing DBAmp Stored Procedures
- Specifying DBAmp Configuration Program Settings
- Enabling the xp_cmdshell Command for DBAmp
- Connecting DBAmp to Your Salesforce Sandbox instance
- Advanced Configuration Settings for Secure Sockets Layer
Installing and Configuring DBAmp
Follow the steps in this section to install and configure DBAmp, including setting up the Microsoft Windows service, linked server, stored procedures, and configuration settings.
Installing the CData DBAmp Windows Service
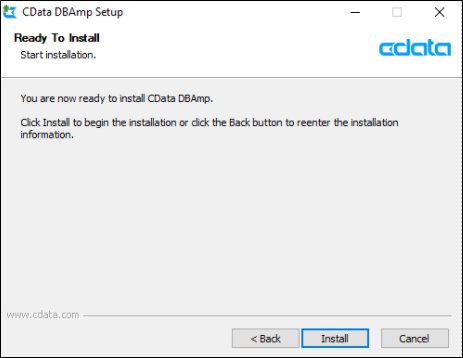
Download and run the CData DBAmp setup application to install the CData DBAmp Windows Service:
Creating the DBAmp Linked Server
To create the linked server:
-
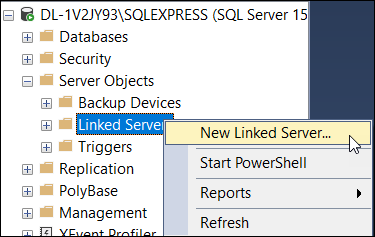
In Microsoft SQL Server Management Studio, select Server Objects > Linked Servers in the Object Explorer. Right-click Linked Servers and select New Linked Server:
-
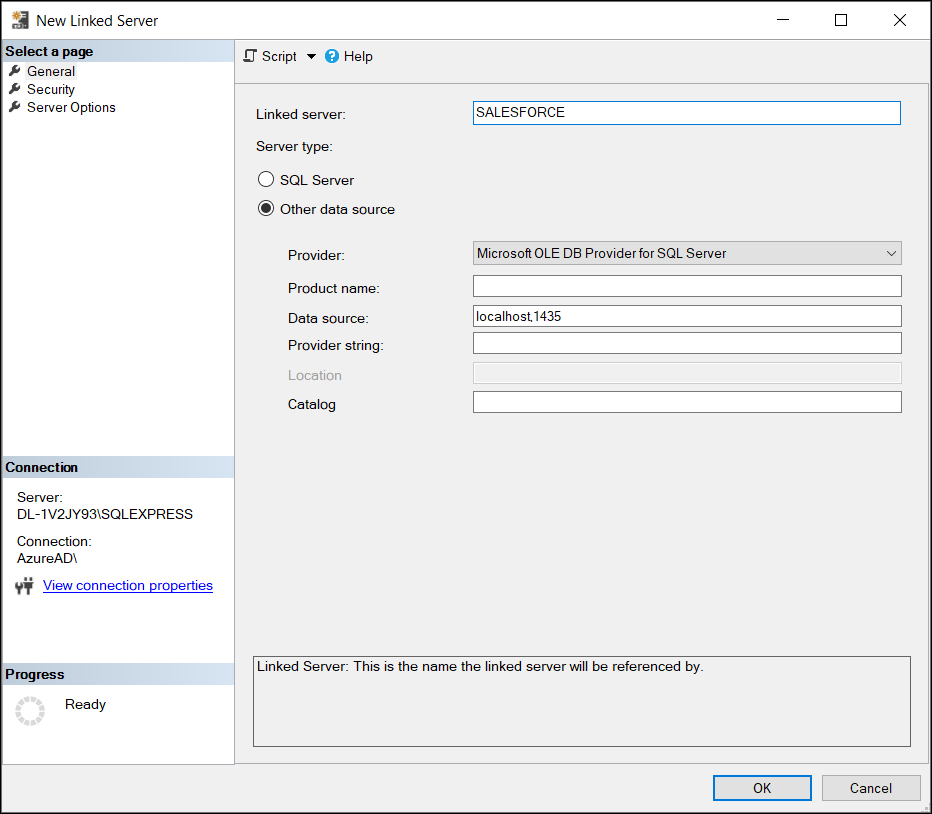
Provide the following information on the General page of the New Linked Server dialog box:
-
Linked Server: Enter a name for your DBAmp linked server.
-
Provider: Select Microsoft OLE DB Driver for SQL Server or Microsoft OLE DB Provider for SQL Server. Typically, both options are acceptable. However, your environment might support only one provider.
-
Data Source: Enter localhost,1435.
Note: If you need to connect to a remote server, see Remote Setup.
-
Provider String: If you are connecting to a sandbox, enter App=https://test.salesforce.com. Otherwise, leave this field blank.
Note: If you are connecting to a sandbox or your organization requires MyDomain URL logins, and you are using a non-admin or non-Windows account, you must include the User Id parameter in the Provider string (for example, App=your URL;User Id=YourUsername). If you do not use a provider string, the account type is not relevant.
The following image shows the completed settings on the General tab of the New Linked Server dialog box.
-
-
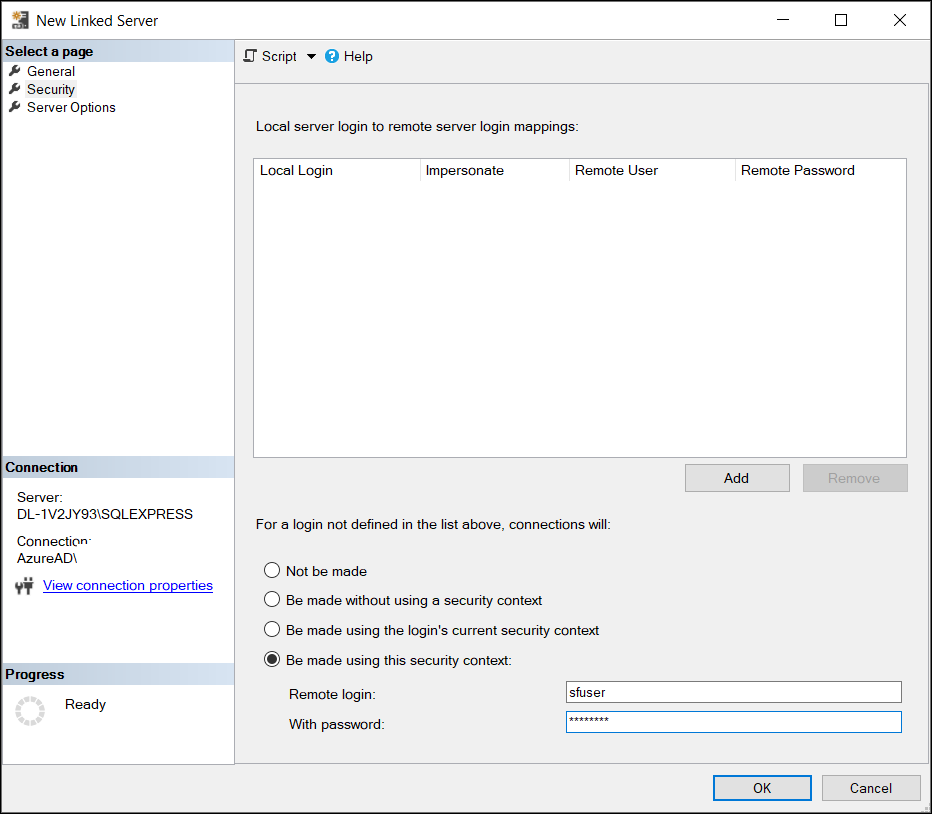
Select Be made using this security context on the Security page of the New Linked Server dialog box and enter your Salesforce credentials:
-
Remote Login: Enter your Salesforce username.
-
With Password: Enter your Salesforce password with your security token appended.
The following image shows these settings on the Security tab.
-
-
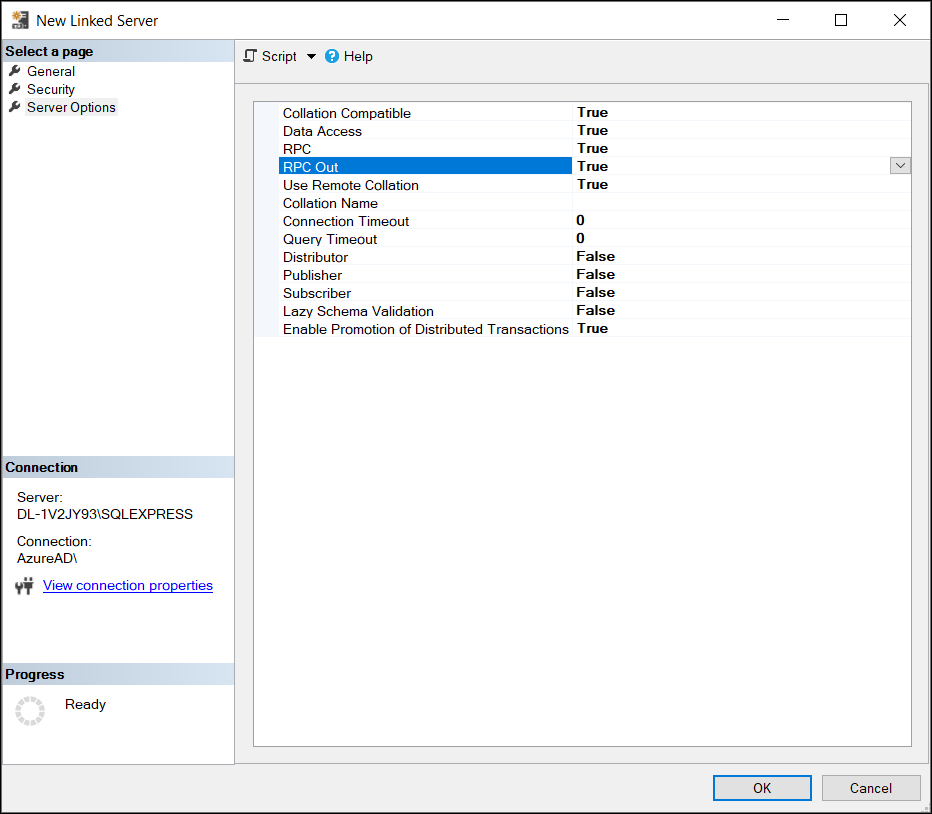
Verify that the following options are set to True on the Server Options page of the New Linked Server dialog box:
-
Collation Compatible
-
Data Access
-
RPC
-
RPC Out
-
Use Remote Collation
The following image shows the Server Options page with the required settings enabled:
-
-
Click OK to create the DBAmp linked server.
Installing DBAmp Stored Procedures
Next, either create a database to run DBAmp commands or install the stored procedures in each existing database that you want to use. After installation, your databases contain the DBAmp stored procedures and the local replicated tables that are created from your live Salesforce data.
Note: If you did not install DBAmp in the default directory, the SQL (.sql) file is located in a different directory. In this case, you must edit the Create DBAmp SPROCS.sql script, as shown below, to update all references to the bin folder path:
In this case, you must edit the Create DBAmp SPROCS.sql script, as shown below, to update all references to the bin folder path:
set @ProgDir='C:\Program Files\CData\CData DBAmp\bin\'
Then, edit the file path so that it points to the bin folder in the directory where you installed the application.
To install DBAmp stored procedures:
-
Either create a new database or select existing databases in which you want to include stored-procedure support. In either case, you must install stored procedures in the selected databases. These databases contain all the local replicated tables and the DBAmp stored procedures.
-
Open the file Create DBAmp SPROCS.sql in the Query Analyzer or in Management Studio but do not execute it yet. This file is located in
C:\ProgramFiles\CData\CData DBAmp\SQL. -
Make sure that default database that is displayed on the toolbar is the Salesforce backups database (not the main database). Then click F5 to add the stored procedures to the database.
Specifying DBAmp Configuration Program Settings
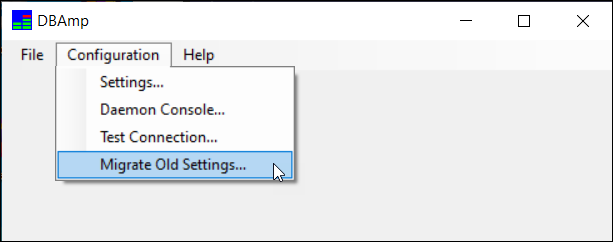
Running the CData DBAmp setup application along with the Windows service installs the DBAmp Configuration program. If you currently have a previous version of DBAmp installed on your server, you can use the Migrate Old Settings option in the DBAmp Configuration program to migrate the settings in the old DBAmp Configuration program.
To migrate your settings, select Configuration > Migrate Old Settings.
If you are a new user, follow these steps to set up the DBAmp Configuration program.
-
Run the DBAmp Configuration program, located at
C:\Program Files\CData\CData DBAmp\bin\DBAmp Config2. -
Select Configuration > Settings in the menu bar:
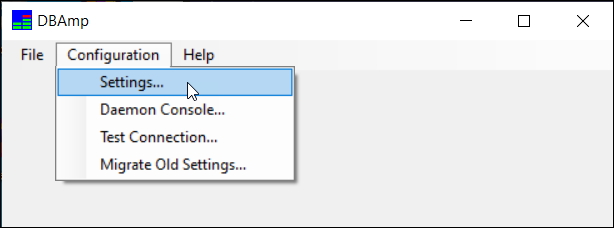
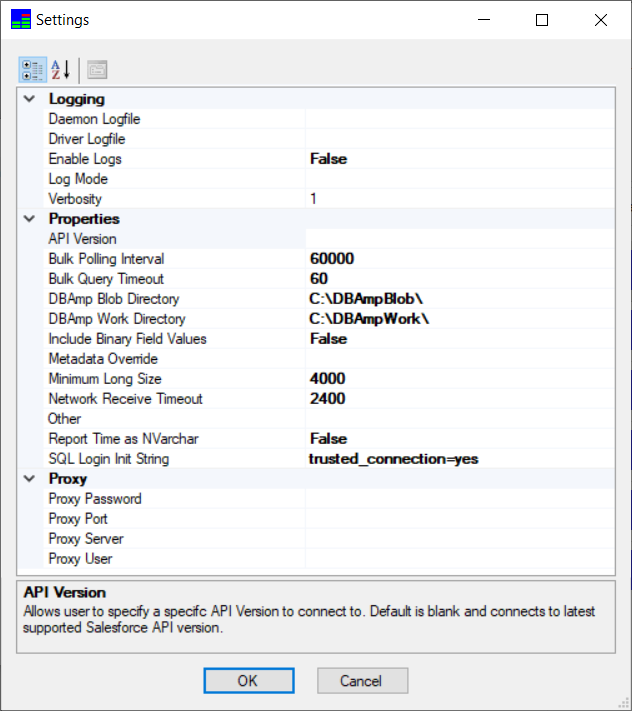
This option opens the Settings page:
-
On the Settings page, configure the following components:
Note: When you specify directories, be aware that large downloads can significantly increase directory size. Ensure that sufficient disk space is available.
Enabling the xp_cmdshell Command for DBAmp
The DBAmp stored procedure uses the xp_cmdshell command. If you are not an SQL Server administrator, you must have the proper permission to use this command. For more information, see the Microsoft SQL Server xp_cmdshell documentation.
Connecting DBAmp to Your Salesforce Sandbox instance
By default, DBAmp connects to your production Salesforce instance. To connect to a sandbox instance or a different endpoint, modify the Provider String parameter of your linked server.
Typically, the Provider String parameter is left blank. To connect to a sandbox instance, enter App=https://test.salesforce.com in the Provider String field on the linked server’s General page.
Advanced Configuration Settings for Secure Sockets Layer
Secure Sockets Layer (SSL) is always enabled because it is required by SQL Server. However, if you have special requirements, you can set the exact ciphers and protocols that you want to use by editing the Microsoft Windows registry.
To improve TLS/SSL security, specify values for the SSLProtocols and SSLCipherSuites settings in the Microsoft Windows registry. The SSLProtocols setting specifies which version of Transport Layer Security (TLS) that you want to use. The SSLCipherSuites setting specifies the encryption you want to use.
You can specify values for both settings in Computer\HKEY_LOCAL_MACHINE\SOFTWARE\CData\CData SQL Broker\Config. For SSLProtocols, use the DWORD value type and set one or more of the following:
-
192: TLS1
-
768: TLS1_1
-
3072: TLS1_2
-
12288: TLS1_3
To combine protocols, add their values. For example, to specify TLS1_1 and TSL1_2, add 768+3072 and set the value to 3840.
For SSLCipherSuites in the same registry entry, specify the string value as one of the following:
- TLS_ECDHE_ECDSA_WITH_AES_256_GCM_SHA384
- TLS_ECDHE_ECDSA_WITH_AES_128_GCM_SHA256
- TLS_ECDHE_RSA_WITH_AES_128_GCM_SHA256
- TLS_ECDHE_RSA_WITH_AES_256_GCM_SHA384
- TLS_ECDH_ECDSA_WITH_AES_256_GCM_SHA384
- TLS_RSA_WITH_AES_256_GCM_SHA384
- TLS_RSA_WITH_AES_128_GCM_SHA256
- TLS_ECDH_ECDSA_WITH_AES_128_GCM_SHA256
- TLS_DHE_DSS_WITH_AES_256_GCM_SHA384
- TLS_DHE_RSA_WITH_AES_256_GCM_SHA384
- TLS_ECDH_RSA_WITH_AES_256_GCM_SHA384
- TLS_ECDH_RSA_WITH_AES_128_GCM_SHA256
- TLS_DHE_RSA_WITH_AES_128_GCM_SHA256
- TLS_DHE_DSS_WITH_AES_128_GCM_SHA256
- TLS_DH_RSA_WITH_AES_128_GCM_SHA256 (not recommended)
- TLS_DH_RSA_WITH_AES_256_GCM_SHA384 (not recommended)
- TLS_DH_DSS_WITH_AES_128_GCM_SHA256 (not recommended)
- TLS_DH_DSS_WITH_AES_256_GCM_SHA384 (not recommended)
- TLS_ECDHE_ECDSA_WITH_AES_256_CBC_SHA384
- TLS_ECDHE_ECDSA_WITH_AES_128_CBC_SHA256
- TLS_ECDH_ECDSA_WITH_AES_256_CBC_SHA384
- TLS_DHE_DSS_WITH_AES_256_CBC_SHA256
- TLS_RSA_WITH_AES_256_CBC_SHA256
- TLS_ECDHE_RSA_WITH_AES_256_CBC_SHA384
- TLS_ECDH_RSA_WITH_AES_256_CBC_SHA384
- TLS_DHE_RSA_WITH_AES_256_CBC_SHA256
- TLS_DHE_RSA_WITH_AES_128_CBC_SHA256
- TLS_ECDHE_RSA_WITH_AES_128_CBC_SHA256
- TLS_RSA_WITH_AES_128_CBC_SHA256
- TLS_ECDH_ECDSA_WITH_AES_128_CBC_SHA256
- TLS_ECDH_RSA_WITH_AES_128_CBC_SHA256
- TLS_DHE_DSS_WITH_AES_128_CBC_SHA256
- TLS_RSA_WITH_AES_256_CBC_SHA
- TLS_ECDHE_ECDSA_WITH_AES_256_CBC_SHA
- TLS_ECDHE_RSA_WITH_AES_256_CBC_SHA
- TLS_ECDH_ECDSA_WITH_AES_256_CBC_SHA
- TLS_DHE_RSA_WITH_AES_256_CBC_SHA
- TLS_ECDH_RSA_WITH_AES_256_CBC_SHA
- TLS_DHE_DSS_WITH_AES_256_CBC_SHA
- TLS_RSA_WITH_AES_128_CBC_SHA
- TLS_ECDHE_RSA_WITH_AES_128_CBC_SHA
- TLS_ECDHE_ECDSA_WITH_AES_128_CBC_SHA
- TLS_ECDH_ECDSA_WITH_AES_128_CBC_SHA
- TLS_ECDH_RSA_WITH_AES_128_CBC_SHA
- TLS_DHE_RSA_WITH_AES_128_CBC_SHA
- TLS_DHE_DSS_WITH_AES_128_CBC_SHA
- TLS_ECDHE_ECDSA_WITH_3DES_EDE_CBC_SHA
- TLS_ECDHE_RSA_WITH_3DES_EDE_CBC_SHA
- TLS_ECDH_ECDSA_WITH_3DES_EDE_CBC_SHA
- TLS_ECDH_RSA_WITH_3DES_EDE_CBC_SHA
- TLS_DHE_RSA_WITH_3DES_EDE_CBC_SHA
- TLS_DHE_DSS_WITH_3DES_EDE_CBC_SHA
- TLS_RSA_WITH_3DES_EDE_CBC_SHA
- TLS_RSA_WITH_DES_CBC_SHA
- TLS_DHE_RSA_WITH_DES_CBC_SHA
- TLS_DHE_DSS_WITH_DES_CBC_SHA
- TLS_RSA_WITH_RC4_128_MD5
- TLS_RSA_WITH_RC4_128_SHA
For TLS1_3 only:
- TLS_AES_256_GCM_SHA384
- TLS_CHACHA20_POLY1305_SHA256
- TLS_AES_128_GCM_SHA256