Qlik Sense Cloud
Version 22.0.8486
Qlik Sense Cloud
Version 22.0.8486
This page outlines the steps to connect Qlik Sense Cloud to the CData Connect Virtual SQL Server endpoint.
Prerequisites
Before you connect, you must first connect a data source to your CData Connect account. See Data Model for more information.
Note: To connect Qlik Sense Cloud to CData Connect, your CData Connect instance must be hosted in an internet-facing server that is accessible to other entities through a stable URL (for example, myConnectInstance.cdata.com). If your instance of CData Connect is hosted locally and only accessible from a localhost address (for example, localhost:8080) or local network IP address (for example, 192.168.1.x), it will not be able to communicate with Qlik Sense Cloud.
Connecting to CData Connect
To establish a connection from Qlik Sense Cloud to the CData Connect Virtual SQL Server endpoint, follow these steps.
-
Log in to Qlik Sense Cloud.
-
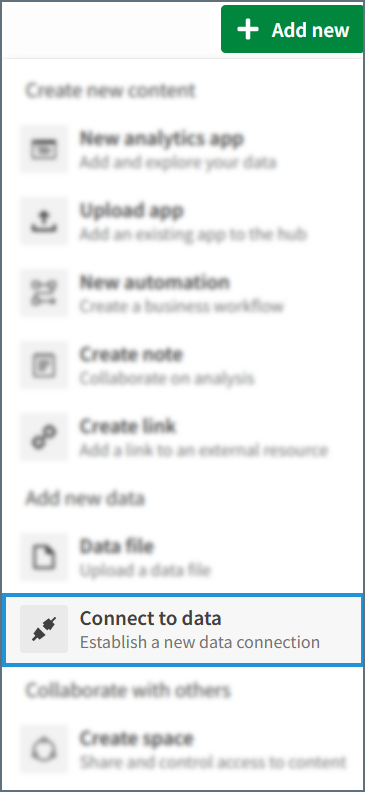
On the home dashboard, click Add new > Connect to data.
-
In the Add data connection modal, select Microsoft SQL Server.
-
Enter the connection settings.
-
Database Properties
-
Server—enter the URL from the Qlik Sense Cloud connection modal in CData Connect
-
Port—enter the Port from the Qlik Sense Cloud connection modal in CData Connect
-
Database—enter the Connection Name of the CData Connect data source you want to connect to (for example, Salesforce1).
-
Encrypt—check this box, but do not upload a certificate file.
-
Trust Server Certificate—check this box.
-
Minimum TLS—leave as 1.0.
-
-
Authentication
-
Use Trusted Connection—leave unchecked.
-
Use NTLM—leave unchecked.
-
-
Account properties
-
User defined credentials—set this according to your needs.
-
User name—enter your CData Connect username as defined on the Users page.
-
Password—enter the password for the user.
-
-
Leave the settings below Account Properties blank and unchecked.
-
-
Click Test connection to test your entered credentials. If you receive an error, check all fields and try again.
-
Click Create to save the connection or Create and Analyze to save the connection and begin an analysis.
Your connection is now available for data analysis. To manage your connection, open the Qlik Sense Management Console and select Data content.