Webhook Connector
Version 26.2.9686
Version 26.2.9686
Webhook Connector
Webhook connectors support exposing a public API endpoint.
Key Capabilities
- Public API endpoint exposure for HTTP POST and PUT data ingestion with modern authentiation mechanisms
- User-based rate limiting and concurrent request management with CORS support
- HMAC signature authentication for enhanced security and custom response event scripting
- Sample request templates for XML Map connector integration and workflow automation
Overview
Webhook connectors enable data to enter the CData Arc flow via HTTP POSTs and PUTs. Each Webhook connector exposes an endpoint in the application where external clients can send XML and JSON payloads. These payloads are written to an output file and passed along to the next connectors in the flow.
You can specify a sample request in the Webhook connector to simplify the process of transforming data that is POSTed to the endpoint. When an XML sample is specified, and the Webhook connector is connected to an XML Map connector in the flow, the XML Map connector automatically detects the expected structure of XML files posted to the endpoint. You can then use the XML Map connector Node Value Editor to map this structure into a target XML structure.
Connector Configuration
This section contains all of the configurable connector properties.
Settings Tab
Connector Details
Settings related to the core operation of the connector.
- コネクタId コネクタの静的な一意の識別子。
- コネクタの種類 コネクタ名とその機能の説明が表示されます。
- コネクタの説明 コネクタとフローにおけるロールについて自由形式の説明を記載するオプションのフィールド。
- Webhook Endpoint The generated URL (based on the connector name) where the endpoint is exposed.
- ローカルファイルスキーム コネクタがアウトプットするメッセージにファイル名を割り当てるスキーム。ファイル名にマクロを動的に使用して、識別子やタイムスタンプなどの情報を含めることができます。詳しくは、マクロ を参照してください。
Advanced Settings
- ローカルファイルスキーム コネクタがアウトプットするメッセージにファイル名を割り当てるスキーム。ファイル名にマクロを動的に使用して、識別子やタイムスタンプなどの情報を含めることができます。詳しくは、マクロ を参照してください。
- Enable HMAC Authentication Check Enabled to use HMAC (Hash-based Message Authentication Code) signature authentication to verify the authenticity and integrity of webhook requests. See HMAC Authentication for details.
- HMAC Signature Header The signature header value. By default this is
x-cdata-hmac-signature, but you can customize it.
Request Details Tab
Supply an XML or JSON template representing the expected structure of incoming data. The primary benefit of specifying a sample request is when you connect the Webhook connector to an XML Map connector in the flow. Use XML Map connectors when the API data needs to be converted into some other format, like an EDI document or a database insert.
The XML Map connector detects the XML structure of the sample request and uses this as the Source File for the XML Map connector. Upload the XML structure representing the target format as the Destination File, then use the Node Value Editor to convert the source structure into the destination.
Users Tab
The Users tab lets you:
- Create users with their associated authtokens and OAuth 2.0 credentials
- Define POST and/or PUT privileges
- Specify how many requests each user can make per hour
- Specify how many concurrent requests are permitted
You can add, edit, and delete users on this tab. See Add or Edit Users for details on each field.
Note: The request settings here override settings in the Default Rate Limits section of the Server tab.
Server Tab
Trusted IP Addresses
次の機能は、信頼されたIP アドレスセクションで利用可能です。
- 追加 新しいIP アドレスの範囲を入力します。
- 編集 選択されたIP アドレスの範囲を編集します。
- 削除 選択されたIP アドレスの範囲をリストから削除します。
この機能には次の制約が適用されます。
localhostを編集したり、リストから削除することはできません。- 定義された範囲外のIP アドレスは拒否されます。
- 範囲指定に対応しています。例えば、エントリ
100.10.100.1-15は、100.10.100.1から100.10.100.15までのIP アドレスが許可されることを示します。 - Classless Inter-Domain Routing (CIDR) 表記に対応しています。例えば、エントリ
100.10.100.0/24は、100.10.100.0から100.10.100.255までのIP アドレスが許可されることを示します。 - ワイルドカードのパターンに対応しています。例えば、エントリ
100.10.100.*は、100.10.100で始まるIP アドレスが許可されることを示します。
Note:クライアントがサーバーに到達できるようにするには、明確なネットワークパスが必要です。クラウド環境では、次の3か所で変更を加える必要がある場合があります:
- クラウドコンソールのネットワークルール。
- アプリケーションをホストしているマシンのファイアウォールルール。例えば、Amazon AMI を使用する場合、Uncomplicated Firewall(UFW)を使って目的のポートのトラフィックを許可することができます。Linux 環境での一般的なストラテジーでは、1024 未満のポートから1024 以上の非標準ポートにトラフィックを転送し、非標準ポートを使用するようにアプリケーションを構成します。これにより、1024 未満のポートにバインドする非root ユーザーに関連する権限の問題を回避できます。
- セキュリティタブのネットワークアクセスセクション。
Default Rate Limits (Per User)
Settings restricting the number of requests allowed, if no values have been provided on the Users tab.
- Max Requests Per Hour The limit to the number of requests a single user can issue in an hour.
- Max Concurrent Requests The limit to the number of concurrent requests a user can issue.
Cross-Origin Resource Sharing (CORS)
Settings governing the use of CORS to serve cross-origin resources.
- クロスオリジンリソース共有(CORS)を有効化する CORS を有効にするかどうか。その他のオプションは、このボックスにチェックを入れた場合のみ利用可能です。
- すべてのドメインを ‘*’ なしで許可 有効にすると、ドメインオリジンは特定のリストに制限されません。
- Access-Control-Allow-Origin 許可するドメインオリジンのカンマ区切りリスト。HTTP レスポンスヘッダーとして含まれます。
- Access-Control-Allow-Credentials クロスオリジンリクエストでcookie のようなユーザークレデンシャルを許可するかどうか。HTTP レスポンスヘッダーとして含まれます。
- Access-Control-Allow-Methods 許可するメソッドのカンマ区切りリスト。HTTP レスポンスヘッダーとして含まれます。
- Access-Control-Allow-Headers 許可するヘッダーのカンマ区切りリスト。HTTP レスポンスヘッダーとして含まれます。
- Access-Control-Max-Age Access-Control レスポンスヘッダー値をキャッシュできる最大時間(秒)。
Advanced Settings
- Authtoken in URL Check this to allow the connector to pass the authtoken in query string parameters for authentication. See Using Auth Tokens as Query String Parameters for more information.
Advanced Tab
Message
Message settings determine how the connector searches for messages and manages them after processing. You can save messages to your Sent folder or you can group them based on a Sent folder scheme, as described below.
- Sent フォルダに保存 チェックすると、コネクタで処理されたファイルをコネクタのSent フォルダにコピーします。
- Sent Folder Scheme Instructs the connector to group files in the Sent folder according to the selected interval. For example, the Weekly option instructs the connector to create a new subfolder each week and store all sent files for the week in that folder. The blank setting instructs the connector to save all files directly in the Sent folder. For connectors that process many transactions, using subfolders can help keep files organized and improve performance.
Logging
- Log Level The verbosity of logs generated by the connector. When you request support, set this to Debug.
- Log Subfolder Scheme Instructs the connector to group files in the Logs folder according to the selected interval. The Weekly option (which is the default) instructs the connector to create a new subfolder each week and store all logs for the week in that folder. Leaving this setting blank tells the connector to save all logs directly in the Logs folder. For connectors that process many transactions, using subfolders helps keep logs organized and improves performance.
- Log Messages Check this to have the log entry for a processed file include a copy of the file itself. If you disable this, you might not be able to download a copy of the file from the Transactions tab.
Miscellaneous
Miscellaneous settings are for specific use cases.
- Other Settings Enables you to configure hidden connector settings in a semicolon-separated list (for example,
setting1=value1;setting2=value2). Normal connector use cases and functionality should not require the use of these settings.
アラートタブ
アラートの設定に関連する設定.
サービスレベル(SLA)を実行する前に、通知用のE メールアラートを設定する必要があります。デフォルトでは、Arc はアラートタブのグローバル設定を使用します。このコネクタに他の設定を使用するには、グローバル設定をオーバーライドをON にしてください。
デフォルトでは、エラーアラートが有効になっています。これはエラーが発生するたびにE メールが送信されることを意味します。アラートをオフにするには、有効化チェックボックスのチェックを外します。
件名(必須)を入力し、オプションでE メールの受信者のリストをカンマ区切りで入力します。
SLA タブ
サービスレベル(SLA)の設定に関連する設定.
サービスレベルでは、フロー内のコネクタが送受信すると予想される処理量を設定し、その量が満たされると予想される時間枠を設定できます。CData Arc は、サービスレベルが満たされていない場合にユーザーに警告するE メールを送信し、SLA を At Risk(危険) としてマークします。これは、サービスレベルがすぐに満たされない場合に Violated(違反) としてマークされることを意味します。これにより、ユーザーはサービスレベルが満たされていない理由を特定し、適切な措置を講じることができます。At Risk の期間内にサービスレベルが満たされなかった場合、SLA はViolated としてマークされ、ユーザーに再度通知されます。
SLA を定義するには、予想処理量をON にして設定タブをクリックします。
![]()
- コネクタに個別の送信アクションと受信アクションがある場合は、ラジオボタンを使用してSLA に関連する方向を指定します。
- ウィンドウの検知基準(最小)で:
- 処理が予想されるトランザクションの最小値(量)に設定します
- 毎フィールドを使用して期間を指定します
- SLA がいつ有効になるかを示します。開始日 を選択した場合は、日時フィールドを入力してください。
- SLA を有効にする曜日のボックスをON にします。必要に応じて、ドロップダウンから毎日を選択します。
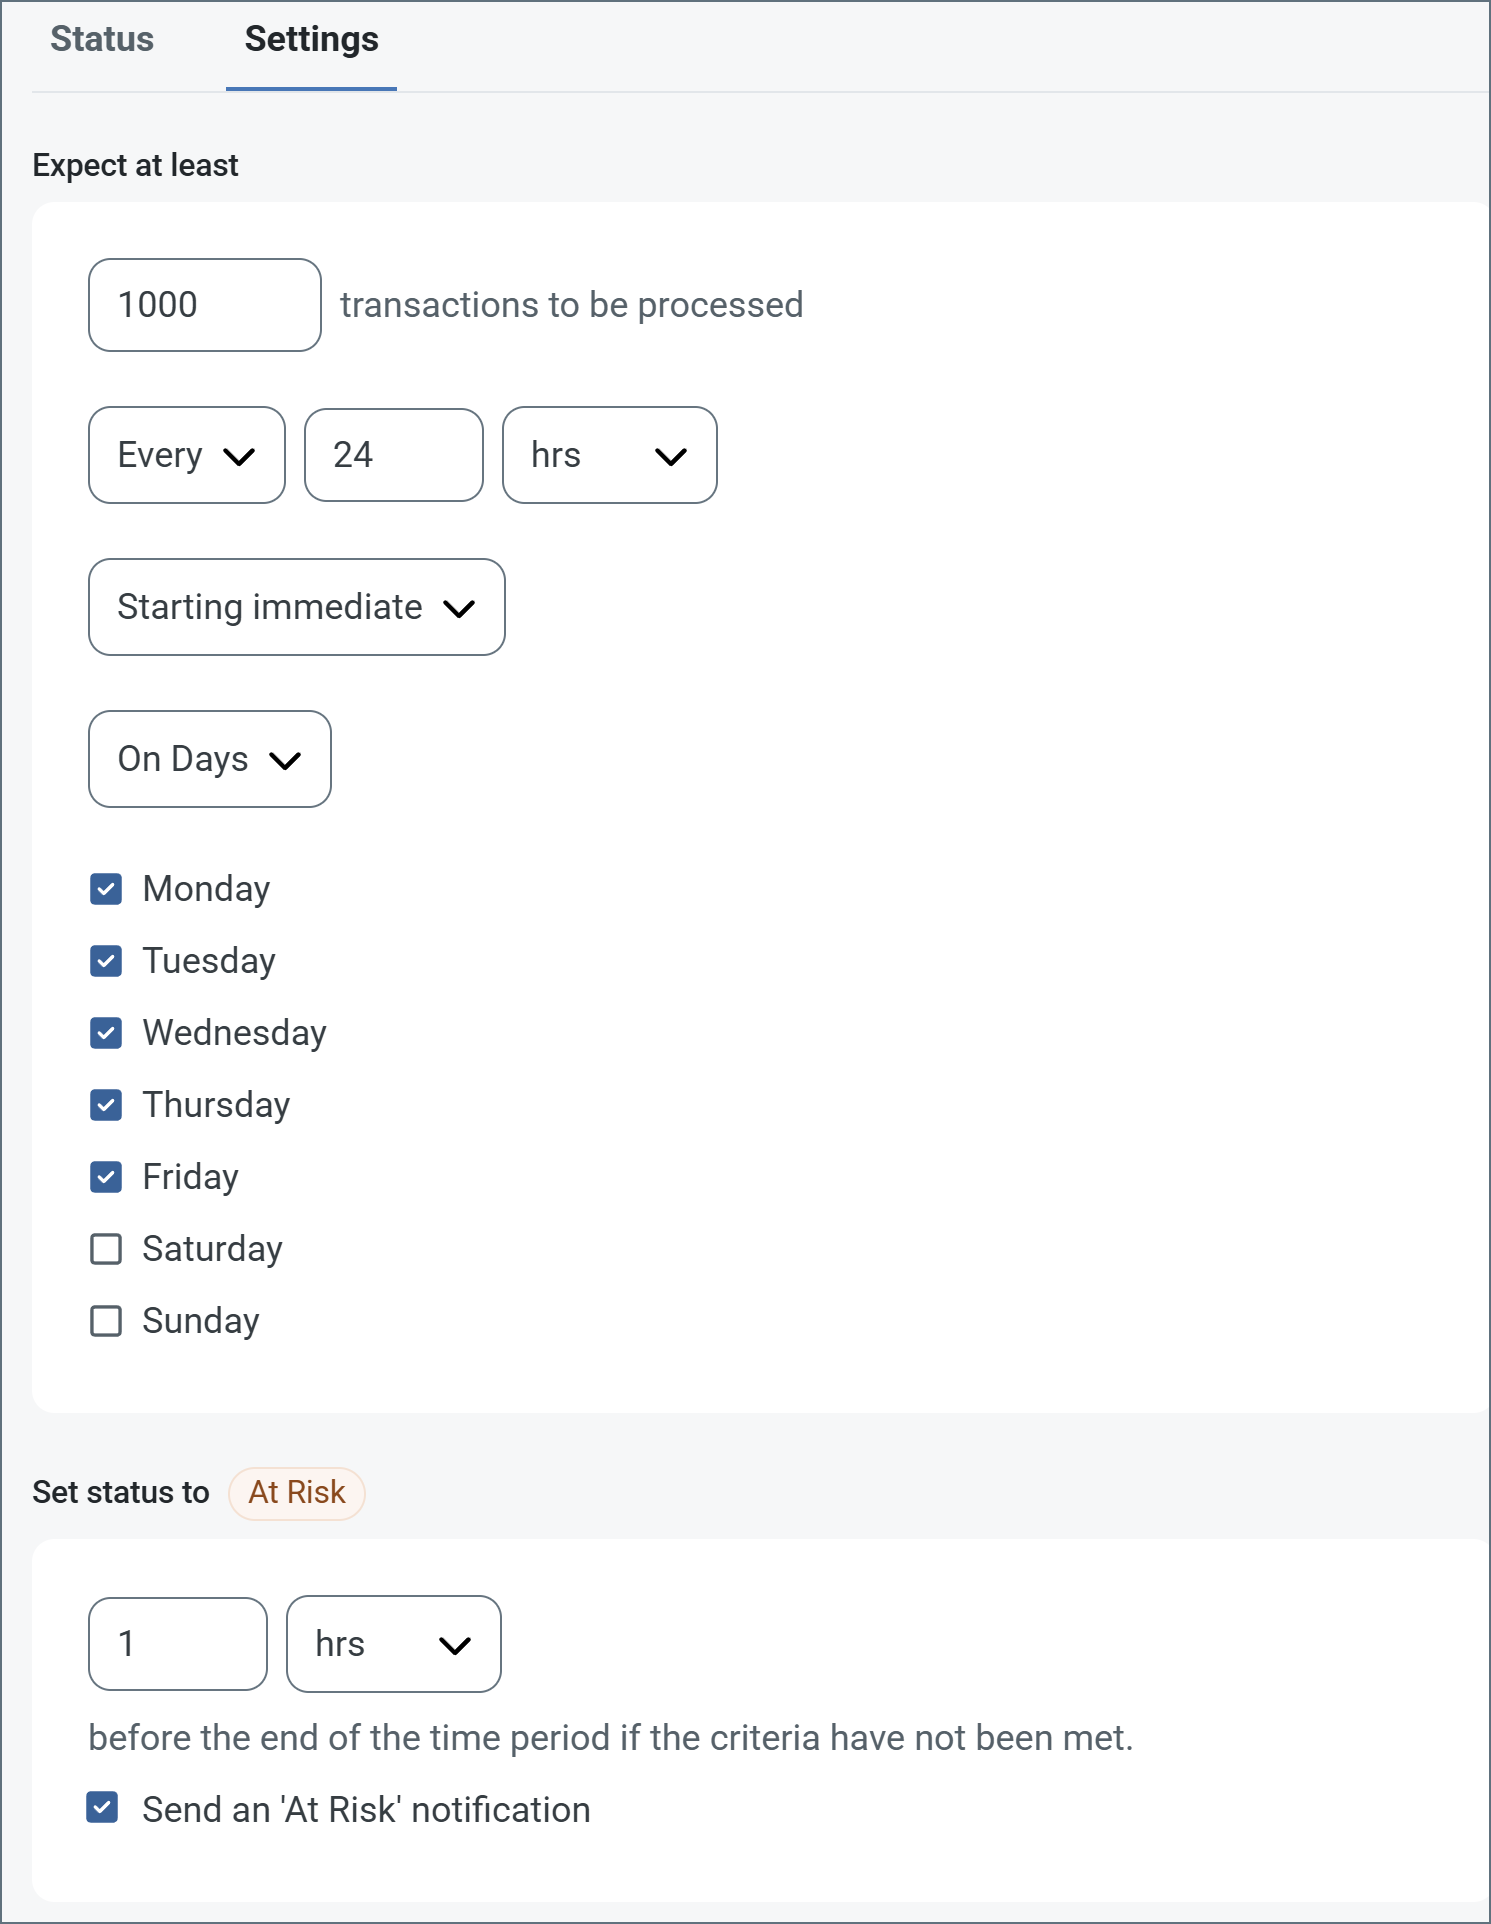
- ウィンドウの期間終了前にステータスを’At Risk’ に設定するタイミングで、SLA がAt Risk としてマークされるタイミングを指定します。
- デフォルトでは、通知はSLA が違反のステータスになるまで送信されません。これを変更するには、‘At Risk’ 通知を送信のチェックをON にします。
次の例は、月曜日から金曜日まで毎日1000ファイルを受信すると予想されるコネクタに対して構成されたSLA を示しています。1000ファイルが受信されていない場合、期間終了の1時間前にAt Risk 通知が送信されます。
Note:必要に応じてSLA アラートをOFF にすることができます。これはWindows メンテナンス期間中に役立ちます。ナビゲーションバーの設定をクリックし、アラート > 一般的なアラートに移動します。タブレットと鉛筆のアイコンをクリックして編集し、SLA アラート設定のチェックを外します。
HMAC Authentication
HMAC (Hash-based Message Authentication Code) signature authentication is a cryptographic method that verifies the authenticity and integrity of webhook requests. It uses a shared secret key to generate a unique signature for each request, ensuring:
- Request Authenticity: Confirms the request originated from a trusted source
- Data Integrity: Verifies that the request payload hasn’t been tampered with during transmission
- Replay Attack Prevention: Protects against malicious reuse of intercepted requests
This provides significantly stronger security compared to traditional authentication methods like basic authentication or API keys, which can be more easily compromised.
Users with Professional or Enterprise licenses can enable HMAC signature authentication for incoming webhook requests.
Configuration
Important: HMAC authentication is a global setting that applies to every user authorized to access the webhook.
- Enable HMAC Authentication
- Check Enable HMAC Authentication in the webhook connector settings.
- Optionally, customize the HMAC Signature Header value (the default is
x-cdata-hmac-signature).
Set HMAC Keys for Users
After enabling HMAC authentication:
- Navigate to the Users tab of the webhook connector.
- Configure the HMAC key each authorized webhook user:
- An HMAC key is automatically generated for each user. You can override the auto-generated key with a custom value. Each user must use their assigned HMAC key to generate valid signatures for their webhook requests.
Auth Token Authentication
Users can access Webhook resources by providing authtokens with requests. Manage users and authtokens by adding or editing a user on the Users tab, and navigating to the Authentication tab.
Before users can call the Webhook endpoint, you must also set trusted IP addresses for connections. Set these in the Trusted IP Addresses section of the Server tab. By default, all IP addresses are restricted.
Using Auth Tokens in Basic Authentication
Enter the user’s authtoken as the password when using Basic Authentication.
Using Auth tokens in the HTTP Header
Add the HTTP header x-cdata-authtoken with the authtoken as part of the HTTP request.
Using Auth Tokens as Query String Parameters
To allow the connector to pass the authtoken in query string parameters, check Allow authtoken in URL in the Advanced Settings section of the Server tab.
After enabling this feature, you can specify the authtoken as the value of the @authtoken parameter, which you supply as part of the HTTP form-post data or as a query parameter.
OAuth 2.0 Authentication
Users can secure Webhook resources using OAuth 2.0 authentication. Manage users and OAuth credentials by adding or editing a user on the Users tab, and navigating to the Authentication tab.
Receiving Data
When data is uploaded to the webhook endpoint, the body of the web request is written as an output file and passed along to the next connector in the flow. This allows for a flexible method of invoking an Arc workflow via an external API call.
Tip: Data uploaded to the endpoint is not validated in the Webhook connector, and should be validated later in the flow if necessary.
Custom Responses
Ordinarily, the Webhook connector accepts the post data with a token response that the request was accepted, but you can customize the response by using the Response event, where the _request, _httpheaders, _response, and _message special items are available. When specified, the connector expects the custom response to be provided through the _response item.
You can also use the Response event to push custom output items using the following attributes:
- Filename: The filename of the output message to pass down the flow.
- Data: The data to include in the message that is passed down the flow. For binary data, use the Base64Data attribute instead.
- Base64Data: The Base64-encoded data to include in the message that is passed down the flow.
- HeaderNames#: A list of header names to include on the message that is passed down the flow. Use the HeaderValues attribute to specify values for these headers at the matching index.
- HeaderValues#: A list of header values to include on the message that is passed down the flow. These values are used for the header names defined at the matching index in the HeaderNames list.
- Logs#: A list of log entries to include in the logs for the transaction.
Examples
To push a file containing the body of the webhook request, with a custom filename and header, down the flow, the ArcScript in the Response event might look like this:
<arc:set attr="out.Filename" value="MyCustomFilename.xml" />
<arc:set attr="out.Data" value="[_message.body]" />
<arc:set attr="out.HeaderNames#1" value="MyHeader1" />
<arc:set attr="out.HeaderValue#1" value="MyHeader1Value" />
<arc:push item="out" />
To surface a header on the incoming request as a header on the message that is passed down the flow, the ArcScript in the Response event might look like this:
<arc:set attr="_message.header:MySpecialHeader" value="[_httpheaders.MyWebhookHeader]" />
<arc:set attr="_response.header:Content-Type" value="application/xml" />
<arc:set attr="_response.write" value="<Status>Successfully processed message with MySpecialHeader=[_message.header:MySpecialHeader]</Status>" />
With the ArcScript above in the Response event, a client can send a request similar to the following:
POST https://localhost/connector/Webhook1/webhook.rsb HTTP/1.1
content-type: application/xml
X-Arc-Authtoken: 1s7U4w0a2P3l8v9W3l0q
MyWebhookHeader: Hello World!

<Items>
  <Webhook>Hello World!</Webhook>
</Items>
and receive the following response:
HTTP/1.1 200 OK
Connection: close
Date: Tue, 31 Aug 2021 19:16:13 GMT
X-Frame-Options: SAMEORIGIN
Content-Type: application/xml
Content-Length: 81
Server: Jetty(9.4.z-SNAPSHOT)

<Status>Successfully processed message with MySpecialHeader=Hello World!</Status>
Macros
ファイルの命名規則にマクロを使用することで、組織の効率とデータの文脈的理解を高めることができます。マクロをファイル名に組み込むことで、識別子、タイムスタンプ、ヘッダー情報などの関連情報を動的に含めることができ、各ファイルに有益なコンテキストを付与できます。これにより、組織にとって重要な詳細をファイル名に反映させることができます。
CData Arc はこれらのマクロをサポートしており、すべて次の構文を使用します:%Macro%
| Macro | 説明 |
|---|---|
| ConnectorID | コネクタのConnectorID を返します。 |
| Ext | コネクタが処理中のファイルの拡張子を返します。 |
| Filename | コネクタが処理中のファイルのファイル名(拡張子を含む)を返します。 |
| FilenameNoExt | コネクタが処理中のファイルのファイル名(拡張子なし)を返します。 |
| MessageId | コネクタがアウトプットするメッセージのMessageId を返します。 |
| RegexFilename:pattern | コネクタで処理中のファイルのファイル名にRegEx パターンを適用します。 |
| Header:headername | コネクタが処理中のメッセージのヘッダー(headername)の値を返します。 |
| LongDate | システムの現在の日時を長い形式(例:Wednesday, January 24, 2024)で返します。 |
| ShortDate | システムの現在の日時をyyyy-MM-dd 形式(例:2024-01-24)で返します。 |
| DateFormat:format | システムの現在の日時を指定されたフォーマット(format)で返します。使用可能な日付フォーマットについては、サンプル日付フォーマット を参照してください。 |
| Vault:vaultitem | 指定されたvault 項目の値を返します。 |
例
%Ext% や%ShortDate% などの引数を必要としないマクロもありますが、引数を必要とするマクロもあります。引数を渡すマクロはすべて次の構文を用います:%Macro:argument%
以下は、引数を渡すマクロの例です。
- %Header:headername%:
headernameはメッセージのヘッダー名です。 - %Header:mycustomheader% は、インプットメッセージで設定された
mycustomheaderヘッダーの値を返します。 - %Header:ponum% は、インプットメッセージで設定された
ponumヘッダーの値に対応します。 - %RegexFilename:pattern%:
patternは正規表現パターンです。例えば、%RegexFilename:^([\w][A-Za-z]+)%はファイル名の最初の単語と照合し、大文字と小文字を区別せずに結果を返します(test_file.xmlはtestに変換されます)。 - %Vault:vaultitem%:
vaultitemは、vault のアイテム名です。例えば、%Vault:companyname%はVault に保存されているcompanynameアイテムの値を返します。 - %DateFormat:format%:
formatは使用可能な日付フォーマットです(詳細はサンプル日付フォーマット を参照してください)。例えば、%DateFormat:yyyy-MM-dd-HH-mm-ss-fff%はファイルの日付とタイムスタンプを返します。
以下の例に示すように、より詳細なマクロを作成することもできます。
- 複数のマクロを1つのファイル名にまとめる:
%DateFormat:yyyy-MM-dd-HH-mm-ss-fff%%EXT% - マクロの外側にテキストを含める:
MyFile_%DateFormat:yyyy-MM-dd-HH-mm-ss-fff% - マクロ内にテキストを含める:
%DateFormat:'DateProcessed-'yyyy-MM-dd_'TimeProcessed-'HH-mm-ss%