AI Connector
Version 26.2.9686
Version 26.2.9686
AI Connector
AI connectors are designed to connect to a number of AI models that expose a REST API. The supported list is below.
Key Capabilities
- Multi-provider AI integration
- Flexible prompt engineering
- Customizable AI model selection
- Structured output control
- Intelligent content processing
Overview
The CData Arc AI connector is a flexible integration tool that connects to any AI model via REST APIs, enabling you to process input messages using configurable system and user prompts to generate structured outputs within your data flows. It supports popular AI services like OpenAI, Gemini, Ollama, and other OpenAI-compatible providers, with full control over API endpoints, models, and parameters. With ArcScript-enabled prompts and customizable output formats, the connector enables use cases such as extracting insights from unstructured feedback, translating content across languages, and transforming text data into actionable structured information.
Actions
このコネクタは、次の3種類のコネクタアクションのいずれかを実行できます:
- Trigger は、スケジュールに従ってrequest を実行し、フローに送信されるファイルを生成する場合があります。このアクションはフローの起点として機能します。
- Transform は、フローからのメッセージをrequest のインプットとして受け入れ、アウトプットを生成します。このアクションはフローの中間として機能します。
- Terminal は、フローからのメッセージをrequest のインプットとして受け入れ、フローの終点として機能します。
Connector Configuration
This section contains all of the configurable connector properties.
AI Config Tab
If you have not already configured the global AI settings at Settings > Advanced > AI Settings, the AI Config tab displays a message that you must do this before you can use the connector. Click the Configure AI Settings button, and follow the instructions in AI Settings. If the global settings have already been configured but you want to override them in this connector, click Edit. To override the global settings, toggle on Override global setting. Now you can select which AI provider you want to use, enter the appropriate connection details and then save the configuration. The connector supports the following providers:
- Claude
- Deepseek
- Gemini
- Grok
- Ollama (cloud and local)
- OpenAI
- OpenAI Compatible (any AI provider that implements OpenAI’s API)
Use the Edit AI Settings pane to define the Base URL (only available when the provider is Ollama or OpenAI Compatible), add the provider’s API Key, and select a Model.
To populate the User Prompt field, you can click Suggested Prompts to see a set of predefined prompts for a variety of use cases, or you can enter your own prompt directly into the field. This is where you define the task or request that you want the connector to perform when it receives a file. For example, you could enter something like Summarize the inbound EDI X12 file using natural language so that employees who are not familiar with the EDI X12 structure can read the summary and understand what information the document contains. This field supports ArcScript.
You can also choose to Attach input messages to requests. This is especially useful when you are providing binary files (such as a PDF or image) to the AI provider.
Toggle System Prompt to provide a set of specific instructions, constraints, languages, or roles that the AI provider should use when providing its response. For example: Do not use any em dashes or emojis in your response. This field also supports ArcScript.
The way in which you test your configuration and prompts varies by the connector’s action type:
- If your connector is a trigger, click the Test button.
- If your connector is a transform or terminal, on the Testing tab, paste content into the Input Body or use the dropdown to add Headers and values, then click the Test button.
In both cases, the test results appear in the Testing tab. Logs from the test are displayed in the Log tab.
Settings Tab
Settings related to the core configuration of the connector.
Configuration
- コネクタId コネクタの静的な一意の識別子。
- コネクタの種類 コネクタ名とその機能の説明が表示されます。
- コネクタの説明 コネクタとフローにおけるロールについて自由形式の説明を記載するオプションのフィールド。
- Action The action this connector is performing: trigger, transform, or terminal.
- Output in JSON If your model supports structured outputs, check this to deliver the connector output in JSON format. This is useful when you want to ensure the AI output is structured and machine-readable, so it is easier to parse, extract data, or use in downstream connectors and processes.
Advanced Settings
- ローカルファイルスキーム コネクタがアウトプットするメッセージにファイル名を割り当てるスキーム。ファイル名にマクロを動的に使用して、識別子やタイムスタンプなどの情報を含めることができます。詳しくは、マクロ を参照してください。
Advanced Tab
Other Settings
- Timeout The AI response timeout, in seconds. By default, this value is set to 60 seconds.
Proxy Settings
These are a collection of settings that identify and authenticate to the proxy through which the Box connection should be routed. By default, this section uses the global settings on the Proxy Settings portion of the Security Settings page. Clear the checkbox to supply settings specific to your connector.
- プロキシの種類 プロキシベースのファイアウォールで使用されるプロトコル。
- プロキシホスト プロキシベースのファイアウォールの名前またはIP アドレス。
- プロキシポート プロキシベースのファイアウォールのTCP ポート。
- プロキシユーザー プロキシベースのファイアウォールでの認証に使用するユーザー名。
- プロキシパスワード プロキシベースのファイアウォールに認証するために使われるパスワード。
- 認証スキーム デフォルトのNone のままにするか、以下の認証スキームから1つを選択します:Basic、Digest、Proprietary、NTLM。
Message
- Sent フォルダに保存 チェックすると、コネクタで処理されたファイルをコネクタのSent フォルダにコピーします。
- Sent フォルダのスキーム 選択された時間間隔に従ってSent フォルダ内のメッセージをグループ化するようコネクタに指示します。例えば、Weekly オプションを選択すると、コネクタは毎週新しいサブフォルダを作成してその週のすべてのメッセージをそのフォルダに格納します。ブランクに設定すると、コネクタはすべてのメッセージをSent フォルダに直接保存します。多くのメッセージを処理するコネクタの場合、サブフォルダを使用するとメッセージが整理されてパフォーマンスが向上します。
Logging
- Log Level The verbosity of logs generated by the connector. When you request support, set this to Debug.
- Log Subfolder Scheme Instructs the connector to group files in the Logs folder according to the selected interval. The Weekly option (which is the default) instructs the connector to create a new subfolder each week and store all logs for the week in that folder. Leaving this setting blank tells the connector to save all logs directly in the Logs folder. For connectors that process many transactions, using subfolders helps keep logs organized and improves performance.
- Log Messages Check this to have the log entry for a processed file include a copy of the file itself. If you disable this, you might not be able to download a copy of the file from the Transactions tab.
Miscellaneous
Miscellaneous settings are for specific use cases.
- Other Settings Enables you to configure hidden connector settings in a semicolon-separated list (for example,
setting1=value1;setting2=value2). Normal connector use cases and functionality should not require the use of these settings.
Automation Tab
Automation Settings
Settings related to the automatic processing of files by the connector.
- Send Whether files arriving at the connector are automatically uploaded.
- Retry Interval The amount of time before a failed upload is retried.
- Max Attempts The maximum number of times the connector processes the input file. Success is measured based on a successful server acknowledgement. If you set this to 0, the connector retries the file indefinitely.
- Receive Whether the connector should automatically poll the remote download path for files to download.
- Interval The interval between automatic download attempts.
- 毎時何分 時間単位のスケジュールの分オフセット。上記の受信間隔の設定が Hourly に設定されている場合にのみ適用されます。例えば、この値を5 に設定すると、自動的に1:05、2:05、3:05 のようにダウンロードを行います。
- 時 試行が行われる時刻。上記の受信間隔の設定が Daily 、Weekly、または Monthly に設定されている場合にのみ適用されます。
- 曜日/日付 試行が行われる日。上記の受信間隔の設定が Weekly または Monthly に設定されている場合にのみ適用されます。
- 分 ダウンロードを試行するまでの待機時間。上記の受信間隔の設定が Minute に設定されている場合にのみ適用されます。
- Cron 式 いつ試行するかを決定するcron 式を表す5つの欄の文字列。上記の受信間隔の設定が Advanced に設定されている場合にのみ適用されます。
アラートタブ
アラートの設定に関連する設定.
サービスレベル(SLA)を実行する前に、通知用のE メールアラートを設定する必要があります。デフォルトでは、Arc はアラートタブのグローバル設定を使用します。このコネクタに他の設定を使用するには、グローバル設定をオーバーライドをON にしてください。
デフォルトでは、エラーアラートが有効になっています。これはエラーが発生するたびにE メールが送信されることを意味します。アラートをオフにするには、有効化チェックボックスのチェックを外します。
件名(必須)を入力し、オプションでE メールの受信者のリストをカンマ区切りで入力します。
SLA タブ
サービスレベル(SLA)の設定に関連する設定.
サービスレベルでは、フロー内のコネクタが送受信すると予想される処理量を設定し、その量が満たされると予想される時間枠を設定できます。CData Arc は、サービスレベルが満たされていない場合にユーザーに警告するE メールを送信し、SLA を At Risk(危険) としてマークします。これは、サービスレベルがすぐに満たされない場合に Violated(違反) としてマークされることを意味します。これにより、ユーザーはサービスレベルが満たされていない理由を特定し、適切な措置を講じることができます。At Risk の期間内にサービスレベルが満たされなかった場合、SLA はViolated としてマークされ、ユーザーに再度通知されます。
SLA を定義するには、予想処理量をON にして設定タブをクリックします。
![]()
- コネクタに個別の送信アクションと受信アクションがある場合は、ラジオボタンを使用してSLA に関連する方向を指定します。
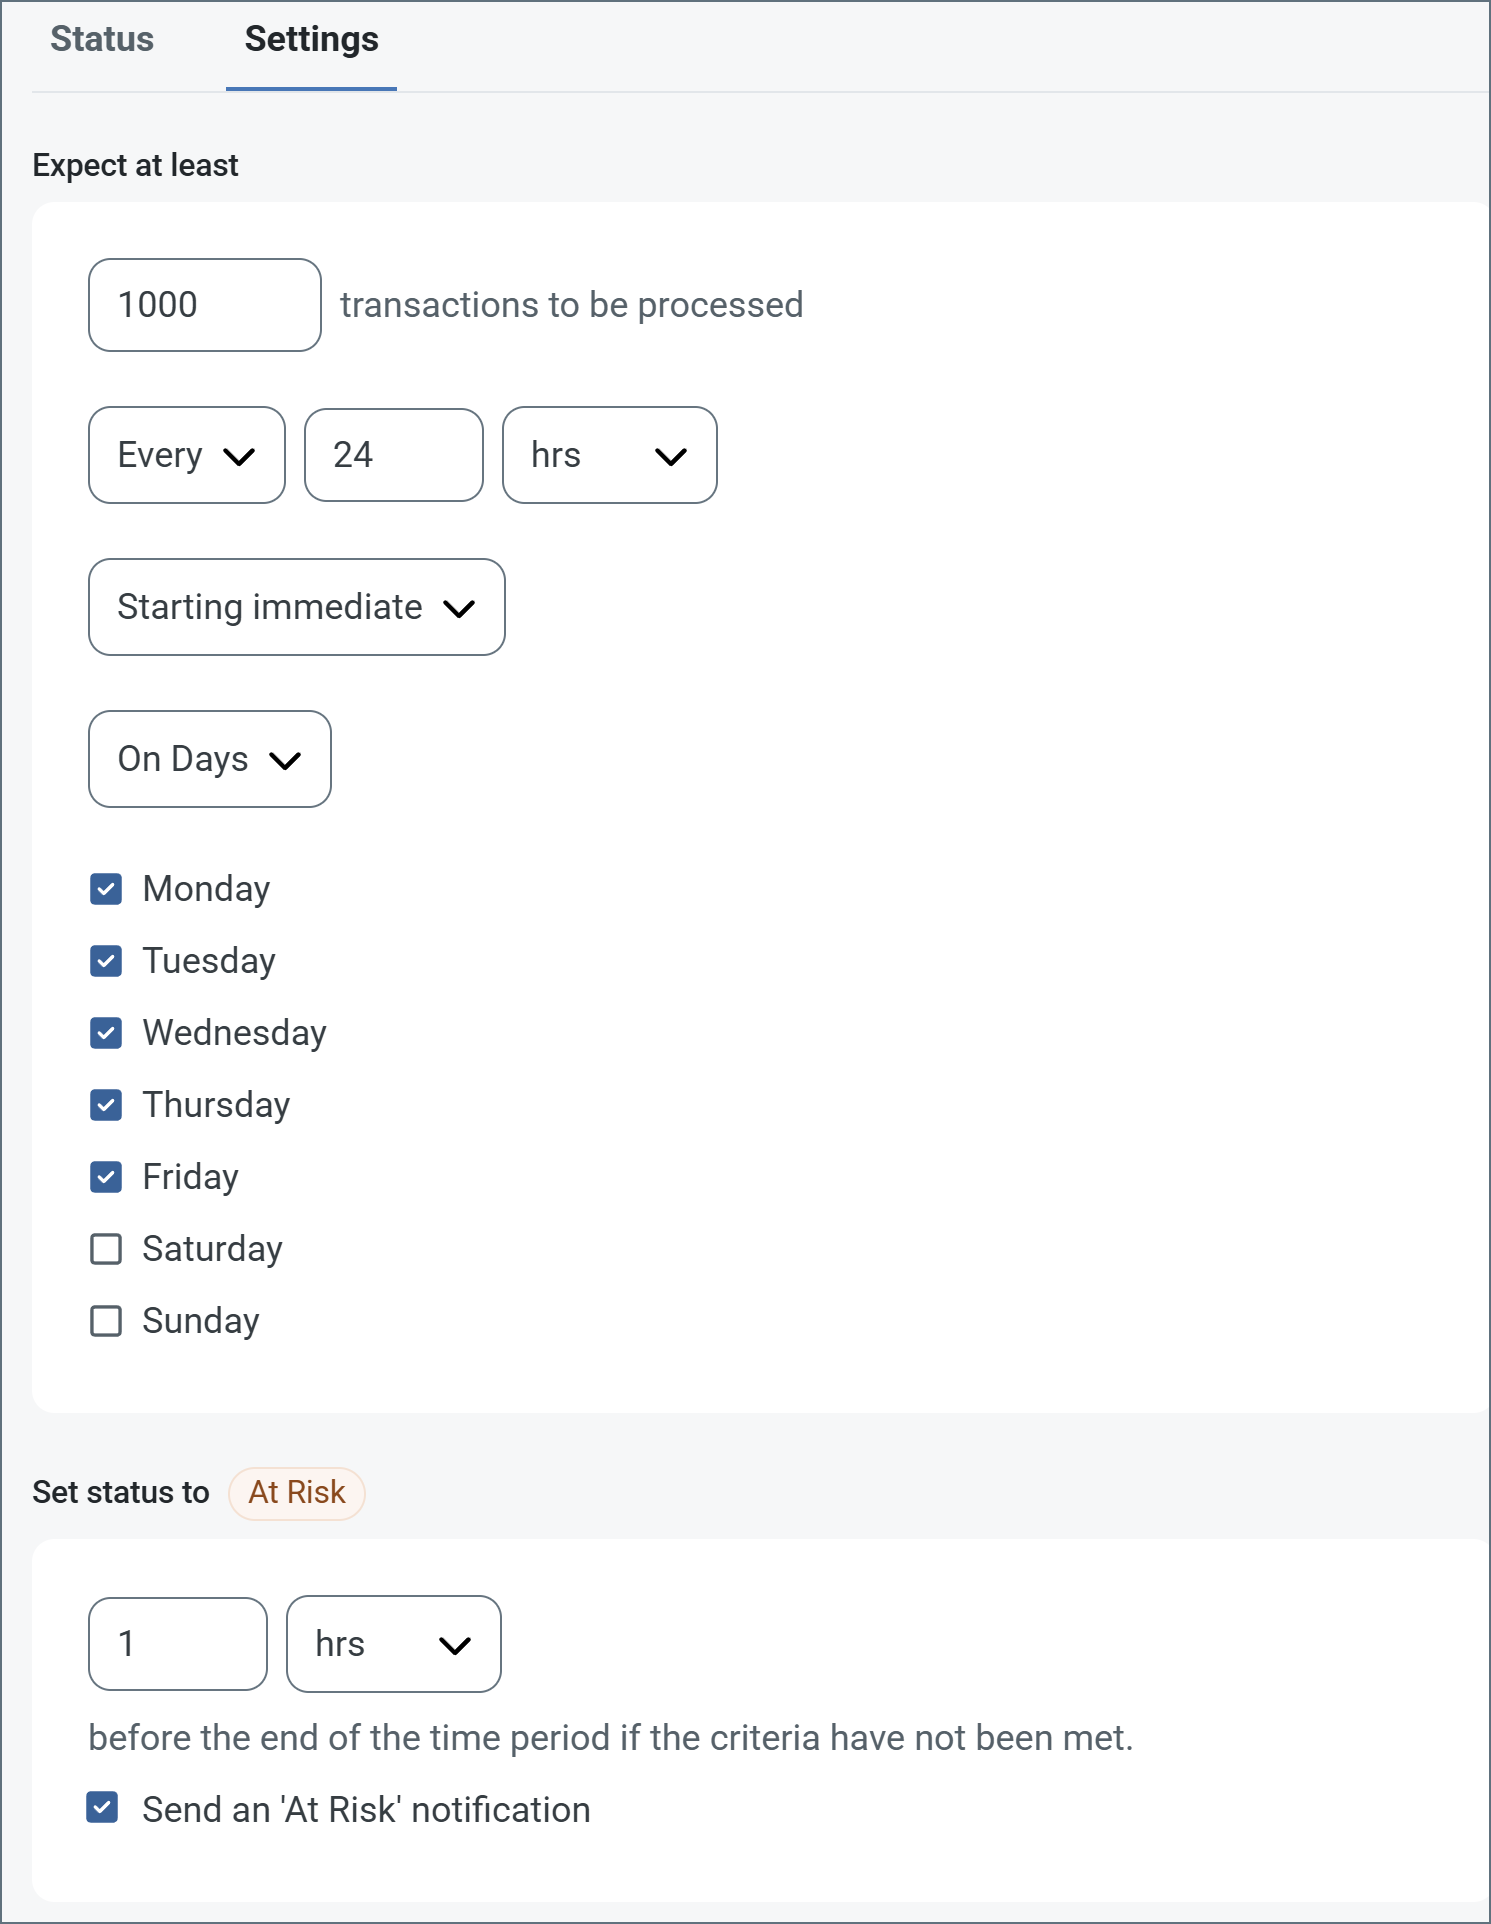
- ウィンドウの検知基準(最小)で:
- 処理が予想されるトランザクションの最小値(量)に設定します
- 毎フィールドを使用して期間を指定します
- SLA がいつ有効になるかを示します。開始日 を選択した場合は、日時フィールドを入力してください。
- SLA を有効にする曜日のボックスをON にします。必要に応じて、ドロップダウンから毎日を選択します。
- ウィンドウの期間終了前にステータスを’At Risk’ に設定するタイミングで、SLA がAt Risk としてマークされるタイミングを指定します。
- デフォルトでは、通知はSLA が違反のステータスになるまで送信されません。これを変更するには、‘At Risk’ 通知を送信のチェックをON にします。
次の例は、月曜日から金曜日まで毎日1000ファイルを受信すると予想されるコネクタに対して構成されたSLA を示しています。1000ファイルが受信されていない場合、期間終了の1時間前にAt Risk 通知が送信されます。
Note:必要に応じてSLA アラートをOFF にすることができます。これはWindows メンテナンス期間中に役立ちます。ナビゲーションバーの設定をクリックし、アラート > 一般的なアラートに移動します。タブレットと鉛筆のアイコンをクリックして編集し、SLA アラート設定のチェックを外します。
Transactions Tab
This tab lists all messages associated with the connector. Use the search bar to find specific messages, or click the funnel icon to apply a filter. You can filter by time, message direction, and/or status.
Options on this tab vary depending on the connector’s action type:
- If your connector is a Trigger, use the Receive Files button to start the flow.
- If your connector is a Transform or Terminal, use the Upload Files button to upload files to the flow.
Macros
ファイルの命名規則にマクロを使用することで、組織の効率とデータの文脈的理解を高めることができます。マクロをファイル名に組み込むことで、識別子、タイムスタンプ、ヘッダー情報などの関連情報を動的に含めることができ、各ファイルに有益なコンテキストを付与できます。これにより、組織にとって重要な詳細をファイル名に反映させることができます。
CData Arc はこれらのマクロをサポートしており、すべて次の構文を使用します:%Macro%
| Macro | 説明 |
|---|---|
| ConnectorID | コネクタのConnectorID を返します。 |
| Ext | コネクタが処理中のファイルの拡張子を返します。 |
| Filename | コネクタが処理中のファイルのファイル名(拡張子を含む)を返します。 |
| FilenameNoExt | コネクタが処理中のファイルのファイル名(拡張子なし)を返します。 |
| MessageId | コネクタがアウトプットするメッセージのMessageId を返します。 |
| RegexFilename:pattern | コネクタで処理中のファイルのファイル名にRegEx パターンを適用します。 |
| Header:headername | コネクタが処理中のメッセージのヘッダー(headername)の値を返します。 |
| LongDate | システムの現在の日時を長い形式(例:Wednesday, January 24, 2024)で返します。 |
| ShortDate | システムの現在の日時をyyyy-MM-dd 形式(例:2024-01-24)で返します。 |
| DateFormat:format | システムの現在の日時を指定されたフォーマット(format)で返します。使用可能な日付フォーマットについては、サンプル日付フォーマット を参照してください。 |
| Vault:vaultitem | 指定されたvault 項目の値を返します。 |
例
%Ext% や%ShortDate% などの引数を必要としないマクロもありますが、引数を必要とするマクロもあります。引数を渡すマクロはすべて次の構文を用います:%Macro:argument%
以下は、引数を渡すマクロの例です。
- %Header:headername%:
headernameはメッセージのヘッダー名です。 - %Header:mycustomheader% は、インプットメッセージで設定された
mycustomheaderヘッダーの値を返します。 - %Header:ponum% は、インプットメッセージで設定された
ponumヘッダーの値に対応します。 - %RegexFilename:pattern%:
patternは正規表現パターンです。例えば、%RegexFilename:^([\w][A-Za-z]+)%はファイル名の最初の単語と照合し、大文字と小文字を区別せずに結果を返します(test_file.xmlはtestに変換されます)。 - %Vault:vaultitem%:
vaultitemは、vault のアイテム名です。例えば、%Vault:companyname%はVault に保存されているcompanynameアイテムの値を返します。 - %DateFormat:format%:
formatは使用可能な日付フォーマットです(詳細はサンプル日付フォーマット を参照してください)。例えば、%DateFormat:yyyy-MM-dd-HH-mm-ss-fff%はファイルの日付とタイムスタンプを返します。
以下の例に示すように、より詳細なマクロを作成することもできます。
- 複数のマクロを1つのファイル名にまとめる:
%DateFormat:yyyy-MM-dd-HH-mm-ss-fff%%EXT% - マクロの外側にテキストを含める:
MyFile_%DateFormat:yyyy-MM-dd-HH-mm-ss-fff% - マクロ内にテキストを含める:
%DateFormat:'DateProcessed-'yyyy-MM-dd_'TimeProcessed-'HH-mm-ss%