JSON Connector
Version 26.2.9686
Version 26.2.9686
JSON Connector
JSON connectors support converting XML data into JSON and JSON data into XML.
Key Capabilities
- Bidirectional JSON to XML conversion with automatic format detection
- Minimal configuration required (the connector typically works with the default configurations)
- Configurable attribute prefixes and text property handling for accurate translations
- Custom formatting options including minification and root element naming
- Type conversion support with JSON type annotations for precise data handling
Overview
The JSON connector enables conversion between JSON and XML without requiring much configuration. The connector automatically detects whether input files are JSON or XML, and then the connector translates the file to the other format. The connector supports configurable syntax for distinguishing attributes and ensuring that the output is valid XML or JSON.
Connector Settings
This section contains all of the configurable connector properties.
Settings Tab
Connector Settings
Settings related to the core operation of the connector.
- コネクタId コネクタの静的な一意の識別子。
- コネクタの種類 コネクタ名とその機能の説明が表示されます。
- コネクタの説明 コネクタとフローにおけるロールについて自由形式の説明を記載するオプションのフィールド。
- Root Element Name When converting from JSON to XML, this value is used as the name of the root element in the resulting XML document. This ensures that the output XML has a single root element regardless of the structure of the input JSON.
- Attribute Prefix The prefix is used to identify attributes in JSON. When converting from JSON to XML, the connector interprets values with this prefix as attributes in the resulting XML. When converting from XML to JSON, the connector adds this prefix to attribute values in the resulting JSON. See the Examples section for more information.
- Text Property Name When a JSON object has attribute values and a non-attribute value, this name identifies the non-attribute value. When converting from JSON to XML, values associated with this name are set in the text of the resulting XML element. When converting from XML to JSON, the text in the element is set as the value for this name. See the Examples section for more information.
- Minify When enabled, this option instructs the connector to reduce the whitespace in the resulting XML or JSON document. This option conserves space, but it can make the output more difficult for humans to read.
Other Settings
- Invalid XML Name Prefix When a JSON element has a name that would not be valid XML, the connector adds this prefix to the beginning of the XML element name.
For example, a JSON element named10pricemust be modified to translate it to XML. Although a JSON element name can start with a number, XML element names cannot. If you set this field tonum, the10priceJSON element becomesnum10pricein the XML output. - ローカルファイルスキーム コネクタがアウトプットするメッセージにファイル名を割り当てるスキーム。ファイル名にマクロを動的に使用して、識別子やタイムスタンプなどの情報を含めることができます。詳しくは、マクロ を参照してください。
Advanced Tab
Message
Message settings determine how the connector searches for messages and manages them after processing. You can save messages to your Sent folder or you can group them based on a Sent folder scheme, as described below.
- Sent フォルダに保存 チェックすると、コネクタで処理されたファイルをコネクタのSent フォルダにコピーします。
- Sent Folder Scheme Instructs the connector to group files in the Sent folder according to the selected interval. For example, the Weekly option instructs the connector to create a new subfolder each week and store all sent files for the week in that folder. The blank setting instructs the connector to save all files directly in the Sent folder. For connectors that process many transactions, using subfolders can help keep files organized and improve performance.
Logging
- Log Level The verbosity of logs generated by the connector. When you request support, set this to Debug.
- Log Subfolder Scheme Instructs the connector to group files in the Logs folder according to the selected interval. The Weekly option (which is the default) instructs the connector to create a new subfolder each week and store all logs for the week in that folder. Leaving this setting blank tells the connector to save all logs directly in the Logs folder. For connectors that process many transactions, using subfolders helps keep logs organized and improves performance.
- Log Messages Check this to have the log entry for a processed file include a copy of the file itself. If you disable this, you might not be able to download a copy of the file from the Transactions tab.
Other Settings
- 処理の遅延 トランザクションタブに置かれたファイルの処理を遅延させる時間(秒)。これは旧式の設定です。代替として、ローカルファイルシステムの管理にはFile コネクタの使用がベストプラクティスです。
Miscellaneous
Miscellaneous settings are for specific use cases.
- Other Settings Enables you to configure hidden connector settings in a semicolon-separated list (for example,
setting1=value1;setting2=value2). Normal connector use cases and functionality should not require the use of these settings.
Automation Tab
Automation Settings
Settings related to the automatic processing of files by the connector.
- Send A toggle that instructs the connector to automatically send files when they are ready.
Performance
コネクタへのリソースの割り当てに関する設定。
- 最大ワーカー数 このコネクタでファイルを処理するためにスレッドプールで消費されるワーカースレッドの最大数。設定すると、高度な設定ページのパフォーマンス設定セクションのデフォルト設定がオーバーライドされます。
- 最大ファイル数 コネクタに割り当てられた各スレッドが送信するファイルの最大数。設定すると、高度な設定ページのパフォーマンス設定セクションのデフォルト設定がオーバーライドされます。
アラートタブ
アラートの設定に関連する設定.
サービスレベル(SLA)を実行する前に、通知用のE メールアラートを設定する必要があります。デフォルトでは、Arc はアラートタブのグローバル設定を使用します。このコネクタに他の設定を使用するには、グローバル設定をオーバーライドをON にしてください。
デフォルトでは、エラーアラートが有効になっています。これはエラーが発生するたびにE メールが送信されることを意味します。アラートをオフにするには、有効化チェックボックスのチェックを外します。
件名(必須)を入力し、オプションでE メールの受信者のリストをカンマ区切りで入力します。
SLA タブ
サービスレベル(SLA)の設定に関連する設定.
サービスレベルでは、フロー内のコネクタが送受信すると予想される処理量を設定し、その量が満たされると予想される時間枠を設定できます。CData Arc は、サービスレベルが満たされていない場合にユーザーに警告するE メールを送信し、SLA を At Risk(危険) としてマークします。これは、サービスレベルがすぐに満たされない場合に Violated(違反) としてマークされることを意味します。これにより、ユーザーはサービスレベルが満たされていない理由を特定し、適切な措置を講じることができます。At Risk の期間内にサービスレベルが満たされなかった場合、SLA はViolated としてマークされ、ユーザーに再度通知されます。
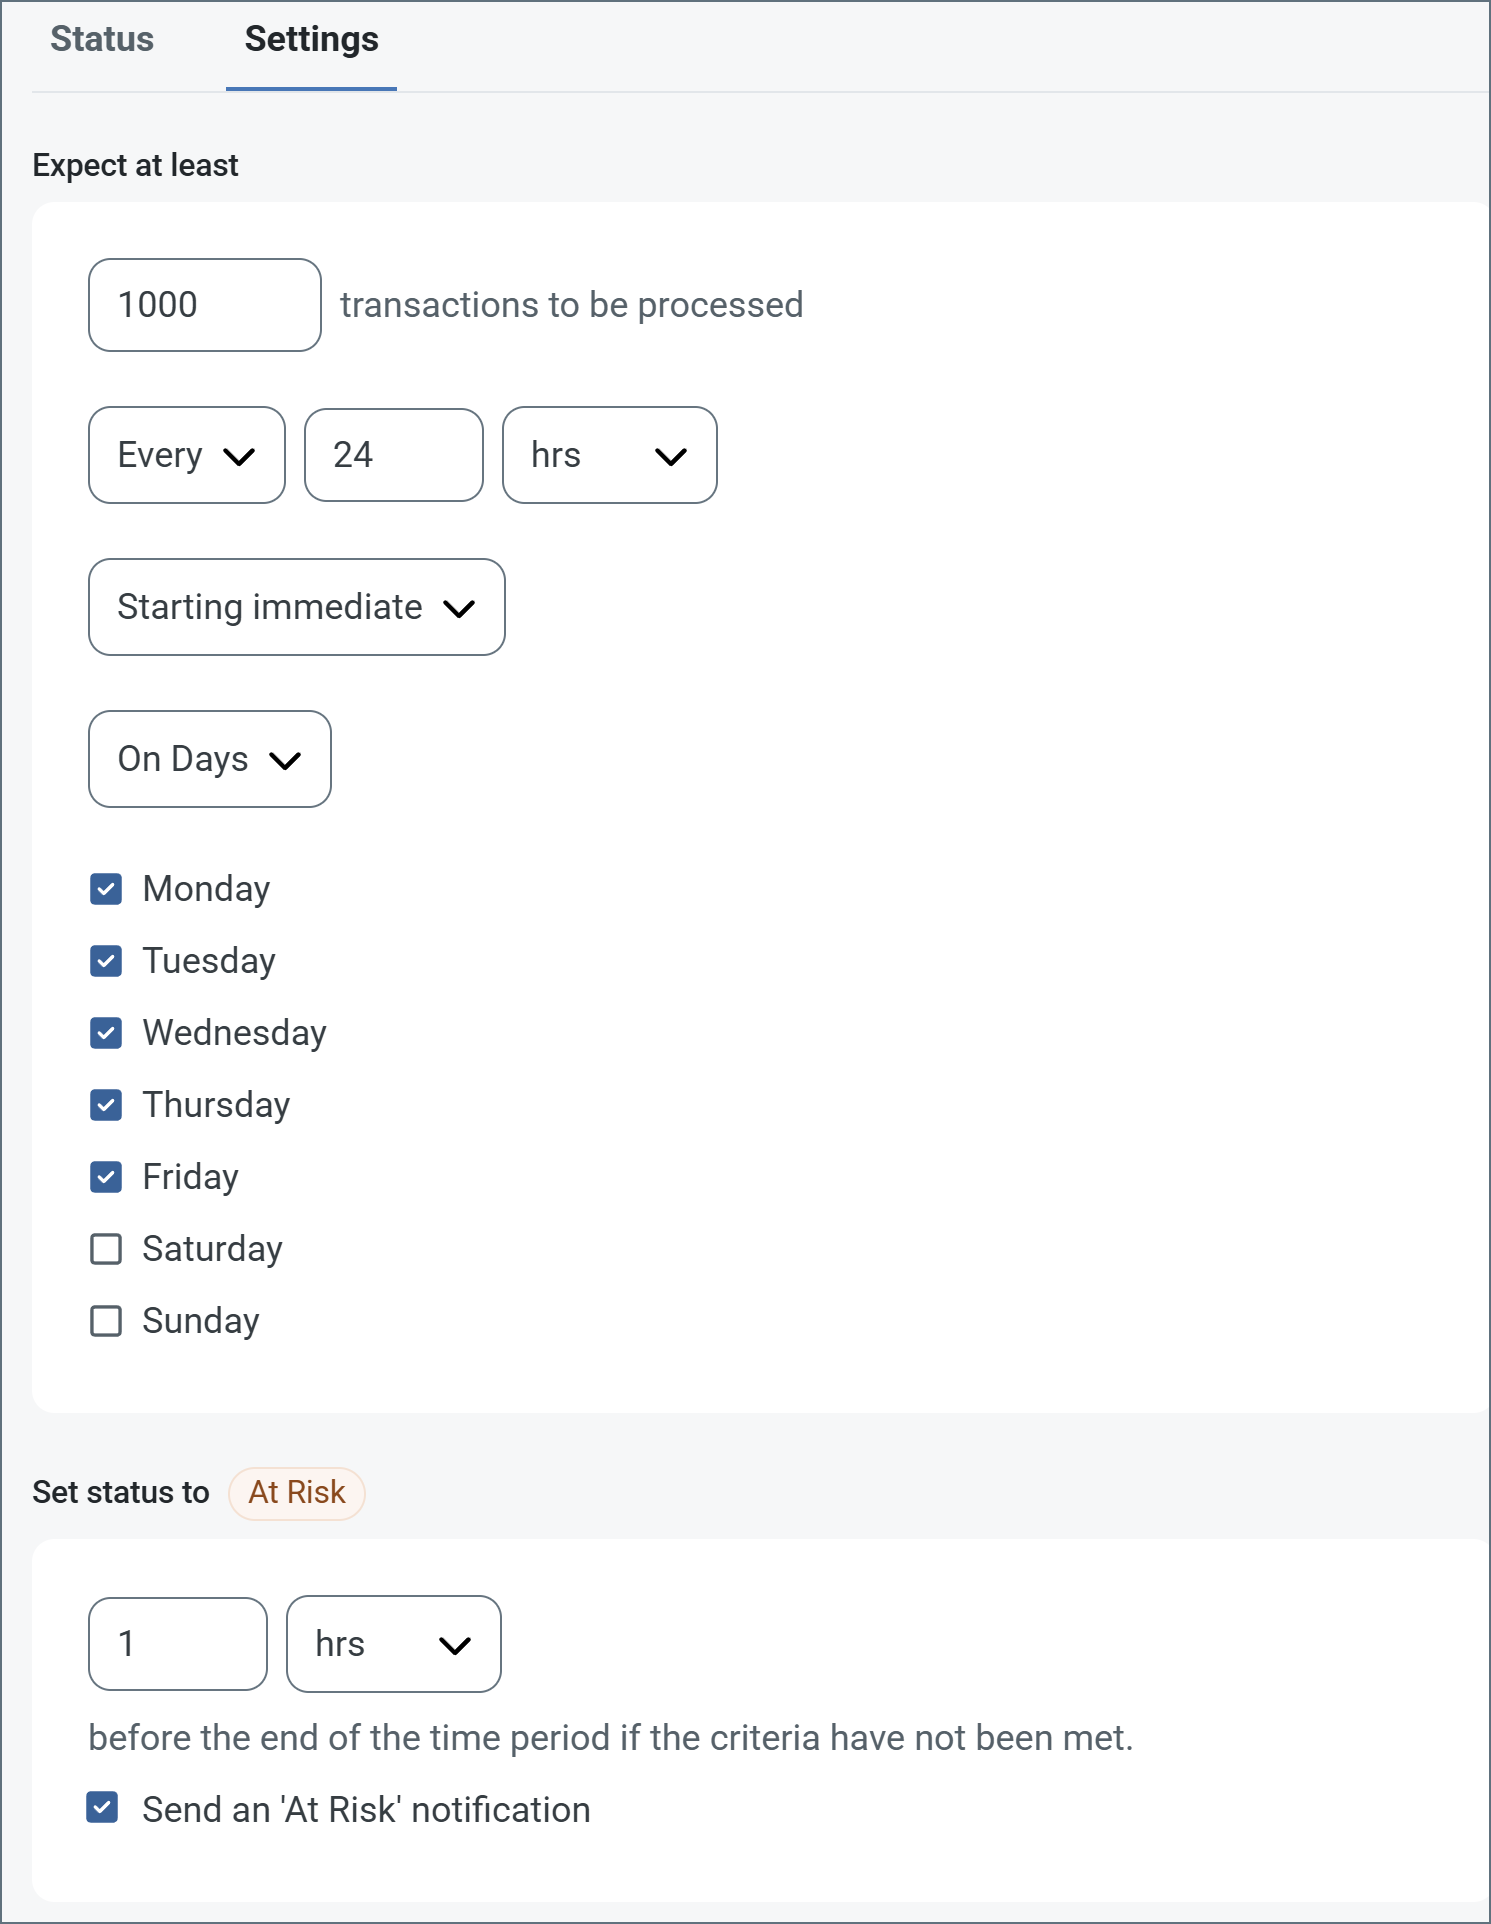
SLA を定義するには、予想処理量をON にして設定タブをクリックします。
![]()
- コネクタに個別の送信アクションと受信アクションがある場合は、ラジオボタンを使用してSLA に関連する方向を指定します。
- ウィンドウの検知基準(最小)で:
- 処理が予想されるトランザクションの最小値(量)に設定します
- 毎フィールドを使用して期間を指定します
- SLA がいつ有効になるかを示します。開始日 を選択した場合は、日時フィールドを入力してください。
- SLA を有効にする曜日のボックスをON にします。必要に応じて、ドロップダウンから毎日を選択します。
- ウィンドウの期間終了前にステータスを’At Risk’ に設定するタイミングで、SLA がAt Risk としてマークされるタイミングを指定します。
- デフォルトでは、通知はSLA が違反のステータスになるまで送信されません。これを変更するには、‘At Risk’ 通知を送信のチェックをON にします。
次の例は、月曜日から金曜日まで毎日1000ファイルを受信すると予想されるコネクタに対して構成されたSLA を示しています。1000ファイルが受信されていない場合、期間終了の1時間前にAt Risk 通知が送信されます。
Note:必要に応じてSLA アラートをOFF にすることができます。これはWindows メンテナンス期間中に役立ちます。ナビゲーションバーの設定をクリックし、アラート > 一般的なアラートに移動します。タブレットと鉛筆のアイコンをクリックして編集し、SLA アラート設定のチェックを外します。
Macros
ファイルの命名規則にマクロを使用することで、組織の効率とデータの文脈的理解を高めることができます。マクロをファイル名に組み込むことで、識別子、タイムスタンプ、ヘッダー情報などの関連情報を動的に含めることができ、各ファイルに有益なコンテキストを付与できます。これにより、組織にとって重要な詳細をファイル名に反映させることができます。
CData Arc はこれらのマクロをサポートしており、すべて次の構文を使用します:%Macro%
| Macro | 説明 |
|---|---|
| ConnectorID | コネクタのConnectorID を返します。 |
| Ext | コネクタが処理中のファイルの拡張子を返します。 |
| Filename | コネクタが処理中のファイルのファイル名(拡張子を含む)を返します。 |
| FilenameNoExt | コネクタが処理中のファイルのファイル名(拡張子なし)を返します。 |
| MessageId | コネクタがアウトプットするメッセージのMessageId を返します。 |
| RegexFilename:pattern | コネクタで処理中のファイルのファイル名にRegEx パターンを適用します。 |
| Header:headername | コネクタが処理中のメッセージのヘッダー(headername)の値を返します。 |
| LongDate | システムの現在の日時を長い形式(例:Wednesday, January 24, 2024)で返します。 |
| ShortDate | システムの現在の日時をyyyy-MM-dd 形式(例:2024-01-24)で返します。 |
| DateFormat:format | システムの現在の日時を指定されたフォーマット(format)で返します。使用可能な日付フォーマットについては、サンプル日付フォーマット を参照してください。 |
| Vault:vaultitem | 指定されたvault 項目の値を返します。 |
例
%Ext% や%ShortDate% などの引数を必要としないマクロもありますが、引数を必要とするマクロもあります。引数を渡すマクロはすべて次の構文を用います:%Macro:argument%
以下は、引数を渡すマクロの例です。
- %Header:headername%:
headernameはメッセージのヘッダー名です。 - %Header:mycustomheader% は、インプットメッセージで設定された
mycustomheaderヘッダーの値を返します。 - %Header:ponum% は、インプットメッセージで設定された
ponumヘッダーの値に対応します。 - %RegexFilename:pattern%:
patternは正規表現パターンです。例えば、%RegexFilename:^([\w][A-Za-z]+)%はファイル名の最初の単語と照合し、大文字と小文字を区別せずに結果を返します(test_file.xmlはtestに変換されます)。 - %Vault:vaultitem%:
vaultitemは、vault のアイテム名です。例えば、%Vault:companyname%はVault に保存されているcompanynameアイテムの値を返します。 - %DateFormat:format%:
formatは使用可能な日付フォーマットです(詳細はサンプル日付フォーマット を参照してください)。例えば、%DateFormat:yyyy-MM-dd-HH-mm-ss-fff%はファイルの日付とタイムスタンプを返します。
以下の例に示すように、より詳細なマクロを作成することもできます。
- 複数のマクロを1つのファイル名にまとめる:
%DateFormat:yyyy-MM-dd-HH-mm-ss-fff%%EXT% - マクロの外側にテキストを含める:
MyFile_%DateFormat:yyyy-MM-dd-HH-mm-ss-fff% - マクロ内にテキストを含める:
%DateFormat:'DateProcessed-'yyyy-MM-dd_'TimeProcessed-'HH-mm-ss%
Examples
Examples of converting between XML and JSON with the JSON connector are below.
XML to JSON
XML input:
<Fable>
  <Author alive="false">Aesop</Author>
  <Title>Tortoise and the Hare</Title>
  <Characters>
    <Character id="1" slow="true">Tortoise</Character>
    <Character id="2" slow="hardly">Hare</Character>
  </Characters>
  <Moral>Persistence over speed</Moral>
</Fable>
JSON output:
{
  "Fable": {
    "Author": {
      "@alive":"false",
      "#text":"Aesop"
    },
    "Title":"Tortoise and the Hare",
    "Characters": {
      "Character": [
        {
          "@id":"1",
          "@slow":"true",
          "#text":"Tortoise"
        },
        {
          "@id":"2",
          "@slow":"hardly",
          "#text":"Hare"
        }
      ]
    },
    "Moral":"Persistence over speed"
    }
}
JSON to XML
JSON input:
{
  "Catch": [
    {
      "type": "salmon",
      "quantity": "2",
      "weight": "20.2 lbs"
    },
    {
      "type": "pike",
      "quantity": "21",
      "weight": "521 lbs"
    }
  ],
  "Lake": "Boulder",
  "Weather": "Clear",
  "808s": "Loud"
}
XML output:
<Items>
  <Catch>
    <type>salmon</type>
    <quantity>2</quantity>
    <weight>20.2 lbs</weight>
  </Catch>
  <Catch>
    <type>pike</type>
    <quantity>21</quantity>
    <weight>521 lbs</weight>
  </Catch>
  <Lake>Boulder</Lake>
  <Weather>Clear</Weather>
  <_808s>Loud</_808s>
</Items>
JSON Type Conversions
When converting from XML to JSON, the connector treats all XML elements as strings except in two cases:
- If the connector detects multiple elements or values in the same XML structure in the XML input, it treats them as an array.
- If you apply an XML attribute to specify the JSON output format, this attribute overrides the default string behavior. These attributes are listed in the table below.
- json:array=”true” If you have a single-element array, you can apply this attribute to ensure that the connector treats it as an array instead of a string.
- json:type=”number” Instructs the connector to treat the XML element as a number.
- json:type=”boolean” Instructs the connector to treat the XML element as a boolean.
- json:type=”object” Instructs the connector to treat the XML element as an object.
- json:type=”null” The connector treats empty XML elements as strings of length zero. This command forces the output to be
nullinstead of an empty string. - xsi:nil=”true” Same functionality as json:type=”null”.