アップグレード
Version 22.0.8215
Version 22.0.8215
アップグレード
CData Arc 2022 is the latest version of several earlier application releases, including the following:
- ArcESB 2020 and 2021
- RSSBus Connect 2016, 2017, 2018, and 2019
- AS2 Connector V2 (/n software)
- AS2 Connector V3, FTP Connector V1, OFTP Connector V2, and SFTP Connector V1 (RSSBus)
- IP*Works! EDI AS2 Connector V7 (/n software)
Upgrading from ArcESB 2021
Windows
Arc 2022 functions as a drop-in upgrade to ArcESB 2021; simply running the Windows installer for Arc 2022 will upgrade all necessary application resources. Arc 2022 requires new product keys to license the application, and you can request new keys from our sales team at [email protected].
The Windows installer for Arc 2022 attempts to detect existing installations of ArcESB 2021 and preserve the connectors, flows, and settings from the existing installation. If ArcESB 2021 was not installed in the default location, it might be necessary to point the Arc 2022 installer to the folder on disk where ArcESB 2021 was installed.
Arc 2022 can be installed separately from ArcESB by directing the Arc 2022 installer to a different folder than the one in which ArcESB was installed. Installations will not interfere with each other as long as they are installed to different folders.
Unix/Mac
The Java Edition of Arc 2022 is provided through a setup.zip file. Follow these steps to upgrade an existing installation of ArcESB 2021 Java Edition to Arc 2022:
- Extract arc.war from setup.zip and place it in the webapp directory of your existing installation:
sudo unzip setup.zip webapp/arc.war -d /opt/arcesb/ - Back up your existing arc.war file:
sudo cp /opt/arcesb/webapp/arc.war /opt/arcesb/webapp/arc.war.bak - Create a symlink at /opt/arcesb/webapp/arc.war that points to /opt/arcesb/webapp/arc.war:
sudo ln -s /opt/arcesb/webapp/arc.war /opt/arcesb/webapp/arc.war - Ensure that the new war and symlink are owned by the user that will run the server, most likely the arcesb user:
sudo chown -R arcesb:arcesb /opt/arcesb - Restart the service:
sudo systemctl restart arcesb
Notes for Java users:
-
No matter how you choose to deploy Arc, the files and folders that are contained in
ApplicationDirectorymust be readable and writable by the user running the application. The service.sh script included with the Java Edition will use cdataarc as this user. - Arc 2021 manages users within the application rather than through server configuration, so some user settings may not transfer.
- Arc 2021 does not automatically preserve subfolder structures found on FTP and SFTP servers.
- Arc 2021 does not require Windows administrator privileges to run by default, so some folder permissions may need to be updated.
-
If the application was previously run as a different user and you want to restore the necessary permissions for a cdataarc user to run the application, the command should be similar to the following:
sudo chown -R cdataarc:cdataarc /opt/arc
Upgrading from ArcESB 2020
Windows
Arc 2022 functions as a drop-in upgrade to ArcESB 2020. Simply running the installer for Arc 2022 will upgrade all necessary application resources. Arc 2022 requires new product keys to license the application, and you can request new keys from our sales team at [email protected].
The installer for Arc 2022 attempts to detect existing installations of ArcESB 2020 and preserve the connectors, flows, and settings from the existing installation. If ArcESB 2020 was not installed in the default location, it might be necessary to point the Arc 2022 installer to the folder on disk where ArcESB 2020 was installed.
Arc 2022 can be installed separately from ArcESB 2020 by directing the Arc 2022 installer to a different folder than the one in which ArcESB 2020 was installed. Installations will not interfere with each other as long as they are installed to different folders.
Unix/Mac
The Java Edition of Arc 2022 is provided through a setup.zip file. Due to the security and performance updates involved in the upgrade to the Embedded Jetty Web Server, many of the class names and references used in the XML configuration for ArcESB 2020 are no longer valid in CData Arc 2022. As a result, the upgrade process requires setting up CData Arc 2022 as a new installation and pointing it to the Application Directory that ArcESB 2020 used.
Notes for Java users:
-
No matter how you choose to deploy Arc, the files and folders that are contained in
ApplicationDirectorymust be readable and writable by the user running the application. The service.sh script included with the Java Edition will use cdataarc as this user. -
If the application was previously run as a different user and you want to restore the necessary permissions for a cdataarc user to run the application, the command should be similar to the following:
sudo chown -R cdataarc:cdataarc /opt/arc
Arc 2022 includes several improvements that might cause the application to behave differently from an ArcESB 2020 installation:
- Arc 2022 manages users within the application rather than through server configuration, so some user settings may not transfer.
- Arc 2022 does not automatically preserve subfolder structures found on FTP and SFTP servers.
- Arc 2022 does not require Windows administrator privileges to run by default, so some folder permissions may need to be updated.
ユーザー管理
Previous versions of Arc managed users via the server configuration XML files (e.g. Web.Config, server.xml). Arc 2022 brings user management within the application itself, introducing a Users tab in the Settings page.
Users configured in previous versions will not persist in the new installation of Arc 2022 and should be recreated as necessary within the Users tab. More information about user management can be found in the User Roles page.
Subfolders in File Based Connectors
Note: This section is only relevant for users with file-based connectors, including File, FTP, and SFTP, that preserve the folder structure from remote file systems.
Previous versions of CData Arc exhibited the following behavior:
These file-based connectors target a single folder on a remote server from which to upload or download files. When files should also be downloaded from subfolders within this target folder, this same subfolder structure was recreated locally in the connector’s Output directory. Likewise for uploads, these connectors treated a file being in a subfolder of the Input directory as an indication of the subfolder the file should be placed in on the remote file system. This recreation of subfolder structure is what is meant by “preserving subfolder structures”.
Arc 2022 requires the use of the File Connector to mirror folder structures on remote systems. These file based connectors add a subfolder header to downloaded files if the file was stored in a subfolder of the target folder on the server. This subfolder header is used to automatically reproduce the subfolder structure when files are uploaded to remote file systems.
Overriding Local Folders
In versions of CData Arc prior to CData Arc 2021, you could override the Send, Receive, and Sent folders for individual connectors using Connector Settings. Starting with CData Arc 2021, these options are no longer available in the interface, and direct overrides of connector folders are discouraged. Instead, it is recommended to use a File connector to manage local file systems.
If needed, the SendFolder, ReceiveFolder, and SentFolder properties of connectors can still be manually overridden in Connector Settings using the field under Advanced > Miscellaneous > Other Settings. If these settings were overridden for a connector in a previous release, the configured settings will be present here.
If you choose to use this method to override local folders for the connector, it is recommended that you set the value under Advanced > Processing Delay to a non-zero value in seconds (for example, 10) to prevent Arc from processing files that are still being written by an external process.
Windows Application Directory
The Windows edition of Arc 2022 stores the Application Directory (which holds the data for flows, connectors, profile settings, etc) in the C:\ProgramData folder by default. Previous versions of Arc used the C:\Program Files folder to house the Application Directory. This change helps ensure that Arc 2022 can run without administrator privileges by default.
When upgrading from Arc 2020 to Arc 2022, the application will re-use the Application Directory from the previous (2020) installation, but still attempt to run without administrator privileges by default. As a result, it may be necessary to set the access permission rules on the Application Directory within C:\Program Files to allow Arc access with lower running permissions.
Upgrading from RSSBus Connect 2016, 2017, 2018, or 2019
This section describes the process of upgrading from an earlier release of CData Arc or RSSBus Connect.
For help with upgrading from an earlier version than RSSBus Connect 2016, please see Upgrading from AS2 Connector.
ドロップインアップグレード
Windows
Upgrading to Arc 2022 from RSSBus Connect 2016, 2017, 2018, or 2019 can be a one-step in-place upgrade. Simply run the Arc installer to update application resources (.exe’s, .dll’s, .jar’s, .war’s) without disturbing configuration data.
If the CData Arc installer detects an RSSBus Connect installation, the installer uses this same installation path to store configuration data (profile, connectors/ports, certificates). Thus, the settings from older versions are automatically used by the new CData Arc installation.
コンフィギュレーションデータの手動転送
If an in-place upgrade is not possible, configuration data can still easily be transferred from previous versions of CData Arc/RSSBus Connect.
The first transfer method is to export connector (port) settings from the older version and import these connectors (ports) in the new version. Connectors (ports) can be exported from the Ports tab by clicking the cogwheel and selecting ‘Export Port Settings’. In later versions of RSSBus Connect, connectors (ports) can be exported from the Flows tab by right clicking the connector (port) in the flow and selecting ‘Export Port Settings’. Connectors can be imported from the Flows tab of CData Arc by clicking the cogwheel in the top-right and selecting ‘Import Workspace’.
2つ目の方法は、ディスク上のフォルダを管理することによって、すべてのコンフィギュレーションデータを一度に転送します。すべての設定情報は、インストールディレクトリの’data’ フォルダにあります。’data’ フォルダを以前のバージョンから最新バージョンの同じフォルダにコピーすると、アプリケーション設定全体が効率的にコピーされます。
The default installation directory for CData Arc is:
- Windows: C:\Program Files\CData\CData Arc
- Java:
/opt/arc
The default installation directory for RSSBus Connect is:
Windows: C:\Program Files\RSSBus\RSSBus Connect
Java: ~/rssbus/connect
Unix システムでは、’~’ はJava サーブレットがインストールされているユーザーのホームディレクトリになります。Windows システムでは、’~’ は%ProgramData% になります。
Note: If you do not see the CData Arc installation directory, check for the RSSBus Connect default installation directory.The CData Arc installer will attempt to detect RSSBus Connect installations and use the pre-existing folder structure from RSSBus Connect.
Upgrading Application Data Source Connectors
CData Arc introduced a new approach to connecting to external data sources that are applications rather than traditional databases (e.g. SalesForce, NetSuite, QuickBooks, etc). In RSSBus Connect, each external data source application required a dedicated connector (port) to interface with the application. In CData Arc, a single connector called the CData Connector is used to connect to each application data source.
CData Drivers
The CData Connector uses CData drivers to connect to a specific data source. CData is our parent company, and they provide the ADO.NET and JDBC drivers that enable connectivity to hundreds of cloud and on-premise applications, databases, and more. These drivers were used under-the-hood in previous RSSBus Connect connectors (ports), so the interface and approach to accessing data in these application data sources has not changed.
In order to upgrade this set of connectors (ports) to CData Arc, the appropriate CData driver must be installed and configured in a CData Connector. Please see the CData Connector documentation for details on installing CData drivers. Once the CData driver is installed and selected within the CData Connector’s settings, the CData Connector can be configured with the same connection settings and credentials that were used in RSSBus Connect connectors (e.g. the SalesForce Connector, the HubSpot Connector, etc).
Upgrading External Connectors
A small number of connectors that were previously external have moved to embedded in Arc 2022:
- SQL Server
- Oracle
These connectors will be appropriately installed along with the rest of the application, and they no longer require additional downloads.
Overriding Local Folders
In versions of Arc prior to Arc 2022, you could override the Send, Receive, and Sent folders for individual connectors using Connector Settings. Starting with Arc 2022, these options are no longer available in the interface, and direct overrides of connector folders are discouraged. Instead, it is recommended to use a File connector to manage local file systems.
If needed, the SendFolder, ReceiveFolder, and SentFolder properties of connectors can still be manually overridden in Connector Settings using the field under Advanced > Miscellaneous > Other Settings. If these settings were overridden for a connector in a previous release, the configured settings will be present here.
If you choose to use this method to override local folders for the connector, it is recommended that you set the value under Advanced > Processing Delay to a non-zero value in seconds (for example, 10) to prevent Arc from processing files that are still being written by an external process.
AS2 コネクタからのアップグレード
このセクションは、FTP コネクタ、OFTP コネクタ、およびSFTP コネクタ からのアップグレードにも適用されます。
Installing CData Arc
Windows ユーザー
The Windows installation of CData Arc will target a different installation path than earlier versions of the product and listen on a different port. This change ensures that both releases can be run side-by-side without conflicting with one another. setup.exe を実行してプロンプトに従うだけで、アプリケーションをマシンにインストールできます。
Java ユーザー
As with previous versions of the AS2 Connector (and other releases in the Connector family), the application is provided as a distributable arc.war file.サーバーの組み込みデプロイメントウィザードを使用してこのWAR ファイルをJava サーバーに配布すると、パートナープロファイルを含め、既存のAS2 コネクタのインストール全体が置き換えられます。
AS2コネクタの一括アップグレードを実行してもインストール間でプロファイル設定を保存する場合は、新しいパッケージをデプロイする前に、以前のインストールのデータフォルダのコピーを作成してください。このデータフォルダは、既存のWeb アプリケーションフォルダの下の/WEB-INF/data/ フォルダにあります。Once you have copied this folder into a new location, deploy CData Arc in place of the existing installation.When launching the application for the first time, the connectors (ports) are not configured.プロファイルをインポート をクリックしてデータフォルダをコピーした場所を指定し、プロファイルを復元します。
Alternatively, you can rename the arc.war provided with CData Arc to install this version of the application as a parallel application.
プロファイル情報のインポート
以前のバージョンのAS2コネクタ、SFTP コネクタ、またはその他の以前のバージョンからアップグレードする場合は、既存のパートナープロファイル設定を検出およびインポートするために使用できる方法がいくつかあります。
自動インポート
If you are installing the Windows edition of CData Arc on a machine where a previous version of the application was installed, the installation program attempts to detect the installation of the previous version and can import the profile settings from it.If a partner profile is detected that is of the same name as one already configured in CData Arc, this process will create a duplicate entry with a number appended to the identifying field to ensure that it is unique.重複したプロファイルは、インポート後に安全に削除できます。
Import Using the Admin API
CData Arc’s Admin API includes an import action that can be used to import settings from previous versions. The import action requires three parameters:
- Arcflow - The base64-encoded string containing the Flow data. This string can be generated by base64-encoding the entire file contents of a .arcflow file.
- Overwrite - How CData Arc should respond if an imported profile/partner configuration causes a conflict with the current configuration. If True, the existing configurations will be overwritten. Otherwise, an error will be thrown.
- WorkspaceId - The Workspace into which the Flow will be imported. If unspecified, the application will attempt to determine which Workspace to import into (based on Workspace values within the Flow being imported) and fall back to the default Workspace if necessary.
All requests to the import action must be sent as HTTP POST requests.
More information about the Admin API can be found in the Admin API section.
トランスペアレントアップグレードの設定
After running the installer for CData Arc and importing partner profiles from a previous installation of the application into CData Arc, the new version has backwards compatibility for receiving URLs in the old version. However, there are two key differences:
-
CData Arc は、アプリケーションの以前のインストールをホストしていたアプリケーションサーバーとは異なるローカルポートを使用します。This avoids conflicts with the installation of a previous version of the AS2 Connector so that you can maintain both versions of the application and transfer partners to the new version at your own pace.
-
The Incoming, Outgoing, and Sent Folders from the previous installation of the AS2 Connector are not automatically imported into the profiles used in CData Arc.デフォルトでは、現在実行中のアプリケーションのインスタンスに干渉しないように、独自のローカルファイルリソースを使用します。これにより、以前のプロファイルで自動化が有効になっている場合、アプリケーションはAS2コネクタの古いバージョンで送信待ちになっているファイルの送信をすぐには開始しません。
AS2 コネクタのインスタンスを置き換えたい場合:
- Determine whether you want to use the old folder structure from the previous installation of the AS2 Connector or use CData Arc’s default folder structure.
- Determine whether you wish to use your existing receiving URL or a new one.
以前のフォルダを保持する
Arc 2022 adds a new File connector that allows you to interact with external folders in the file system as a separate logical step in your message flow. This process allows you integrate with the local file system using the same resources that you used previously. However, if you add additional connectors in the future, the application creates these in a different data folder by default.
The following image shows an example of a flow that uses File connectors in this way:
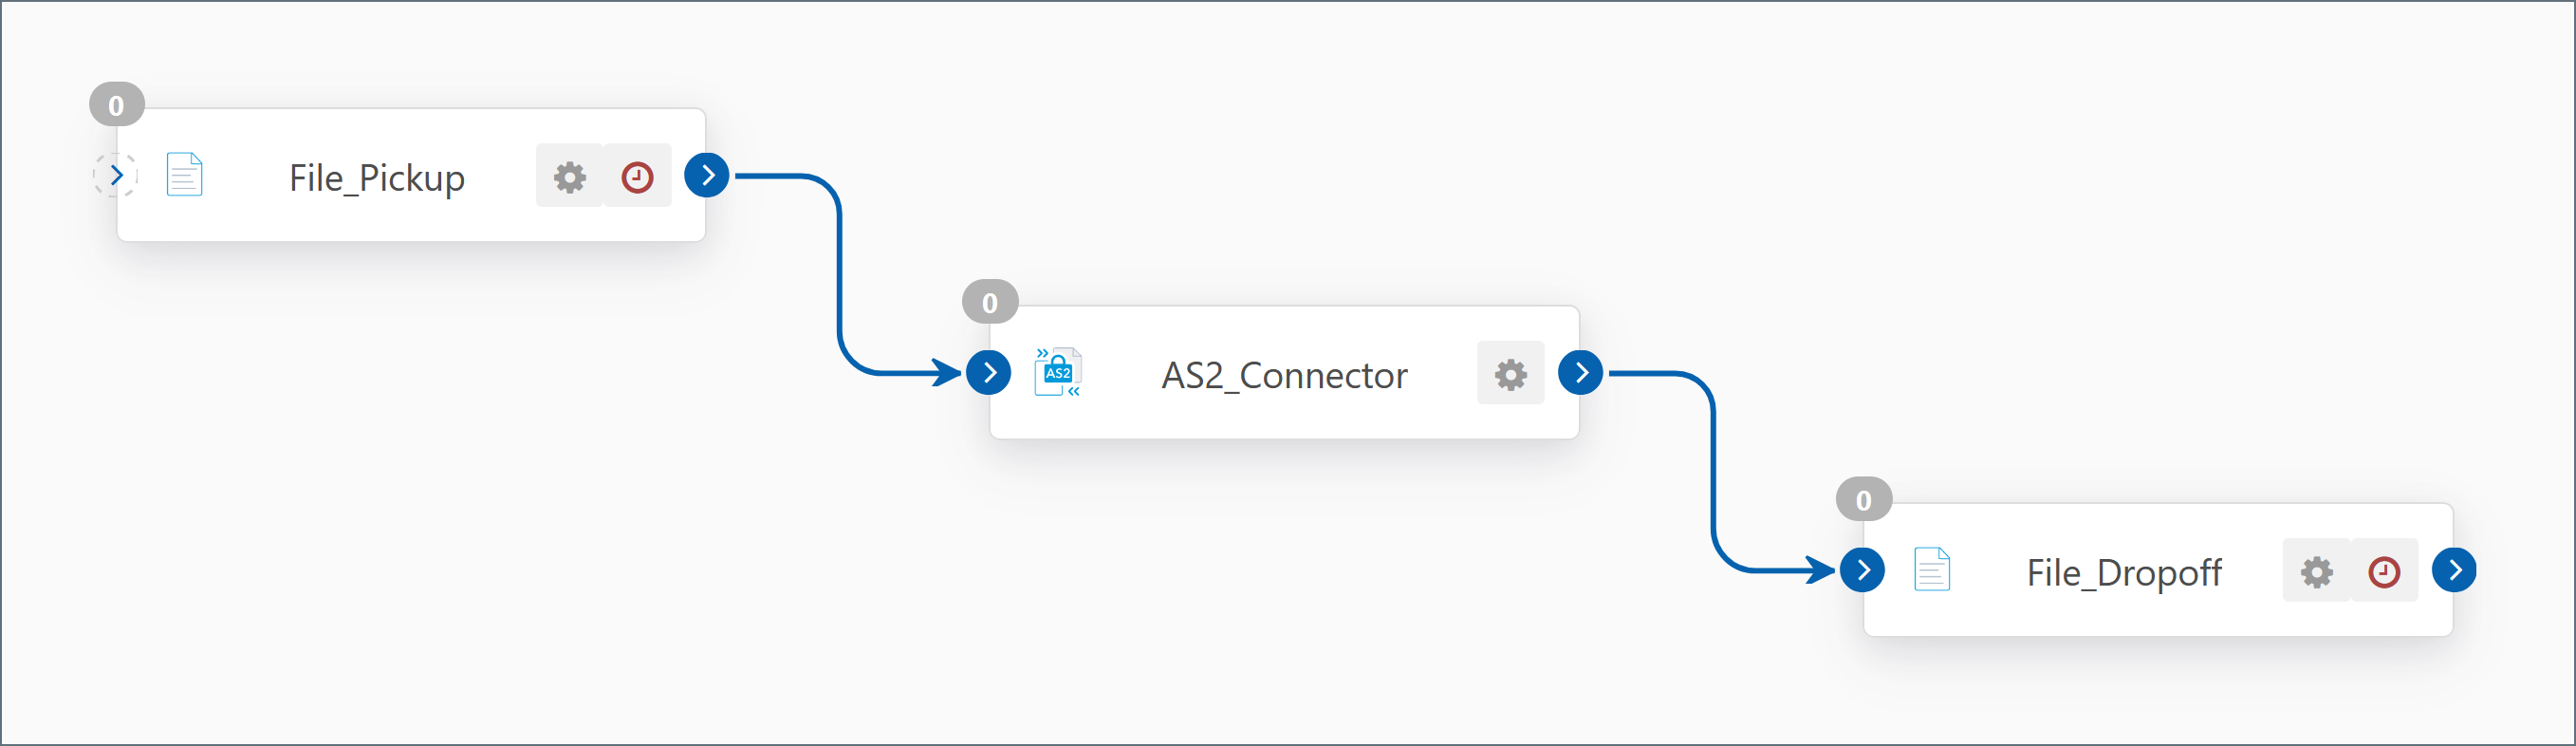
See Best Practices for information about how to configure File connectors for this purpose.
メリット
The existing back-end business logic is preserved for configured trading partners.
デメリット
Additional connectors use a different data folder by default.
新しいフォルダを使用するように切り替える
If you plan to add more partners or configure additional connectors in CData Arc, it may be best to switch to the new folder structure that CData Arc uses by default. This structure is described below.
CData Arc uses an Application Directory that contains all connector and profile configuration data. Each configured connector in CData Arc has its own folder within the data folder (for the default workspace) or appropriate workspace folder within the workspaces folder. The connector-specific folder contains the following folders:
- Logs - A folder where the connector will write connector-specific logs.
- Pending - Connectors that wait for a partner response will store pending messages in this folder (only certain connector types require this).
- Receive - Connectors that receive/download files from an external source will place those files here.Connectors that operate on local data (without sending or receiving from an external source) will place files here after they are processed.
- Send - Files placed in this folder are slated to be processed/sent/uploaded by the connector.
- Sent - The connector places a copy of processed/sent/uploaded files here.
For AS2 Connectors, place files that should be sent to external trading partners in the connector’s Send folder, and pick up files received from external trading partners in the connector’s Receive folder.
メリット
A consistent folder structure will be maintained if additional trading partners are configured.
デメリット
Business logic may need to be reconfigured to use the new folder structure.
新規URL の使用
The server provided with CData Arc listens on different ports and uses different URLs for receiving AS2 transmissions than earlier releases.After you import your profiles into CData Arc, you must update your trading partners so that they are sending to your new Receiving URL.
By default, the server provided with CData Arc listens in plaintext on port 8001 and uses SSL/TLS on port 8401.You can find the Receiving URL by clicking Profile > AS2
メリット
- パートナーの移行を自分のペースで。
- ダウンタイムなし。
デメリット
- パートナーは、パートナー側のプロファイル設定であなたのURL を変更する必要がある。
- 追加のポートをファイアウォールで開く必要がある。
- アプリケーションの両方のバージョンが維持される。
既存のURL の使用
To receive requests on the same URL that is used by the previous version, stop the server hosting the previous version so that the same port can be assigned to CData Arc.また、以前のバージョンで使用していたものと同じポートにサーバーを割り当てる必要があります。システムトレイのアイコンを右クリックして、Server Optionsをクリックすることで、ポートの設定を行うことができます。The application automatically recognizes requests to resources that were supported in previous versions of the application (/as2connector/pub/ReceiveFile.rsb and /Receiver.aspx, for instance) and forwards them to the appropriate resources in CData Arc.
メリット
- パートナーはプロファイルを変更する必要なし。
- 1つのシステムを管理。
デメリット
- 新しいサーバー用のポートを解放するために古いサーバーが停止している間のダウンタイム。
- 既存のプロファイルを最初にインポートする必要あり。
Note:If the port that you configure is an SSL/TLS-enabled port, you also need to configure the same SSL/TLS certificate that was used for the previous version of the AS2 Connector on this port.If you were previously hosting an SSL/TLS port in CData Arc, the same certificate store is the location of SSL/TLS certificates in CData Arc (the local machine’s personal account).
After you configure CData Arc to use the same port that you used in older versions of the application, you start receiving incoming transmissions at the folders configured above.
Upgrading an Amazon AMI
Arc 2022 has a dedicated AMI in the AWS Marketplace that can be used to create a new EC2 instance running Arc. In order to preserve all application data, please follow the instructions for copying application folders directly from the filesystem in our Back Up or Migrate Arc guide. To make a persistent copy of the relevant folders, they must be copied from the Amazon VM to a local machine via a transfer protocol like SFTP or SCP; then, the same folders must be transferred to the new EC2 instance created from the latest AMI.