Oracle (Native)
Version 26.2.9669
Version 26.2.9669
Oracle (Native)
You can use the Oracle (Native) connector from the CData Sync application to move data from any supported source to the Oracle (Native) destination. This page explains how to set up both the Oracle database and the Oracle Autonomous Database as Sync destinations.
Prerequisites
This section describes the prerequisites that you must complete before adding an Oracle destination connector in CData Sync. It outlines the supported Oracle versions and the recommended approach for creating a dedicated user account to support secure and reliable data replication.
Version Support
Sync supports connections to Oracle 11g and later.
Installing the Native Driver
Sync uses the Java Database Connectivity (JDBC) driver to connect to your Oracle Server. If you have not done so already, download the driver from the OracleJDBC and UCP Downloads page.
Copy the JDBC driver into the libs directory (based on your operating system) and restart the server.
-
Windows:
C:\ProgramData\CData\sync\libs -
UNIX or Mac OS X:
~/cdata/sync/libs
Creating a Sync User
You can connect to an Oracle database by using any existing database user with adequate permissions. However, as a best practice, CData recommends that you create a new Sync user and schema with minimum permissions that are specifically for use with CData Sync.
To create a new Oracle login and an associated database user named sync_user, submit the following commands in Oracle SQL Developer:
CREATE USER sync_user IDENTIFIED BY <Password>
DEFAULT TABLESPACE <Tablespace>
TEMPORARY TABLESPACE <TempTablespace>
QUOTA UNLIMITED ON <Tablespace>;
By default, the new sync_user account does not have any permissions. To connect to the database, you must grant the CREATE SESSION privilege, as shown below:
GRANT CREATE SESSION TO sync_user;
To ensure that sync_user can write, modify, and delete data in an Oracle destination connection, you should also grant it the CREATE TABLE permission:
GRANT CREATE TABLE TO sync_user;
For a detailed reference with command syntax that is used to create Oracle database users, see Create Users.
Add the Oracle Connector
To enable Sync to use data from Oracle, you first must add the connector, as follows:
-
Open the Connections page of the Sync dashboard.
-
Click Add Connection to open the Select Connectors page.
-
Click the Destinations tab and locate the Oracle (Native) row.
-
Click the Configure Connection icon at the end of that row to open the New Connection page. This action opens the Add Connection dialog box.
Note: If the Configure Connection icon is not available, click the Download Connector icon to install the Oracle (Native) connector.
-
Enter a name for your connection in the Add Connection dialog box.
-
Click Add to open the Settings tab for your connector.
For more information about installing new connectors, see Connections.
Authenticate to Oracle
After you add the connector, you need to set the required properties.
CData Sync supports authenticating to Oracle in several ways. Select your authentication method below to proceed to the relevant section that contains the authentication details.
- Security Identifier (default)
- Service Name
- Data Source
Security Identifier (SID)
To connect to Oracle resources by using a SID, specify the following settings:
-
User: Enter the username that you use to authenticate to the Oracle database.
-
Password: Enter the password that you use to authenticate to the Oracle database.
-
Server: Enter the host name or IP address of the server that hosts the Oracle database. The default server is localhost.
-
Port: Enter the port number for the Oracle server. The default port is 1521.
-
SID: Enter the SID for your Oracle database. The default SID is ORCL.
Service Name
To connect to Oracle resources by using a service name, specify the following settings:
-
User: Enter the username that you use to authenticate to the Oracle database.
-
Password: Enter the password that you use to authenticate to the Oracle database.
-
Server: Enter the host name or IP address of the server that hosts the Oracle database. The default server is localhost.
-
Port: Enter the port number for the Oracle server. The default port is 1521.
-
Service: Enter the service name for your Oracle database. The default SID is ORCL.
To obtain the service name, submit the following query from the Oracle SQL*PLUS command line:
SELECT * FROM global_name;Note: The result of this query returns the global database name, which might not always align with the service name that is defined in the Oracle listener. If there is any uncertainty, verify the result with your DBA or review the tnsnames.ora file to confirm the correct service name.
Data Source
To connect to Oracle resources by using a data source, specify the following settings:
-
User: Enter the username that you use to authenticate to the Oracle database.
-
Password: Enter the password that you use to authenticate to the Oracle database.
-
Data Source: Enter the data source for your Oracle database.
Complete Your Connection
To complete your connection:
-
Define advanced connection settings on the Advanced tab. (In most cases, though, you should not need these settings.)
-
Click Create & Test to create your connection.
Configure Oracle Autonomous Database as a Destination
The Oracle Autonomous Database has been supported for some time as a source for CData Sync software, via the OCI driver. Now, you can set up the database as a destination as well in Sync 21.0.8179.0 or later, as explained in the following sections.
Step 1: Obtain and Install the Required DLLs and Libraries
The first step is to obtain and install the required DLLs and libraries. This procedure differs depending on whether you use the Microsoft Windows (.NET) edition or the Java edition of Sync.
To obtain and install the DLLs and libraries:
-
Download the zipped JDBC driver (ojdbc8.jar) and companion JAR files (ojdbc8-full.tar.gz) for your version of Oracle Database.
-
Extract the downloaded ojdbc8-full.tar.gz file.
-
Copy the following files from the extracted file into the libs subdirectory of the Sync installation directory:
-
ojdbc8.jar
-
oraclepki.jar
-
osdt_core.jar
-
osdt_cert.jar
-
-
Restart Sync.
These steps complete the installation of the required DLLs and libraries. You can now move on to step 2.
Step 2: Add Oracle Autonomous Database as a CData Sync Destination
Now, you can add Oracle Autonomous Database as a Sync destination. This step involves connecting with Mutual TLS (mTLS), with client certificate authentication. So, you need to download and set up the wallet for mTLS. If you choose to use a TLS connection (without client certificate authentication) instead, you do not need to set up a wallet. However, to use the TLS connection, you must limit the connection source via the access control list (ACL) in the database settings.
For step 2, you need to perform the following tasks:
-
Set up connection information.
-
Add the destination connection.
Set Up Connection Information
To obtain the connection information that you need to create an Oracle Autonomous Database destination:
-
Navigate to the Autonomous Database management window for the database that you want to connect to in Oracle Cloud.
-
Add the IP address for the machine that hosts Sync to the ACL by selecting Autonomous Database Information > Network> Access Control List.
-
Click the DB Connection tab in the Autonomous Database Details window.
-
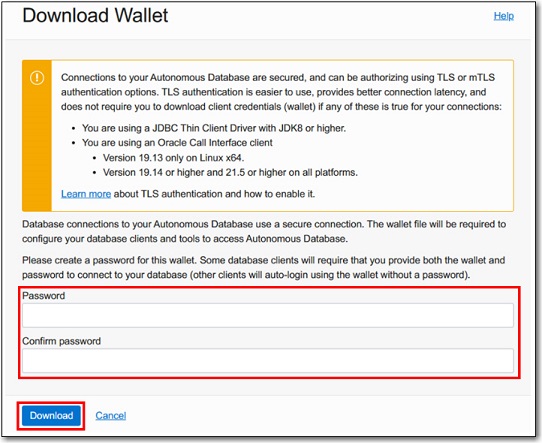
Download the wallet file by selecting Wallet instance in the Wallet type field. Then, click Download wallet.
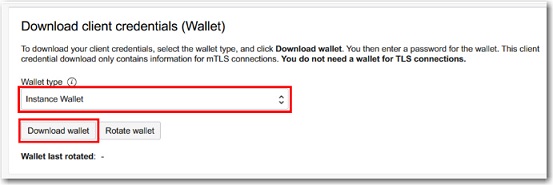
You will be asked for the password to encrypt the private key. Set an appropriate password in the Download Wallet modal. Then, click Download to download a ZIP file that contains the wallet.
Note: The password that you set here is not used in Sync.
After you click Download, the Database Connection modal is displayed.
-
Save a copy of the string (in the Connection Strings section of the dialog box) for the Transparent Network Substrate (TNS) name to which you want to connect. You need this string later in the process.
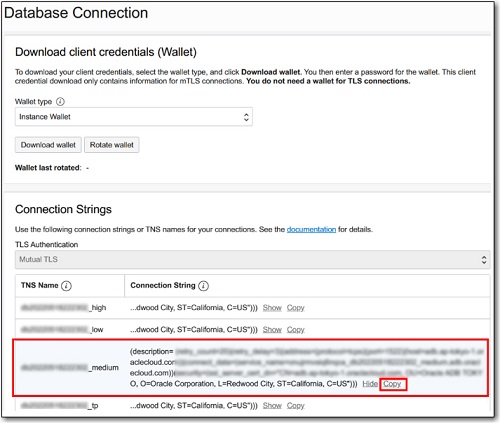
At this point, your connection information is ready.
Add the Oracle Destination Connector
To enable Sync to use data from the Oracle Autonomous database, you first must add the connector, as follows:
-
Open the Connections page of the Sync dashboard.
-
Click Add Connection to open the Select Connectors page.
-
Click the Destinations tab and locate the Oracle (Native) row.
-
Click the Configure Connection icon at the end of that row to open the New Connection page. If the Configure Connection icon is not available, click the Download Connector icon to install the Oracle (Native) connector. For more information about installing new connectors, see Connections.
Authenticate to Oracle
-
Set values for the following properties on the Connections Settings page:
-
Name: Enter a connection name of your choosing.
-
Provider Class: Enter the value Oracle.ManagedDataAccess.Client.
-
Settings Format: Enter the value Property List.
-
Connection Type: Select Data Source from the drop-down list.
-
User: Enter the username that you use to authenticate to the Oracle autonomous database.
-
Password: Enter the password that you use to authenticate to the Oracle autonomous database.
-
Data Source: Enter the connection string you copied in step 4 of the section “Setting Up Connection Information.” The key is setting the connection string in the data source. At this point, you need to unzip the wallet ZIP file that you downloaded earlier to the
C:\ProgramData\CData\sync\data\directory (folder). Then, specify that path in the connection string, as shown in this example:
-
-
Click Create and Test to verify that the connection is successful.
If your connection is not successful, the problem might be that Sync cannot read the wallet file. Make sure that the directory (folder) that you specify in for the MY_WALLET_DIRECTORY= parameter can be accessed by the user account of the process in which Sync is running.
Note: The wallet ZIP file that you downloaded contains various files. However, you only need the cwallet.sso file to connect with Sync. The other key files in the wallet have the private key encrypted with the password that you set in the downloading process. However, because the cwallet.sso file is stored with the private key unencrypted, you can connect to the client certificate without entering the password. Therefore, in this example, you can connect just by specifying the
C:\ProgramData\CData\sync\data\Wallet_XXX\cwallet.ssodirectory (folder).
Data-Type Mapping
CData Sync uses the following data-type conversions when it loads data into your SQL Server database:
| CData Type | Oracle Type | Notes |
|---|---|---|
| bigint | NUMBER(19) | |
| binary | BLOB | |
| boolean | BOOLEAN or NUMBER(1) | BOOLEAN is supported when MajorVersion >= Oracle 23C |
| date | DATE | |
| decimal | NUMBER | |
| double | NUMBER | |
| float | NUMBER | |
| integer | NUMBER(10) | |
| smallint | NUMBER(5) | |
| time | TIMESTAMP | |
| timestamp | TIMESTAMP | |
| timestamp_tz | TIMESTAMP WITH TIME ZONE | |
| tinyint | NUMBER(3) | |
| uuid | VARCHAR2(36) | |
| varchar | VARCHAR2( |
If ColumnSize <= 4000, VARCHAR2 is used. If ColumnSize > 4000, CLOB is used. |
| varbinary | BLOB |
Note: Most destinations that are available in Sync allow custom column mapping. See Mapping Columns for information about how to remove or adjust column mappings and apply different transformations to tasks in Sync.
Advanced Job Options
The following table shows an advanced job option that is most frequently used with Oracle destination connections. For a complete list of available job options, see Advanced Job Options.
| Option Name | Default Value | Description |
|---|---|---|
| StoresUppercaseIdentifiers | False | Specifies whether identifiers in the cache are stored with all uppercase characters. If this option is set to True, the identifiers are stored in all uppercase characters. |
Note: This option, which is not displayed in the Sync UI, is set in the Additional Options field in the Replicate Options category on your job’s Advanced tab.
Common Issues and Solutions
When you connect to Oracle destinations, you might occasionally encounter errors. Common errors and issues fall into the following categories:
-
index handling
-
additional errors and issues
Index Handling
By default, Sync automatically disables indexes in Oracle before performing Insert operations and re-enables them after the operation completes to improve replication performance. However, in certain use cases, this behavior might need to be disabled.
To prevent Sync from automatically disabling Oracle destination indexes, add the following setting to the Additional Options field in the Replicate Options category on your job’s Advanced tab:
DisableOracleIndexesOnStart=false
Additional Errors and Issues
For more help and troubleshooting resources for other issues and errors that you might encounter, explore the CData Knowledge Base, join the CData Community, or contact CData Technical Support to open a support ticket.