Workspace Management
Version 26.2.9669
Version 26.2.9669
Workspace Management
In CData Sync, workspaces provide a streamlined way for you to organize your connections, jobs, and transformations. Instead of sifting through numerous configurations, you can group related resources under a single organizational structure. The workspace structure simplifies navigation, enhances efficiency, and helps you quickly locate, manage, and build the integrations that you need. Using workspaces makes data integration more manageable—especially for users handling multiple customer environments.
Each workspace functions as an independent environment, maintaining its own dedicated set of resources (connections, jobs, and transformations). These resources cannot be shared across workspaces (although you can move resources to another workspace). Workspaces also have full create/read/update/delete (CRUD) support.
You can manage a workspace in the following ways:
Viewing a Workspace
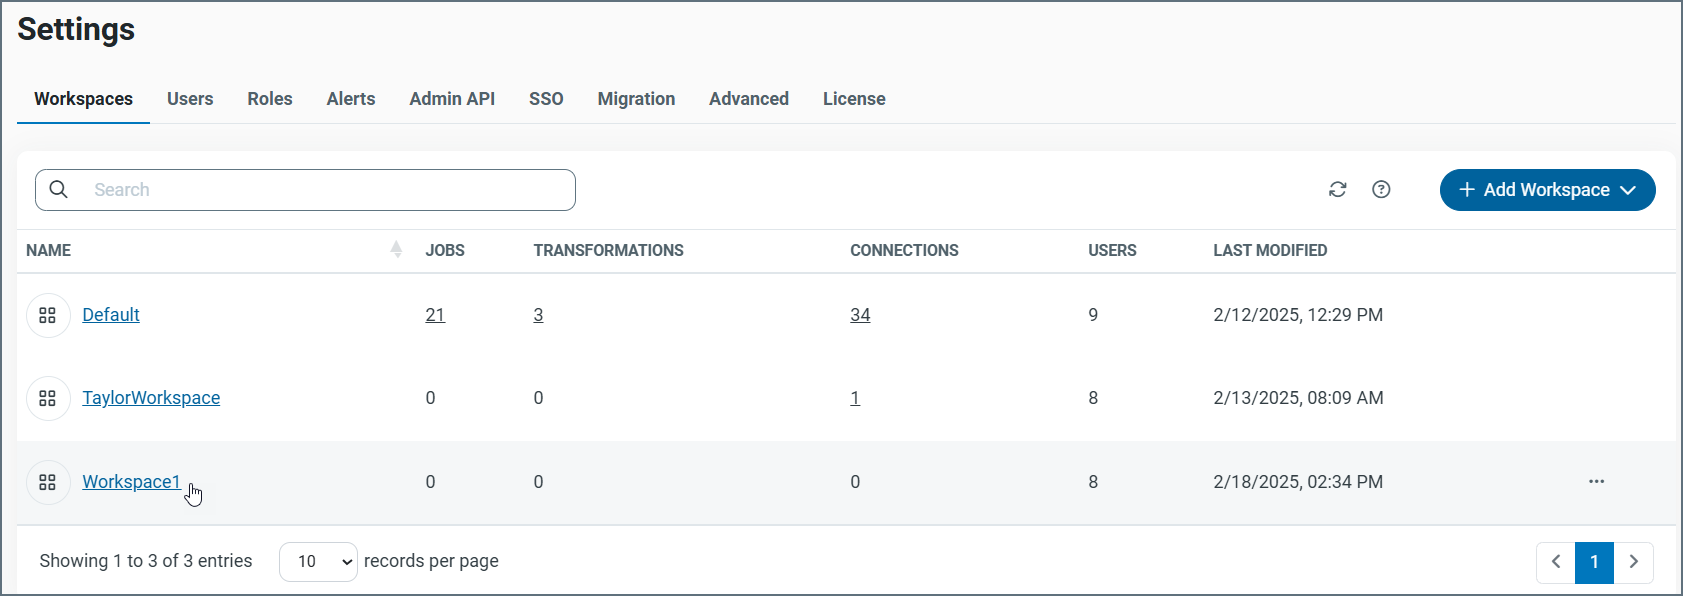
When you open the Sync application, you are already in the default workspace. You can view a list of all your workspaces from the Workspace tab on the Settings page. The table on this page summarizes your workspaces and enables you to manage them from one access point.

The workspace records are displayed in rows, with columns that provide details about each workspace. As shown in the image above, you can specify the number of rows that you want to display on the page by selecting a number from the X records per page list at the bottom of the page.
Sync provides details about your workspaces in six columns:
-
NAME - Lists the name of the workspace.
-
JOBS - Lists the number of jobs within the workspace.
-
TRANSFORMATIONS - Lists the number of transformations within the workspace.
-
USERS - The number of users who have access to the workspace.
-
CONNECTIONS - Lists the number of connections within the workspace.
-
LAST MODIFIED - Lists the date and time when the workspace was last modified.
You can organize your workspace list in ascending or descending order, by name. To order the NAME column, simply click the up (↑) and down (↓) arrows next to the right of that column name.
On this page, you can create, rename, or remove a workspace via the options menu (…) at the end of the row. You can also export the workspace, go to the workspace, or move resources from that workspace from the same menu.
Adding a Workspace
To add a new workspace:
-
Open the Settings page and click the Workspaces tab.
-
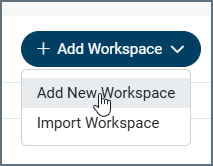
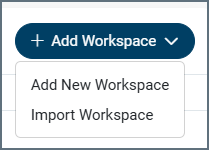
Select Add Workspace > Add New Workspace from the top right of the Workspaces tab, as shown below.
This selection opens the Add Workspace dialog box.
-
Enter a name for your workspace in the Name text box. Then, click Add Workspace. The new workspace then appears in the Workspaces table (on the Workspaces tab).
Switching Workspaces
You can switch to a workspace in three ways. Two of these methods are available when you are on the Workspaces tab on the Settings page:
-
Click the workspace-name link in the workspace table to open the workspace.
-
At the end of the row for the workspace you want, select … > Go To Workspace.
The third method—a workspace indicator box—remains visible throughout the Sync UI, providing a constant reference to your current workspace. This box not only acts as a visual cue but also includes a drop-down list of all available workspaces, allowing you to easily switch between them.
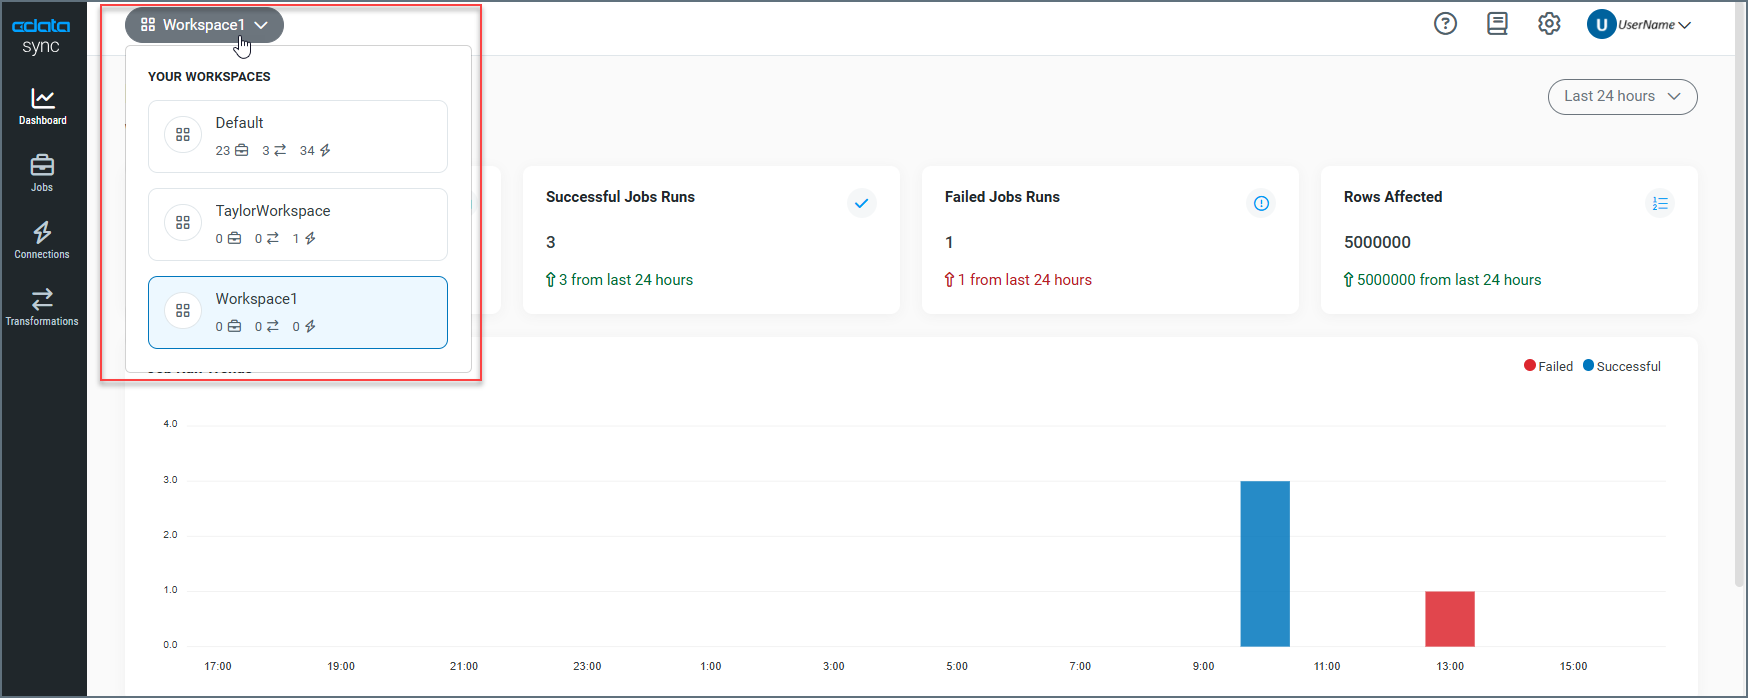
Regardless of which method you use, the workspace opens on the Dashboard page.
Renaming a Workspace
To rename a workspace:
-
Open the Settings page and click the Workspaces tab.
-
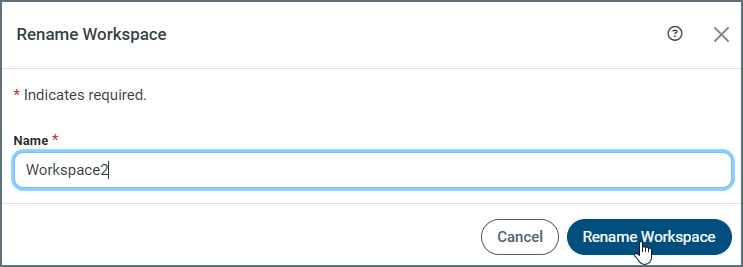
Select … > Rename at the end of the workspace row to open the Rename Workspace dialog box.
Note: You cannot rename the Default workspace.
-
Enter the new name for the workspace in the Name text box.
-
Click Rename Workspace to save the new name.
After you click Rename Workspace, the new name is displayed in the workspace table.
Removing a Workspace
To remove a workspace:
-
Open the Settings page and click the Workspaces tab.
-
Select … > Remove at the end of the workspace row. This selection opens the message that is shown below, which is a final verification to ensure that you do want to remove the workspace.
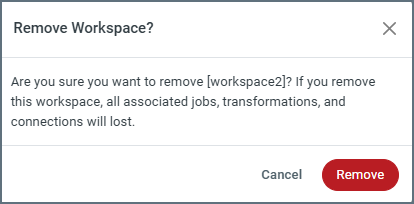
After you click Remove in the message dialog box, the workspace is deleted from the workspace table.
Exporting a Workspace
In Sync, you can export workspaces and settings to a file on your operating system. You can choose to export all workspaces and settings or you can choose a custom export to download specific jobs and transformations from a workspace. Sync also exports all connections, tasks, settings, and events that parts of exported jobs.
To export all workspaces and settings:
-
Open the Settings page and click the Workspaces tab.
-
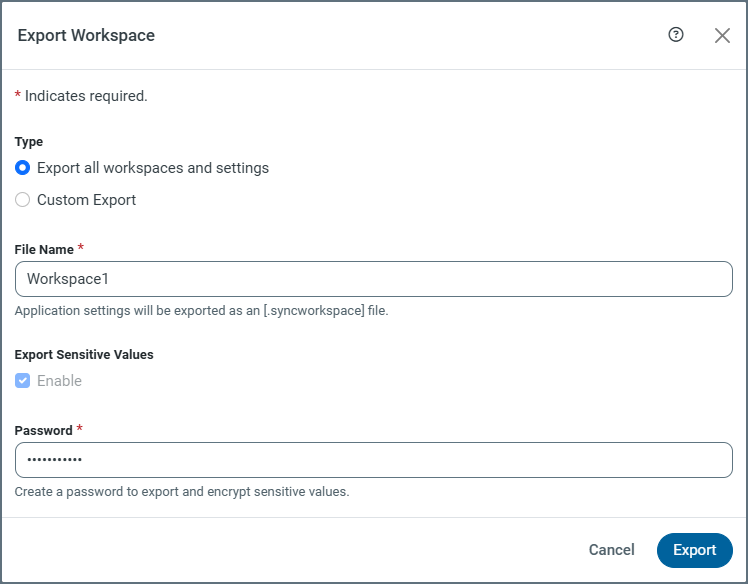
Select … > Export at the end of the workspace row in the workspace table. By default, the Type option Export all workspaces and settings is already selected. The Export Sensitive Values option is enabled also by default.
-
Enter a file name to where you want your workspaces and settings to be exported. Application settings are exported as a SYNCWORKSPACE file (for example, MySettings.syncworkspace)
-
Enter a password in the Password text box. This password is used to export and encrypt sensitive values. You also need this password if you import the workspace at a later time.
-
Click Export to upload all your workspaces and settings to a SYNCWORKSPACE file on your operating system. Sync exports the SYNCWORKSPACE file to your Downloads folder. From there, you can move it to any other location on your machine.
To export specific components of a workspace (custom export):
-
Open the Settings page and click the Workspaces tab.
-
Select … > Export at the end of the workspace row in the workspace table.
-
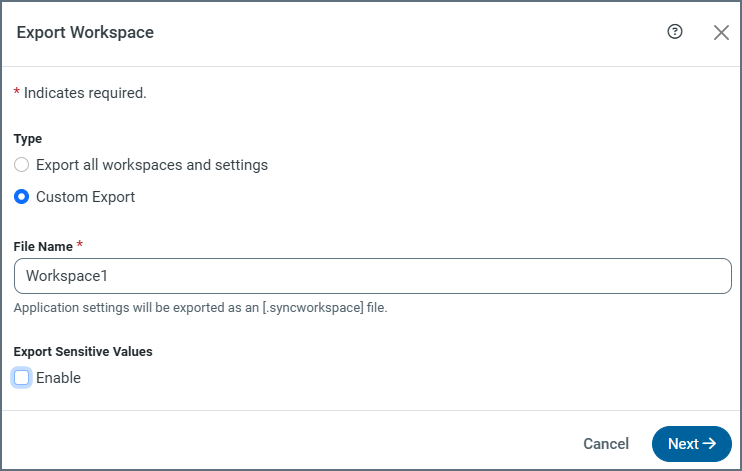
Select Custom Export for Type in the Export Workspace dialog box. When you choose a custom export, the Export Sensitive Values becomes disabled and the Password text box disappears. However, you can re-enable those options by selecting the Enable checkbox that appears under Export Sensitive Values.
-
Enter a file name to where you want your workspaces and settings to be exported. Application settings are exported as a SYNCWORKSPACE file (for example, MySettings.syncworkspace).
-
Click Next to open the Select Items to Export dialog box.
-
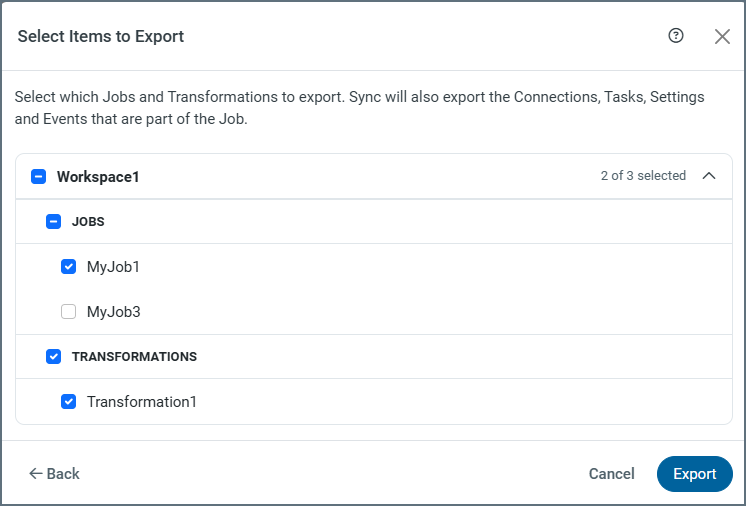
Select the checkbox by the name of your workspace to display a list of jobs and transformations. Then, click the down arrow to the right of the workspace name to display the jobs and transformations for that workspace. By default, all jobs and transformations are selected.
-
Clear the checkboxes next to any jobs and transformations that you do not want to export. For example, in the image below, Job3 will not be exported because it is not selected.
-
Click Export to download all your jobs and transformations to the SYNCWORKSPACE file.
Importing a Workspace
In addition to adding a workspace, you can import workspaces that you exported previously.
To import a workspace:
-
Navigate to the Workspaces tab in Settings and select Add Workspace > Import Workspace. This selection opens the Import dialog box.
-
In the dialog box, click Choose File to open Microsoft Windows Explorer. Then locate and select the SYNCWORKSPACE file that you want to import. After you select the file that you want, click Open in the Explorer to display the name of the file in the File text box of the Import dialog box.
-
Select whether you want to import sensitive values by selecting the checkbox next to Enable that appears below the Import Sensitive Values option. (By default, the Enable checkbox is not selected.) You must also enter the password that you assigned originally when you exported the workspace.
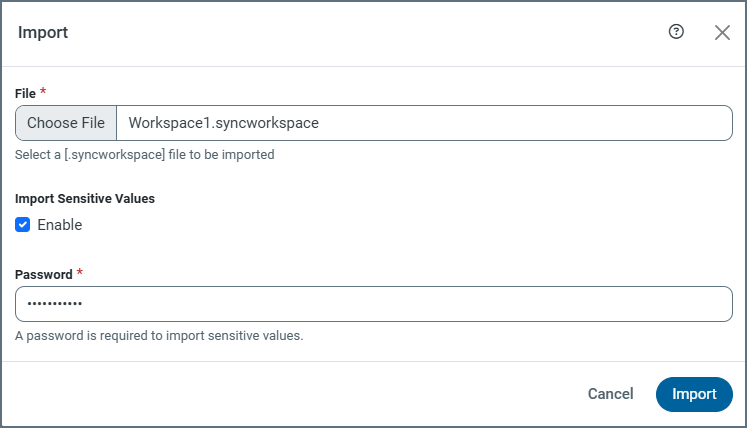
Note: You cannot import a workspace that currently exists. So, if you export a workspace that you know you will want to import later, you need to remove the workspace in the Workspace table before you import it.
-
Click Import to upload the workspace to the location you chose in step 2. If the import is successful, a message to that effect appears at the top right of the workspace table.
Moving Resources between Workspaces
As mentioned earlier, resources (jobs, transformations, and connections) can exist in only one workspace. However, you can move these resources from one workspace to another workspace.
-
Open the Settings page and click the Workspaces tab.
-
For the workspace from which you want to move resources, select … > Move Resources at the end of that row in the workspace table. This selection opens the Move Workspace Entities dialog box. The workspace from which you want to move resources appears in ORIGINATING WORKSPACE text box at the top left of the page.
-
Select the destination workspace by clicking the drop-down arrow in the NEW WORKSPACE list box at the top right of the dialog box.
-
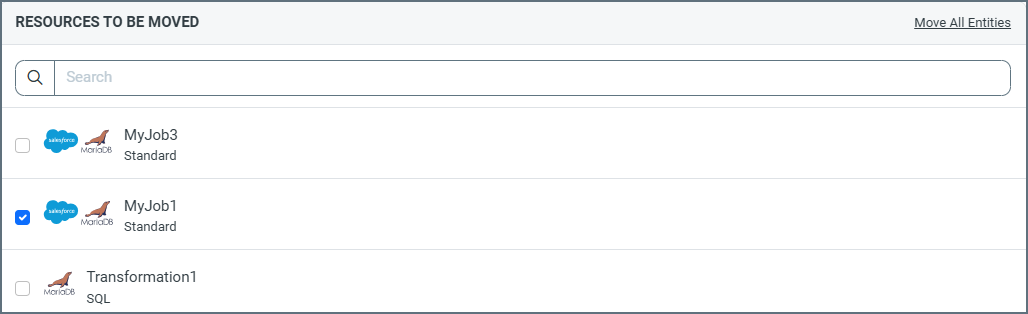
Under the RESOURCES TO BE MOVED category, select the jobs, transformations, or both that you want to move to the destination workspace. You can move all resources (jobs and transformations) or just specific resources:
-
To move all resources, click the Move All Entities link at the top right of the RESOURCES TO BE MOVED title bar. This action selects all jobs and transformations in the resources list.
-
To move specific jobs and resources, as shown below, select them manually from the list of resources that appears below the title bar.
Notes:
-
If you have a long list of jobs and transformations, you can use the search bar just below the Resources to Be Moved title bar to search for specific jobs and transformations.
-
For any jobs or transformations that you want to move, you must also move any dependent resources as well.
-
-
-
Under the ASSOCIATED CONNECTIONS category (not shown in the earlier image), select the connections that you want to move. Similar to jobs and transformations, you can move all connectors or just specific ones:
-
To move all connectors, click the Move All Entities link at the right end of the ASSOCIATED CONNECTIONS title bar. This action selects all connectors in the connections list.
-
To move specific connectors, select them manually from the connections list.
-
-
Click Next to move to the Confirm Move tab in the dialog box.
-
Click Move Resources to move your resources and exit the dialog box.