Windows DSN Configuration
Using the Microsoft ODBC Data Source Administrator
You can use the Microsoft ODBC Data Source Administrator to edit the DSN configuration. Note that the DSN is created during the installation process.
Complete the following steps to edit the DSN configuration:
- Select Start > Search, and enter ODBC Data Sources in the Search box.
- Choose the version of the ODBC Administrator that corresponds to the bitness of your application (32-bit or 64-bit).
- Click the System DSN tab.
- Select the system data source and click Configure.
- Edit the information on the Connection tab and click OK.
Note: For .NET Framework 4.0, the driver distributes Microsoft Visual C++ 2015-2022 Redistributable. For .NET Framework 3.5, the driver distributes Microsoft Visual C++ 2008 Redistributable.
Ensuring Registry Access
The driver stores connection information in the Windows registry. To ensure that the driver can write to the registry, perform either of the following actions:
- Run the calling application as an administrator.
- Connect via a User DSN instead of a System DSN.
Before You Connect
In order to connect, a user must have a role assigned to them with certain permissions.
To create or edit a user role:
- Log into NetSuite.
- To create a new role, in the NetSuite Navigation Menu, hover your mouse over Setup > User/Roles > Manage Roles, then click New.
OR
To modify an existing role, in the NetSuite Navigation Menu, hover your mouse over Setup > User/Roles, then click Manage Roles. This opens the Manage Roles page.
On the Manage Roles page, on the row whose "NAME" column contains the role you want to edit, click Customize in the "EDIT" column.
Both options open the Role page. - In the Permissions section, click the Setup () dropdown menu.
- Within the Setup () menu, click the dropdown menu above the Add button.
- Select the SOAP Web Services permission, then click Add. Repeat this for the REST Web Services permission.
- Select any other permissions that you need. See Permission Configurations for a complete list of permissions, including what each permission is used for and when it is required.
- In the NetSuite Navigation Menu, hover your mouse over Setup, then User/Roles, then click Manage Users. This opens the Manage Users page.
- In the "NAME" column, click the name of the user to which you want to assign the role you just created or edited. This opens the Employee page.
- On the Employee page, in the bar of tabs, click the Access tab, then click Edit. This opens the editing version of the Employee page.
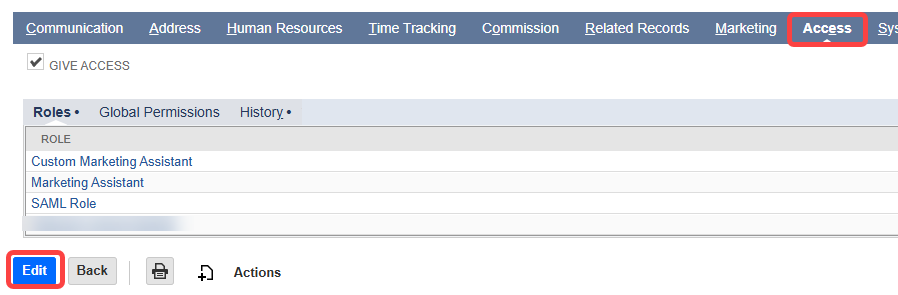
- At the bottom of this page, in the dropdown above the Add button, select your new (or newly edited) role, then click Add.
- Click Save.
Connecting to NetSuite
NetSuite makes its data available via two distinct APIs. Specify the API you want to use by setting the Schema connection property to one of the following:- SuiteTalk is an older, SOAP-based service used to communicate with NetSuite. It has broad support for a lot of entities and full support for INSERT/UPDATE/DELETE. However, it returns data more slowly than the SuiteQL API. Server-side JOINs are unavailable with this API, so these actions are performed by the driver entirely client-side.
- SuiteQL is the newer API. It allows JOINs, GROUP BY, aggregations, and column filtering to be done server-side. This makes it significantly faster than SuiteTalk for selecting data. However, it only offers read-only access to NetSuite data.
If you are just retrieving data, we recommend you use SuiteQL. If you need to both retrieve and modify data, we recommend you use SuiteTalk.
If you plan to connect to SuiteTalk, we recommend that you specify the NetsuiteMetadataFolder. The Netsuite Metadata Folder is a folder where NetSuite metadata files are stored. If you do not specify one, a folder location is selected automatically. To ensure fast load times when listing metadata about tables, it is best to set this property.
Authenticating to NetSuite
NetSuite offers the following authentication mechanisms:- Token Based Authentication (TBA) is similar to OAuth 1.0. TBA is available for both SuiteTalk versions later than 2020.2, and SuiteQL.
- OAuth 2.0 Authentication uses the OAuth 2.0 authorization code grant flow and is only available for SuiteQL.
- OAuth JWT Authentication uses the OAuth 2.0 client credentials flow by including a JWT containing client credentials to request access to NetSuite data.
- Basic authentication, or "User/Password" authentication is, as of NetSuite version 2020.2, no longer supported by NetSuite. While the CData ODBC Driver for NetSuite continues to support User/Password connections when the Version connection property is set to versions older than 2020.2, we recommend that all customers migrate to the OAuth or Token Based Authentication mechanisms described above. This option is only available when the Schema connection property has been set to SuiteTalk.
Token Based Authentication (OAuth 1.0)
Token Based Authentication (TBA) is essentially OAuth 1.0.
Token Based Authentication is performed by creating the OAuthClientId, OAuthClientSecret, OAuthAccessToken and OAuthAccessTokenSecret directly within the NetSuite UI by an administrator with permissions to do so.
Creating Tokens in the NetSuite UI
Many NetSuite admins prefer to create and assign a token directly in the NetSuite UI. Connecting via token enables users to bypass the normal steps for generating an OAuth Access Token. This provides the admin with more direct control over giving access. However, it also creates a need for them to take manual steps in the UI each time they need to create a new token.
Instead of creating and assigning a token directly in the NetSuite UI, follow this procedure:
- In NetSuite, log in using an account with administrator privileges.
- In the NetSuite Navigation Menu, hover your mouse over Setup > Company, then click Enable Features. This opens the Enable Features page.

- On the Enable Features page, in the tab bar, click SuiteCloud.
- In the Manage Authentication section, enable Token-Based Authentication.
- Click the blue Save button at the bottom of the page.
- In the NetSuite Navigation Menu, hover your mouse over Setup > Integration and click Manage Integrations. This opens the Integrations page.
- Click New to create a new integration. This opens the Integration page.
- In the Authentication section, under Token-based Authentication, enable TOKEN-BASED AUTHENTICATION.
- Click the blue Save button on the top or bottom of the page. A read-only version of the page opens.
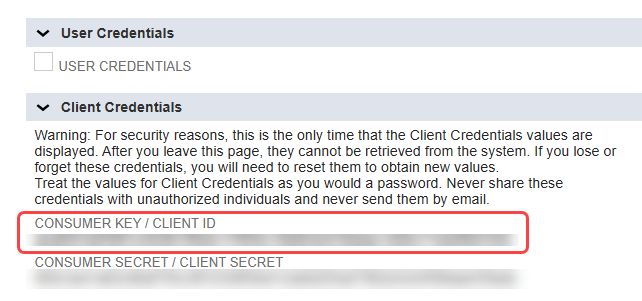
- In the Authentication > Client Credentials section, the CONSUMER KEY and CONSUMER SECRET are displayed. Record these values for use in the OAuthClientId and OAuthClientSecret connection properties.

- Note: The consumer key and client secret only display once, immediately after creating the integration. If you return to this page, these values are no longer displayed.
- To create a new token role, in the NetSuite Navigation Menu, hover your mouse over Setup > User/Roles > Manage Roles, then click New.
OR
To modify an existing token role, in the NetSuite Navigation Menu, hover your mouse over Setup > User/Roles, then click Manage Roles. This opens the Manage Roles page.
On the Manage Roles page, on the row whose "NAME" column contains the role you want to edit, click Customize in the "EDIT" column.
Both options open the Role page. - In the Permissions section, click the Setup () dropdown menu.
- Within the Setup () menu, click the dropdown menu above the Add button.
- Click the dropdown menu above the "Add" button, select the User Access Tokens permission, set its Level to Full, and click Add. Repeat this for the Access Token Management permission (set the Level to Full for this as well).
- To add the new token role to a user, in the NetSuite Navigation Menu, hover your mouse over Lists > Employees, then click Employees. This opens the Employees page.
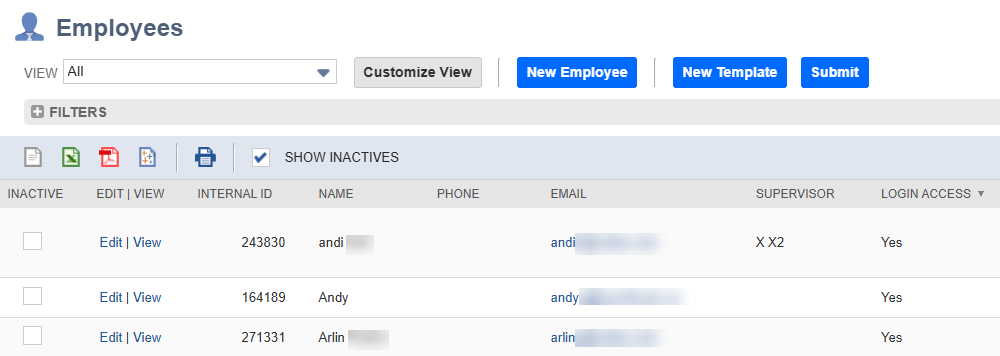
- On the Employees page, in the EDIT | VIEW column, in the row representing the user you want to add the role to, click Edit. This opens the Employee page.
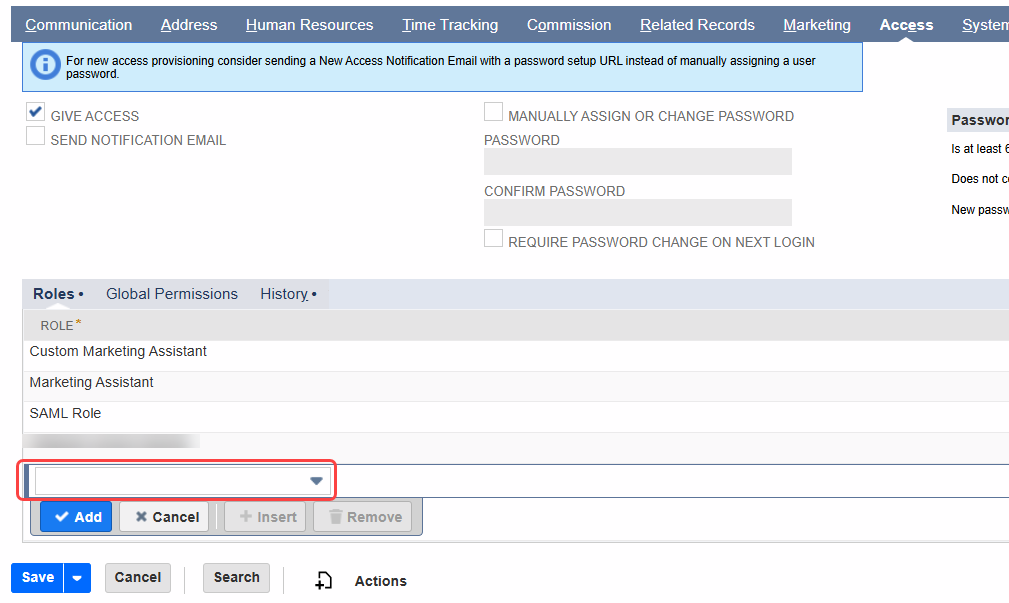
- On the Employee page, in the bar of tabs, click the Access tab. In the dropdown above the "Add" button, select your new (or newly edited) role, then click Add.
- To create a new access token, in the NetSuite Navigation Menu, hover your mouse over Setup > User/Roles, then click Access Tokens. This opens the Access Tokens page.
- On the Access Tokens page, click the blue New Access Token button. This opens the Access Token page.
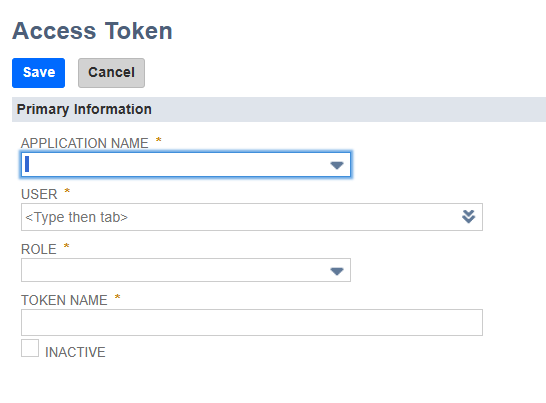
- On the Access Token page:
- Set APPLICATION NAME to the integration that was created earlier.
- Set USER to the user you created or edited earlier.
- Set ROLE to the same role that was created or updated in the previous steps.
- Set TOKEN NAME to a name of your choice.
- Click the blue Save button to create the token. A read-only version of the current page is loaded.
- On the new read-only page, in the Token Id / secret section, note values of the TOKEN ID and TOKEN SECRET for use in the OAuthAccessToken and OAuthAccessTokenSecret connection properties.
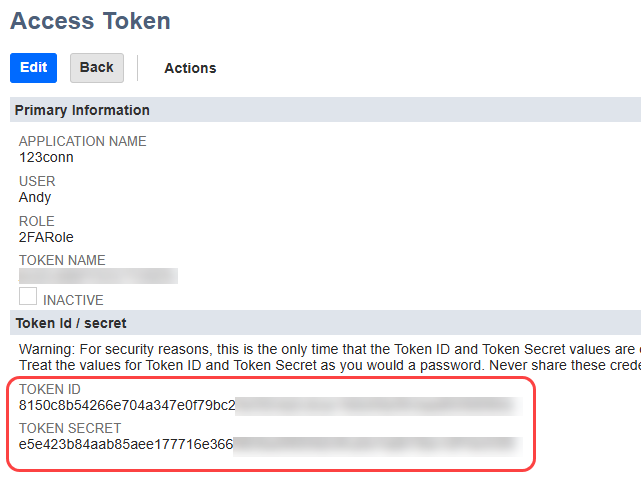
- Note: The token ID and token secret only display once, immediately after creating the token. If you return to this page, these values are no longer displayed.
After the access token is created, it can be used to connect using the values obtained from the previous steps. Before you connect, specify at least the following connection properties:
- AuthScheme = Token
- AccountId = the account to connect to.
- OAuthClientId = the Consumer Key displayed when the application was created.
- OAuthClientSecret = the Consumer Secret displayed when the application was created.
- OAuthAccessToken = the Token Id when the access token was created.
- OAuthAccessTokenSecret = the Token Secret when the access token was created.
OAuth 2.0
NetSuite SuiteQL supports OAuth 2.0 authentication.The following subsections describe how to authenticate to NetSuite from three common authentication flows:
- Desktop: a connection to a server on the user's local machine, frequently used for testing and prototyping. Authenticated via either embedded OAuth or custom OAuth.
- Web: access to data via a shared website. Authenticated via custom OAuth only.
- Headless Server: a dedicated computer that provides services to other computers and their users, which is configured to operate without a monitor and keyboard. Authenticated via embedded OAuth or custom OAuth.
For information about how to create a custom OAuth application, and why you might want to create one even for auth flows that have embedded OAuth credentials, see Creating a Custom OAuth Application.
For a complete list of connection string properties available in NetSuite, see Connection.
Desktop Applications
CData provides an embedded OAuth application that simplifies authentication at the desktop. You can also authenticate from the desktop via a custom OAuth application, which you configure and register at the NetSuite console. For further information, see Creating a Custom OAuth Application.Before you connect, set the following variables:
- AuthScheme = OAuth
- AccountId = the account to connect to.
- InitiateOAuth = GETANDREFRESH. Used to automatically get and refresh the OAuthAccessToken.
- Custom OAuth applications only:
- OAuthClientId = the client Id assigned when you registered your custom OAuth application.
- OAuthClientSecret = the client secret assigned when you registered your custom OAuth application.
- CallbackURL = the redirect URI defined when you registered your custom OAuth application.
When you connect, the driver opens NetSuite's OAuth endpoint in your default browser. Log in and grant permissions to the application.
When the access token expires, the driver refreshes it automatically.
Automatic refresh of the OAuth access token:
To have the driver automatically refresh the OAuth access token, do the following:
- The first time you connect to data, set the following connection parameters:
- AuthScheme = OAuth
- AccountId = the account to connect to.
- InitiateOAuth = REFRESH.
- OAuthClientId = the client Id in your application settings.
- OAuthClientSecret = the client secret in your application settings.
- OAuthAccessToken = the access token returned by GetOAuthAccessToken.
- OAuthSettingsLocation = the path where you want the driver to save the OAuth values, which persist across connections.
- On subsequent data connections, set the following:
Manual refresh of the OAuth access token:
The only value needed to manually refresh the OAuth access token is the OAuth refresh token.
- To manually refresh the OAuthAccessToken after the ExpiresIn period (returned by GetOAuthAccessToken) has elapsed, call the RefreshOAuthAccessToken stored procedure.
- Set the following connection properties:
- AuthScheme = OAuth
- AccountId = the account to connect to.
- OAuthClientId = the Client Id in your application settings.
- OAuthClientSecret = the Client Secret in your application settings.
- Call RefreshOAuthAccessToken with OAuthRefreshToken set to the OAuth refresh token returned by GetOAuthAccessToken.
- After the new tokens have been retrieved, set the OAuthAccessToken property to the value returned by RefreshOAuthAccessToken. This opens a new connection.
Store the OAuth refresh token so that you can use it to manually refresh the OAuth access token after it has expired.
Headless Machines
If you need to log in to a resource that resides on a headless machine, you must authenticate on another device that has an internet browser. You can do this in either of the following ways:
- Option 1: Obtain the OAuthVerifier value.
- Option 2: Install the driver on a machine with an internet browser and transfer the OAuth authentication values after you authenticate through the usual browser-based flow.
After you execute either Option 1 or Option 2, configure the driver to automatically refresh the access token on the headless machine.
Option 1: Obtaining and Exchanging a Verifier Code
To obtain a verifier code, you must authenticate at the OAuth authorization URL. Do the following:
-
Authenticate from the machine with an internet browser, and obtain the OAuthVerifier connection property.
If you are using the embedded OAuth application, call the GetOAuthAuthorizationURL stored procedure. Open the URL returned by the stored procedure in a browser.
If you are using a custom OAuth application, set the following properties:
- AuthScheme = OAuth
- InitiateOAuth = OFF.
- OAuthClientId = the client Id assigned when you registered your application.
- OAuthClientSecret = the client secret assigned when you registered your application.
-
Call the GetOAuthAuthorizationURL stored procedure. The stored procedure returns the CallbackURL established when the custom OAuth application was registered. (See Creating a Custom OAuth Application.)
Copy this URL and paste it into a new browser tab.
-
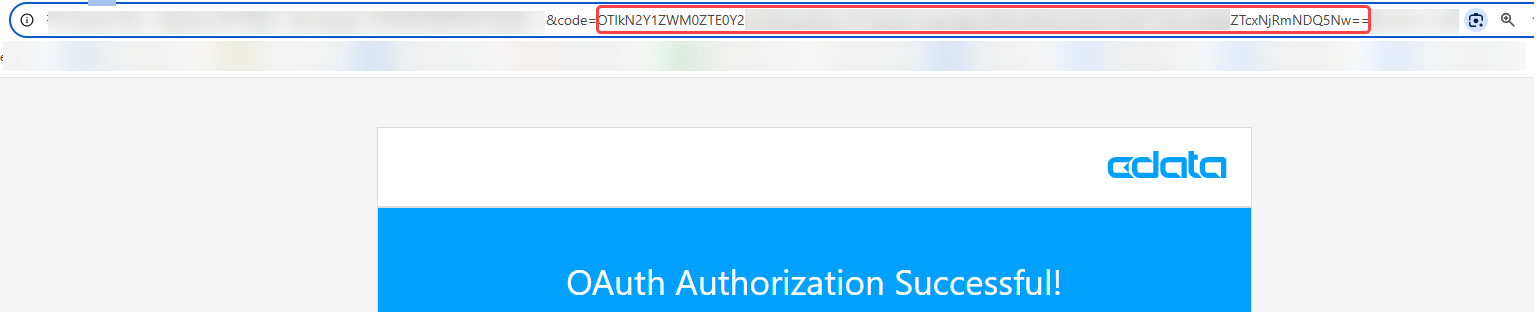
Log in and grant permissions to the driver. The OAuth application redirects you to the redirect URI, with a parameter called code appended. Note the value of this parameter; you will need it later, to configure the OAuthVerifier connection property.
-
Exchange the OAuth verifier code for OAuth refresh and access tokens. On the headless machine, set the following connection properties to obtain the OAuth authentication values:
- AuthScheme = OAuth
- AccountId = the account to connect to.
- InitiateOAuth = REFRESH.
- OAuthVerifier = the noted verifier code (the value of the code parameter in the redirect URI).
- OAuthSettingsLocation = persist the encrypted OAuth authentication values to the specified file.
- Custom OAuth applications only:
- OAuthClientId = the client Id in your custom OAuth application settings.
- OAuthClientSecret = the client secret in the custom OAuth application settings.
-
Test the connection to generate the OAuth settings file.
-
After you re-set the following properties, you are ready to connect:
- AuthScheme = OAuth
- AccountId = the account to connect to.
- InitiateOAuth = REFRESH.
- OAuthSettingsLocation = the file containing the encrypted OAuth authentication values. To enable the automatic refreshing of the access token, be sure that this file gives read and write permissions to the driver.
- Custom OAuth applications only:
- OAuthClientId = the client Id assigned when you registered your application.
- OAuthClientSecret = the client secret assigned when you registered your application.
Option 2: Transferring OAuth Settings
Prior to connecting on a headless machine, you must install and create a connection with the driver on a device that supports an internet browser. Set the connection properties as described above in "Desktop Applications".
After completing the instructions in "Desktop Applications", the resulting authentication values are encrypted and written to the path specified by OAuthSettingsLocation. The default filename is OAuthSettings.txt.
Test the connection to generate the OAuth settings file, then copy the OAuth settings file to your headless machine.
To connect to data via the headless machine, set the following connection properties:
- AuthScheme = OAuth
- AccountId = the account to connect to.
- InitiateOAuth = REFRESH
- OAuthSettingsLocation = the path to the OAuth settings file you copied from the machine with the browser. To enable automatic refreshing of the access token, ensure that this file gives read and write permissions to the driver.
- Custom OAuth applications only:
- OAuthClientId = the client Id assigned when you registered your custom OAuth application.
- OAuthClientSecret = the client secret assigned when you registered your custom OAuth application.
OAuthJWT
The driver supports the OAuth 2.0 client credentials flow, which uses a JWT containing client credentials to request access to NetSuite data.
This authentication method enables the driver to be used without user interaction (machine-to-machine).
Note: The OAuthJWT authentication method is only available when the Schema connection property is set to SuiteQL.
Generating a Certificate
The NetSuite OAuth 2.0 client credentials flow requires that the JWT is signed with a certificate in the x.509 format.
You can create a valid certificate using OpenSSL. Here is a sample certificate generation console command with ES256 encryption:
openssl req -new -x509 -newkey ec -pkeyopt ec_paramgen_curve:prime256v1 -nodes -days 365 -out public.pem -keyout private.pem
This creates a public and private key file on your machine. Save these keys for later use.
See NetSuite's documentation for more details about supported certificate types.
Creating an Integration Record
Before you can create a client credentials mapping, which is required for this authentication method, you must create an application called an integration record.
To create an integration record:
- In the NetSuite Navigation Menu, hover your mouse over Setup > Integration > Manage Integrations and click New. This opens the Integration page.
- In the NAME field, provide a name for your integration record.
- Set the STATE field to Enabled.
- Under Authentication > Token-based Authentication, disable TOKEN-BASED AUTHENTICATION and TBA: AUTHORIZATION FLOW.
- Under Authentication > OAuth 2.0, enable CLIENT CREDENTIALS (MACHINE TO MACHINE) GRANT and disable AUTHORIZATION CODE GRANT.
- Scroll down and click the blue Save button. A read-only version of the page is then loaded.
- Scroll down to Authentication > Client Credentials. Record the value of the CONSUMER KEY for use in the OAuthJWTIssuer connection property.
- Note: The consumer key is only displayed once, immediately after creating the integration. If you return to this page, this value is no longer displayed.
Creating a Client Credentials Mapping
After creating an integration record, you must create an association between an entity, an integration record, and your certificate.
To do this:
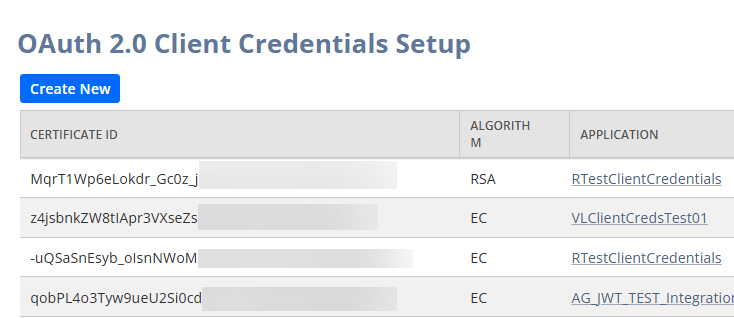
- In the NetSuite Navigation Menu, hover your mouse over Setup > Integration and click OAuth 2.0 Client Credentials (M2M) Setup. This opens the OAuth 2.0 Client Credentials Setup page.
- Click the blue Create New button. This opens the Create a New Client Credentials Mapping window.
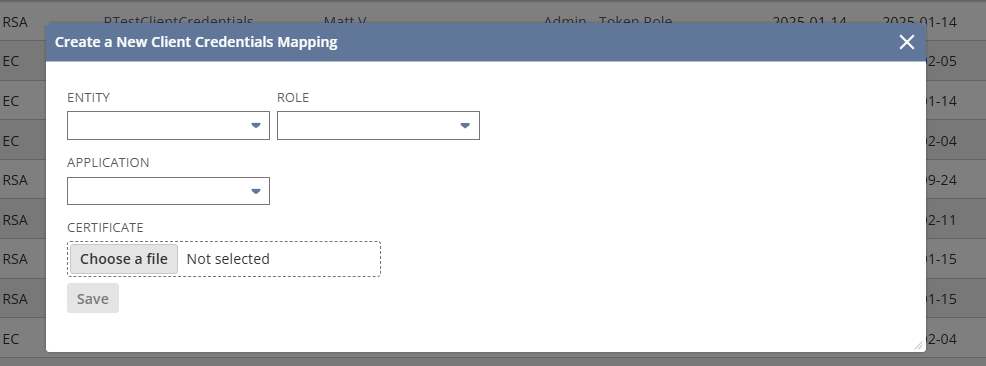
- Configure the fields in this window as follows:
- In the ENTITY field, choose an entity you would like to associate with your certificate.
- In the ROLE field, choose the role you would like to assign the entity.
- In the APPLICATION field, select the application with the name you gave your integration record.
- Under CERTIFICATE, click Choose a file. Select the public key file you generated earlier.
- Click the blue Save button.
Configuring Connection Properties
You now have everything you need to configure the driver to use this authentication method.
Set the following connection properties:
- Schema: This authentication method is only available when this connection property is set to SuiteQL.
- AuthScheme: Set this to OAuthJWT.
- JWTScope: This is the scope of the JWT, which specifies the level of access it grants to NetSuite data. Set this to "restlets", "rest_webservices", "suite_analytics", or all of them, separated by a comma
- OAuthJWTHeaders: Set to "kid=XXXXX", where XXXXX is obtained as follows: In the NetSuite Navigation Menu, hover your mouse over Setup > Integration and click OAuth 2.0 Client Credentials (M2M) Setup. This takes you to the OAuth 2.0 Client Credentials Setup page. Use the value in the CERTIFICATE ID column, in the row where the value of the APPLICATION column matches the name of the integration record created earlier, as the value of this connection property.
- OAuthJWTCert: The filepath on your machine to the private key you generated earlier.
- OAuthJWTCertType: Select PEMKEY_FILE.
- OAuthJWTEncryption: Set this to the encryption method you used when generating your certificate.
- OAuthJWTIssuer: The consumer key value you recorded when creating the integration record.
Concurrent Requests
NetSuite allows only a certain number of concurrent requests per account, which is configurable per integration connection. (The default is usually 5.) If another request is made when the maximum number of concurrent requests is already in use, the user may receive an "Only one request may be made against a session at a time" error.The CData ODBC Driver for NetSuite attempts to account for this situation by staggering additional requests so as not to exceed the concurrent request limit. However, if an account is being connected to from multiple machines or applications, it is not always possible to do this correctly.
Asynchronous Services
Slow NetSuite response times extend to INSERTs, updates, and deletes as well. This can be especially noticeable when using batch processing. When inserting, updating, or deleting multiple records at a time, it may be worthwhile to set UseAsyncServices to true. This will cause the request to be processed asynchronously on NetSuite's end and a JobId will be returned in the Info#TEMP table. The JobId can be checked against the stored procedures CheckJobStatus and GetJobResults for information about when the job is completed, if any errors occurred, and for the InternalIds for newly created entities.