Lookup Connector [Deprecated]
Version 23.4.8839
Version 23.4.8839
Lookup Connector [Deprecated]
The Lookup Connector supports fetching a value from a data source and inserting it into an existing file.
Overview
A Lookup connector connects to a data source using the connection configuration of another connector in the CData Arc flow. When an input file is processed by the connector, the connector issues a custom query over the configured connection and stores the results in the processed file. These response values are inserted into the input file either as header values or as XML elements at a configured XPath.
Lookup connectors utilize caching to improve performance when repeatedly looking up values from a data source.
Connector Configuration
This section contains all of the configurable connector properties.
Settings Tab
Connector Configuration
Settings related to the core operation of the connector.
- Data Source The connector that will be used to establish a connection to the data source. The Lookup connector will use this connector’s configuration to determine what data source to connect to, how to connect to it, and what credentials to use during the connection.
Lookup Settings
Settings related to the lookup query and how to interpret the response.
- Connector Id The static, unique identifier for the connector.
- Connector Type Displays the connector name and a description of what it does.
- Connector Description An optional field to provide a free-form description of the connector and its role in the flow.
- Destination Type Whether the query response should be inserted into the processed file as a header value or an XML element at a specified XPath.
- Destination If Destination Type is set to XPath, this value is the XPath at which the lookup response value will be inserted into the input XML document. If Destination Type is set to Header, this value is the name of the header whose value will be set to the response value.
- Lookup Query The query to execute against the data source. This query should fetch a value to be inserted into the input file. Values from the input file can be referenced in this query using the following syntax:
${XPATH:/path/to/element}
OR
${HEADER:HeaderName} - Use first result When multiple results are returned from the Lookup Query, the Lookup connector can either throw an error or use the first result. Enable this field to use the first result instead of throwing an error.
Cache
Settings related to the cache maintained by the connector.
- Enable Cache Whether the connector should maintain a cache to reduce the number of queries performed against the data source.
- Cache Tolerance The duration that the cache will be used before the cache is refreshed against the data source. The unit of time for this field is governed by Cache Tolerance Unit.
- Cache Tolerance Unit The unit of time for the Cache Tolerance field.
- Reset Cache Automatically refreshes the cache by querying the data source.
Automation
Settings related to the automatic processing of files by the connector.
- Send Whether messages arriving at the connector will automatically be processed.
Performance
Settings related to the allocation of resources to the connector.
- Max Workers The maximum number of worker threads consumed from the threadpool to process files on this connector. If set, this overrides the default setting on the Settings > Automation page.
- Max Files The maximum number of files sent by each thread assigned to the connector. If set, this overrides the default setting on the Settings > Automation page.
Alerts Tab
Settings related to configuring alerts and Service Level Agreements (SLAs).
Connector Email Settings
Before you can execute SLAs, you need to set up email alerts for notifications. Clicking Configure Alerts opens a new browser window to the Settings page where you can set up system-wide alerts. See Alerts for more information.
Service Level Agreement (SLA) Settings
SLAs enable you to configure the volume you expect connectors in your flow to send or receive, and to set the time frame in which you expect that volume to be met. CData Arc sends emails to warn the user when an SLA is not met, and marks the SLA as At Risk, which means that if the SLA is not met soon, it will be marked as Violated. This gives the user an opportunity to step in and determine the reasons the SLA is not being met, and to take appropriate actions. If the SLA is still not met at the end of the at-risk time period, the SLA is marked as violated, and the user is notified again.
To define an SLA, click Add Expected Volume Criteria.
- If your connector has separate send and receive actions, use the radio buttons to specify which direction the SLA pertains to.
- Set Expect at least to the minimum number of transactions (the volume) you expect to be processed, then use the Every fields to specify the time frame.
- By default, the SLA is in effect every day. To change that, uncheck Everyday then check the boxes for the days of the week you want.
- Use And set status to ‘At Risk’ to indicate when the SLA should be marked as at risk.
- By default, notifications are not sent until an SLA is in violation. To change that, check Send an ‘At Risk’ notification.
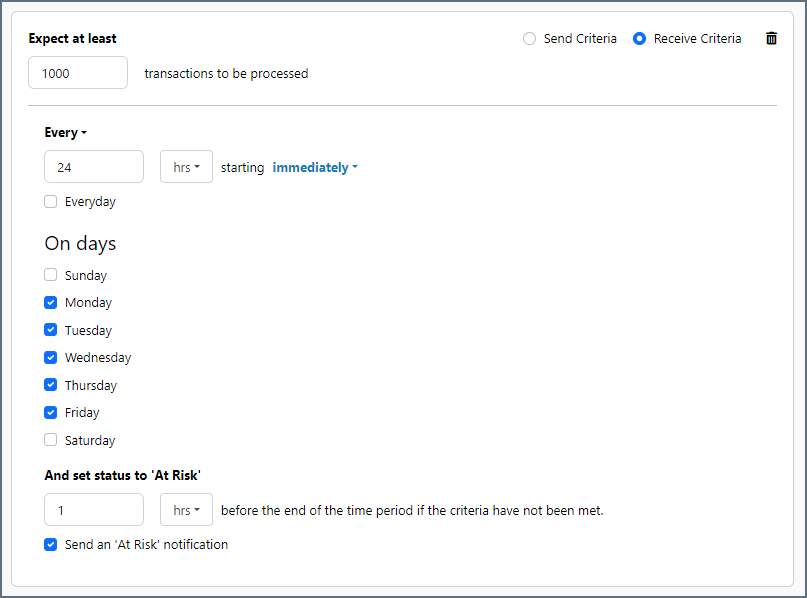
The following example shows an SLA configured for a connector that expects to receive 1000 files every day Monday-Friday. An at-risk notification is sent 1 hour before the end of the time period if the 1000 files have not been received.
Advanced Tab
Other Settings
Settings not included in the previous categories.
- Local File Scheme A scheme for assigning filenames to messages that are output by the connector. You can use macros in your filenames dynamically to include information such as identifiers and timestamps. For more information, see Macros.
- Log Subfolder Scheme Instructs the connector to group files in the Logs folder according to the selected interval. For example, the Weekly option instructs the connector to create a new subfolder each week and store all logs for the week in that folder. The blank setting tells the connector to save all logs directly in the Logs folder. For connectors that process many transactions, using subfolders helps keep logs organized and improves performance.
- Log Messages Whether the log entry for a processed file includes a copy of the file itself.
- Save to Sent Folder Whether files processed by the connector should be copied to the Sent folder for the connector.
Miscellaneous
Miscellaneous settings are for specific use cases.
- Other Settings Enables you to configure hidden connector settings in a semicolon-separated list (for example,
setting1=value1;setting2=value2). Normal connector use cases and functionality should not require the use of these settings.
Example
Use Case
Imagine an invoice for a particular customer needs to be entered into QuickBooks. QuickBooks requires that an internal CustomerID field is included in order to insert the invoice, but only the customer name is known. A Lookup connector can be used to query QuickBooks for the CustomerID for a particular customer name and insert this into the invoice data. The invoice-plus-CustomerID can then be passed along to a QuickBooks connector for insertion.
Input File
A QuickBooks connector expects invoice data to be formatted as XML, so in this case it is likely that the invoice file being processed by the Lookup connector has already been converted into XML. The structure of this XML should be ‘flattened’ so that each value that should be inserted into QuickBooks is a child of a single insert element, like this:
<Items>
  <Invoices>
    <InvoiceNumber>123</InvoiceNumber>
    <Date>01012019</Date>
    <Amount>921.22</Amount>
    <Customer>Marshall Rosenberg</Customer>
  </Invoices>
</Items>
Configuration
A QuickBooks connector must already be configured to connect to QuickBooks with the appropriate credentials, and this connector should be set as the Data Source for the Lookup connector.
The Destination Type should be set to ‘XPath’ since the input file is XML and the lookup response data should be inserted into this XML.
The Destination field should be set to the XPath where the lookup value (CustomerID) will be appropriately included in the QuickBooks insert. For this example, assume that the current customer name in the Customer element should be replaced by the CustomerID. In this case, Destination should set to: /Items/Invoices/Customer
The Lookup Query should be set to return the CustomerID for a given customer name, for example: SELECT CustomerID FROM Customers WHERE CustomerName = ${XPATH:/Items/Invoices/Customer}
Result
With the above configuration, the Lookup connector will process the example input file and query QuickBooks for the CustomerID of ‘Marshall Rosenberg’. The ID returned by this query will replace ‘Marshall Rosenberg’ in the Customer element of the XML, then the resulting XML will be pushed to the Output tab of the connector.
Caching
By default, the Lookup Connector will maintain a local cache to improve performance when making repeated queries to the same data source. The behavior of this cache, including whether it is enabled, the duration of time before the cache is synchronized against the data source, etc, is controlled by the fields in the Cache section of the Settings tab.
When caching is enabled, lookup queries will be made against the local cache rather than the external data source. The exception to this is when the connector processes a complex query with syntax not supported by the local cache. In that case, the query will always be passed through to the remote data source. In these cases, it is recommended to disable caching altogether to avoid warnings in the connector (the connector will still process the query successfully even if the cache is enabled).
Macros
Using macros in file naming strategies can enhance organizational efficiency and contextual understanding of data. By incorporating macros into filenames, you can dynamically include relevant information such as identifiers, timestamps, and header information, providing valuable context to each file. This helps ensure that filenames reflect details important to your organization.
CData Arc supports these macros, which all use the following syntax: %Macro%.
| Macro | Description |
|---|---|
| ConnectorID | Evaluates to the ConnectorID of the connector. |
| Ext | Evaluates to the file extension of the file currently being processed by the connector. |
| Filename | Evaluates to the filename (extension included) of the file currently being processed by the connector. |
| FilenameNoExt | Evaluates to the filename (without the extension) of the file currently being processed by the connector. |
| MessageId | Evaluates to the MessageId of the message being output by the connector. |
| RegexFilename:pattern | Applies a RegEx pattern to the filename of the file currently being processed by the connector. |
| Header:headername | Evaluates to the value of a targeted header (headername) on the current message being processed by the connector. |
| LongDate | Evaluates to the current datetime of the system in long-handed format (for example, Wednesday, January 24, 2024). |
| ShortDate | Evaluates to the current datetime of the system in a yyyy-MM-dd format (for example, 2024-01-24). |
| DateFormat:format | Evaluates to the current datetime of the system in the specified format (format). See Sample Date Formats for the available datetime formats |
| Vault:vaultitem | Evaluates to the value of the specified vault item. |
Examples
Some macros, such as %Ext% and %ShortDate%, do not require an argument, but others do. All macros that take an argument use the following syntax: %Macro:argument%
Here are some examples of the macros that take an argument:
- %Header:headername%: Where
headernameis the name of a header on a message. - %Header:mycustomheader% resolves to the value of the
mycustomheaderheader set on the input message. - %Header:ponum% resolves to the value of the
ponumheader set on the input message. - %RegexFilename:pattern%: Where
patternis a regex pattern. For example,%RegexFilename:^([\w][A-Za-z]+)%matches and resolves to the first word in the filename and is case insensitive (test_file.xmlresolves totest). - %Vault:vaultitem%: Where
vaultitemis the name of an item in the vault. For example,%Vault:companyname%resolves to the value of thecompanynameitem stored in the vault. - %DateFormat:format%: Where
formatis an accepted date format (see Sample Date Formats for details). For example,%DateFormat:yyyy-MM-dd-HH-mm-ss-fff%resolves to the date and timestamp on the file.
You can also create more sophisticated macros, as shown in the following examples:
- Combining multiple macros in one filename:
%DateFormat:yyyy-MM-dd-HH-mm-ss-fff%%EXT% - Including text outside of the macro:
MyFile_%DateFormat:yyyy-MM-dd-HH-mm-ss-fff% - Including text within the macro:
%DateFormat:'DateProcessed-'yyyy-MM-dd_'TimeProcessed-'HH-mm-ss%