XSLT Connector
Version 23.4.8841
Version 23.4.8841
XSLT Connector
The XSLT connector provides support for Extensible Stylesheet Transformation (XSLT 1.0) transforms.
Overview
After an XSLT file has been uploaded to the connector, XML files arriving at the connector are automatically converted based on the XLST definition.
Connector Configuration
This section contains all of the configurable connector properties.
Settings Tab
Connector Settings
Settings related to the core operation of the connector.
- Connector Id The static, unique identifier for the connector.
- Connector Type Displays the connector name and a description of what it does.
- Connector Description An optional field to provide a free-form description of the connector and its role in the flow.
- XSL Template File The XSLT file that defines the XML transformation to be performed by the connector.
Other Settings
Settings not included in the previous categories.
- Document Function Check this to allow use of the
document()function while processing XSLT. - Embedded Scripts Check this to allow use of embedded scripts while processing XSLT.
- Local File Scheme A scheme for assigning filenames to messages that are output by the connector. You can use macros in your filenames dynamically to include information such as identifiers and timestamps. For more information, see Macros.
- Processing Delay The amount of time (in seconds) by which the processing of files placed in the Input folder is delayed. This is a legacy setting. Best practice is to use a File connector to manage local file systems instead of this setting.
Message
Message settings determine how the connector searches for messages and manages them after processing. You can save messages to your Sent folder or you can group them based on a Sent folder scheme, as described below.
- Save to Sent Folder A toggle that instructs the connector to keep a copy of sent messages in the Sent folder.
- Sent Folder Scheme Instructs the connector to group files in the Sent folder according to the selected interval. For example, the Weekly option instructs the connector to create a new subfolder each week and store all sent files for the week in that folder. The blank setting instructs the connector to save all files directly in the Sent folder. For connectors that process many transactions, using subfolders can help keep files organized and improve performance.
Logging
- Log Level The verbosity of logs generated by the connector. When you request support, set this to Debug.
- Log Subfolder Scheme Instructs the connector to group files in the Logs folder according to the selected interval. For example, the Weekly option instructs the connector to create a new subfolder each week and store all logs for the week in that folder. The blank setting tells the connector to save all logs directly in the Logs folder. For connectors that process many transactions, using subfolders helps keep logs organized and improves performance.
- Log Messages Check this to have the log entry for a processed file include a copy of the file itself. If you disable this, you might not be able to download a copy of the file from the Input or Output tabs.
Miscellaneous
Miscellaneous settings are for specific use cases.
- Other Settings Enables you to configure hidden connector settings in a semicolon-separated list (for example,
setting1=value1;setting2=value2). Normal connector use cases and functionality should not require the use of these settings.
Automation Tab
Automation Settings
Settings related to the automatic processing of files by the connector.
- Send Whether messages arriving at the connector are automatically processed.
Performance
Settings related to the allocation of resources to the connector.
- Max Workers The maximum number of worker threads consumed from the threadpool to process files on this connector. If set, this overrides the default setting on the Settings > Automation page.
- Max Files The maximum number of files sent by each thread assigned to the connector. If set, this overrides the default setting on the Settings > Automation page.
アラートタブ
アラートとサービスレベル(SLA)の設定に関連する設定.
コネクタのE メール設定
サービスレベル(SLA)を実行する前に、通知用のE メールアラートを設定する必要があります。アラートを設定をクリックすると、新しいブラウザウィンドウで設定ページが開き、システム全体のアラートを設定することができます。詳しくは、アラートを参照してください。
サービスレベル(SLA)の設定
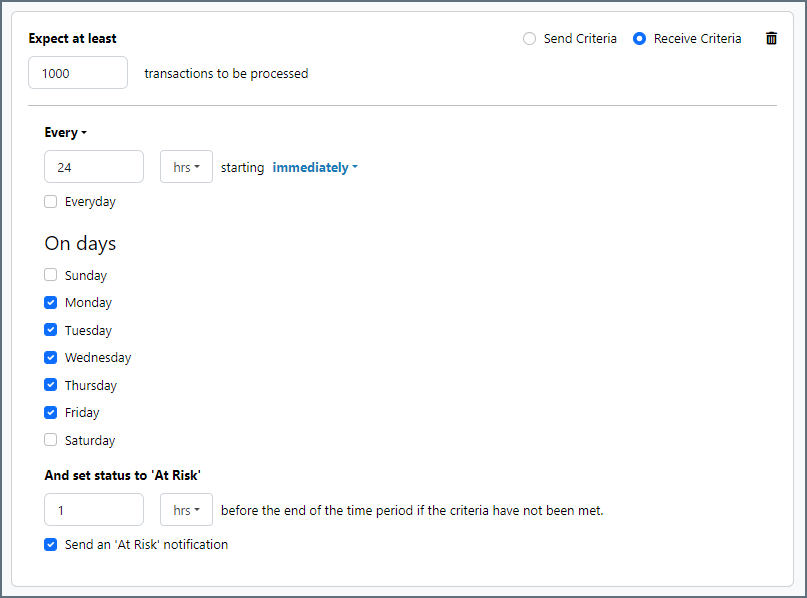
サービスレベルでは、フロー内のコネクタが送受信すると予想される処理量を設定し、その量が満たされると予想される時間枠を設定できます。CData Arc は、サービスレベルが満たされていない場合にユーザーに警告するE メールを送信し、SLA を At Risk(危険) としてマークします。これは、サービスレベルがすぐに満たされない場合に Violated(違反) としてマークされることを意味します。これにより、ユーザーはサービスレベルが満たされていない理由を特定し、適切な措置を講じることができます。At Risk の期間内にサービスレベルが満たされなかった場合、SLA はViolated としてマークされ、ユーザーに再度通知されます。
サービスレベルを定義するには、予想処理量の条件を追加をクリックします。
- コネクタに個別の送信アクションと受信アクションがある場合は、ラジオボタンを使用してSLA に関連する方向を指定します。
- 検知基準(最小)を、処理が予想されるトランザクションの最小値(量)に設定し、毎フィールドを使用して期間を指定します。
- デフォルトでは、SLA は毎日有効です。これを変更するには、毎日のチェックをOFF にし、希望する曜日のチェックをON にします。
- 期間終了前にステータスを’At Risk’ に設定するタイミングを使用して、SLA がAt Risk としてマークされるようにします。
- デフォルトでは、通知はSLA が違反のステータスになるまで送信されません。これを変更するには、‘At Risk’ 通知を送信のチェックをON にします。
次の例は、月曜日から金曜日まで毎日1000ファイルを受信すると予想されるコネクタに対して構成されたSLA を示しています。1000ファイルが受信されていない場合、期間終了の1時間前にAt Risk 通知が送信されます。
Macros
Using macros in file naming strategies can enhance organizational efficiency and contextual understanding of data. By incorporating macros into filenames, you can dynamically include relevant information such as identifiers, timestamps, and header information, providing valuable context to each file. This helps ensure that filenames reflect details important to your organization.
CData Arc supports these macros, which all use the following syntax: %Macro%.
| Macro | Description |
|---|---|
| ConnectorID | Evaluates to the ConnectorID of the connector. |
| Ext | Evaluates to the file extension of the file currently being processed by the connector. |
| Filename | Evaluates to the filename (extension included) of the file currently being processed by the connector. |
| FilenameNoExt | Evaluates to the filename (without the extension) of the file currently being processed by the connector. |
| MessageId | Evaluates to the MessageId of the message being output by the connector. |
| RegexFilename:pattern | Applies a RegEx pattern to the filename of the file currently being processed by the connector. |
| Header:headername | Evaluates to the value of a targeted header (headername) on the current message being processed by the connector. |
| LongDate | Evaluates to the current datetime of the system in long-handed format (for example, Wednesday, January 24, 2024). |
| ShortDate | Evaluates to the current datetime of the system in a yyyy-MM-dd format (for example, 2024-01-24). |
| DateFormat:format | Evaluates to the current datetime of the system in the specified format (format). See サンプル日付フォーマット for the available datetime formats |
| Vault:vaultitem | Evaluates to the value of the specified vault item. |
Examples
Some macros, such as %Ext% and %ShortDate%, do not require an argument, but others do. All macros that take an argument use the following syntax: %Macro:argument%
Here are some examples of the macros that take an argument:
- %Header:headername%: Where
headernameis the name of a header on a message. - %Header:mycustomheader% resolves to the value of the
mycustomheaderheader set on the input message. - %Header:ponum% resolves to the value of the
ponumheader set on the input message. - %RegexFilename:pattern%: Where
patternis a regex pattern. For example,%RegexFilename:^([\w][A-Za-z]+)%matches and resolves to the first word in the filename and is case insensitive (test_file.xmlresolves totest). - %Vault:vaultitem%: Where
vaultitemis the name of an item in the vault. For example,%Vault:companyname%resolves to the value of thecompanynameitem stored in the vault. - %DateFormat:format%: Where
formatis an accepted date format (see サンプル日付フォーマット for details). For example,%DateFormat:yyyy-MM-dd-HH-mm-ss-fff%resolves to the date and timestamp on the file.
You can also create more sophisticated macros, as shown in the following examples:
- Combining multiple macros in one filename:
%DateFormat:yyyy-MM-dd-HH-mm-ss-fff%%EXT% - Including text outside of the macro:
MyFile_%DateFormat:yyyy-MM-dd-HH-mm-ss-fff% - Including text within the macro:
%DateFormat:'DateProcessed-'yyyy-MM-dd_'TimeProcessed-'HH-mm-ss%
XSLT Operations
In addition to the Operations provided with Arc, connectors can provide operations that extend functionality into ArcScript.
These connector operations can be called just like any other ArcScript operation, except for two details:
- They must be called through the
connector.rscendpoint. - They must include an auth token.
For example, calling a connector operation using both of these rules might look something like this:
<arc:set attr="in.myInput" value="myvalue" />
<arc:call op="connector.rsc/opName" authtoken="admin:1j9P8v8b9K0x6g5R5t7k" in="in" out="out">
  <!-- handle output from the op here -->
</arc:call>
The operation specific to the functionality of the XSLT connector is described below.
xsltTranslate
Translates an input XML file according to a configured XSLT connector or a specified XSLT file.
Required Parameters
- ConnectorId: The name of the configured XSLT connector to use for translation
OR - TemplateFile: The path to the XSL template to use for translation
OR -
Data: The contents of the XSL template to use for translation
- File: The input file to translate
Optional Parameters
- OutputEncoding: By default, the operation outputs ASCII data. To output base64-encoded binary data instead, set this parameter to
base64. - OutputFile: When this is set, output data is not written to the Data output attribute and is instead written to the specified file.
Output Attributes
- Data: The output from the translation is passed through this parameter.