Webhook Connector
Version 23.4.8841
Version 23.4.8841
Webhook Connector
Webhook connectors support exposing a public API endpoint.
Overview
Webhook connectors enable data to enter the CData Arc flow via HTTP POSTs and PUTs. Each Webhook connector exposes an endpoint in the application where external clients can send XML and JSON payloads. These payloads are written to an output file and passed along to the next connectors in the flow.
You can specify a sample request in the Webhook connector to simplify the process of transforming data that is POSTed to the endpoint. When an XML sample is specified, and the Webhook connector is connected to an XML Map connector in the flow, the XML Map connector automatically detects the expected structure of XML files posted to the endpoint. You can then use the XML Map connector Expression Editor to map this structure into a target XML structure.
Connector Configuration
This section contains all of the configurable connector properties.
Settings Tab
Connector Details
Settings related to the core operation of the connector.
- Connector Id The static, unique identifier for the connector.
- Connector Type Displays the connector name and a description of what it does.
- Connector Description An optional field to provide a free-form description of the connector and its role in the flow.
- Webhook Endpoint The generated URL (based on the connector name) where the endpoint is exposed.
Sample Request
An XML or JSON template representing the expected structure of incoming data. See the Sample Requests section for details.
Local File Scheme
A scheme for assigning filenames to messages that are output by the connector. You can use macros in your filenames dynamically to include information such as identifiers and timestamps. For more information, see Macros.
アラートタブ
アラートとサービスレベル(SLA)の設定に関連する設定.
コネクタのE メール設定
サービスレベル(SLA)を実行する前に、通知用のE メールアラートを設定する必要があります。アラートを設定をクリックすると、新しいブラウザウィンドウで設定ページが開き、システム全体のアラートを設定することができます。詳しくは、アラートを参照してください。
サービスレベル(SLA)の設定
サービスレベルでは、フロー内のコネクタが送受信すると予想される処理量を設定し、その量が満たされると予想される時間枠を設定できます。CData Arc は、サービスレベルが満たされていない場合にユーザーに警告するE メールを送信し、SLA を At Risk(危険) としてマークします。これは、サービスレベルがすぐに満たされない場合に Violated(違反) としてマークされることを意味します。これにより、ユーザーはサービスレベルが満たされていない理由を特定し、適切な措置を講じることができます。At Risk の期間内にサービスレベルが満たされなかった場合、SLA はViolated としてマークされ、ユーザーに再度通知されます。
サービスレベルを定義するには、予想処理量の条件を追加をクリックします。
- コネクタに個別の送信アクションと受信アクションがある場合は、ラジオボタンを使用してSLA に関連する方向を指定します。
- 検知基準(最小)を、処理が予想されるトランザクションの最小値(量)に設定し、毎フィールドを使用して期間を指定します。
- デフォルトでは、SLA は毎日有効です。これを変更するには、毎日のチェックをOFF にし、希望する曜日のチェックをON にします。
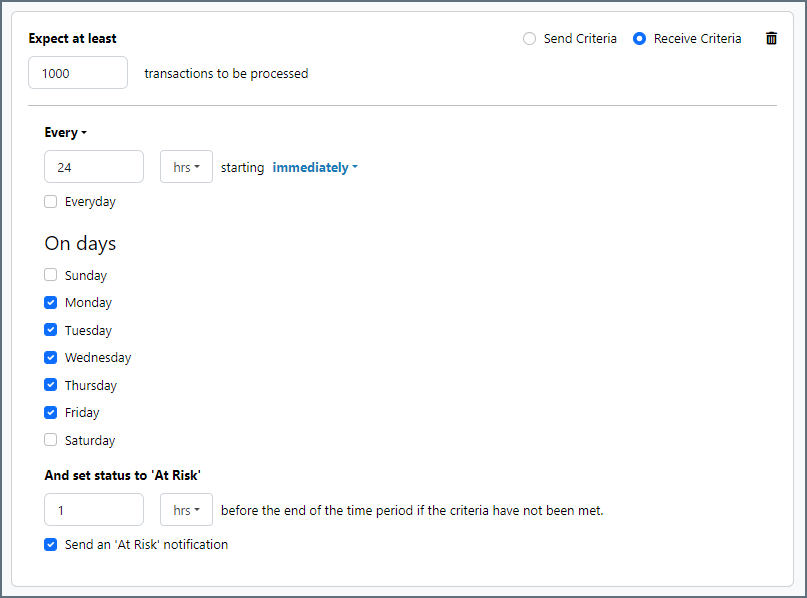
- 期間終了前にステータスを’At Risk’ に設定するタイミングを使用して、SLA がAt Risk としてマークされるようにします。
- デフォルトでは、通知はSLA が違反のステータスになるまで送信されません。これを変更するには、‘At Risk’ 通知を送信のチェックをON にします。
次の例は、月曜日から金曜日まで毎日1000ファイルを受信すると予想されるコネクタに対して構成されたSLA を示しています。1000ファイルが受信されていない場合、期間終了の1時間前にAt Risk 通知が送信されます。
Users Tab
The Users tab lets you:
- create users with their associated auth tokens
- define POST and/or PUT privileges
- specify how many requests each user can make per hour
- specify how many concurrent requests are permitted
You can add, edit, and delete users on this tab.
Note: The request settings here override settings in the Default Rate Limits section of the Server tab.
Server Tab
Trusted IP Addresses
Settings defining which IP addresses are trusted.
- Add Opens a modal to enter a new IP address range.
- Edit Opens a modal to modify the selected IP address range.
- Delete Deletes the selected IP address range from the list.
The following restrictions apply:
localhostcannot be modified or removed from the list.- Any IP addresses outside of the defined ranges are rejected.
- Ranges are supported. For example, the entry
100.10.100.1-15indicates that IP addresses between100.10.100.1and100.10.100.15are allowed. - Classless inter-domain routing (CIDR) notation is supported. For example, the entry
100.10.100.0/24indicates that IP addresses between100.10.100.0and100.10.100.255are allowed. - Wildcard patterns are supported. For example, the entry
100.10.100.*indicates that IP addresses beginning with100.10.100are allowed.
Default Rate Limits (Per User)
Settings restricting the number of requests allowed, if no values have been provided on the Users tab.
- Max Requests Per Hour The limit to the number of requests a single user can issue in an hour.
- Max Concurrent Requests The limit to the number of concurrent requests a user can issue.
Cross-Origin Resource Sharing (CORS)
Settings governing the use of CORS to serve cross-origin resources.
- クロスオリジンリソース共有(CORS)を有効化する Whether or not CORS is enabled. The rest of these options are only available when you check this box.
- Allow all domains without ‘*‘ If enabled, domain origins are not restricted to a specific list.
- Access-Control-Allow-Origin The comma-delimited list of domain origins to allow. Included as an HTTP response header.
- Access-Control-Allow-Credentials Whether or not user credentials such as cookies are allowed in cross-origin requests. Included as an HTTP response header.
- Access-Control-Allow-Methods The comma-delimited list of methods to allow. Included as an HTTP response header.
- Access-Control-Allow-Headers The comma-delimited list of headers to allow. Included as an HTTP response header.
- Access-Control-Max-Age The maximum duration (in seconds) that Access-Control response header values can be cached.
Advanced Settings
- Authtoken in URL Check this to allow the connector to pass the auth token in query string parameters for authentication. See Using Auth Tokens as Query String Parameters for more information.
Message
Message settings determine how the connector searches for messages and manages them after processing. You can save messages to your Sent folder or you can group them based on a Sent folder scheme, as described below.
- Save to Sent Folder A toggle that instructs the connector to keep a copy of sent messages in the Sent folder.
- Sent Folder Scheme Instructs the connector to group files in the Sent folder according to the selected interval. For example, the Weekly option instructs the connector to create a new subfolder each week and store all sent files for the week in that folder. The blank setting instructs the connector to save all files directly in the Sent folder. For connectors that process many transactions, using subfolders can help keep files organized and improve performance.
Logging
- Log Level The verbosity of logs generated by the connector. When you request support, set this to Debug.
- Log Subfolder Scheme Instructs the connector to group files in the Logs folder according to the selected interval. For example, the Weekly option instructs the connector to create a new subfolder each week and store all logs for the week in that folder. The blank setting tells the connector to save all logs directly in the Logs folder. For connectors that process many transactions, using subfolders helps keep logs organized and improves performance.
- Log Messages Check this to have the log entry for a processed file include a copy of the file itself. If you disable this, you might not be able to download a copy of the file from the Input or Output tabs.
Miscellaneous
Miscellaneous settings are for specific use cases.
- Other Settings Enables you to configure hidden connector settings in a semicolon-separated list (for example,
setting1=value1;setting2=value2). Normal connector use cases and functionality should not require the use of these settings.
Authentication
Users access Webhook resources by providing auth tokens with requests. Manage users and auth tokens on the Users tab.
Before users can call the Webhook endpoint, you also need to set trusted IP addresses for connections. Set these in the Trusted IP Addresses section of the Server tab. By default, all IP addresses are restricted.
Using Auth Tokens in Basic Authentication
Enter the user’s auth token as the password when using Basic Authentication.
Using Auth tokens in the HTTP Header
Add the HTTP header x-cdata-authtoken with the auth token as part of the HTTP request.
Using Auth Tokens as Query String Parameters
To allow the connector to pass the auth token in query string parameters, check Allow authtoken in URL in the Advanced Settings section of the Server tab.
After enabling this feature, you can specify the auth token as the value of the @authtoken parameter, which you supply as part of the HTTP form-post data or as a query parameter.
Receiving Data
When data is uploaded to the webhook endpoint, the body of the web request is written as an output file and passed along to the next connector in the flow. This allows for a flexible method of invoking an Arc workflow via an external API call.
Tip: Data uploaded to the endpoint is not validated in the Webhook connector, and should be validated later in the flow if necessary.
Sample Requests
The Sample Request field on the Settings tab lets you specify the XML or JSON structure expected for API calls to the webhook endpoint.
The primary benefit to specifying a sample request is when you connect the Webhook connector to an XML Map connector in the flow. Use XML Map connectors when the API data needs to be converted into some other format, like an EDI document or a database insert.
The XML Map connector detects the XML structure of the sample request and uses this as the Source File for the XML Map connector. Upload the XML structure representing the target format as the Destination File, then use the Expression Editor to convert the source structure into the destination.
Custom Responses
Ordinarily, the Webhook connector accepts the post data with a token response that the request was accepted, but you can customize the response by using the Response event, where the _request, _httpheaders, _response, and _message 特殊なアイテム are available. When specified, the connector expects the custom response to be provided through the _response item.
For example, to surface a header on the incoming request as a header on the message that is passed down the flow, the ArcScript in the Response event might look something like this:
<arc:set attr="_message.header:MySpecialHeader" value="[_httpheaders.MyWebhookHeader]" />
<arc:set attr="_response.header:Content-Type" value="application/xml" />
<arc:set attr="_response.write" value="<Status>Successfully processed message with MySpecialHeader=[_message.header:MySpecialHeader]</Status>" />
With the ArcScript above in the Response event, a client can send a request similar to the following:
POST https://localhost/connector/Webhook1/webhook.rsb HTTP/1.1
content-type: application/xml
X-Arc-Authtoken: 1s7U4w0a2P3l8v9W3l0q
MyWebhookHeader: Hello World!

<Items>
  <Webhook>Hello World!</Webhook>
</Items>
and receive the following response:
HTTP/1.1 200 OK
Connection: close
Date: Tue, 31 Aug 2021 19:16:13 GMT
X-Frame-Options: SAMEORIGIN
Content-Type: application/xml
Content-Length: 81
Server: Jetty(9.4.z-SNAPSHOT)

<Status>Successfully processed message with MySpecialHeader=Hello World!</Status>
Macros
Using macros in file naming strategies can enhance organizational efficiency and contextual understanding of data. By incorporating macros into filenames, you can dynamically include relevant information such as identifiers, timestamps, and header information, providing valuable context to each file. This helps ensure that filenames reflect details important to your organization.
CData Arc supports these macros, which all use the following syntax: %Macro%.
| Macro | Description |
|---|---|
| ConnectorID | Evaluates to the ConnectorID of the connector. |
| Ext | Evaluates to the file extension of the file currently being processed by the connector. |
| Filename | Evaluates to the filename (extension included) of the file currently being processed by the connector. |
| FilenameNoExt | Evaluates to the filename (without the extension) of the file currently being processed by the connector. |
| MessageId | Evaluates to the MessageId of the message being output by the connector. |
| RegexFilename:pattern | Applies a RegEx pattern to the filename of the file currently being processed by the connector. |
| Header:headername | Evaluates to the value of a targeted header (headername) on the current message being processed by the connector. |
| LongDate | Evaluates to the current datetime of the system in long-handed format (for example, Wednesday, January 24, 2024). |
| ShortDate | Evaluates to the current datetime of the system in a yyyy-MM-dd format (for example, 2024-01-24). |
| DateFormat:format | Evaluates to the current datetime of the system in the specified format (format). See サンプル日付フォーマット for the available datetime formats |
| Vault:vaultitem | Evaluates to the value of the specified vault item. |
Examples
Some macros, such as %Ext% and %ShortDate%, do not require an argument, but others do. All macros that take an argument use the following syntax: %Macro:argument%
Here are some examples of the macros that take an argument:
- %Header:headername%: Where
headernameis the name of a header on a message. - %Header:mycustomheader% resolves to the value of the
mycustomheaderheader set on the input message. - %Header:ponum% resolves to the value of the
ponumheader set on the input message. - %RegexFilename:pattern%: Where
patternis a regex pattern. For example,%RegexFilename:^([\w][A-Za-z]+)%matches and resolves to the first word in the filename and is case insensitive (test_file.xmlresolves totest). - %Vault:vaultitem%: Where
vaultitemis the name of an item in the vault. For example,%Vault:companyname%resolves to the value of thecompanynameitem stored in the vault. - %DateFormat:format%: Where
formatis an accepted date format (see サンプル日付フォーマット for details). For example,%DateFormat:yyyy-MM-dd-HH-mm-ss-fff%resolves to the date and timestamp on the file.
You can also create more sophisticated macros, as shown in the following examples:
- Combining multiple macros in one filename:
%DateFormat:yyyy-MM-dd-HH-mm-ss-fff%%EXT% - Including text outside of the macro:
MyFile_%DateFormat:yyyy-MM-dd-HH-mm-ss-fff% - Including text within the macro:
%DateFormat:'DateProcessed-'yyyy-MM-dd_'TimeProcessed-'HH-mm-ss%